


目录
1. 创建springboot项目
2. 配置数据库环境以及数据源环境
server.port=8080
spring.datasource.driver-class-name=com.mysql.cj.jdbc.Driver
spring.datasource.url=jdbc:mysql://localhost:3306/springbootdata?
serverTimezone=UTC
spring.datasource.username=root
spring.datasource.password=123456
spring.datasource.type=com.alibaba.druid.pool.DruidDataSource
spring.datasource.initialSize=20
spring.datasource.minIdle=10
spring.datasource.maxActive=100
3.导入相关依赖
        <dependency>
            <groupId>org.springframework.boot</groupId>
            <artifactId>spring-boot-starter-web</artifactId>
        </dependency>
        <dependency>
            <groupId>com.alibaba</groupId>
            <artifactId>druid-spring-boot-starter</artifactId>
            <version>1.2.23</version>
        </dependency>
        <dependency>
            <groupId>com.baomidou</groupId>
            <artifactId>mybatis-plus-boot-starter</artifactId>
            <version>3.5.7</version>
        </dependency>
        <dependency>
            <groupId>com.mysql</groupId>
            <artifactId>mysql-connector-j</artifactId>
            <scope>runtime</scope>
        </dependency>
        <dependency>
            <groupId>org.projectlombok</groupId>
            <artifactId>lombok</artifactId>
            <optional>true</optional>
        </dependency>
        <dependency>
            <groupId>org.springframework.boot</groupId>
            <artifactId>spring-boot-starter-test</artifactId>
            <scope>test</scope>
        </dependency>
4.创建student实体类并生成restfulAPI风格的接口
创建一个domain包,并在改包下创建Student实体类
@Data
    @TableName("t_student")
    public class Student {
        @TableId
        private Integer id;
        private Integer age;
    }
    private String name;
创建一个mapper包,并在改包下创建StudentMapper类
@Mapper
 public interface StudentMapper extends BaseMapper<Student> {
 }
创建一个service包,并在改包下创建StudentService类
@Service
public class StudentService extends ServiceImpl {
}
创建一个controller包,并在改包下创建Studentcontroller类
@RestController
@RequestMapping("/students")
public class StudentController {
    @Autowired
    private StudentService studentService;
    @PostMapping
    public Student create(@RequestBody Student student) {
        studentService.save(student);
        return student;
    }
    @GetMapping("/{id}")
    public Student getOne(@Parameter(description = "学生ID", required = true)
                          @PathVariable Integer id) {
        return studentService.getById(id);
    }

    @PutMapping("/{id}")
    public Student update(@Parameter(description = "学生ID", required = true)
                          @PathVariable Integer id,
                          @RequestBody Student student) {
        student.setId(id);
        studentService.updateById(student);
        return student;
    }

    @DeleteMapping("/{id}")
    public void delete(@Parameter(description = "学生ID", required = true)
                       @PathVariable Integer id) {
        studentService.removeById(id);
    }
}
完成上面的工作后引入Swagger对API接口进行说明
1. 导入swagger依赖
 <dependency>
            <groupId>org.springdoc</groupId>
            <artifactId>springdoc-openapi-ui</artifactId>
            <version>1.6.12</version>
 </dependency>
2.创建Swagger配置类
在项目的config包下创建一个名为SwaggerConfig的类,用于配置Swagger的相关信息。
@Configuration
 public class SwaggerConfig {
    @Bean
    public OpenAPI customOpenAPI() {
        return new OpenAPI()
                .info(new Info()
                        .title("API 文档")
                        .version("1.0")
                        .description("包含学生管理的API文档")
                        .contact(new Contact()
                                .name("某某某")
                                .url("http://example.com")
                                .email("123456@qq.com"))
                        .license(new License()
                                .name("Apache 2.0")
                        .url("https://www.apache.org/licenses/LICENSE2.0.html")))
                        .servers(Arrays.asList(
                        new Server().url("http://localhost:8080").description("本地服务器"),
                        new Server().url("https://your-productionurl.com").description("生产服务器")))
                        .tags(Arrays.asList(
                        new Tag().name("学生管理").description("包含学生的增删改查操作")));
    }
 }
下面是对OpenAPI对象及其主要属性的详细解释:
OpenAPI 对象
 public class OpenAPI {
    private Info info;
    private List<Server> servers;
    private List<Tag> tags;
    private Map<String, PathItem> paths;
    private Components components;
    private SecurityRequirement[] security;
    private Map<String, Object> extensions;
 }
主要属性解释
1. info :
类型:Info
描述:包含API的基本信息,如标题、版本、描述、联系人信息和许可证信息。
示例:
 new Info()
    .title("API 文档")
    .version("1.0")
    .description("包含文章、评论和学生管理的API文档")
    .contact(new Contact()
        .name("黎明")
        .url("http://example.com")
        .email("123456@qq.com"))
    .license(new License()
        .name("Apache 2.0")
        .url("https://www.apache.org/licenses/LICENSE-2.0.html"));
2. servers :
类型:List
描述:定义API的服务器地址。可以指定多个服务器,每个服务器可以有不同的URL和描述。
示例:
Arrays.asList(
    new Server().url("http://localhost:8080").description("本地服务器"),
    new Server().url("https://your-production-url.com").description("生产
服务器")
 );
3. tags :
类型:List
描述:定义API的分组标签。每个标签可以包含一个名称和描述,用于在Swagger UI中对API进 行分组。
示例:
Arrays.asList(
    new Tag().name("文章管理").description("包含文章的增删改查操作"),
    new Tag().name("评论管理").description("包含评论的增删改查操作"),
    new Tag().name("学生管理").description("包含学生的增删改查操作")
 );
4. paths :
类型:Map
描述:定义API的所有路径和HTTP方法。每个路径可以包含多个HTTP方法(如GET、POST、 PUT、DELETE等)。
示例:
 Map<String, PathItem> paths = new HashMap<>();
 paths.put("/students", new PathItem()
    .get(new Operation()
        .operationId("getStudents")
        .summary("获取所有学生")
        .responses(new ApiResponses()
            .addApiResponse("200", new ApiResponse()
                .description("成功获取所有学生")
                .content(new Content()
                    .addMediaType("application/json", new MediaType()
                        .schema(new Schema<>().$ref("#/components/schemas/Student")))))))
    .post(new Operation()
        .operationId("createStudent")
        .summary("创建学生")
        .requestBody(new RequestBody()
            .content(new Content()
                .addMediaType("application/json", new MediaType()
                    .schema(new Schema<>().$ref("#/components/schemas/Student")))))
        .responses(new ApiResponses()
            .addApiResponse("201", new ApiResponse()
                .description("成功创建学生")
                .content(new Content()
                    .addMediaType("application/json", new MediaType()
.schema(new Schema<>().$ref("#/components/schemas/Student"))))))));
5. components :
类型: Components
描述:定义可重用的组件,如模式(Schemas)、响应(Responses)、参数 (Parameters)、请求体(RequestBodies)、头(Headers)、安全方案 (SecuritySchemes)等。
示例:
new Components()
 .schemas(Map.of(
 "Student", new Schema<>()
 .type("object")
 .properties(Map.of(
 "id", new Schema<>().type("integer"),
 "name", new Schema<>().type("string"),
 "age", new Schema<>().type("integer")
 ))
 ));
6. security :
类型: SecurityRequirement[]
描述:定义API的安全要求,指定哪些安全方案必须应用到API的所有路径或特定路径。
示例:
new SecurityRequirement().addList("bearerAuth");7. extensions :
类型: Map
描述:扩展属性,用于添加自定义的元数据。
示例:
Map.of("x-custom-extension", "Custom Value");3. 引入@Schema注解进字段描述
功能:描述字段的用途、示例值等信息。
属性:
description :字段的描述。
example :字段的示例值
@Data
 @TableName("t_student")
 @Schema(description = "学生实体类,用于表示学生的基本信息")
 public class Student {
 @TableId
 @Schema(description = "学生的唯一标识符", example = "1")
 private Integer id;
 @Schema(description = "学生的年龄", example = "20")
    private Integer age;
    @Schema(description = "学生的姓名", example = "张三")
    private String name;
 }
4. 引入相关注解对接口进行说明
 @Tag(name = "学生对象的接口", description = "包含了基础的增删改查")
 @RestController
 @RequestMapping("/students")
 public class StudentController {
    @Autowired
    private StudentService studentService;
    @Operation(summary = "创建学生", description = "创建一个新的学生记录",
            responses = {
                    @ApiResponse(responseCode = "200", description = "成功创建学生",
                            content = @Content(schema = @Schema(implementation = Student.class))),
                    @ApiResponse(responseCode = "400", description = "无效的学生信息",
                            content = @Content)
            })
    @PostMapping
    public Student create(@RequestBody Student student) {
        studentService.save(student);
        return student;
    }
    @Operation(summary = "获取学生信息", description = "根据ID获取学生信息",
            responses = {
                    @ApiResponse(responseCode = "200", description = "成功获取学生信息",
                            content = @Content(schema = @Schema(implementation = Student.class))),
                    @ApiResponse(responseCode = "404", description = "学生未找到",
                            content = @Content)
            })
    @GetMapping("/{id}")
    public Student getOne(@Parameter(description = "学生ID", required = true)
@PathVariable Integer id) {
        return studentService.getById(id);
    }
    @Operation(summary = "更新学生信息", description = "根据ID更新学生信息",
            responses = {
                    @ApiResponse(responseCode = "200", description = "成功更新学生信息",
                            content = @Content(schema = @Schema(implementation = Student.class))),
@ApiResponse(responseCode = "404", description = "学生未找到",
                            content = @Content),
                    @ApiResponse(responseCode = "400", description = "无效的学生信
息",
                            content = @Content)
            })
    @PutMapping("/{id}")
    public Student update(@Parameter(description = "学生ID", required = true)
@PathVariable Integer id,
                          @RequestBody Student student) {
        student.setId(id);
        studentService.updateById(student);
        return student;
    }
    @Operation(summary = "删除学生", description = "根据ID删除学生记录",
            responses = {
                    @ApiResponse(responseCode = "204", description = "成功删除学
生",
                            content = @Content),
                    @ApiResponse(responseCode = "404", description = "学生未找到",
                            content = @Content)
            })
    @DeleteMapping("/{id}")
    public void delete(@Parameter(description = "学生ID", required = true)
@PathVariable Integer id) {
        studentService.removeById(id);
    }
 }
1. @Tag 注解
@Tag(name = "学生对象的接口", description = "包含了基础的增删改查")name :标签的名称,用于在Swagger UI中对API进行分组。
description :标签的描述,提供关于该分组的详细信息。
2. @Operation 注解
 @Operation(summary = "创建学生", description = "创建一个新的学生记录",
        responses = {
                @ApiResponse(responseCode = "200", description = "成功创建学生",
                        content = @Content(schema = @Schema(implementation =
Student.class))),
                @ApiResponse(responseCode = "400", description = "无效的学生信息",
                        content = @Content)
        })
summary :简短的摘要,描述该操作的目的。
description :详细的描述,提供更多的信息。
responses :定义该操作可能的响应及其描述。
3. @ApiResponse 注解
@ApiResponse(responseCode = "200", description = "成功创建学生",
 content = @Content(schema = @Schema(implementation = Student.class)))
responseCode :HTTP响应状态码。
description :响应的状态码描述。
content :响应的内容,可以包含一个或多个媒体类型(如JSON、XML等)。
4. @Content 注解
@Content(schema = @Schema(implementation = Student.class))schema :定义响应的数据结构,通常引用一个
5. @Schema 注解
@Schema(implementation = Student.class)implementation :指定响应数据的具体类。
swagger分组整合
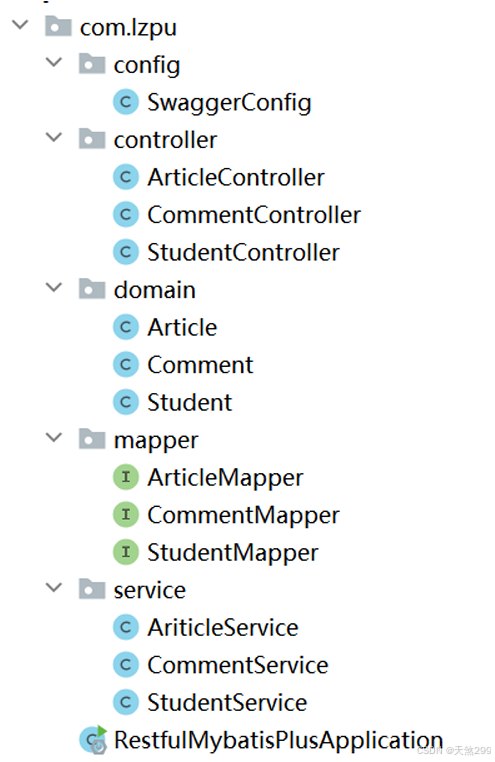
1.创建Artice和Comment实体类,并创建对应的RestfulAPI接口,接口包含基础的增删改查。
目录层架参考如下:
2. 修改SwaggerConfig
 @Configuration
 public class SwaggerConfig {
 @Bean
 public GroupedOpenApi commentApi() {
 return GroupedOpenApi.builder()
 .group("comment")
 .pathsToMatch("/comments/**")
 .build();
 }
 @Bean
 public GroupedOpenApi articleApi() {
 return GroupedOpenApi.builder()
 .group("article")
 .pathsToMatch("/articles/**")
 .build();
 }
 @Bean
 public GroupedOpenApi studentApi() {
 return GroupedOpenApi.builder()
                .group("student")
                .pathsToMatch("/students/**")
                .build();
    }
    @Bean
    public OpenAPI customOpenAPI() {
        return new OpenAPI()
                .info(new Info()
                        .title("API 文档")
                        .version("1.0")
                        .description("包含文章、评论和学生管理的API文档")
                        .contact(new Contact()
                                .name("黎明")
                                .url("http://baidu.com")
                                .email("123456@qq.com"))
                        .license(new License()
                                .name("Apache 2.0")
                                .url("https://www.apache.org/licenses/LICENSE2.0.html")))
                .servers(Arrays.asList(
                        new Server().url("http://localhost:8080").description("本地服务器"),
                        new Server().url("https://your-production
url.com").description("生产服务器")));
    }
 }


 2120
2120

 被折叠的 条评论
为什么被折叠?
被折叠的 条评论
为什么被折叠?
 到【灌水乐园】发言


