


今天在虚拟机中安装 Qemu 和 MIPS 交叉编译环境 buildroot,操作系统环境信息查看 【揭秘家用路由器0day】Wine + IDA环境搭建
遇到了很多问题,在此做一个记录。
Qemu
目前通过 apt 安装的 qemu 版本是 7.2
apt-cache policy qemu-system
qemu-system:
  Installed: (none)
  Candidate: 1:7.2+dfsg-5ubuntu2.4
  Version table:
     1:7.2+dfsg-5ubuntu2.4 500
        500 https://mirrors.aliyun.com/ubuntu lunar-updates/main amd64 Packages
        500 https://mirrors.aliyun.com/ubuntu lunar-security/main amd64 Packages
     1:7.2+dfsg-5ubuntu2 500
        500 https://mirrors.aliyun.com/ubuntu lunar/main amd64 Packages
官方可下载最新版本是 8.2.1
同时根据官方的说法,从 git 上直接拉源码获取的的最新开发代码,稳定版可以在分支或者 https://download.qemu.org/ 下载,我决定和书中一样使用最新的 git 代码。
安装依赖库
先按照官方说明安装必须的依赖库
sudo apt-get install git libglib2.0-dev libfdt-dev libpixman-1-dev zlib1g-dev ninja-build
除此之外,官方还提供了一个建议的可选库列表,我也都安装了
sudo apt-get install git-email
sudo apt-get install libaio-dev libbluetooth-dev libcapstone-dev libbrlapi-dev libbz2-dev
sudo apt-get install libcap-ng-dev libcurl4-gnutls-dev libgtk-3-dev
sudo apt-get install libibverbs-dev libjpeg8-dev libncurses5-dev libnuma-dev
sudo apt-get install librbd-dev librdmacm-dev
sudo apt-get install libsasl2-dev libsdl2-dev libseccomp-dev libsnappy-dev libssh-dev
sudo apt-get install libvde-dev libvdeplug-dev libvte-2.91-dev libxen-dev liblzo2-dev
sudo apt-get install valgrind xfslibs-dev

sudo apt-get install libnfs-dev libiscsi-dev
安装 Qemu
源码下载
书中的在从 git 克隆代码之后执行的对 pixman 和 dtc 子模块的更新现在已经失效了,直接根据官网的提示进行
git clone https://gitlab.com/qemu-project/qemu.git
cd qemu
git submodule init
git submodule update --recursive
配置
书中提到如果 qemu 版本较低,直接配置编译在运行 MIPS 程序时会出错,虽然我的是最新版本,但还是看了一下源码,elfload.c 文件中已经不存在书中提到的问题,因此继续安装即可。
接下来要执行 ./configure,书中使用了 --static 的参数,官网上也提到了一个 --enable-debug 参数,根据帮助信息
--enable-debug           enable common debug build options,这个是帮助调试 QEMU 的,会降低代码优化级别,方便调试,开启后运行速度很慢
--static                 enable static build [no] 指定编译出来的二进制命令文件是静态链接的
因此配置时选择和书中同样的参数 --static(注:最终没有使用任何参数,原因在下面)
配置报错,需要安装一些包
apt install python3-pip python3-sphinx-rtd-theme flex bison
再次执行 ./configure --static
编译安装
执行 make,报错
......
/usr/bin/ld: cannot find -lmount: No such file or directory
/usr/bin/ld: cannot find -lmount: No such file or directory
/usr/bin/ld: cannot find -lunistring: No such file or directory
/usr/bin/ld: cannot find -lp11-kit: No such file or directory
collect2: error: ld returned 1 exit status
ninja: build stopped: subcommand failed.
make[1]: *** [Makefile:162: run-ninja] Error 1
make[1]: Leaving directory '/opt/qemu/build'
make: *** [GNUmakefile:6: build] Error 2
但是在尝试
apt install mount unistring p11-kit
的时候,提示找不到 unistring,同时另外两个已经安装过了
我尝试了临时设置环境变量 LD_LIBRARY_PATH,或者将 so 文件复制到动态链接库的默认搜索目录,但是都失败了,最后我找到了这个 issue。
问题的原因在于:
Many libraries that are used by qemu in system mode are not provided as static libraries by distributions.
我现在还不知道书的作者为什么要添加 --static 参数,但是我决定先去掉这个参数。
重新配置并编译
make clean
./configure
make -j4
经过漫长的等待之后,编译结束,这个时候已经在 build 目录下生成了可执行文件,虽然官网没有再写 make install 命令,但是执行 make install 就是把生成的相关文件复制到系统可识别的为止,从而可以通过命令行执行 qemu。
因此执行 make install 即可。
测试
直接使用书中的例子:
ubuntu@ubuntu-VM:~/resources/8/_firmware.bin.extracted/squashfs-root$ which qemu-mipsel
/usr/local/bin/qemu-mipsel
ubuntu@ubuntu-VM:~/resources/8/_firmware.bin.extracted/squashfs-root$ cp $(which qemu-mipsel) ./
ubuntu@ubuntu-VM:~/resources/8/_firmware.bin.extracted/squashfs-root$ ./qemu-mipsel bin/ls
mnt          usr          tmp          sys          bin          proc
home         www          sbin         htdocs       etc
dev          qemu-mipsel  lib          include      var
没有问题,👍
Buildroot
安装
过程和书中相比有一些小的变动
wget https://buildroot.org/downloads/buildroot-2023.11.1.tar.gz
tar -xvf buildroot-2023.11.1.tar.gz
cd buildroot-2023.11.1
# 为了使用 menuconfig 接口,执行
apt install libncurses5 libncurses5-dev
make menuconfig
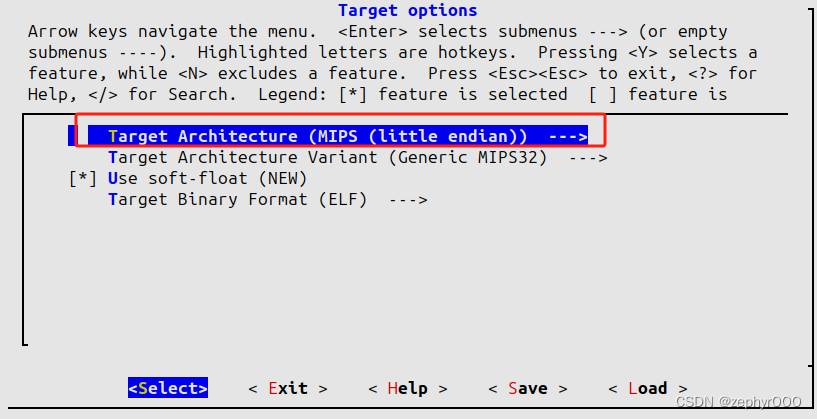
接下来我修改了以下几项
- Target options -> Target Architecture:修改为 MIPS (little endian)
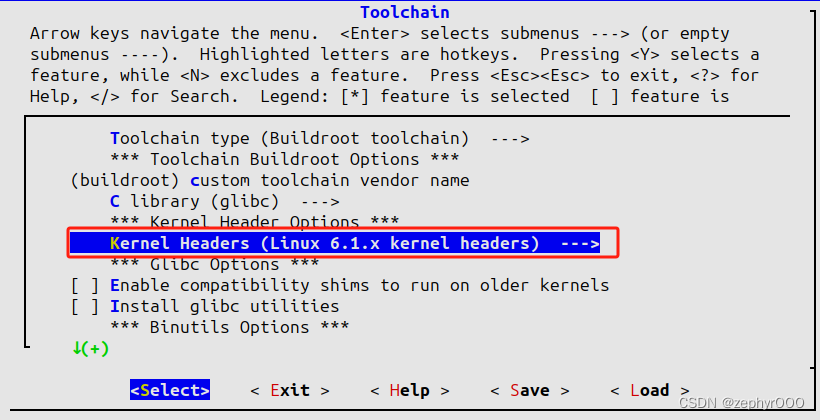
- Toolchain -> Kernel Headers:修改为 Linux 6.1.x kernel headers
注意这里选择的 kernel headers 版本,我的虚拟机内核版本是 6.2.x,根据官网说明
Since this interface is backward compatible, the version of the Linux kernel headers used to build your toolchain do not need to match exactly the version of the Linux kernel you intend to run on your embedded system. They only need to have a version equal or older to the version of the Linux kernel you intend to run.
你需要选择一个 ≤ 当前内核版本的选项。
然后开始 make
再次经过漫长的等待…… 查看版本
root@ubuntu-VM:~/buildroot-2023.11.1/output/host/usr/bin# ./mipsel-linux-gcc --version
mipsel-linux-gcc.br_real (Buildroot 2023.11.1) 12.3.0
Copyright (C) 2022 Free Software Foundation, Inc.
This is free software; see the source for copying conditions.  There is NO
warranty; not even for MERCHANTABILITY or FITNESS FOR A PARTICULAR PURPOSE.
添加环境变量
生成的可执行文件位于目录 output/host/usr/bin,把这个路径加入环境变量,之前在安装 wine 的时候已经修改过一次 /etc/profile 了,这次修改完成之后完整的是(我后来移动过 buildroot 所在目录):
export PATH=/opt/wine-stable/bin:/opt/buildroot/output/host/usr/bin:$PATH
执行 source /etc/profile 使其生效。
测试
测试文件
#include <stdio.h>

int vul(char *src) {
	char output[20] = {0};
	strcpy(output, src);
	printf("%s\n", output);
	return 0;
}

int main(int argc, char *argv[]) {
	if (argc < 2) {
		printf("need more arguments\n");
		return 1;
	}

	vul(argv[1]);
	return 0;
}
使用 mipsel-linux-gcc 进行编译,使用 qemu-mipsel 执行
ubuntu@ubuntu-VM:~$ mipsel-linux-gcc -o hello hello.c -static
ubuntu@ubuntu-VM:~$ file hello
hello: ELF 32-bit LSB executable, MIPS, MIPS32 version 1 (SYSV), statically linked, for GNU/Linux 6.1.0, with debug_info, not stripped
ubuntu@ubuntu-VM:~$ qemu-mipsel hello "Hello World"
Hello World
注意这里是 mipsel 而不是 mips,因为我们一开始配置 buildroot 的时候选择的是小端模式,我也不知道书里作者为什么直接使用了 mips-linux-gcc,因为我并没有生成这个文件,可能是版本不同。
最后我又编译了一个大端的版本。


 816
816


 被折叠的 条评论
为什么被折叠?
被折叠的 条评论
为什么被折叠?
 到【灌水乐园】发言


