


场景介绍
Neural Network Runtime作为AI推理引擎和加速芯片的桥梁,为AI推理引擎提供精简的Native接口,满足推理引擎通过加速芯片执行端到端推理的需求。
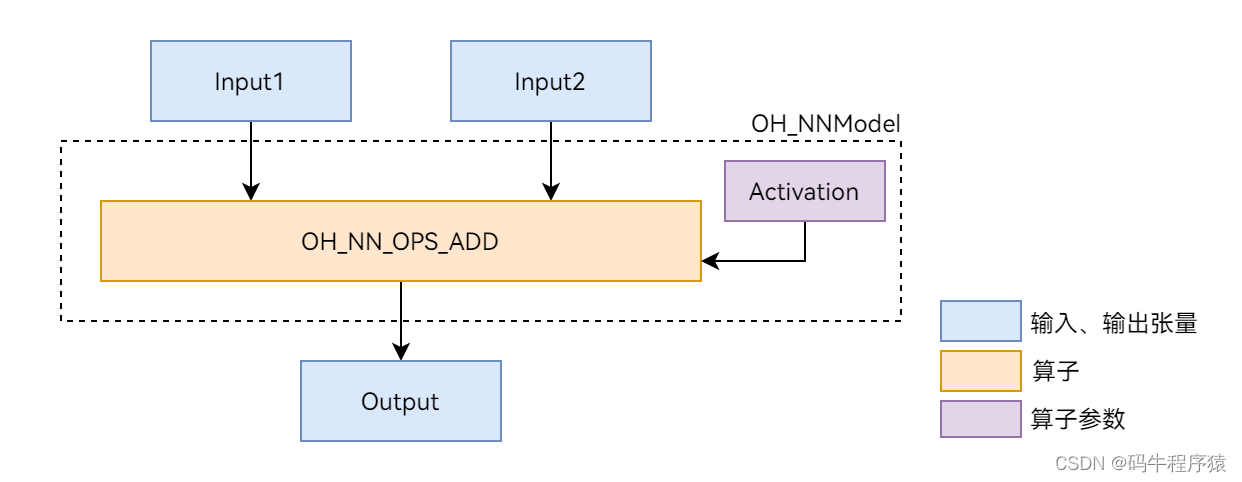
本文以图1展示的Add单算子模型为例,介绍Neural Network Runtime的开发流程。Add算子包含两个输入、一个参数和一个输出,其中的activation参数用于指定Add算子中激活函数的类型。
图1 Add单算子网络示意图 “Add单算子网络示意图”
环境准备
环境要求
Neural Network Runtime部件的环境要求如下:
- 开发环境:Ubuntu 18.04及以上。
- 接入设备:系统定义的标准设备,系统中内置AI硬件驱动并已接入Neural NetworkRuntime。
由于Neural Network Runtime通过Native API对外开放,需要通过Native开发套件编译Neural Network Runtime应用。在社区的每日构建中下载对应系统版本的ohos-sdk压缩包,从压缩包中提取对应平台的Native开发套件。以Linux为例,Native开发套件的压缩包命名为native-linux-{版本号}.zip。
环境搭建
- 打开Ubuntu编译服务器的终端。
- 把下载好的Native开发套件压缩包拷贝至当前用户根目录下。
- 执行以下命令解压Native开发套件的压缩包。
unzip native-linux-{版本号}.zip
解压缩后的内容如下(随版本迭代,目录下的内容可能发生变化,请以最新版本的Native API为准):
native/
├── build // 交叉编译工具链
├── build-tools // 编译构建工具
├── docs
├── llvm
├── nativeapi_syscap_config.json
├── ndk_system_capability.json
├── NOTICE.txt
├── oh-uni-package.json
└── sysroot // Native API头文件和库
text
native/
├── build // 交叉编译工具链
├── build-tools // 编译构建工具
├── docs
├── llvm
├── nativeapi_syscap_config.json
├── ndk_system_capability.json
├── NOTICE.txt
├── oh-uni-package.json
└── sysroot // Native API头文件和库
接口说明
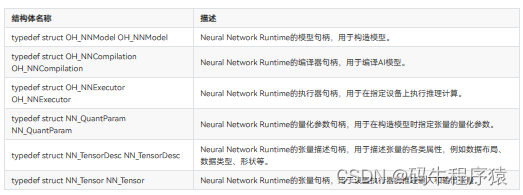
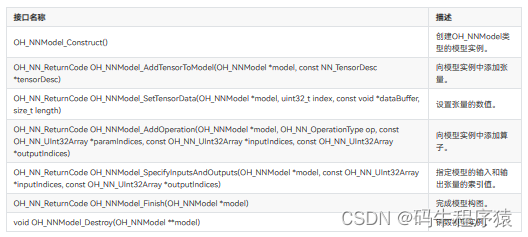
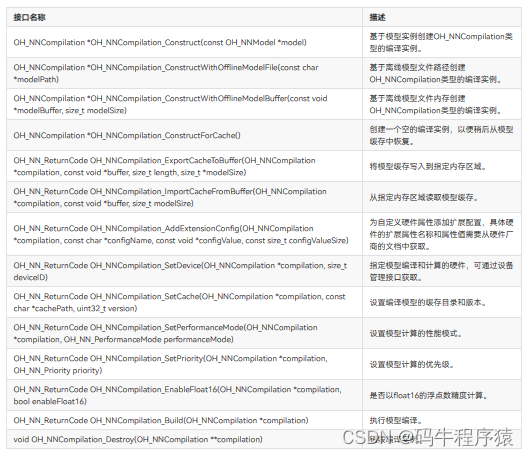
这里给出Neural Network Runtime开发流程中通用的接口,具体请见下列表格。
结构体
模型构造接口
模型编译接口
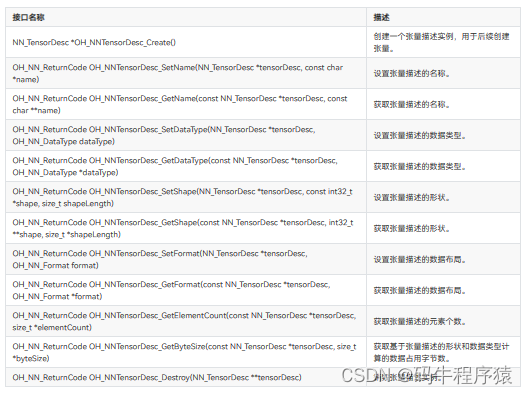
张量描述接口
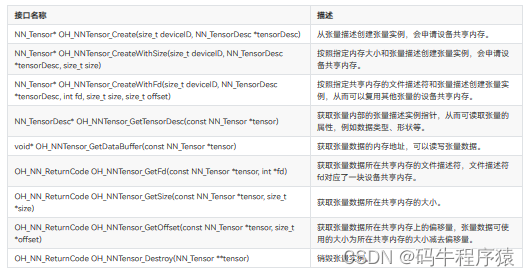
张量接口
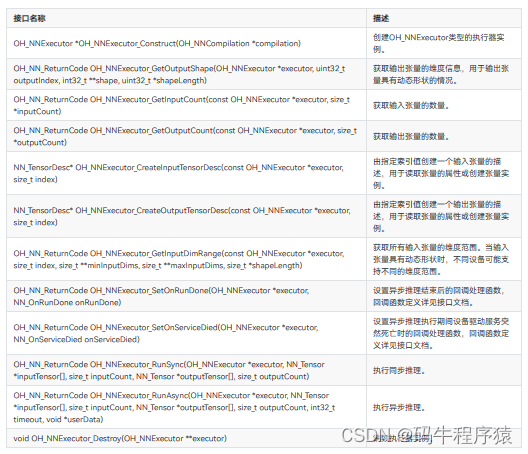
执行推理接口
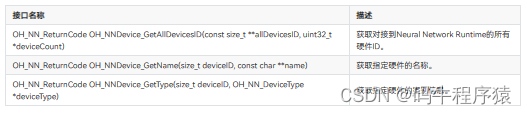
设备管理接口
开发步骤
Neural Network Runtime的开发流程主要包含模型构造、模型编译和推理执行三个阶段。以下开发步骤以Add单算子模型为例,介绍调用Neural Network Runtime接口,开发应用的过程。
1.创建应用样例文件。
首先,创建Neural Network Runtime应用样例的源文件。在项目目录下执行以下命令,创建nnrt_example/目录,并在目录下创建 nnrt_example.cpp 源文件。
mkdir ~/nnrt_example && cd ~/nnrt_example
touch nnrt_example.cpp
2.导入Neural Network Runtime。
在 nnrt_example.cpp 文件的开头添加以下代码,引入Neural Network Runtime。
#include <iostream>
#include <cstdarg>
#include "hilog/log.h"
#include "neural_network_runtime/neural_network_runtime.h"
3.定义日志打印、设置输入数据、数据打印等辅助函数。
#define LOG_DOMAIN 0xD002101
#define LOG_TAG "NNRt"
#define LOGD(...) OH_LOG_DEBUG(LOG_APP, __VA_ARGS__)
#define LOGI(...) OH_LOG_INFO(LOG_APP, __VA_ARGS__)
#define LOGW(...) OH_LOG_WARN(LOG_APP, __VA_ARGS__)
#define LOGE(...) OH_LOG_ERROR(LOG_APP, __VA_ARGS__)
#define LOGF(...) OH_LOG_FATAL(LOG_APP, __VA_ARGS__)

// 返回值检查宏
#define CHECKNEQ(realRet, expectRet, retValue, ...) \
    do { \
        if ((realRet) != (expectRet)) { \
            printf(__VA_ARGS__); \
            return (retValue); \
        } \
    } while (0)

#define CHECKEQ(realRet, expectRet, retValue, ...) \
    do { \
        if ((realRet) == (expectRet)) { \
            printf(__VA_ARGS__); \
            return (retValue); \
        } \
    } while (0)

// 设置输入数据用于推理
OH_NN_ReturnCode SetInputData(NN_Tensor* inputTensor[], size_t inputSize)
{
    OH_NN_DataType dataType(OH_NN_FLOAT32);
    OH_NN_ReturnCode ret{OH_NN_FAILED};
    size_t elementCount = 0;
    for (size_t i = 0; i < inputSize; ++i) {
        // 获取张量的数据内存
        auto data = OH_NNTensor_GetDataBuffer(inputTensor[i]);
        CHECKEQ(data, nullptr, OH_NN_FAILED, "Failed to get data buffer.");
        // 获取张量的描述
        auto desc = OH_NNTensor_GetTensorDesc(inputTensor[i]);
        CHECKEQ(desc, nullptr, OH_NN_FAILED, "Failed to get desc.");
        // 获取张量的数据类型
        ret = OH_NNTensorDesc_GetDataType(desc, &dataType);
        CHECKNEQ(ret, OH_NN_SUCCESS, OH_NN_FAILED, "Failed to get data type.");
        // 获取张量的元素个数
        ret = OH_NNTensorDesc_GetElementCount(desc, &elementCount);
        CHECKNEQ(ret, OH_NN_SUCCESS, OH_NN_FAILED, "Failed to get element count.");
        switch(dataType) {
            case OH_NN_FLOAT32: {
                float* floatValue = reinterpret_cast<float*>(data);
                for (size_t j = 0; j < elementCount; ++j) {
                    floatValue[j] = static_cast<float>(j);
                }
                break;
            }
            case OH_NN_INT32: {
                int* intValue = reinterpret_cast<int*>(data);
                for (size_t j = 0; j < elementCount; ++j) {
                    intValue[j] = static_cast<int>(j);
                }
                break;
            }
            default:
                return OH_NN_FAILED;
        }
    }
    return OH_NN_SUCCESS;
}

OH_NN_ReturnCode Print(NN_Tensor* outputTensor[], size_t outputSize)
{
    OH_NN_DataType dataType(OH_NN_FLOAT32);
    OH_NN_ReturnCode ret{OH_NN_FAILED};
    size_t elementCount = 0;
    for (size_t i = 0; i < outputSize; ++i) {
        auto data = OH_NNTensor_GetDataBuffer(outputTensor[i]);
        CHECKEQ(data, nullptr, OH_NN_FAILED, "Failed to get data buffer.");
        auto desc = OH_NNTensor_GetTensorDesc(outputTensor[i]);
        CHECKEQ(desc, nullptr, OH_NN_FAILED, "Failed to get desc.");
        ret = OH_NNTensorDesc_GetDataType(desc, &dataType);
        CHECKNEQ(ret, OH_NN_SUCCESS, OH_NN_FAILED, "Failed to get data type.");
        ret = OH_NNTensorDesc_GetElementCount(desc, &elementCount);
        CHECKNEQ(ret, OH_NN_SUCCESS, OH_NN_FAILED, "Failed to get element count.");
        switch(dataType) {
            case OH_NN_FLOAT32: {
                float* floatValue = reinterpret_cast<float*>(data);
                for (size_t j = 0; j < elementCount; ++j) {
                    std::cout << "Output index: " << j << ", value is: " << floatValue[j] << "." << std::endl;
                }
                break;
            }
            case OH_NN_INT32: {
                int* intValue = reinterpret_cast<int*>(data);
                for (size_t j = 0; j < elementCount; ++j) {
                    std::cout << "Output index: " << j << ", value is: " << intValue[j] << "." << std::endl;
                }
                break;
            }
            default:
                return OH_NN_FAILED;
        }
    }

    return OH_NN_SUCCESS;
}
4.构造模型。
使用Neural Network Runtime的模型构造接口,构造Add单算子样例模型。
OH_NN_ReturnCode BuildModel(OH_NNModel** pmodel)
{
// 创建模型实例model,进行模型构造
OH_NNModel* model = OH_NNModel_Construct();
CHECKEQ(model, nullptr, -1, "Create model failed.");
// 添加Add算子的第一个输入张量,类型为float32,张量形状为[1, 2, 2, 3]
NN_TensorDesc* tensorDesc = OH_NNTensorDesc_Create();
CHECKEQ(tensorDesc, nullptr, -1, "Create TensorDesc failed.");
int32_t inputDims[4] = {1, 2, 2, 3};
returnCode = OH_NNTensorDesc_SetShape(tensorDesc, inputDims, 4);
CHECKNEQ(returnCode, OH_NN_SUCCESS, -1, "Set TensorDesc shape failed.");
returnCode = OH_NNTensorDesc_SetDataType(tensorDesc, OH_NN_FLOAT32);
CHECKNEQ(returnCode, OH_NN_SUCCESS, -1, "Set TensorDesc data type failed.");
returnCode = OH_NNTensorDesc_SetFormat(tensorDesc, OH_NN_FORMAT_NONE);
CHECKNEQ(returnCode, OH_NN_SUCCESS, -1, "Set TensorDesc format failed.");
returnCode = OH_NNModel_AddTensorToModel(model, tensorDesc);
CHECKNEQ(returnCode, OH_NN_SUCCESS, -1, "Add first TensorDesc to model failed.");
returnCode = OH_NNModel_SetTensorType(model, 0, OH_NN_TENSOR);
CHECKNEQ(returnCode, OH_NN_SUCCESS, -1, "Set model tensor type failed.");
// 添加Add算子的第二个输入张量,类型为float32,张量形状为[1, 2, 2, 3]
tensorDesc = OH_NNTensorDesc_Create();
CHECKEQ(tensorDesc, nullptr, -1, "Create TensorDesc failed.");
returnCode = OH_NNTensorDesc_SetShape(tensorDesc, inputDims, 4);
CHECKNEQ(returnCode, OH_NN_SUCCESS, -1, "Set TensorDesc shape failed.");
returnCode = OH_NNTensorDesc_SetDataType(tensorDesc, OH_NN_FLOAT32);
CHECKNEQ(returnCode, OH_NN_SUCCESS, -1, "Set TensorDesc data type failed.");
returnCode = OH_NNTensorDesc_SetFormat(tensorDesc, OH_NN_FORMAT_NONE);
CHECKNEQ(returnCode, OH_NN_SUCCESS, -1, "Set TensorDesc format failed.");
returnCode = OH_NNModel_AddTensorToModel(model, tensorDesc);
CHECKNEQ(returnCode, OH_NN_SUCCESS, -1, "Add second TensorDesc to model failed.");
returnCode = OH_NNModel_SetTensorType(model, 1, OH_NN_TENSOR);
CHECKNEQ(returnCode, OH_NN_SUCCESS, -1, "Set model tensor type failed.");
// 添加Add算子的参数张量,该参数张量用于指定激活函数的类型,张量的数据类型为int8。
tensorDesc = OH_NNTensorDesc_Create();
CHECKEQ(tensorDesc, nullptr, -1, "Create TensorDesc failed.");
int32_t activationDims = 1;
returnCode = OH_NNTensorDesc_SetShape(tensorDesc, &activationDims, 1);
CHECKNEQ(returnCode, OH_NN_SUCCESS, -1, "Set TensorDesc shape failed.");
returnCode = OH_NNTensorDesc_SetDataType(tensorDesc, OH_NN_INT8);
CHECKNEQ(returnCode, OH_NN_SUCCESS, -1, "Set TensorDesc data type failed.");
returnCode = OH_NNTensorDesc_SetFormat(tensorDesc, OH_NN_FORMAT_NONE);
CHECKNEQ(returnCode, OH_NN_SUCCESS, -1, "Set TensorDesc format failed.");
returnCode = OH_NNModel_AddTensorToModel(model, tensorDesc);
CHECKNEQ(returnCode, OH_NN_SUCCESS, -1, "Add second TensorDesc to model failed.");
returnCode = OH_NNModel_SetTensorType(model, 2, OH_NN_ADD_ACTIVATIONTYPE);
CHECKNEQ(returnCode, OH_NN_SUCCESS, -1, "Set model tensor type failed.");
// 将激活函数类型设置为OH_NN_FUSED_NONE,表示该算子不添加激活函数。
int8_t activationValue = OH_NN_FUSED_NONE;
returnCode = OH_NNModel_SetTensorData(model, 2, &activationValue, sizeof(int8_t));
CHECKNEQ(returnCode, OH_NN_SUCCESS, -1, "Set model tensor data failed.");
// 设置Add算子的输出张量,类型为float32,张量形状为[1, 2, 2, 3]
tensorDesc = OH_NNTensorDesc_Create();
CHECKEQ(tensorDesc, nullptr, -1, "Create TensorDesc failed.");
returnCode = OH_NNTensorDesc_SetShape(tensorDesc, inputDims, 4);
CHECKNEQ(returnCode, OH_NN_SUCCESS, -1, "Set TensorDesc shape failed.");
returnCode = OH_NNTensorDesc_SetDataType(tensorDesc, OH_NN_FLOAT32);
CHECKNEQ(returnCode, OH_NN_SUCCESS, -1, "Set TensorDesc data type failed.");
returnCode = OH_NNTensorDesc_SetFormat(tensorDesc, OH_NN_FORMAT_NONE);
CHECKNEQ(returnCode, OH_NN_SUCCESS, -1, "Set TensorDesc format failed.");
returnCode = OH_NNModel_AddTensorToModel(model, tensorDesc);
CHECKNEQ(returnCode, OH_NN_SUCCESS, -1, "Add forth TensorDesc to model failed.");
returnCode = OH_NNModel_SetTensorType(model, 3, OH_NN_TENSOR);
CHECKNEQ(returnCode, OH_NN_SUCCESS, -1, "Set model tensor type failed.");
// 指定Add算子的输入张量、参数张量和输出张量的索引
uint32_t inputIndicesValues[2] = {0, 1};
uint32_t paramIndicesValues = 2;
uint32_t outputIndicesValues = 3;
OH_NN_UInt32Array paramIndices = {¶mIndicesValues, 1 * 4};
OH_NN_UInt32Array inputIndices = {inputIndicesValues, 2 * 4};
OH_NN_UInt32Array outputIndices = {&outputIndicesValues, 1 * 4};
// 向模型实例添加Add算子
returnCode = OH_NNModel_AddOperation(model, OH_NN_OPS_ADD, ¶mIndices, &inputIndices, &outputIndices);
CHECKNEQ(returnCode, OH_NN_SUCCESS, -1, "Add operation to model failed.");
// 设置模型实例的输入张量、输出张量的索引
returnCode = OH_NNModel_SpecifyInputsAndOutputs(model, &inputIndices, &outputIndices);
CHECKNEQ(returnCode, OH_NN_SUCCESS, -1, "Specify model inputs and outputs failed.");
// 完成模型实例的构建
returnCode = OH_NNModel_Finish(model);
CHECKNEQ(returnCode, OH_NN_SUCCESS, -1, "Build model failed.");
// 返回模型实例
*pmodel = model;
return OH_NN_SUCCESS;
}
5.查询Neural Network Runtime已经对接的AI加速芯片。
Neural Network Runtime支持通过HDI接口,对接多种AI加速芯片。在执行模型编译前,需要查询当前设备下,Neural Network Runtime已经对接的AI加速芯片。每个AI加速芯片对应唯一的ID值,在编译阶段需要通过设备ID,指定模型编译的芯片。
void GetAvailableDevices(std::vector<size_t>& availableDevice)
{
    availableDevice.clear();

    // 获取可用的硬件ID
    const size_t* devices = nullptr;
    uint32_t deviceCount = 0;
    OH_NN_ReturnCode ret = OH_NNDevice_GetAllDevicesID(&devices, &deviceCount);
    if (ret != OH_NN_SUCCESS) {
        std::cout << "GetAllDevicesID failed, get no available device." << std::endl;
        return;
    }

    for (uint32_t i = 0; i < deviceCount; i++) {
        availableDevice.emplace_back(devices[i]);
    }
}
6.在指定的设备上编译模型。
Neural Network Runtime使用抽象的模型表达描述AI模型的拓扑结构。在AI加速芯片上执行前,需要通过Neural Network Runtime提供的编译模块来创建编译实例,并由编译实例将抽象的模型表达下发至芯片驱动层,转换成可以直接推理计算的格式,即模型编译。
OH_NN_ReturnCode CreateCompilation(OH_NNModel* model, const std::vector<size_t>& availableDevice,
                                   OH_NNCompilation** pCompilation)
{
    // 创建编译实例compilation,将构图的模型实例或MSLite传下来的模型实例传入
    OH_NNCompilation* compilation = OH_NNCompilation_Construct(model);
    CHECKEQ(compilation, nullptr, -1, "OH_NNCore_ConstructCompilationWithNNModel failed.");

    // 设置编译的硬件、缓存路径、性能模式、计算优先级、是否开启float16低精度计算等选项
    // 选择在第一个设备上编译模型
    returnCode = OH_NNCompilation_SetDevice(compilation, availableDevice[0]);
    CHECKNEQ(returnCode, OH_NN_SUCCESS, -1, "OH_NNCompilation_SetDevice failed.");

    // 将模型编译结果缓存在/data/local/tmp目录下,版本号指定为1
    returnCode = OH_NNCompilation_SetCache(compilation, "/data/local/tmp", 1);
    CHECKNEQ(returnCode, OH_NN_SUCCESS, -1, "OH_NNCompilation_SetCache failed.");

    // 设置硬件性能模式
    returnCode = OH_NNCompilation_SetPerformanceMode(compilation, OH_NN_PERFORMANCE_EXTREME);
    CHECKNEQ(returnCode, OH_NN_SUCCESS, -1, "OH_NNCompilation_SetPerformanceMode failed.");

    // 设置推理执行优先级
    returnCode = OH_NNCompilation_SetPriority(compilation, OH_NN_PRIORITY_HIGH);
    CHECKNEQ(returnCode, OH_NN_SUCCESS, -1, "OH_NNCompilation_SetPriority failed.");

    // 是否开启FP16计算模式
    returnCode = OH_NNCompilation_EnableFloat16(compilation, false);
    CHECKNEQ(returnCode, OH_NN_SUCCESS, -1, "OH_NNCompilation_EnableFloat16 failed.");

    // 执行模型编译
    returnCode = OH_NNCompilation_Build(compilation);
    CHECKNEQ(returnCode, OH_NN_SUCCESS, -1, "OH_NNCompilation_Build failed.");

    *pCompilation = compilation;
    return OH_NN_SUCCESS;
}
7.创建执行器。
完成模型编译后,需要调用Neural Network Runtime的执行模块,通过编译实例创建执行器。模型推理阶段中的设置模型输入、触发推理计算以及获取模型输出等操作均需要围绕执行器完成。
OH_NNExecutor* CreateExecutor(OH_NNCompilation* compilation)
{
    // 通过编译实例compilation创建执行器executor
    OH_NNExecutor *executor = OH_NNExecutor_Construct(compilation);
    CHECKEQ(executor, nullptr, -1, "OH_NNExecutor_Construct failed.");
    return executor;
}
8.执行推理计算,并打印推理结果。
通过执行模块提供的接口,将推理计算所需要的输入数据传递给执行器,触发执行器完成一次推理计算,获取模型的推理结果并打印。
OH_NN_ReturnCode Run(OH_NNExecutor* executor, const std::vector<size_t>& availableDevice)
{
    // 从executor获取输入输出信息
    // 获取输入张量的个数
    size_t inputCount = 0;
    returnCode = OH_NNExecutor_GetInputCount(executor, &inputCount);
    CHECKNEQ(returnCode, OH_NN_SUCCESS, -1, "OH_NNExecutor_GetInputCount failed.");
    std::vector<NN_TensorDesc*> inputTensorDescs;
    NN_TensorDesc* tensorDescTmp = nullptr;
    for (size_t i = 0; i < inputCount; ++i) {
        // 创建输入张量的描述
        tensorDescTmp = OH_NNExecutor_CreateInputTensorDesc(executor, i);
        CHECKEQ(tensorDescTmp, nullptr, -1, "OH_NNExecutor_CreateInputTensorDesc failed.");
        inputTensorDescs.emplace_back(tensorDescTmp);
    }
    // 获取输出张量的个数
    size_t outputCount = 0;
    returnCode = OH_NNExecutor_GetOutputCount(executor, &outputCount);
    CHECKNEQ(returnCode, OH_NN_SUCCESS, -1, "OH_NNExecutor_GetOutputCount failed.");
    std::vector<NN_TensorDesc*> outputTensorDescs;
    for (size_t i = 0; i < outputCount; ++i) {
        // 创建输出张量的描述
        tensorDescTmp = OH_NNExecutor_CreateOutputTensorDesc(executor, i);
        CHECKEQ(tensorDescTmp, nullptr, -1, "OH_NNExecutor_CreateOutputTensorDesc failed.");
        outputTensorDescs.emplace_back(tensorDescTmp);
    }

    // 创建输入和输出张量
    NN_Tensor* inputTensors[inputCount];
    NN_Tensor* tensor = nullptr;
    for (size_t i = 0; i < inputCount; ++i) {
        tensor = nullptr;
        tensor = OH_NNTensor_Create(availableDevice[0], inputTensorDescs[i]);
        CHECKEQ(tensor, nullptr, -1, "OH_NNTensor_Create failed.");
        inputTensors[i] = tensor;
    }
    NN_Tensor* outputTensors[outputCount];
    for (size_t i = 0; i < outputCount; ++i) {
        tensor = nullptr;
        tensor = OH_NNTensor_Create(availableDevice[0], outputTensorDescs[i]);
        CHECKEQ(tensor, nullptr, -1, "OH_NNTensor_Create failed.");
        outputTensors[i] = tensor;
    }

    // 设置输入张量的数据
    returnCode = SetInputData(inputTensors, inputCount);
    CHECKNEQ(returnCode, OH_NN_SUCCESS, -1, "SetInputData failed.");

    // 执行推理
    returnCode = OH_NNExecutor_RunSync(executor, inputTensors, inputCount, outputTensors, outputCount);
    CHECKNEQ(returnCode, OH_NN_SUCCESS, -1, "OH_NNExecutor_RunSync failed.");

    // 打印输出张量的数据
    Print(outputTensors, outputCount);

    // 清理输入和输出张量以及张量描述
    for (size_t i = 0; i < inputCount; ++i) {
        returnCode = OH_NNTensor_Destroy(&inputTensors[i]);
        CHECKNEQ(returnCode, OH_NN_SUCCESS, -1, "OH_NNTensor_Destroy failed.");
        returnCode = OH_NNTensorDesc_Destroy(&inputTensorDescs[i]);
        CHECKNEQ(returnCode, OH_NN_SUCCESS, -1, "OH_NNTensorDesc_Destroy failed.");
    }
    for (size_t i = 0; i < outputCount; ++i) {
        returnCode = OH_NNTensor_Destroy(&outputTensors[i]);
        CHECKNEQ(returnCode, OH_NN_SUCCESS, -1, "OH_NNTensor_Destroy failed.");
        returnCode = OH_NNTensorDesc_Destroy(&outputTensorDescs[i]);
        CHECKNEQ(returnCode, OH_NN_SUCCESS, -1, "OH_NNTensorDesc_Destroy failed.");
    }

    return OH_NN_SUCCESS;
}
9.构建端到端模型构造-编译-执行流程。
步骤4-步骤8实现了模型的模型构造、编译和执行流程,并封装成多个函数,便于模块化开发。以下示例代码将串联这些函数, 形成一个完整的Neural Network Runtime使用流程。
int main()
{
    OH_NNModel* model = nullptr;
    OH_NNCompilation* compilation = nullptr;
    OH_NNExecutor* executor = nullptr;
    std::vector<size_t> availableDevices;

    // 模型构造
    OH_NNModel* model = nullptr;
    OH_NN_ReturnCode ret = BuildModel(&model);
    if (ret != OH_NN_SUCCESS) {
        std::cout << "BuildModel failed." << std::endl;
        OH_NNModel_Destroy(&model);
        return -1;
    }

    // 获取可执行的设备
    GetAvailableDevices(availableDevices);
    if (availableDevices.empty()) {
        std::cout << "No available device." << std::endl;
        OH_NNModel_Destroy(&model);
        return -1;
    }

    // 模型编译
    ret = CreateCompilation(model, availableDevices, &compilation);
    if (ret != OH_NN_SUCCESS) {
        std::cout << "CreateCompilation failed." << std::endl;
        OH_NNModel_Destroy(&model);
        OH_NNCompilation_Destroy(&compilation);
        return -1;
    }

    // 销毁模型实例
    OH_NNModel_Destroy(&model);

    // 创建模型的推理执行器
    executor = CreateExecutor(compilation);
    if (executor == nullptr) {
        std::cout << "CreateExecutor failed, no executor is created." << std::endl;
        OH_NNCompilation_Destroy(&compilation);
        return -1;
    }

    // 销毁编译实例
    OH_NNCompilation_Destroy(&compilation);

    // 使用上一步创建的执行器,执行推理计算
    ret = Run(executor, availableDevices);
    if (ret != OH_NN_SUCCESS) {
        std::cout << "Run failed." << std::endl;
        OH_NNExecutor_Destroy(&executor);
        return -1;
    }

    // 销毁执行器实例
    OH_NNExecutor_Destroy(&executor);

    return 0;
}
调测验证
1.准备应用样例的编译配置文件。
新建一个 CMakeLists.txt 文件,为开发步骤中的应用样例文件 nnrt_example.cpp 添加编译配置。以下提供简单的 CMakeLists.txt 示例:
cmake_minimum_required(VERSION 3.16)
project(nnrt_example C CXX)

add_executable(nnrt_example
    ./nnrt_example.cpp
)

target_link_libraries(nnrt_example
    neural_network_runtime
    neural_network_core
)
2.编译应用样例。
执行以下命令,在当前目录下新建build/目录,在build/目录下编译 nnrt_example.cpp,得到二进制文件 nnrt_example。
mkdir build && cd build
cmake -DCMAKE_TOOLCHAIN_FILE={交叉编译工具链的路径}/build/cmake/ohos.toolchain.cmake -DOHOS_ARCH=arm64-v8a -DOHOS_PLATFORM=OHOS -DOHOS_STL=c++_static ..
make
3.执行以下代码,将样例推送到设备上执行。
# 将编译得到的 `nnrt_example` 推送到设备上,执行样例。
hdc_std file send ./nnrt_example /data/local/tmp/.

# 给测试用例可执行文件加上权限。
hdc_std shell "chmod +x /data/local/tmp/nnrt_example"

# 执行测试用例
hdc_std shell "/data/local/tmp/nnrt_example"
shell
如果样例执行正常,应该得到以下输出。
Output index: 0, value is: 0.000000.
Output index: 1, value is: 2.000000.
Output index: 2, value is: 4.000000.
Output index: 3, value is: 6.000000.
Output index: 4, value is: 8.000000.
Output index: 5, value is: 10.000000.
Output index: 6, value is: 12.000000.
Output index: 7, value is: 14.000000.
Output index: 8, value is: 16.000000.
Output index: 9, value is: 18.000000.
Output index: 10, value is: 20.000000.
Output index: 11, value is: 22.000000.
4.检查模型缓存(可选)。
如果在调测环境下,Neural Network Runtime对接的HDI服务支持模型缓存功能,执行完 nnrt_example, 可以在 /data/local/tmp 目录下找到生成的缓存文件。
说明:
模型的IR需要传递到硬件驱动层,由HDI服务将统一的IR图,编译成硬件专用的计算图,编译的过程非常耗时。Neural Network
Runtime支持计算图缓存的特性,可以将HDI服务编译生成的计算图,缓存到设备存储中。当下一次在同一个加速芯片上编译同一个模型时,通过指定缓存的路径,Neural
Network Runtime可以直接加载缓存文件中的计算图,减少编译消耗的时间。
检查缓存目录下的缓存文件:
ls /data/local/tmp
以下为打印结果:
# 0.nncache 1.nncache 2.nncache cache_info.nncache
如果缓存不再使用,需要手动删除缓存,可以参考以下命令,删除缓存文件。
rm /data/local/tmp/*nncache
如果大家还没有掌握鸿蒙,现在想要在最短的时间里吃透它,我这边特意整理了《鸿蒙语法ArkTS、TypeScript、ArkUI、教学视频》以及《鸿蒙生态应用开发白皮书V2.0PDF》《鸿蒙开发学习手册》(共计890页)鸿蒙开发资料等…希望对大家有所帮助:https://docs.qq.com/doc/DZVVBYlhuRkZQZlB3
鸿蒙语法ArkTS、TypeScript、ArkUI等…视频教程:https://docs.qq.com/doc/DZVVBYlhuRkZQZlB3

OpenHarmony APP开发教程步骤:https://docs.qq.com/doc/DZVVBYlhuRkZQZlB3
鸿蒙生态应用开发白皮书V2.0PDF:https://docs.qq.com/doc/DZVVkRGRUd3pHSnFG

南北双向高工技能基础:https://docs.qq.com/doc/DZVVBYlhuRkZQZlB3

应用开发中高级就业技术:https://docs.qq.com/doc/DZVVBYlhuRkZQZlB3

全网首发-工业级 南向设备开发就业技术:https://docs.qq.com/doc/DZVVBYlhuRkZQZlB3

《鸿蒙开发学习手册》:
如何快速入门:https://docs.qq.com/doc/DZVVBYlhuRkZQZlB3
1.基本概念
2.构建第一个ArkTS应用
3.……

开发基础知识:https://docs.qq.com/doc/DZVVBYlhuRkZQZlB3
1.应用基础知识
2.配置文件
3.应用数据管理
4.应用安全管理
5.应用隐私保护
6.三方应用调用管控机制
7.资源分类与访问
8.学习ArkTS语言
9.……

基于ArkTS 开发:https://docs.qq.com/doc/DZVVBYlhuRkZQZlB3
1.Ability开发
2.UI开发
3.公共事件与通知
4.窗口管理
5.媒体
6.安全
7.网络与链接
8.电话服务
9.数据管理
10.后台任务(Background Task)管理
11.设备管理
12.设备使用信息统计
13.DFX
14.国际化开发
15.折叠屏系列
16.……


 被折叠的 条评论
为什么被折叠?
被折叠的 条评论
为什么被折叠?
 到【灌水乐园】发言


