


原文来源于:程序员成长指北;作者:Aphelios_
如有侵权,联系删除
前言

之前在我自己的项目中 打造属于你自己的 Mac(Next.js+Nest.js TS全栈项目)[1]有同学问Terminal 组件是怎么实现的呢,现在我们就用 React+TS 写一个支持多种命令的 Terminal 终端吧。
每一步骤后都有对应的 commit 记录;
源码地址:github.com/ljq0226/my-…[2] 欢迎 Star ⭐️⭐️⭐️
体验地址:my-terminal.netlify.app/[3]
搭建环境
我们使用 vite 构建项目,安装所需要的依赖库:
-
@neodrag/react (拖拽)
-
tailwindcss
-
lucide-react (图标) 步骤:
-
pnpm create vite -
选择 React+TS 模版
-
安装依赖:
pnpm install @neodrag/react lucide-react&&pnpm install -D tailwindcss postcss autoprefixer&&npx tailwindcss init -p配置 tailwind.config.js:
/** @type {import('tailwindcss').Config} */
export default {
  content: [
    './index.html',
    './src/**/*.{js,ts,jsx,tsx}',
  ],
  theme: {
    extend: {},
  },
  plugins: [],
}
仓库代码:commit1[4]
开发流程
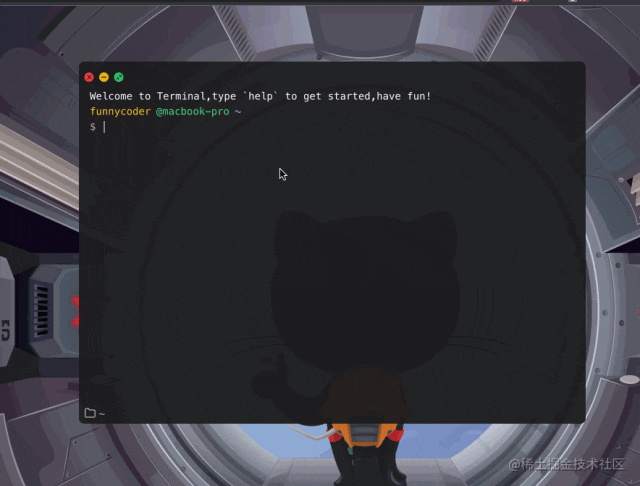
搭建页面

image.png
以上是终端的静态页面,样式这里就不在详细展开了,此次代码仓库 commit2[5] 。接下来我们为该终端添加拖拽效果:
//App.tsx
···
import type { DragOptions } from '@neodrag/react'
import { useRef, useState } from 'react'

function APP(){
const [position, setPosition] = useState({ x: 0, y: 0 })
  const draggableRef = useRef(null)
  // 初始化 dragable 拖拽设置
  const options: DragOptions = {
    position,
    onDrag: ({ offsetX, offsetY }) => setPosition({ x: offsetX, y: offsetY }),
    bounds: { bottom: -500, top: 32, left: -600, right: -600 },
    handle: '.window-header',
    cancel: '.traffic-lights',
  }
  useDraggable(draggableRef, options)

}

return (
	<div ref={draggableRef}> //将 draggableRef 挂在到节点上

	</div>
)
···
这样我们的 Terminal 终端就有了拖拽效果,其它 API 方法在@neodrag/react[6] 官网中,代码仓库 commit3[7]。

terminal2.gif
输入命令
一个终端最重要的当然是输入命令了,在这我们使用 input 框来收集收集输入命令的内容。由于我们每次执行完一次命令之后,都会生成新的行,所以我们将新行封装成一个组件,Row 组件接收两个参数(id:当前 Row 的唯一标识;onkeydown:监听 input 框的操作):
// components.tsx
interface RowProps {
  id: number
  onkeydown: (e: React.KeyboardEvent<HTMLInputElement>) => void
}
const Row: React.FC<RowProps> = ({ id, onkeydown }) => {

  return (
    <div className='flex flex-col w-full h-12'>
      <div>
        <span className="mr-2 text-yellow-400">funnycoder</span>
        <span className="mr-2 text-green-400">@macbook-pro</span>
        <span className="mr-2 text-blue-400">~{dir}</span>
        <span id={`terminal-currentDirectory-${id}`} className="mr-2 text-blue-400"></span>
      </div>
      <div className='flex'>
        <span className="mr-2 text-pink-400">$</span>
        <input
          type="text"
          id={`terminal-input-${id}`}
          autoComplete="off"
          autoFocus={true}
          className="flex-1 px-1 text-white bg-transparent outline-none"
          onKeyDown={onkeydown}
        />
      </div>

    </div>
  )
}
一开始的时候,我们通过初始化一个 Row 进行操作,我们所有生成的 Row 通过
//app.tsx
 const [content, setContent] = useState<JSX.Element[]>(
    [<Row
      id={0}
      key={key()} // React 渲染列表时需要key
      onkeydown={(e: React.KeyboardEvent<HTMLInputElement>) => executeCommand(e, 0)}
    />,
    ])
content 变量来存储,在后续我们经常要修改 content 的值,为了简化代码我们为 setContent 封装成 generateRow 方法:
// 生成内容
  const generateRow = (row: JSX.Element) => {
    setContent(s => [...s, row])
  }
问题来了,当我们获取到了输入的命令时,怎么执行对应的方法呢?
每一个 Row 组件都有 onKeyDown事件监听,当按下按键时就调用 executeCommand 方法,通过 input 框的 id 获取该 input 框 dom 节点, const [cmd, args] = input.value.trim().split(' ') 获取执行命令 cmd 和 参数 args,此时根据 event.key 按键操作执行对应的方法:
 // 执行方法
  function executeCommand(event: React.KeyboardEvent<HTMLInputElement>, id: number) {
    const input = document.querySelector(`#terminal-input-${id}`) as HTMLInputElement
    const [cmd, args] = input.value.trim().split(' ')
    if (event.key === 'ArrowUp')
      alert(`ArrowUp,Command is  ${cmd} Args is ${args}`)

    else if (event.key === 'ArrowDown')
      alert(`ArrowDown,Command is  ${cmd} Args is ${args}`)

    else if (event.key === 'Tab')
      alert(`Tab,Command is  ${cmd} Args is ${args}`)

    else if (event.key === 'Enter')
      alert(`Enter,Command is  ${cmd} Args is ${args}`)
  }
接下来我们测试一下,输入cd desktop,按下 Enter 键:
代码仓库 commit3[8]。
构建文件夹系统
终端的最常用的功能就是操作文件,所以我们需要构建一个文件夹系统,起初,在我的项目[9]中使用的是一个数组嵌套,类似下面这种
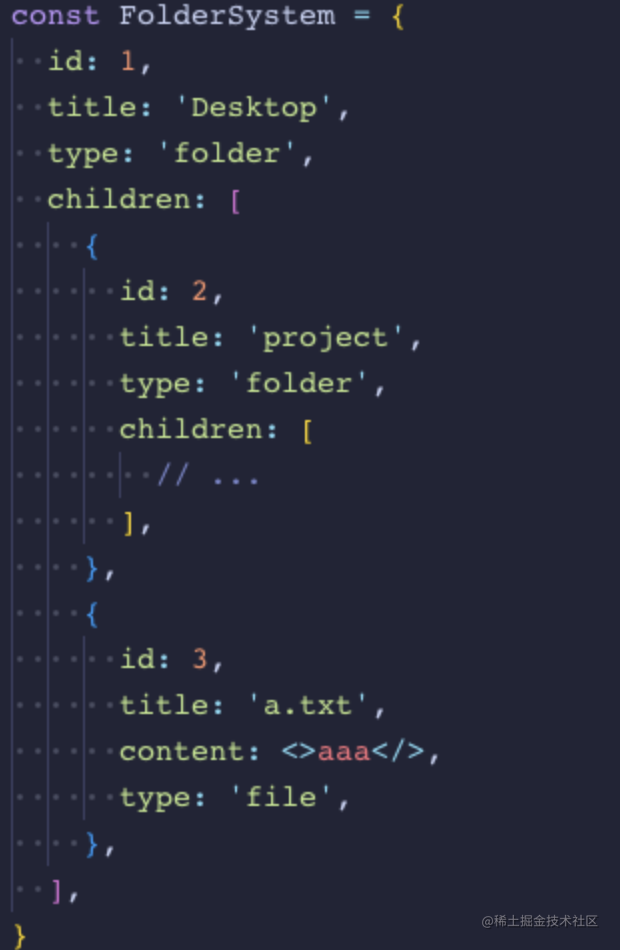
image.png
这种数据结构的话,每次寻找子项的都需要递归计算,非常麻烦。在这我们采用 map 进行存储,将数据扁平化:
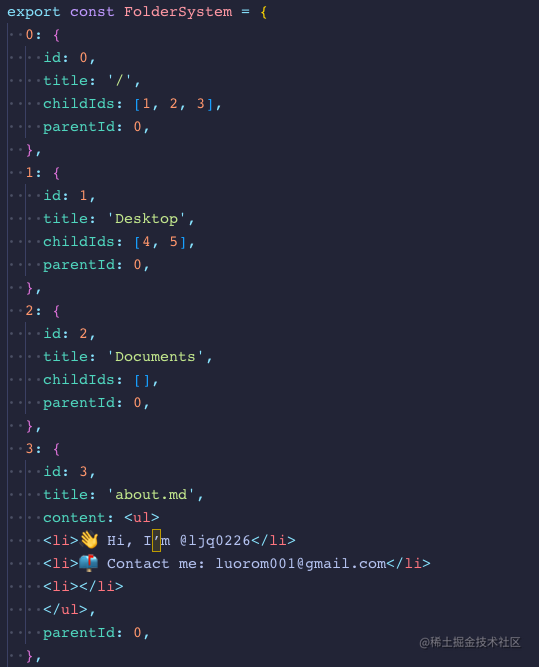
image.png
代码仓库 commit4[10] 。
执行命令
准备工作
我们先介绍一下几个变量:
-
currentFolderId :当前文件夹的 id,默认为 0 也就是最顶层的文件夹
-
currentDirectory : 当前路径
-
currentId : input 输入框的 id 标识
  const [currentId, setCurrentId] = useState<number>(0)
  const [currentFolderId, setCurrentFolderId] = useState(0)
  const [currentDirectory, setCurrentDirectory] = useState<string>('')
并把一些静态组件封装在 components.tsx 文件中:
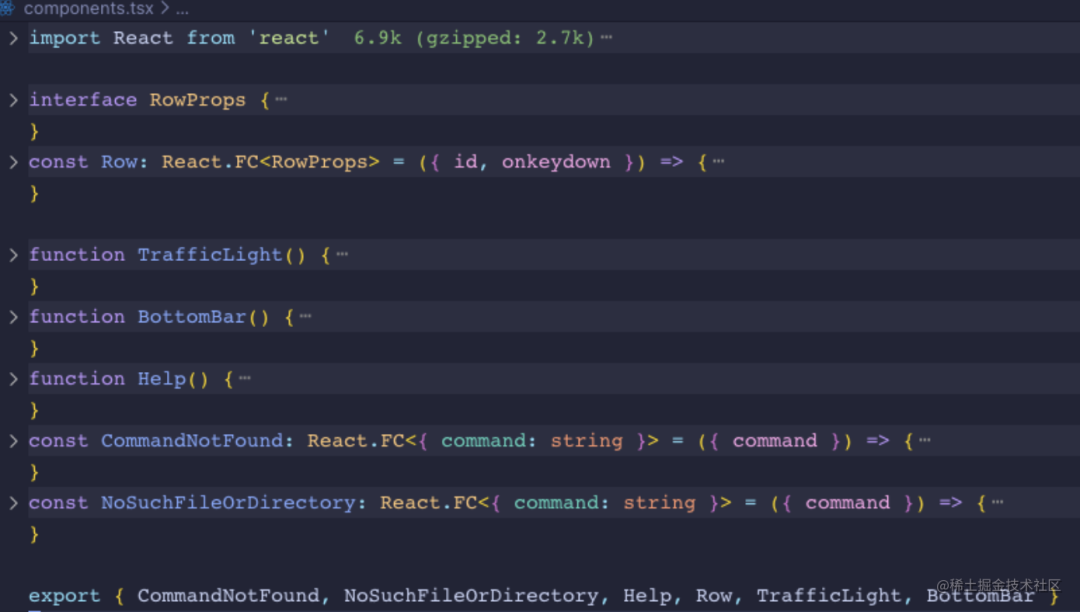
image.png
核心介绍
我们用一个对象来存储需要执行对应的方法:
  const commandList: CommandList = {
    cat,
    cd,
    clear,
    ls,
    help,
    mkdir,
    touch,
  }
在executeCommand 方法中,如果用户按下的是'Enter' 键,我们首先判断下输入的 cmd 是否在 commandlist 中,如果存在,就直接执行该方法,如果不存在,就生成一个 CommandNotFound 行:
//app.js
function executeCommand(){
//...
	 else if (event.key === 'Enter') {
      // 将新输入 command 加入 commandHistory 中
      const newArr = commandHistory
      newArr.push(input.value.trim())
      setCommandHistory(newArr)
      // 如果输入 command 符合就执行 ⭐️⭐️⭐️
      if (cmd && Object.keys(commandList).includes(cmd))
        commandList[cmd](args)
      else if (cmd !== '')
        generateRow(<CommandNotFound key={key()} command={input.value.trim()} />)
      // 每次无论 command 符不符合,都需要生成一行新的 Row,并且 curentId++
      setCurrentId(id => id + 1)
      setTimeout(() => {
        generateRow(
        <Row
          key={key()}
          id={commandHistory.length}
          onkeydown={(e: React.KeyboardEvent<HTMLInputElement>) => executeCommand(e, commandHistory.length)}
        />,
        )
      }, 100)
    }
//...
}
help
当输入的 cmd 识别为'help'时就会调用该方法,生成在 components.tsx 里 Help()中定义好的静态数据:
  // help 命令
  const help = () => {
    generateRow(<Help key={key()} />)
  }
代码仓库:commit5[11]
cd
首先,默认的currentFolderId为 0,也就是指向我们的根文件夹,我们可以通过 folderSysteam.get(currentFolderId) 来获取当前文件夹下的信息,包括该文件夹的 title,子文件的 id 数组 childIds 。当我们获取到了参数 arg 时,首先要判断 是否为空或者'..',若是的话,即返回上一层目录, 如果是正常参数的话,通过 folderSysteam.get(currentFolderId) 获取子目录的 childIds 数组,遍历当前目录下的子目录,找到子目录中 title 和 arg 一样的目录并返回该子目录 id,将 currentFolderId 设置为该子目录 id 并且拼接文件路径:
  // cd 命令
  const cd = (arg = '') => {
    const dir: string = localStorage.getItem(CURRENTDIRECTORY) as string
    //判断是否返回上一层目录
    if (!arg || arg === '..') {
      // 处理文件路径
      const dirArr = dir.split('/')
      dirArr.length = Math.max(0, dirArr.length - 2)
      //区分是否是root层
      if (!dirArr.length)
        setCurrentDirectory(`${dirArr.join('')}`)
      else
        setCurrentDirectory(`${dirArr.join('')}/`)
      // 将当前目录设置为上一层目录
      setCurrentFolderId(folderSysteam.get(`${currentFolderId}`)?.parentId as number)
      return
    }
	//若是正常的跳转子目录
	//根据 arg 参数获取需跳转目录的 id
    const id = searchFile(arg)
    // 如果子目录存在,设置路径、更新当前目录id
    if (id) {
      const res = `${dir + folderSysteam.get(`${id}`)?.title}/`
      setCurrentFolderId(id)
      setCurrentDirectory(res)
    }
    // 否则返回 NoSuchFileOrDirectory
    else { generateRow(<NoSuchFileOrDirectory key={key()} command={arg}/>) }
  }
  const searchFile = (arg: string) => {
    // 对输入做一个优化,例如文件夹名为 Desktop,只要我们输入'Desktop'|'desktop'|'DESKTOP'都行
    const args = [arg, arg.toUpperCase(), arg.toLowerCase(), arg.charAt(0).toUpperCase() + arg.slice(1)]
    // 获取当前目录下子目录
    const childIds = getStorage(CURRENTCHILDIDS)
    // 遍历子目录,找到title 为 arg 的目录
    for (const item of folderSysteam.entries()) {
      if (childIds.includes(item[1].id) && args.includes(item[1].title))
        return item[1].id
    }
  }
ls
  // ls 命令
  const ls = () => {
    let res = ''
    // 获取当前目录下所有子目录 id
    const ids = getStorage(CURRENTCHILDIDS)
    // 遍历 id 进行拼接
    for (const id of ids)
      res = `${res + folderSysteam.get(`${id}`)?.title} `
    if (!res) {
      generateRow(<div key={key()} >There are no other folders or files in the current directory.</div>)
    }
    else {
      res.split(' ').map((item: string) =>
        generateRow(<div key={key()} className={item.includes('.') ? 'text-blue-500' : ''}>{item}</div>),
      )
    }
  }
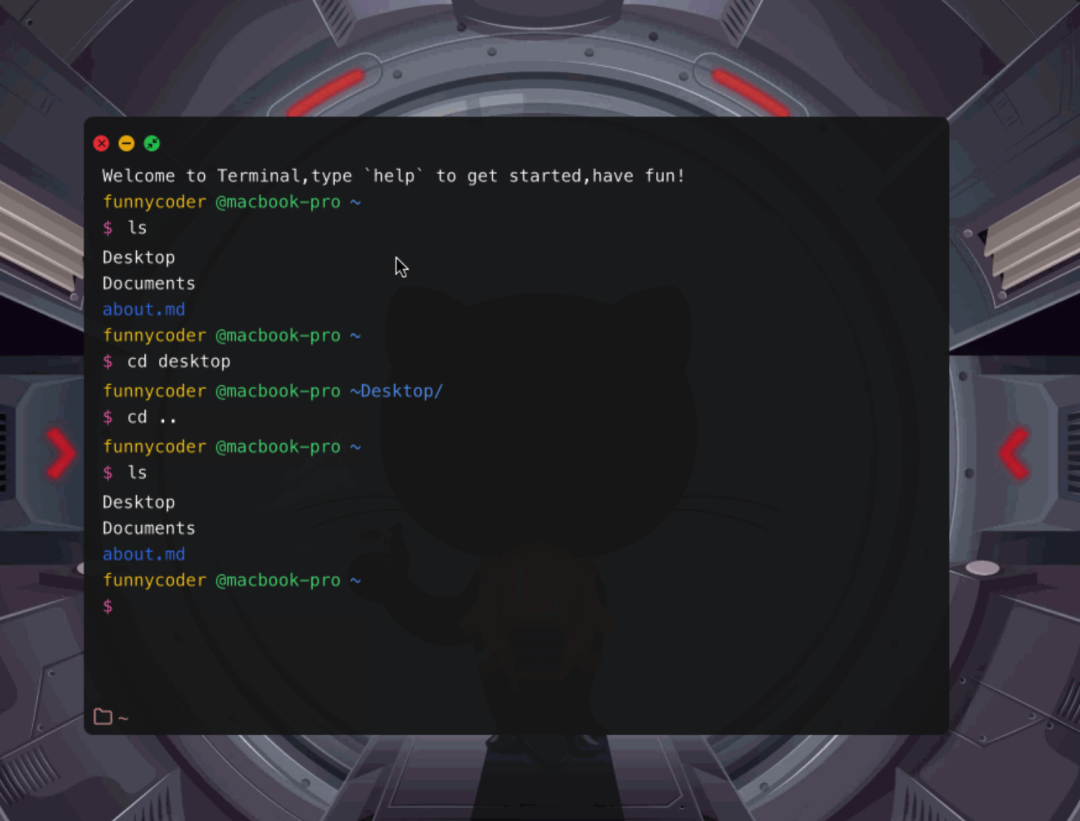
terminal6.gif
代码仓库:commit6[12]| commit6.1[13]
mkdir、touch
创建文件或文件夹,我们只需要创建该文件或文件夹对象,新对象的 parentId 指向当前目录,其新 id 加入到当前目录的 childIds 数组中,最后再更新一下 folderSysteam 变量:
  // mkdir 命令
  const mkdir = (arg = '') => {
    const currentFolderId = getStorage(CURRENTFOLDERID)
    const size = folderSysteam.size.toString()
    // 创建新对象
    const newFolderSysteam = folderSysteam.set(`${size}`, {
      id: +size,
      title: arg,
      childIds: [],
      parentId: currentFolderId,
    })
    // 更新 当前文件夹下的 childIds
    const childIds = (folderSysteam.get(`${currentFolderId}`) as FolderSysteamType).childIds as number[]
    childIds && childIds.push(+size)
    setStorage(CURRENTCHILDIDS, childIds)
    setFolderSysteam(newFolderSysteam)
  }
  // touch 命令
  const touch = (arg = '') => {
    const currentFolderId = getStorage(CURRENTFOLDERID)
    const size = folderSysteam.size.toString()
    // 创建新对象
    const newFolderSysteam = folderSysteam.set(`${size}`, {
      id: +size,
      title: arg,
      content: <div ><h1>
        This is <span className='text-red-400 underline'>{arg}</span> file!
        </h1>
        <p>Imagine there's a lot of content here...</p>
        </div>,
      parentId: currentFolderId,
    })
    // 更新 当前文件夹下的 childIds
    const childIds = (folderSysteam.get(`${currentFolderId}`) as FolderSysteamType).childIds as number[]
    childIds && childIds.push(+size)
    setStorage(CURRENTCHILDIDS, childIds)
    setFolderSysteam(newFolderSysteam)
  }
terminal7.gif
代码仓库:commit7[14]
cat、clear
cat 命令只需要展示子文件的 content 属性值即可:
  // cat 命令
  const cat = (arg = '') => {
  //获取当前目录下 childIds 进行遍历
    const ids = getStorage(CURRENTCHILDIDS)
    ids.map((id: number) => {
      const item = folderSysteam.get(`${id}`) as FolderSysteamType
      //生成 title 为 arg 文件的 content Row 行
      return item.title === arg ? generateRow(<div key={key()}>{item.content}</div> as JSX.Element) : ''
    })
  }
clear 命令只需要调用 setContent():
  // clear 命令
  const clear = () => {
    setContent([])
    //清空 input 框内容
    const input = document.querySelector('#terminal-input-0') as HTMLInputElement
    input.value = ''
  }
代码仓库:commit8[15]
其它操作
准备工作
我们先介绍一下几个变量:
-
commandHistory :用于存储输入过的 command数组
-
changeCount : 用来切换 command 计数
  const [changeCount, setChangeCount] = useState<number>(0)
  const [commandHistory, setCommandHistory] = useState<string[]>([])
上下键切换 command
上面定义的 changeCount 变量默认为 0,当我们按上🔼键时,changeCount-1,当我们按下🔽键时,changeCount+1。而当 changeCount 变量变化时,获取当前 input dom 节点,设置其值为commandHistory[commandHistory.length + changeCount],这样我们的上下键切换 command 就实现了:
    // 当按下上下键时 获取历史 command
  useEffect(() => {
    const input = document.querySelector(`#terminal-input-${commandHistory.length}`) as HTMLInputElement
    if (commandHistory.length)
      input.value = commandHistory[commandHistory.length + changeCount]
    if (!changeCount) {
      input.value = ''
      setChangeCount(0)
    }
  }, [changeCount])

  // 按向上🔼键
  function handleArrowUp() {
    setChangeCount(prev => Math.max(prev - 1, -commandHistory.length))
  }
  // 按向下🔽键
  function handleArrowDown() {
    setChangeCount(prev => Math.min(prev + 1, 0))
  }
  // 执行方法
  function executeCommand(...) {
	//...
    if (event.key === 'ArrowUp') {
      handleArrowUp()
    }
    else if (event.key === 'ArrowDown') {
      handleArrowDown()
    }
	//...
Tab 键补全 command
根据历史记录补全 command ,利用 Array.filter() 和 String.startsWith() 就行:
  // 匹配历史 command 并补充
  const matchCommand = (inputValue: string): string | null => {
    // 遍历历史command 返回以当前输入 command 值开头(startsWith)的 command
    const matchedCommands = commandHistory.filter(command => command.startsWith(inputValue))
    return matchedCommands.length > 0 ? matchedCommands[matchedCommands.length - 1] : null
  }
代码仓库:commit9[16]
最后
大家有兴趣的话可以自己再去二次改造或添加一些新玩法,此组件已通过 Netlify 部署上线,地址为 my-terminal.netlify.app/[17] 项目源代码:github.com/ljq0226/my-…[18] 欢迎 Star ⭐️⭐️⭐️
参考资料
[1] https://juejin.cn/post/7220327699385532471: https://juejin.cn/post/7220327699385532471
[2] https://github.com/ljq0226/my-terminal: https://github.com/ljq0226/my-terminal
[3] https://my-terminal.netlify.app/: https://my-terminal.netlify.app/
[4] https://github.com/ljq0226/my-terminal/commit/ee2df27291ca8a49558262001a162cb76ef9b99a: https://github.com/ljq0226/my-terminal/commit/ee2df27291ca8a49558262001a162cb76ef9b99a
[5] https://github.com/ljq0226/my-terminal/commit/ea2154def8985a6861d6612c7fc547a7ee6c3057: https://github.com/ljq0226/my-terminal/commit/ea2154def8985a6861d6612c7fc547a7ee6c3057
[6] https://www.neodrag.dev/docs/react: https://www.neodrag.dev/docs/react
[7] https://github.com/ljq0226/my-terminal/commit/4573a191487049109a0a7acc699f1068a63effa6: https://github.com/ljq0226/my-terminal/commit/4573a191487049109a0a7acc699f1068a63effa6
[8] https://github.com/ljq0226/my-terminal/commit/5db1f92cda200b46ef0a0d0fd3904f27b963bda2: https://github.com/ljq0226/my-terminal/commit/5db1f92cda200b46ef0a0d0fd3904f27b963bda2
[9] https://github.com/ljq0226/turbomac: https://github.com/ljq0226/turbomac
[10] https://github.com/ljq0226/my-terminal/commit/efac4729383a36b5430f90c58bb94cad9b35168b: https://github.com/ljq0226/my-terminal/commit/efac4729383a36b5430f90c58bb94cad9b35168b
[11] https://github.com/ljq0226/my-terminal/commit/c52c391187bc9759489c2056ec55f2d439e93d84: https://github.com/ljq0226/my-terminal/commit/c52c391187bc9759489c2056ec55f2d439e93d84
[12] https://github.com/ljq0226/my-terminal/commit/f767728ea1b9edb80a20314314c2d1850a4d8aae: https://github.com/ljq0226/my-terminal/commit/f767728ea1b9edb80a20314314c2d1850a4d8aae
[13] https://github.com/ljq0226/my-terminal/commit/46328197d18843f95666b3639b655c3cdbf69ca8: https://github.com/ljq0226/my-terminal/commit/46328197d18843f95666b3639b655c3cdbf69ca8
[14] https://github.com/ljq0226/my-terminal/commit/c907edf4413369ffd8b16e1afe38e0d45778bcc9: https://github.com/ljq0226/my-terminal/commit/c907edf4413369ffd8b16e1afe38e0d45778bcc9
[15] https://github.com/ljq0226/my-terminal/commit/91924a95e4aa9bf3fd9ab321711304de034cc947: https://github.com/ljq0226/my-terminal/commit/91924a95e4aa9bf3fd9ab321711304de034cc947
[16] https://github.com/ljq0226/my-terminal/commit/3cbf8ffc4b7900f3bffbb10df3dfa8c9862181d5: https://github.com/ljq0226/my-terminal/commit/3cbf8ffc4b7900f3bffbb10df3dfa8c9862181d5
[17] https://my-terminal.netlify.app/: https://my-terminal.netlify.app/
[18] https://github.com/ljq0226/my-terminal: https://github.com/ljq0226/my-terminal


 268
268

 被折叠的 条评论
为什么被折叠?
被折叠的 条评论
为什么被折叠?
 到【灌水乐园】发言


