


最后的话
最近很多小伙伴找我要Linux学习资料,于是我翻箱倒柜,整理了一些优质资源,涵盖视频、电子书、PPT等共享给大家!
资料预览
给大家整理的视频资料:

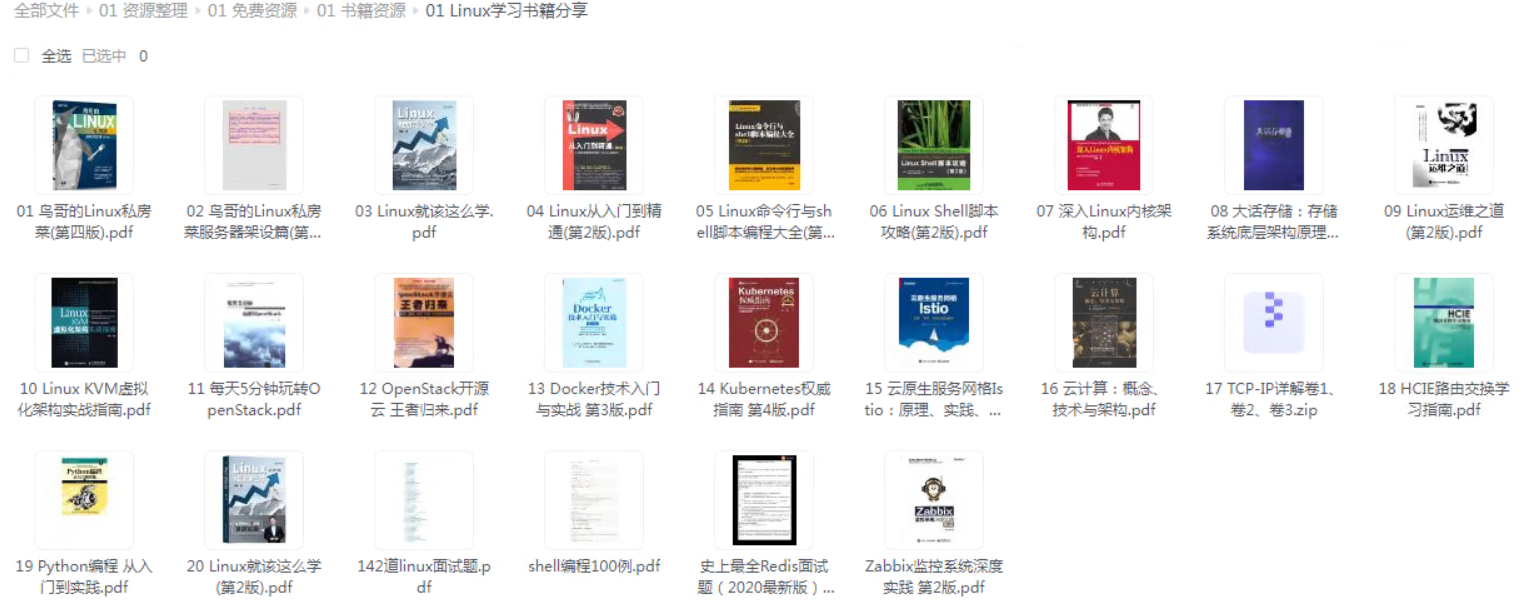
给大家整理的电子书资料:
如果本文对你有帮助,欢迎点赞、收藏、转发给朋友,让我有持续创作的动力!
网上学习资料一大堆,但如果学到的知识不成体系,遇到问题时只是浅尝辄止,不再深入研究,那么很难做到真正的技术提升。
一个人可以走的很快,但一群人才能走的更远!不论你是正从事IT行业的老鸟或是对IT行业感兴趣的新人,都欢迎加入我们的的圈子(技术交流、学习资源、职场吐槽、大厂内推、面试辅导),让我们一起学习成长!
5、nginx进行代理操作
6、nginx发布前端项目
一、反向代理与正向代理
1、nginx是什么?
①、反向代理服务器 --> tomcat
②、html服务器
正向代理:

方向代理:

负载均衡:系统部署图

二、window版nginx的使用
1、有关conf/nginx.conf配置文件的解析
#user nobody;
worker_processes 1;
#error_log logs/error.log;
#error_log logs/error.log notice;
#error_log logs/error.log info;
#pid logs/nginx.pid;
events {
worker_connections 1024;
}
http {
include mime.types;
default_type application/octet-stream;
#log_format main '$remote_addr - r e m o t e u s e r [ remote_user [ remoteuser[time_local] “$request” ’
'$status b o d y b y t e s s e n t " body_bytes_sent " bodybytessent"http_referer" ’
‘“ h t t p u s e r a g e n t " " http_user_agent" " httpuseragent""http_x_forwarded_for”’;
#access_log logs/access.log main;
sendfile on;
#tcp_nopush on;
#keepalive_timeout 0;
keepalive_timeout 65;
#gzip on;
#服务器的集群
upstream tomcat_list { #服务器集群名字
server 127.0.0.1:8080 weight=1; #服务器1 weight是权重的意思,权重越大,分配的概率越大。
#server 172.17.0.4:8080 weight=2; #服务器2 weight是权重的意思,权重越大,分配的概率越大
}
server {
listen 80; #监听80端口,可以改成其他端口
#server_name localhost; #当前服务的域名
server_name www.zking.com; #当前服务的域名(虚拟域名也可以)
root html/crm; #将要访问的网站的根目录,nginx节点会自动继承父节点的配置
#charset koi8-r;
#access_log logs/host.access.log main;
location / {
#该句代码是为解决history路由不能跳转的问题,在vue-router官网有介绍
try_files $uri $uri/ /index.html;
}
location ^~/api/ {
#^~/api/表示匹配前缀是api的请求,proxy_pass的结尾有/, 则会把/api/*后面的路径直接拼接到后面,即移除api
proxy_pass http://tomcat_list/;
}
#error_page 404 /404.html;
redirect server error pages to the static page /50x.html
error_page 500 502 503 504 /50x.html;
location = /50x.html {
root html;
}
proxy the PHP scripts to Apache listening on 127.0.0.1:80
#location ~ .php$ {
proxy_pass http://127.0.0.1;
#}
pass the PHP scripts to FastCGI server listening on 127.0.0.1:9000
#location ~ .php$ {
root html;
fastcgi_pass 127.0.0.1:9000;
fastcgi_index index.php;
fastcgi_param SCRIPT_FILENAME /scripts$fastcgi_script_name;
include fastcgi_params;
#}
deny access to .htaccess files, if Apache’s document root
concurs with nginx’s one
#location ~ /.ht {
deny all;
#}
}
another virtual host using mix of IP-, name-, and port-based configuration
#server {
listen 8000;
listen somename:8080;
server_name somename alias another.alias;
location / {
root html;
index index.html index.htm;
}
#}
HTTPS server
#server {
listen 443 ssl;
server_name localhost;
ssl_certificate cert.pem;
ssl_certificate_key cert.key;
ssl_session_cache shared:SSL:1m;
ssl_session_timeout 5m;
ssl_ciphers HIGH:!aNULL:!MD5;
ssl_prefer_server_ciphers on;
location / {
root html;
index index.html index.htm;
}
#}
}
2、将nginx文件解压,点击nginx文件–》选择nginx.exe文件,双击开启

报错:

解决方案:
cmd窗口输入HTTP命令netsh http show servicestate查看,
发现有个共同进程ID:5420

①、打开任务管理器,选择服务,找到PID(进程id)5420对应的服务把它停止就可以了。

②、直接在conf/nginx.conf配置文件中改端口号
成功进入:

三、 vue前端项目打包
1、在前台src/api/action.js文件中定义域名
/**
* 对后台请求的地址的封装,URL格式如下:
* 模块名_实体名_操作
*/
export default {
‘SERVER’: ‘http://www.lv.com/T216_SSH’, //服务器
‘SYSTEM_USER_DOLOGIN’: ‘/vue/userAction_login.action’, //用户登陆
‘SYSTEM_USER_DOREG’: ‘/vue/userAction_reg.action’, //用户注册
‘SYSTEM_MENU_TREE’: ‘/vue/treeNodeAction.action’, //左侧树形菜单加载
‘SYSTEM_ARTICLE_LIST’: ‘/vue/articleAction_list.action’, //文章列表
‘SYSTEM_ARTICLE_ADD’: ‘/vue/articleAction_add.action’, //文章新增
‘SYSTEM_ARTICLE_EDIT’: ‘/vue/articleAction_edit.action’, //文章修改
‘SYSTEM_ARTICLE_DEL’: ‘/vue/articleAction_del.action’, //文章删除
‘SYSTEM_USER_GETASYNCDATA’: ‘/vue/userAction_getAsyncData.action’, //vuex中的异步加载数据
‘getFullPath’: k => { //获得请求的完整地址,用于mockjs测试时使用
return this.SERVER + this[k];
}
}
config/index.js文件:
‘use strict’
// Template version: 1.3.1
// see http://vuejs-templates.github.io/webpack for documentation.
const path = require(‘path’)
module.exports = {
dev: {
// Paths
assetsSubDirectory: ‘static’,
assetsPublicPath: ‘…/…/’,
proxyTable: {},
// Various Dev Server settings
host: ‘localhost’, // can be overwritten by process.env.HOST
port: 8088, // can be overwritten by process.env.PORT, if port is in use, a free one will be determined
autoOpenBrowser: false,
errorOverlay: true,
notifyOnErrors: true,
poll: false, // https://webpack.js.org/configuration/dev-server/#devserver-watchoptions-
/**
* Source Maps
*/
// https://webpack.js.org/configuration/devtool/#development
devtool: ‘cheap-module-eval-source-map’,
// If you have problems debugging vue-files in devtools,
// set this to false - it *may* help
// https://vue-loader.vuejs.org/en/options.html#cachebusting
cacheBusting: true,
cssSourceMap: true
},
build: {
// Template for index.html
index: path.resolve(__dirname, ‘…/dist/index.html’),
// Paths
assetsRoot: path.resolve(__dirname, ‘…/dist’),
assetsSubDirectory: ‘static’,
assetsPublicPath: ‘./’,
/**
* Source Maps
*/
productionSourceMap: true,
// https://webpack.js.org/configuration/devtool/#production
devtool: ‘#source-map’,
// Gzip off by default as many popular static hosts such as
// Surge or Netlify already gzip all static assets for you.
// Before setting to `true`, make sure to:
// npm install --save-dev compression-webpack-plugin
productionGzip: false,
productionGzipExtensions: [‘js’, ‘css’],
// Run the build command with an extra argument to
// View the bundle analyzer report after build finishes:
// `npm run build --report`
// Set to `true` or `false` to always turn it on or off
bundleAnalyzerReport: process.env.npm_config_report
}
}
2、打包项目
打开终端,运行:
npm run build

打包成功新增一个文件夹: 这个文件夹就是打包好的所有项目


双击index呈现界面:

3、将项目发布到Linux服务器上
①、安装nginx
查看是否有nginx:
whereis nginx
未拥有:

安装nginx服务器:
Ⅰ.添加 nginx 官方提供的 yum 源(需要联网且时间较长)
rpm -Uvh http://nginx.org/packages/centos/7/x86_64/RPMS/nginx-1.14.2-1.el7_4.ngx.x86_64.rpm

Ⅱ、使用 yum 安装 nginx
yum install nginx

Ⅲ、查看nginx版本(yum方式安装nginx,它的安装根目录为/etc/nginx)
rpm -qa | grep nginx

Ⅳ、查看是否已启动
systemctl status nginx

Ⅴ、启动
systemctl start nginx
先自我介绍一下,小编浙江大学毕业,去过华为、字节跳动等大厂,目前在阿里
深知大多数程序员,想要提升技能,往往是自己摸索成长,但自己不成体系的自学效果低效又漫长,而且极易碰到天花板技术停滞不前!
因此收集整理了一份《2024年最新Linux运维全套学习资料》,初衷也很简单,就是希望能够帮助到想自学提升又不知道该从何学起的朋友。
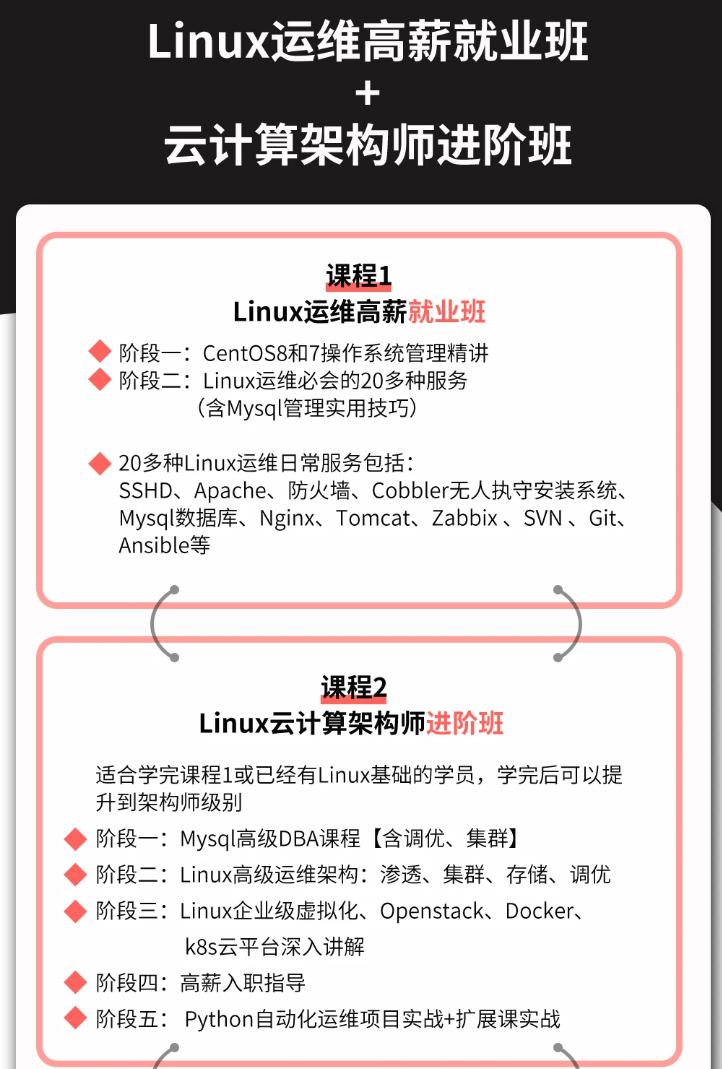


既有适合小白学习的零基础资料,也有适合3年以上经验的小伙伴深入学习提升的进阶课程,涵盖了95%以上运维知识点,真正体系化!
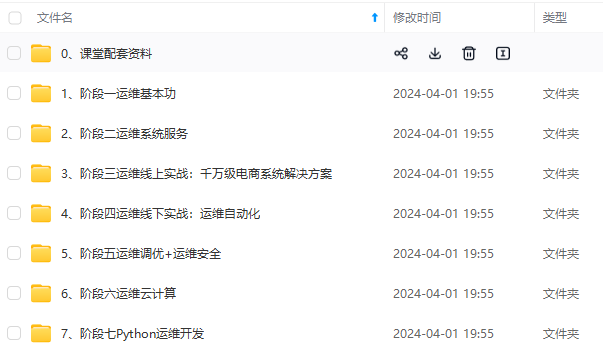
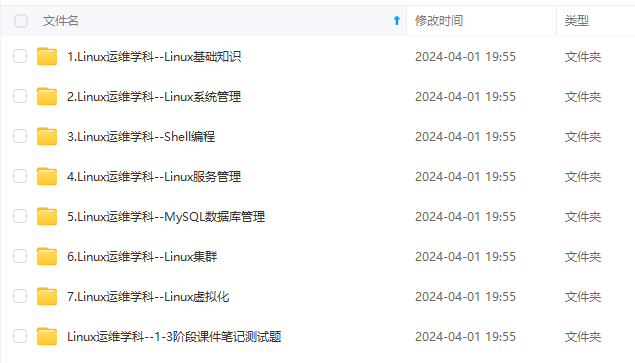
由于文件比较多,这里只是将部分目录截图出来,全套包含大厂面经、学习笔记、源码讲义、实战项目、大纲路线、讲解视频,并且后续会持续更新
ow_50,text_Q1NETiBA54ix5Zik5pav5aGU,size_20,color_FFFFFF,t_70,g_se,x_16)
Ⅴ、启动
systemctl start nginx
先自我介绍一下,小编浙江大学毕业,去过华为、字节跳动等大厂,目前在阿里
深知大多数程序员,想要提升技能,往往是自己摸索成长,但自己不成体系的自学效果低效又漫长,而且极易碰到天花板技术停滞不前!
因此收集整理了一份《2024年最新Linux运维全套学习资料》,初衷也很简单,就是希望能够帮助到想自学提升又不知道该从何学起的朋友。
[外链图片转存中…(img-fVGmPUpW-1715116786209)]
[外链图片转存中…(img-kz3Jd9eJ-1715116786209)]
[外链图片转存中…(img-eZ6fKUKF-1715116786209)]
[外链图片转存中…(img-VXQXCzki-1715116786210)]
[外链图片转存中…(img-BRQlp1lm-1715116786210)]
既有适合小白学习的零基础资料,也有适合3年以上经验的小伙伴深入学习提升的进阶课程,涵盖了95%以上运维知识点,真正体系化!
由于文件比较多,这里只是将部分目录截图出来,全套包含大厂面经、学习笔记、源码讲义、实战项目、大纲路线、讲解视频,并且后续会持续更新


 363
363

 被折叠的 条评论
为什么被折叠?
被折叠的 条评论
为什么被折叠?
 到【灌水乐园】发言


