


网上学习资料一大堆,但如果学到的知识不成体系,遇到问题时只是浅尝辄止,不再深入研究,那么很难做到真正的技术提升。
一个人可以走的很快,但一群人才能走的更远!不论你是正从事IT行业的老鸟或是对IT行业感兴趣的新人,都欢迎加入我们的的圈子(技术交流、学习资源、职场吐槽、大厂内推、面试辅导),让我们一起学习成长!
-
遍历首先要满足一个条件,就是服务器之间已经打通了网络【如果是新服务器,一般是没有被打通网络的,所以只能用上面的方法,一台一台执行配置ip】。
-
这个遍历比较特殊,需要满足2个条件和一个执行条件:
-
1、scp拷贝上面的bond脚本到目标服务器上,然后把脚本中IP掩码网关改成自动获取;
-
2、因为是在目标服务器执行,需要给每台服务器准备ip,掩码和网关,而这些文件是不能存放在本地服务器的,所以得想办法把3样放到目标服务器,因为批量跑,肯定不能像上面一样手动给每个脚本更换IP。
-
执行条件就是上面2样准备完毕以后批量执行每台目标服务器上的脚本。
-
先思考一下怎么解决上面的2样东西,如果实在想不出,再看我下面的方案【思路已经提供了,脚本还是要多想多测试,不然没法提升的】
遍历给每台服务器准备需要配置的IP、掩码和网关。
[root@controll ccx]# pwd
/ccx
[root@controll ccx]# cat iplist1.txt
这个文件是放能正常ssh上去的目标服务器IP
192.168.59.128
192.168.59.129
192.168.59.130
[root@controll ccx]# cat ipmask.txt
这个文件是存放需要新配置的IP、掩码和网关,中间用一个空格隔开【空格只能有一个,不能多】
192.168.59.128 255.255.255.0 192.168.59.2
192.168.59.129 255.255.255.0 192.168.59.2
192.168.59.130 255.255.255.0 192.168.59.2
[root@controll ccx]#
[root@controll ccx]# cat echo.sh
#!/bin/bash
file=/ccx/iplist1.txt
ip=/ccx/ipmask.txt
cat $file|while read line ; do
cat $ip | while read ip ; do
a=($ip)
ssh $line << EOF
mkdir /ccx
echo ${a[0]} > /ccx/ip
echo ${a[1]} > /ccx/mask
echo ${a[2]} > /ccx/gateway
EOF
done
done
[root@controll ccx]#
执行查看效果
-
执行方式:
sh echo.sh -
因为需要拷贝3个文件,所以需要输入3次密码【其中第一次创建了/ccx这个文件,所以第二第三次就会报/ccx文件已存在,无法创建,这个无所谓的,如果有强迫症,不想出现这个提升,可以加个if条件,if=1的时候创建即可】
[root@controll ccx]#
[root@controll ccx]# sh echo.sh
Pseudo-terminal will not be allocated because stdin is not a terminal.
root@192.168.59.128’s password:
Pseudo-terminal will not be allocated because stdin is not a terminal.
root@192.168.59.128’s password:
mkdir: 无法创建目录"/ccx": 文件已存在
Pseudo-terminal will not be allocated because stdin is not a terminal.
root@192.168.59.128’s password:
mkdir: 无法创建目录"/ccx": 文件已存在
Pseudo-terminal will not be allocated because stdin is not a terminal.
root@192.168.59.129’s password:
Pseudo-terminal will not be allocated because stdin is not a terminal.
root@192.168.59.129’s password:
mkdir: cannot create directory ‘/ccx’: File exists
Pseudo-terminal will not be allocated because stdin is not a terminal.
root@192.168.59.129’s password:
mkdir: cannot create directory ‘/ccx’: File exists
Pseudo-terminal will not be allocated because stdin is not a terminal.
root@192.168.59.130’s password:
Pseudo-terminal will not be allocated because stdin is not a terminal.
root@192.168.59.130’s password:
mkdir: cannot create directory ‘/ccx’: File exists
Pseudo-terminal will not be allocated because stdin is not a terminal.
root@192.168.59.130’s password:
mkdir: cannot create directory ‘/ccx’: File exists
[root@controll ccx]# ssh 192.168.59.128
root@192.168.59.128’s password:
Last login: Fri May 28 17:57:44 2021 from 192.168.59.133
[root@centso76_1 ~]# cd /ccx/
[root@centso76_1 ccx]# ls
gateway ip mask
[root@centso76_1 ccx]# cat gateway
192.168.59.2
[root@centso76_1 ccx]# cat mask
255.255.255.0
[root@centso76_1 ccx]# cat ip
192.168.59.130
[root@centso76_1 ccx]# 登出
Connection to 192.168.59.128 closed.
[root@controll ccx]# ssh 192.168.59.129
root@192.168.59.129’s password:
Last login: Thu May 27 22:09:09 2021 from 192.168.59.133
[root@centos76_2 ~]# cd /ccx/
[root@centos76_2 ccx]# ls
gateway ip mask
[root@centos76_2 ccx]# cat gateway
192.168.59.2
[root@centos76_2 ccx]# cat mask
255.255.255.0
[root@centos76_2 ccx]# cat ip
192.168.59.130
[root@centos76_2 ccx]#
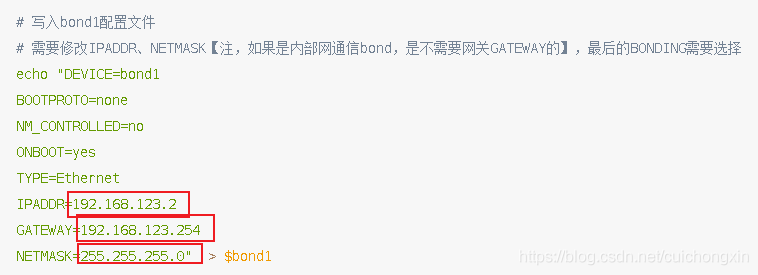
注:上面脚本执行完毕以后,本地中就会生成IP、掩码和网关3个文件,先把bond脚本中不需要的注释掉,只留一个需要用的bond,然后把IP掩码和网关部分改成自动获取【自动获取这个脚本中也有方法,我就不去修改了,自己修改吧】,就是下图这3个地方的固定值改为自动获取文件即可【因为都是脚本跑的,所以每一个脚本文件都是固定的,不存在出错】
- 上面的bond脚本修改完毕以后就可以批量拷贝了
[root@controll ccx]# pwd
/ccx
[root@controll ccx]# cat iplist1.txt
这个文件是放能正常ssh上去的目标服务器IP
192.168.59.128
192.168.59.129
192.168.59.130
[root@controll ccx]# cat install.sh
if [ $# -eq 0 ] ;then
echo “Usage: /ccx/iplist1.txt”
elif [ -f $1 ] ; then
for ip in cat $1 ; do
scp /ccx/bond_aotu.sh $ip:/ccx
done
else
echo “Input file not found”
fi
[root@controll ccx]#
执行查看效果
- 执行方式:
sh install.sh /ccx/iplist1.txt
[root@controll ccx]# sh install.sh # 如果不指定文件就报错咯
Usage: /ccx/iplist1.txt
[root@controll ccx]#
[root@controll ccx]# sh install.sh /ccx/iplist1.txt
root@192.168.59.128’s password:
bond_aotu.sh 100% 0 0.0KB/s 00:00
root@192.168.59.129’s password:
bond_aotu.sh 100% 0 0.0KB/s 00:00
root@192.168.59.130’s password:
bond_aotu.sh 100% 0 0.0KB/s 00:00
[root@controll ccx]#
注:上面的脚本全部执行完毕以后,每台目标服务器上都会有这4个文件【bond脚本、ip、掩码和网关】:bond_aotu.sh gateway ip mask
[root@controll ccx]# ssh 192.168.59.128
root@192.168.59.128’s password:
Last login: Fri May 28 18:13:17 2021 from 192.168.59.133
[root@centso76_1 ~]# cd /ccx
[root@centso76_1 ccx]# ls
bond_aotu.sh gateway ip mask
[root@centso76_1 ccx]#
- 因为上面的全部条件都已经准备好了,所以可以直接在一台服务器上批量执行目标服务器上的这个脚本即可。
【执行方式有很多,可以用expect,我这仅展示使用ssh执行即可】
【另外,因为我不需要批量配置脚本ip,所以我的bond脚本代码内容是:echo "Good morning:hero ccx"】
[root@controll ccx]# pwd
/ccx
[root@controll ccx]# cat iplist1.txt
这个文件是放能正常ssh上去的目标服务器IP
192.168.59.128
192.168.59.129
192.168.59.130
[root@controll ccx]# cat /ccx/send.sh
if [ $# -eq 0 ] ;then
echo “Usage: /ccx/iplist1.txt”
elif [ -f $1 ] ; then
for ip in cat $1 ; do
ssh $ip sh /ccx/bond_aotu.sh
done
else
echo “Input file not found”
fi
[root@controll ccx]#
执行查看效果
- 执行方式:
sh install.sh /ccx/iplist1.txt
[root@controll ccx]#
[root@controll ccx]# sh send.sh iplist1.txt
root@192.168.59.128’s password:
正常情况执行成功后呢,这展示的是bond脚本中的配置内容
Good morning:hero ccx
root@192.168.59.129’s password:
Good morning:hero ccx
root@192.168.59.130’s password:
Good morning:hero ccx
[root@controll ccx]#
注:如果你执行这个脚本去目标服务器上发现ip并没有被配置的话,原因是因为这个方法调用的是本地服务器的ssh进程,换expect的方式执行这个脚本【但配置未成功的几率应该不会发生,这只是留下一个解决方案,以防万一】
===========================================================================
-
这个主要针对 一批服务器上有很多接口名称,从其中定位到正在使用的接口名称;
-
实现方式依然是使用命令
ethtool查看link是否为yes。 -
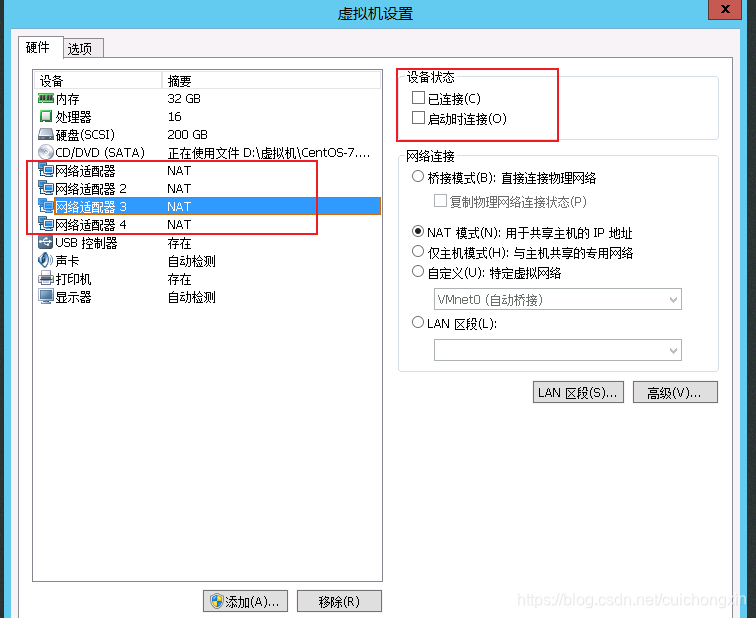
注:如果是在虚拟机上做测试,添加的网卡,需要在设置中把设备状态已连接取消,使用ethtool命令看到的link才会为no【如果仅在虚拟机中down掉网卡,link状态依然为yes】
- 我现在的网卡场景是:
ens33和38是正常的,ens39和40是没有连接的。
[root@controll network-scripts]# nmcli device status
DEVICE TYPE STATE CONNECTION
ens33 ethernet connected ens33
ens38 ethernet connected ens38
virbr0 bridge connected virbr0
ens39 ethernet unavailable –
ens40 ethernet unavailable –
lo loopback unmanaged –
virbr0-nic tun unmanaged –
[root@controll network-scripts]# ethtool ens33 | grep Link
Link detected: yes
[root@controll network-scripts]# ethtool ens38 | grep Link
Link detected: yes
[root@controll network-scripts]# ethtool ens39 | grep Link
Link detected: no
[root@controll network-scripts]# ethtool ens40 | grep Link
Link detected: no
[root@controll network-scripts]#
- 要遍历link状态,首先得获取全部的接口名称,本来这种方式想用数组的方式存储的,但数组有点复杂,并且难以理解,所以就用最简单的,存入文件方式实现了【无需担心本地会多文件,最终会干掉所有生成的文件】;
其次lo名称是回环接口名称,所以不需要看lo的Link状态,所以我用if过滤掉lo接口了。
- 下列代码不需要修改任何信息,直接执行即可。
[root@controll ~]# cat link.sh
#/bin/sh
先创建一个文件
if [ -e /work ] ; then
echo ‘/work The file exists’
else
mkdir /work
echo 'mkdir /work ok ’
fi
/work/ifcfg.txt
ls /etc/sysconfig/network-scripts| grep ifcfg- |awk -F- ‘{print $2}’ >> /work/ifcfg.txt
echo “现有如下网卡名称:”
cat /work/ifcfg.txt
cat << ccx
- 下面展示接口名称的 Link detected状态 *
ccx
cat /work/ifcfg.txt| while read work ; do
if [ $work == lo ] ;then
continue
fi
echo -e “ifcfg-$work网口的Link detected状态为:\c”
ethtool $work | grep Link | awk ‘{print $3}’
done
if [ -f /work/ ] ; then
echo “/work is exists”
else
rm -rf /work
fi
[root@controll ~]#
- 该脚本可以放在任意位置
注:执行前先看看本地是否有/work的文件夹,如果有该文件夹,将代码中的/work改一下,否则会干掉该文件夹【文件不会被干掉】!!!!
- 执行方式:
sh link.sh
[root@controll ~]# sh link.sh
mkdir /work ok
现有如下网卡名称:
ens33
ens38
ens39
ens40
lo
- 下面展示接口名称的 Link detected状态 *
ifcfg-ens33网口的Link detected状态为:yes
ifcfg-ens38网口的Link detected状态为:yes
ifcfg-ens39网口的Link detected状态为:no
ifcfg-ens40网口的Link detected状态为:no
[root@controll ~]#
[root@controll ~]# ll /work
ls: cannot access /work: No such file or directory
[root@controll ~]#
-
上面已经有遍历的方式了,我这就不展示了。
-
执行思路:
-
1、先将该脚本用scp批量拷贝到需要执行的服务器上
-
2、批量执行服务器上的该脚本
================================================================================
-
这个主要是用于,千兆和千兆做一个bond,万兆和万兆做一个bond,所以需要先知道千兆和万兆口分别是哪些
-
使用命令
ethtool命令可以看到Speed结果的。
- 要获取全部网卡的Speed结果,首先得获取全部的接口名称,本来这种方式想用数组的方式存储的,但数组有点复杂,并且难以理解,所以就用最简单的,存入文件方式实现了【无需担心本地会多文件,最终会干掉所有生成的文件】;
其次lo名称是回环接口名称,所以不需要看lo的Link状态,所以我用if过滤掉lo接口了。
- 下列代码不需要修改任何信息,直接执行即可。
[root@controll ~]# cat speed.sh
#/bin/sh
先创建一个文件
if [ -e /work ] ; then
echo ‘/work The file exists’
else
mkdir /work
echo 'mkdir /work ok ’
fi
/work/ifcfg.txt
ls /etc/sysconfig/network-scripts| grep ifcfg- |awk -F- ‘{print $2}’ >> /work/ifcfg.txt
echo “现有如下网卡名称:”
cat /work/ifcfg.txt
cat << ccx
-
下列网卡中万兆接口结果为:10000Mb/s *
-
下列网卡中千兆接口结果为: 1000Mb/s *
-
【下列网卡中结果为:Unknown! *
-
则表示该网卡未启用,忽略即可】 *
ccx
cat /work/ifcfg.txt| while read work ; do
if [ $work == lo ] ;then
continue
fi
echo -e “ifcfg-$work网口的Speed结果为:\c”
ethtool $work | grep Speed | awk ‘{print $2}’
done
if [ -f /work/ ] ; then
echo “/work is exists”
else
rm -rf /work
fi
[root@controll ~]#
- 该脚本可以放在任意位置
注:执行前先看看本地是否有/work的文件夹,如果有该文件夹,将代码中的/work改一下,否则会干掉该文件夹【文件不会被干掉】!!!!
- 执行方式:
sh speed.sh
[root@controll ~]# sh speed.sh
mkdir /work ok
现有如下网卡名称:
ens33
ens38
ens39
ens40
lo
-
下列网卡中万兆接口结果为:10000Mb/s *
-
下列网卡中千兆接口结果为: 1000Mb/s *
-
【下列网卡中结果为:Unknown! *
-
则表示该网卡未启用,忽略即可】 *
ifcfg-ens33网口的Speed结果为:1000Mb/s
ifcfg-ens38网口的Speed结果为:1000Mb/s
ifcfg-ens39网口的Speed结果为:Unknown!
ifcfg-ens40网口的Speed结果为:Unknown!
[root@controll ~]#
[root@controll ~]# ll /work
ls: cannot access /work: No such file or directory
[root@controll ~]#
-
上面已经有遍历的方式了,我这就不展示了。
-
执行思路:
-
1、先将该脚本用scp批量拷贝到需要执行的服务器上
-
2、批量执行服务器上的该脚本
=======================================================================
- 如现在有一个需求:需求是1&4 2& 3进行绑定
问题来了:你怎么知道谁是1,谁是2,谁是3,谁是4 。【所谓是1,2,3,4:就是机房光口的位置而已】
- 最简单的解决方法:
去机房插光纤,一根一根的插
插第一口,在服务器上记录名称,
再插第二口,在服务器上记录名称
再插第三口,在服务器上记录名称
在插第四口,在服务器上记录名称
- 另一个方法,就是在交换机上获取接口的mac名称【需要网络的同事提供了】
然后根据第一口的mac名称对应出第一口网卡名称
根据第二口的mac名称对应出第二口网卡名称
根据第三口的mac名称对应出第三口网卡名称
根据第四口的mac名称对应出第四口网卡名称
- mac查看说明
有些Linux发行版本的MAC地址字段为HWaddr,有些Linux发行版本的MAC地址字段为ether,根据实际情况看关键字【多数为ehter】
查看方式见下面代码【命令后面有说明】
[root@controll ~]# ip link #查看所有mac
1: lo: <LOOPBACK,UP,LOWER_UP> mtu 65536 qdisc noqueue state UNKNOWN mode DEFAULT group default qlen 1000
link/loopback 00:00:00:00:00:00 brd 00:00:00:00:00:00
2: ens33: <BROADCAST,MULTICAST,UP,LOWER_UP> mtu 1500 qdisc pfifo_fast state UP mode DEFAULT group default qlen 1000
link/ether 00:0c:29:4c:e2:1a brd ff:ff:ff:ff:ff:ff
3: ens38: <BROADCAST,MULTICAST,UP,LOWER_UP> mtu 1500 qdisc pfifo_fast state UP mode DEFAULT group default qlen 1000
link/ether 00:0c:29:4c:e2:24 brd ff:ff:ff:ff:ff:ff
4: ens39: <NO-CARRIER,BROADCAST,MULTICAST,UP> mtu 1500 qdisc pfifo_fast state DOWN mode DEFAULT group default qlen 1000
link/ether 00:0c:29:4c:e2:2e brd ff:ff:ff:ff:ff:ff
5: ens40: <NO-CARRIER,BROADCAST,MULTICAST,UP> mtu 1500 qdisc pfifo_fast state DOWN mode DEFAULT group default qlen 1000
link/ether 00:0c:29:4c:e2:38 brd ff:ff:ff:ff:ff:ff
6: virbr0: <NO-CARRIER,BROADCAST,MULTICAST,UP> mtu 1500 qdisc noqueue state DOWN mode DEFAULT group default qlen 1000
link/ether 52:54:00:d1:84:32 brd ff:ff:ff:ff:ff:ff
7: virbr0-nic: <BROADCAST,MULTICAST> mtu 1500 qdisc pfifo_fast master virbr0 state DOWN mode DEFAULT group default qlen 1000
link/ether 52:54:00:d1:84:32 brd ff:ff:ff:ff:ff:ff
[root@controll ~]# ip link show ens33 #查看单台mac
2: ens33: <BROADCAST,MULTICAST,UP,LOWER_UP> mtu 1500 qdisc pfifo_fast state UP mode DEFAULT group default qlen 1000
link/ether 00:0c:29:4c:e2:1a brd ff:ff:ff:ff:ff:ff
[root@controll ~]#
[root@controll ~]# ip link show ens33 | awk ‘/ether/ {print $2}’ #提取mac
00:0c:29:4c:e2:1a
[root@controll ~]#
- 要获取全部网卡的Speed结果,首先得获取全部的接口名称,本来这种方式想用数组的方式存储的,但数组有点复杂,并且难以理解,所以就用最简单的,存入文件方式实现了【无需担心本地会多文件,最终会干掉所有生成的文件】;
其次lo名称是回环接口名称,所以不需要看lo的Link状态,所以我用if过滤掉lo接口了。
-
下列代码直接执行如果获取不到mac信息,将下面的
ether更改为HWaddr即可。 -
下面直接提出所有网卡mac信息和使用中网卡的mac信息,自己对应一下吧,如果弄成自动对应的话,还需要定义mac,较麻烦不说,如果mac定义错了就没结果了。
[root@controll ~]# cat mac.sh
#/bin/sh
先创建一个文件
if [ -e /work ] ; then
echo ‘/work The file exists’
else
mkdir /work
echo 'mkdir /work ok ’
fi
/work/ifcfg.txt
ls /etc/sysconfig/network-scripts| grep ifcfg- |awk -F- ‘{print $2}’ >> /work/ifcfg.txt
echo “现有如下网卡名称:”
cat /work/ifcfg.txt
cat << ccx
- 全部网卡对应的mac信息如下 *
ccx
cat /work/ifcfg.txt| while read work ; do
if [ $work == lo ] ;then
continue
fi
echo -e “ifcfg-$work网口的mac为:\c”
ip link show $work | awk ‘/ether/ {print $2}’
done
cat << ccx
- 使用中的网卡mac信息如下 *
ccx
cat /work/ifcfg.txt| while read work ; do
if [ $work == lo ] ;then
continue
fi
link=ethtool $work | grep Link | awk '{print $3}'
if [ $link == yes ] ;then
echo -e “ifcfg-$work网口的mac为:\c”
ip link show $work | awk ‘/ether/ {print $2}’
else
continue
fi
done
网上学习资料一大堆,但如果学到的知识不成体系,遇到问题时只是浅尝辄止,不再深入研究,那么很难做到真正的技术提升。
一个人可以走的很快,但一群人才能走的更远!不论你是正从事IT行业的老鸟或是对IT行业感兴趣的新人,都欢迎加入我们的的圈子(技术交流、学习资源、职场吐槽、大厂内推、面试辅导),让我们一起学习成长!


 1302
1302

 被折叠的 条评论
为什么被折叠?
被折叠的 条评论
为什么被折叠?
 到【灌水乐园】发言


