


configtxgen -profile TwoOrgsChannel -outputCreateChannelTx ./channel-artifacts/channel.tx -channelID hellofabric-channel
(3)检查创世块文件
configtxgen -inspectBlock genesis_block.pb
(4) 检查通道文件(fabric2.2及以前会用到)
configtxgen -inspectChannelCreateTx channel.tx
## 3. 部署节点(通过docker-compose配置文件)
创建节点的方式有两种:
(1)在创建任何节点之前,必须在本机上自定义其配置文件。对于peer节点,该文件称为`core.yaml`,而orderer节点的配置文件称为`orderer.yaml;`
(2)使用一个docker容器,将docker节点跑在一个docker容器里面。
这里使用的是第二种方法,使用docker容器,首先将原来test-network里的compose文件夹下的compose-test-net.yaml和compose文件夹下的docker文件夹里的docker-compose-test-net.yaml两个文件结合成一个docker-compose.yaml文件,这里面包含了orderer和peer节点及相应的cli的配置信息,将里面相关环境变量的路径换成自己的路径
**注意事项!!!!**在创建peer节点时,我的peer节点每次一创建就会自动退出,查看日志说是缺少core文件,但通过docker容器创建节点时,core.yaml的配置信息其实都是放在了docker-compose.yaml里面的,所以一直找不到原因
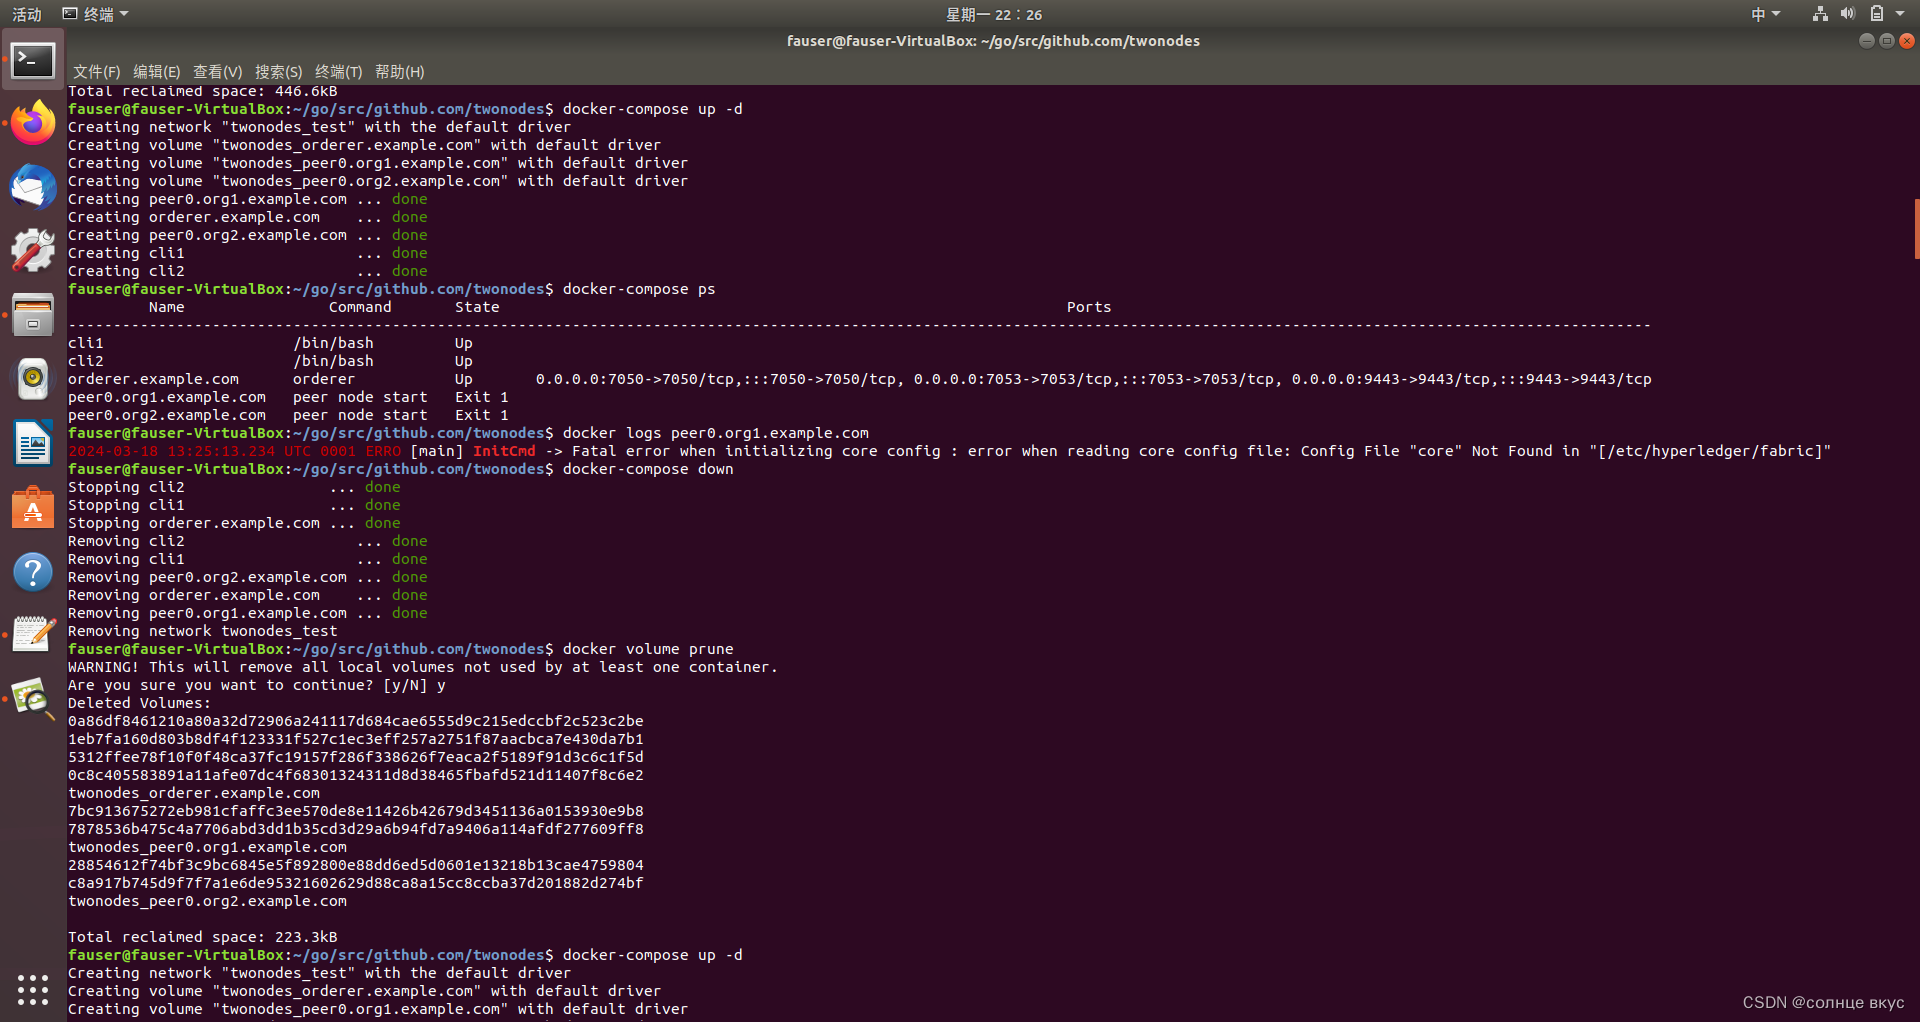
最后发现问题出现在
- ./crypto-config/peerOrganizations/org2.example.com/peers/peer0.org2.example.com:/etc/hyperledger/fabric
卷映射上。在 Docker 中,当使用 `- ./some/path:/another/path` 这样的语法时,是在指定一个卷(volume)映射。这意味着 Docker 会将宿主机上的 `./some/path` 目录或文件的内容复制到容器内的 `/another/path` 目录。注意这里的复制,严格意义来说,它并不是复制,而是替换。
例如./crypto-config/peerOrganizations/org1.example.com/peers/peer0.org1.example.com文件夹里有tsl和msp两个文件夹,而/etc/hyperledger/fabric有msp,tsl,ca等等文件或文件夹,这个映射生效后,/etc/hyperledger/fabric里的文件就只有映射过来的msp和tsl文件夹,其他文件夹和文件会丢失。因此,为了避免意外地覆盖容器内的现有文件和子目录,应该确保每个卷映射都是精确的,只映射确实想要替换的文件或目录。
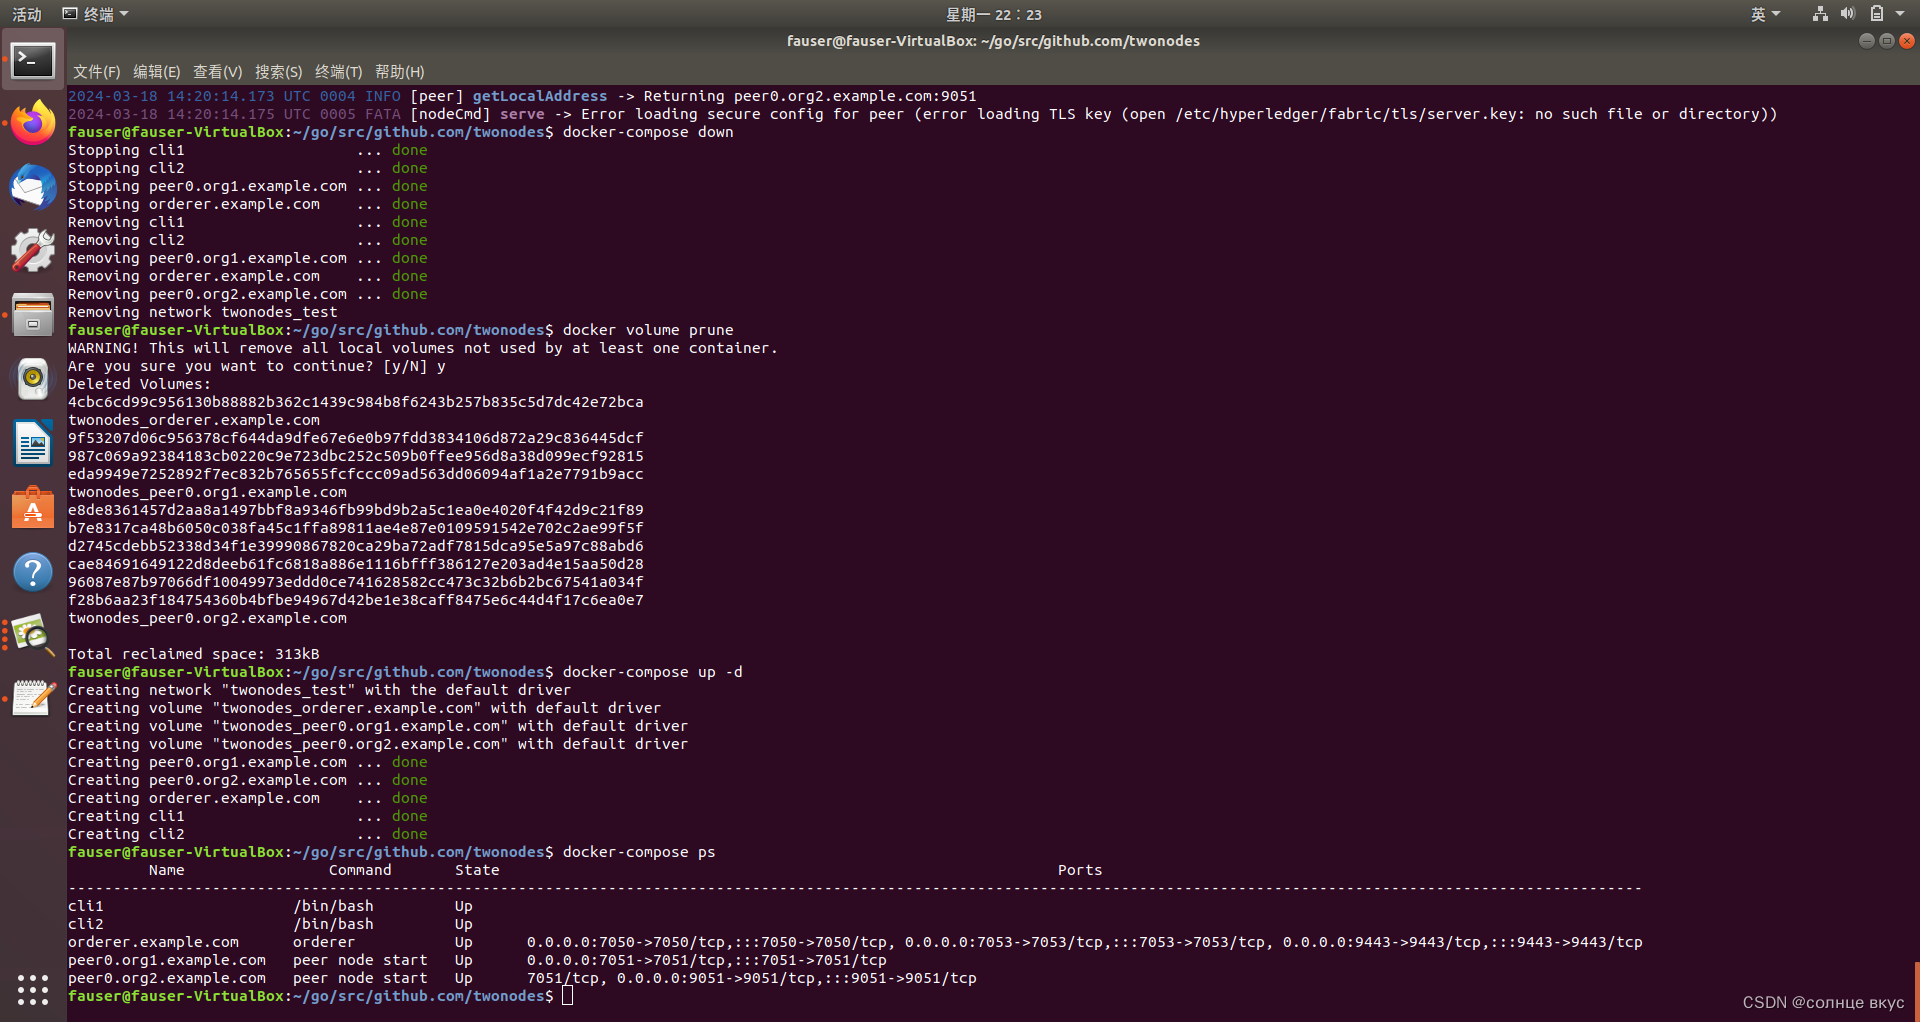
在docker-compose.yaml文件夹的节点 volumes配置里,将上面的内容该为下面的
- ./crypto-config/peerOrganizations/org2.example.com/peers/peer0.org2.example.com/msp:/etc/hyperledger/fabric/msp
- ./crypto-config/peerOrganizations/org2.example.com/peers/peer0.org2.example.com/tls:/etc/hyperledger/fabric/tls
得到了正确的创建效果,节点也不会自动关闭退出网络。状态均为up。
## 4.将节点加入通道
### 4.1 加入orderer节点进入通道,激活通道
创建了创世块文件之后,通道相当于进行了初始化,但里面什么都没有,并且也没有任何节点加入里面,加入第一个节点进入通道,类似于激活通道。
export OSN_TLS_CA_ROOT_CERT=
P
W
D
/
c
r
y
p
t
o
−
c
o
n
f
i
g
/
o
r
d
e
r
e
r
O
r
g
a
n
i
z
a
t
i
o
n
s
/
e
x
a
m
p
l
e
.
c
o
m
/
o
r
d
e
r
e
r
s
/
o
r
d
e
r
e
r
.
e
x
a
m
p
l
e
.
c
o
m
/
m
s
p
/
t
l
s
c
a
c
e
r
t
s
/
t
l
s
c
a
.
e
x
a
m
p
l
e
.
c
o
m
−
c
e
r
t
.
p
e
m
e
x
p
o
r
t
A
D
M
I
N
T
L
S
S
I
G
N
C
E
R
T
=
{PWD}/crypto-config/ordererOrganizations/example.com/orderers/orderer.example.com/msp/tlscacerts/tlsca.example.com-cert.pem export ADMIN_TLS_SIGN_CERT=
PWD/crypto−config/ordererOrganizations/example.com/orderers/orderer.example.com/msp/tlscacerts/tlsca.example.com−cert.pemexportADMINTLSSIGNCERT={PWD}/crypto-config/ordererOrganizations/example.com/orderers/orderer.example.com/tls/server.crt
export ADMIN_TLS_PRIVATE_KEY=${PWD}/crypto-config/ordererOrganizations/example.com/orderers/orderer.example.com/tls/server.key
osnadmin channel join --channelID hellofabric-channel --config-block ./channel-artifacts/genesis_block.pb -o orderer.example.com:7053 --ca-file $OSN_TLS_CA_ROOT_CERT --client-cert $ADMIN_TLS_SIGN_CERT --client-key $ADMIN_TLS_PRIVATE_KEY
因为在这个过程中,我的代码报了很多错误,总是在tls连接时出错,为此我检查了很多地方,但总是感觉没什么问题,弄了很久都没弄出来。


 辅助验证错误的工具


证书检查


检查证书是否存在并正确配置
openssl verify -verbose -CAfile $OSN_TLS_CA_ROOT_CERT $ADMIN_TLS_SIGN_CERT
检查证书的有效性
openssl x509 -text -noout -in /opt/gopath/src/github.com/hyperledger/fabric/peer/crypto/peerOrganizations/org1.example.com/users/Admin@org1.example.com/msp/signcerts/Admin@org1.example.com-cert.pem
网络检查
docker inspect <容器名/容器id>
可以查看到容器的ip配置


然后通过ping和talnet命令来进行检测


检查防火墙配置
sudo iptables -L INPUT -n -v | grep :7050
最后查出来原因在于我的-o写的有问题,端口要和orderer节点所监听的端口对应,也不能忘了写端口。-o这一部分出错,就会对网络配置产生影响,在控制台就会出现tls握手出错的问题。


### 4.2 加入普通节点


首先要进入容器内部来创建通道
docker exec -it cli1 bash
peer channel join -b ./channel-artifacts/genesis_block.pb
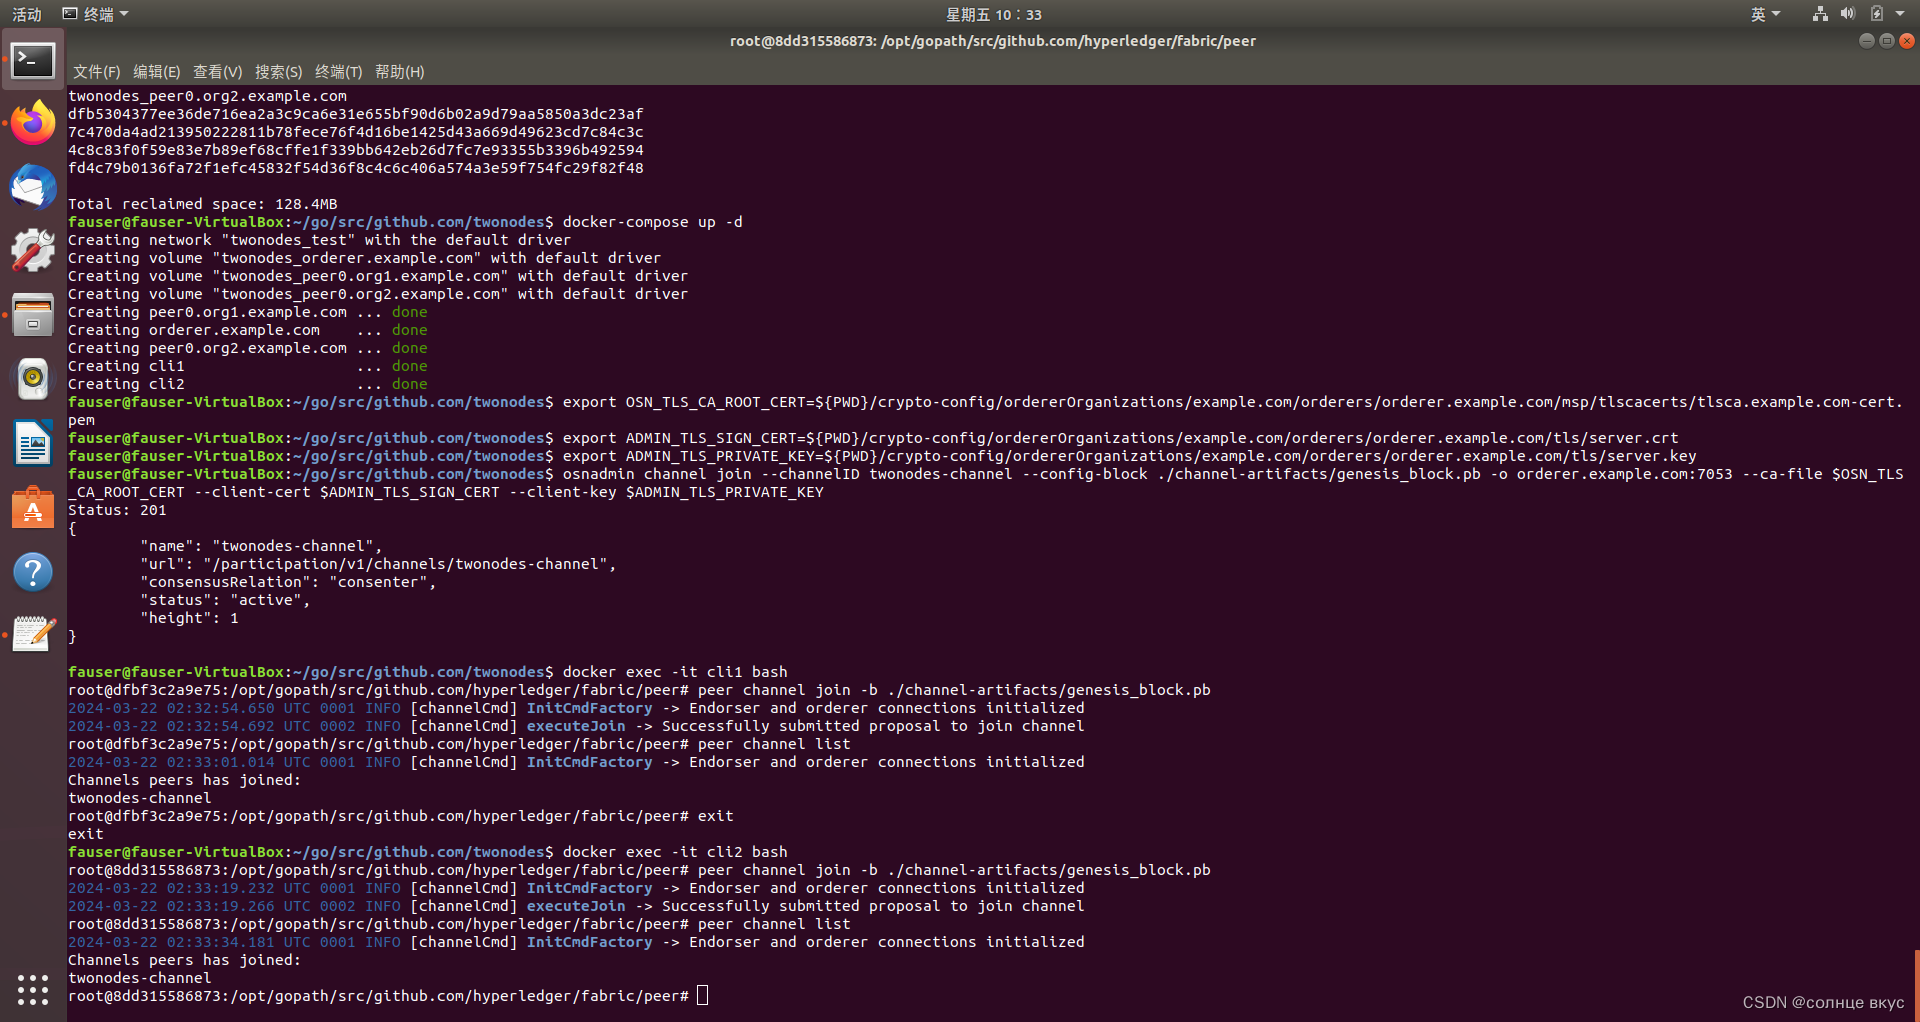
我这里是把节点放在两个cli容器的
### 4.3 为通道设置锚节点
锚节点的作用就是让不同组织底下的节点互相能够进行通讯,发现对方的节点。
进入cli1容器中,获取配置文件并输入到指定文件
peer channel fetch config channel-artifacts/config_block.pb -o orderer.example.com:7050 --ordererTLSHostnameOverride orderer.example.com -c hellofabric-channel --tls --cafile /opt/gopath/src/github.com/hyperledger/fabric/peer/crypto/ordererOrganizations/example.com/orderers/orderer.example.com/msp/tlscacerts/tlsca.example.com-cert.pem
进入channel-artifacts文件夹下,使用 configtxlator 工具来进行通道配置任务(该工具主要由两个功能,一个是执行 protobuf 和 json 两种数据结构的转换,另一个是执行配置更新)。


首先,将配置块信息从 protobuf 类型转换为可读的 json 类型
configtxlator proto_decode --input config_block.pb --type common.Block --output config_block.json
jq ‘.data.data[0].payload.data.config’ config_block.json > config.json
这样我们才可以让我们读懂配置文件并进行一些修改。


拷贝一个 config.json 的副本作为备份
cp config.json config_copy.json
使用 jq 修改配置文件,将 `Org1` 中的普通节点(`peer0.org1.example.com:7051`)加入到配置文件中,这样我们就有了更新版本的配置文件了
jq ‘.channel_group.groups.Application.groups.Org1MSP.values += {“AnchorPeers”:{“mod_policy”: “Admins”,“value”:{“anchor_peers”: [{“host”: “peer0.org1.example.com”,“port”: 7051}]},“version”: “0”}}’ config_copy.json > modified_config.json
将修改的文件重新转换为 protobuf 格式,更新后的锚节点配置信息放在特定文件夹里
configtxlator proto_encode --input config.json --type common.Config --output config.pb
configtxlator proto_encode --input modified_config.json --type common.Config --output modified_config.pb
configtxlator compute_update --channel_id hellofabric-channel --original config.pb --updated modified_config.pb --output config_update.pb
打包交易信封
configtxlator proto_decode --input config_update.pb --type common.ConfigUpdate --output config_update.json
echo ‘{“payload”:{“header”:{“channel_header”:{“channel_id”:“hellofabric-channel”, “type”:2}},“data”:{“config_update”:’$(cat config_update.json)‘}}}’ | jq . > config_update_in_envelope.json
configtxlator proto_encode --input config_update_in_envelope.json --type common.Envelope --output config_update_in_envelope.pb
更新通道配置
peer channel update -f channel-artifacts/config_update_in_envelope.pb -c hellofabric-channel -o orderer.example.com:7050 --ordererTLSHostnameOverride orderer.example.com --tls --cafile “/opt/gopath/src/github.com/hyperledger/fabric/peer/crypto/ordererOrganizations/example.com/orderers/orderer.example.com/msp/tlscacerts/tlsca.example.com-cert.pem”
org2锚节点用类似方法加入

## 5. 部署链码
### 5.1 打包链码
先把链码放到指定的文件目录中,生成链码依赖包
go env -w GOPROXY=https://goproxy.cn,direct
go mod init
go mod vendor
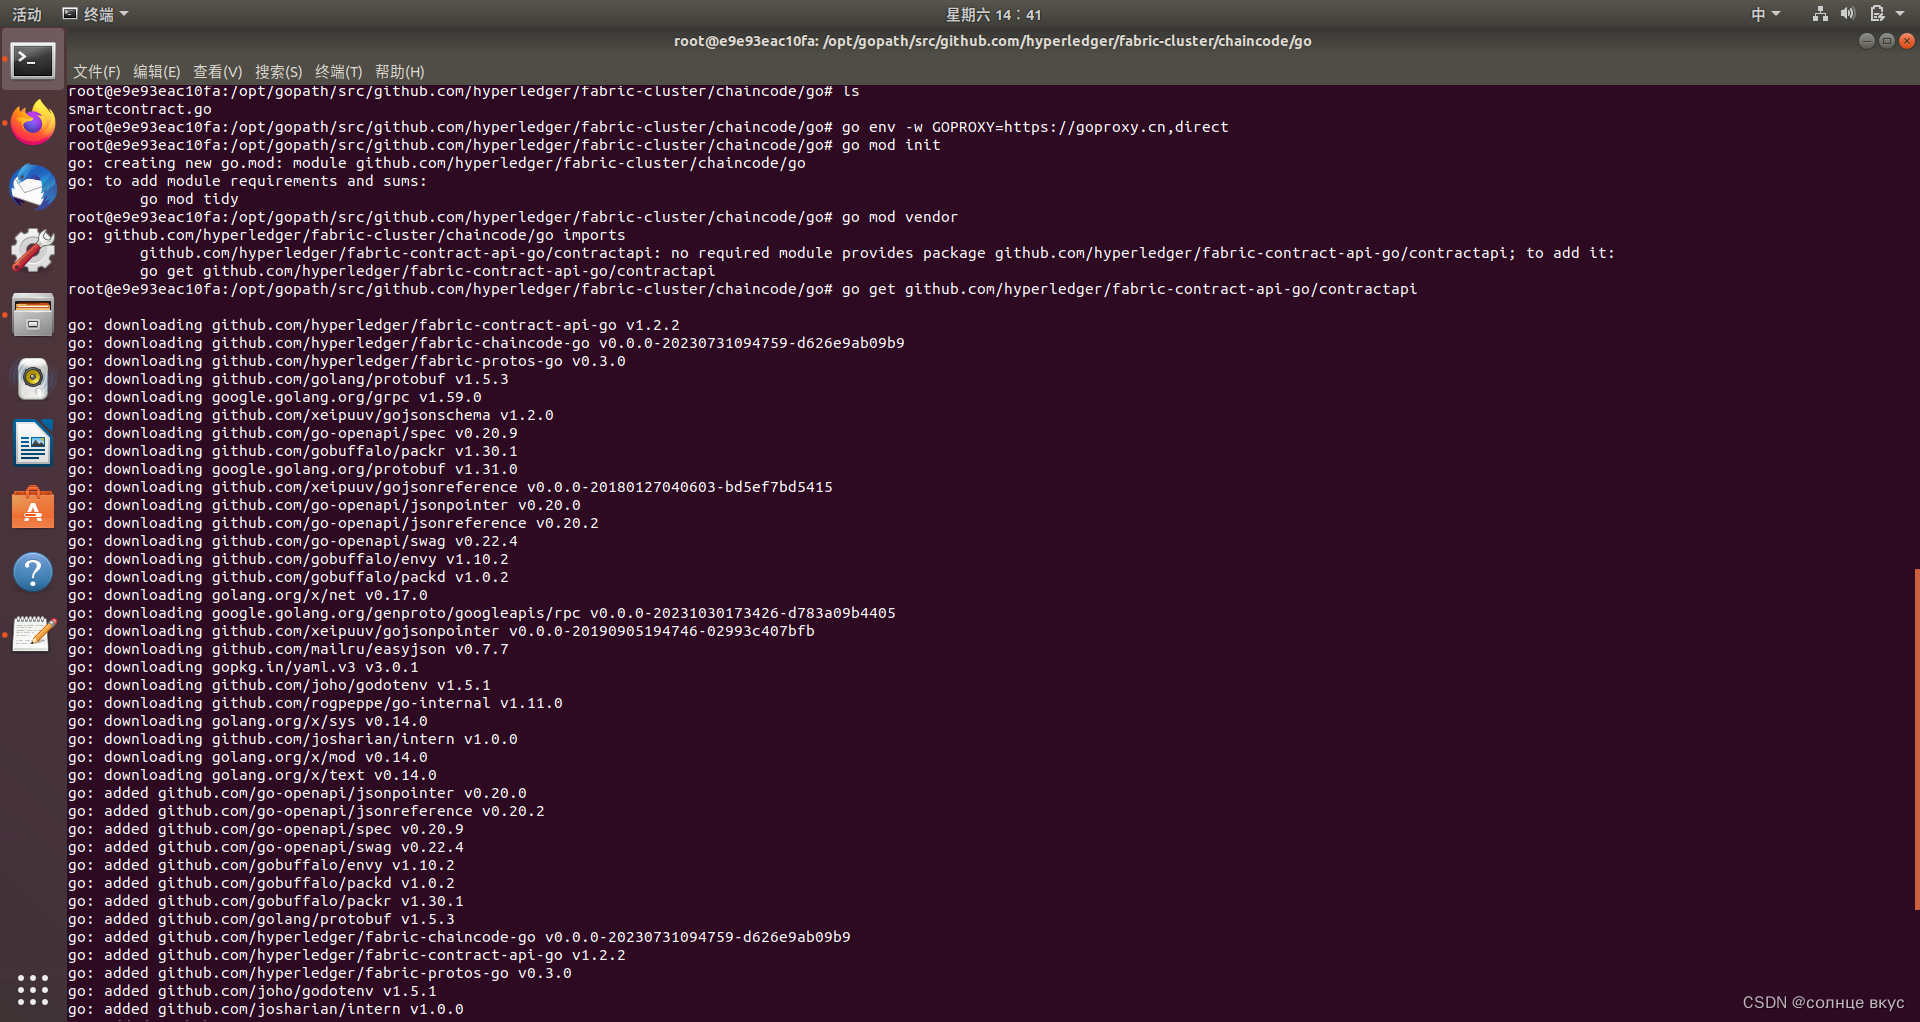
打包链码
peer lifecycle chaincode package helloworld.tar.gz --path /opt/gopath/src/github.com/hyperledger/fabric-cluster/chaincode/go --lang golang --label helloworld_1
### 最后的话
最近很多小伙伴找我要Linux学习资料,于是我翻箱倒柜,整理了一些优质资源,涵盖视频、电子书、PPT等共享给大家!
### 资料预览
给大家整理的视频资料:

给大家整理的电子书资料:

**如果本文对你有帮助,欢迎点赞、收藏、转发给朋友,让我有持续创作的动力!**
**网上学习资料一大堆,但如果学到的知识不成体系,遇到问题时只是浅尝辄止,不再深入研究,那么很难做到真正的技术提升。**
**[需要这份系统化的资料的朋友,可以点击这里获取!](https://bbs.csdn.net/topics/618542503)**
**一个人可以走的很快,但一群人才能走的更远!不论你是正从事IT行业的老鸟或是对IT行业感兴趣的新人,都欢迎加入我们的的圈子(技术交流、学习资源、职场吐槽、大厂内推、面试辅导),让我们一起学习成长!**
64168175)]
**如果本文对你有帮助,欢迎点赞、收藏、转发给朋友,让我有持续创作的动力!**
**网上学习资料一大堆,但如果学到的知识不成体系,遇到问题时只是浅尝辄止,不再深入研究,那么很难做到真正的技术提升。**
**[需要这份系统化的资料的朋友,可以点击这里获取!](https://bbs.csdn.net/topics/618542503)**
**一个人可以走的很快,但一群人才能走的更远!不论你是正从事IT行业的老鸟或是对IT行业感兴趣的新人,都欢迎加入我们的的圈子(技术交流、学习资源、职场吐槽、大厂内推、面试辅导),让我们一起学习成长!**


 1050
1050


 被折叠的 条评论
为什么被折叠?
被折叠的 条评论
为什么被折叠?
 到【灌水乐园】发言


