


### 02-蜂鸣器与继电器
#include “reg52.h”
void Delay(unsigned int t)
{
while(t–);
while(t–);
}
void InitHC138(unsigned char n)
{
switch(n)
{
case 4:
P2 = (P2 & 0X1f) | 0x80;
break;
case 5:
P2 = (P2 & 0X1f) | 0xa0;
break;
case 6:
P2 = (P2 & 0X1f) | 0xc0;
break;
case 7:
P2 = (P2 & 0X1f) | 0xe0;
break;
}
}
void OutPutP0(unsigned char channel, unsigned char dat)
{
InitHC138(channel);
P0 = dat;
}
void Running()
{
unsigned char i;
for(i = 0; i < 3; i++)
{
	OutPutP0(4,0x00);
	Delay(60000);
	Delay(60000);
	OutPutP0(4,0xff);
	Delay(60000);
	Delay(60000);
}

for(i = 1; i <= 8; i++)
{
	OutPutP0(4,(0xff << i));
	Delay(60000);
}

OutPutP0(5,0x10);
Delay(60000);
Delay(60000);
OutPutP0(5,0x00);

InitHC138(4);
for(i = 1; i <= 8; i++)
{
	OutPutP0(4,~(0xff << i));
	Delay(60000);
}

OutPutP0(5,0x40);
Delay(60000);
Delay(60000);
OutPutP0(5,0x00);
}
void InitSystem()
{
OutPutP0(5,0x00);
}
void main()
{
InitSystem();
while(1)
{
Running();
}
}
### 03-数码管静态显示
#include “reg52.h”
unsigned char code SMG_duanma[18]=
{0xc0,0xf9,0xa4,0xb0,0x99,0x92,0x82,0xf8,
0x80,0x90,0x88,0x80,0xc6,0xc0,0x86,0x8e,
0xbf,0x7f};
void Delay(unsigned int t)
{
while(t–);
while(t–);
}
void InitHC138(unsigned char n)
{
switch(n)
{
case 4:
P2 = (P2 & 0x1f) | 0x80;//(1111 1111 & 0001 1111) == (0001 1111) | 1000 0000 1001 1111 765:100 //C是高位
break;
case 5:
P2 = (P2 & 0x1f) | 0xa0; // 1010 0000 de 1011 1111 567:101
break;
case 6:
P2 = (P2 & 0x1f) | 0xc0; //1100 0000 de 1101 1111
break;
case 7:
P2 = (P2 & 0x1f) | 0xe0;
break;
}
}
void ShowSMG_Bit(unsigned char dat, unsigned pos)
{
InitHC138(6); //数码管的位置 com
P0 = 0x01 << pos;
InitHC138(7); //数码管的内容 Y7C
P0 = dat;
}
void SMG_Static()
{
unsigned char i,j;
for(i = 0; i < 8; i++)
{
for(j = 0; j < 10; j++)
{
ShowSMG_Bit(SMG_duanma[j],i);//0到9就全来一遍
Delay(60000);
}
}
}
void main()
{
while(1)
{
SMG_Static();
}
}
### 04-数码管动态显示
#include “reg52.h”
unsigned char yu = 1;
unsigned char code SMG_duanma[18]=
{0xc0,0xf9,0xa4,0xb0,0x99,0x92,0x82,0xf8,
0x80,0x90,0x88,0x80,0xc6,0xc0,0x86,0x8e,
0xbf,0x7f};
void SelectHC573(unsigned char channel)
{
switch(channel)
{
case 4:
P2 = (P2 & 0x1f) | 0x80;
break;
case 5:
P2 = (P2 & 0x1f) | 0xa0;
break;
case 6:
P2 = (P2 & 0x1f) | 0xc0;
break;
case 7:
P2 = (P2 & 0x1f) | 0xe0;
break;
}
}
void DisplaySMG_Bit(unsigned char value, unsigned char pos)
{
P0 = 0xff;
SelectHC573(6);
P0 = 0x01 << pos;
SelectHC573(7);
P0 = value;
}
void DelaySMG(unsigned int t)
{
while(t–);
}
void Display_Dynamic()
{
DisplaySMG_Bit(SMG_duanma[2],0);
DelaySMG(500);
DisplaySMG_Bit(SMG_duanma[0],1);
DelaySMG(500);
DisplaySMG_Bit(SMG_duanma[1],2);
DelaySMG(500);
DisplaySMG_Bit(SMG_duanma[8],3);
DelaySMG(500);
DisplaySMG_Bit(SMG_duanma[16],4);
DelaySMG(500);
DisplaySMG_Bit(SMG_duanma[16],5);
DelaySMG(500);

DisplaySMG_Bit(SMG_duanma[yu/10],6);
DelaySMG(500);
DisplaySMG_Bit(SMG_duanma[yu%10],7);
DelaySMG(500);
}
void Delay(unsigned char t)
{
while(t–)
{
Display_Dynamic();
}
}
void main()
{
while(1)
{
Display_Dynamic();
yu++;
if(yu > 12)
{
yu = 1;
}
Delay(200);
}
}
### 05-独立按键的基本操作
#include “reg52.h”
sbit S7 = P3^0;
sbit S6 = P3^1;
sbit S5 = P3^2;
sbit S4 = P3^3;
sbit L1 = P0^0;
sbit L2 = P0^1;
sbit L3 = P0^2;
sbit L4 = P0^3;
sbit L5 = P0^4;
sbit L6 = P0^5;
void SelectHC573(unsigned char channel)
{
switch(channel)
{
case 4:
P2 = (P2 & 0x1f) | 0x80;
break;
case 5:
P2 = (P2 & 0x1f) | 0xa0;
break;
case 6:
P2 = (P2 & 0x1f) | 0xc0;
break;
case 7:
P2 = (P2 & 0x1f) | 0xe0;
break;
}
}
void DelayK(unsigned char t)
{
while(t–);
}
void ScanKeys_Alone()
{
if(S7 == 0)
{
DelayK(100);
if(S7 == 0)
{
L1 = 0;
while(S7 == 0);
L1 = 1;
}
}
if(S6 == 0)
{
DelayK(100);
if(S6 == 0)
{
L2 = 0;
while(S6 == 0);
L2 = 1;
}
}
if(S5 == 0)
{
DelayK(100);
if(S5 == 0)
{
L3 = 0;
while(S5 == 0);
L3 = 1;
}
}
if(S4 == 0)
{
DelayK(100);
if(S4 == 0)
{
L4 = 0;
while(S4 == 0);
L4 = 1;
}
}
}
void main()
{
SelectHC573(4);
while(1)
{
ScanKeys_Alone();
}
}
### 06-独立按键的扩展应用
#include “reg52.h”
sbit S7 = P3^0;
sbit S6 = P3^1;
sbit S5 = P3^2;
sbit S4 = P3^3;
sbit L1 = P0^0;
sbit L2 = P0^1;
sbit L3 = P0^2;
sbit L4 = P0^3;
sbit L5 = P0^4;
sbit L6 = P0^5;
void SelectHC573(unsigned char channel)
{
switch(channel)
{
case 4:
P2 = (P2 & 0x1f) | 0x80;
break;
case 5:
P2 = (P2 & 0x1f) | 0xa0;
break;
case 6:
P2 = (P2 & 0x1f) | 0xc0;
break;
case 7:
P2 = (P2 & 0x1f) | 0xe0;
break;
}
}
void DelayK(unsigned char t)
{
while(t–);
}
unsigned char stat_k = 0;
void ScanKeys_Alone()
{
if(S7 == 0)
{
DelayK(100);
if(S7 == 0)
{
if(stat_k == 0)
{
L1 = 0;
stat_k = 1;
}
else if(stat_k == 1)
{
L1 = 1;
stat_k = 0;
}
while(S7 == 0);
}
}
if(S6 == 0)
{
DelayK(100);
if(S6 == 0)
{
if(stat_k == 0)
{
L2 = 0;
stat_k = 2;
}
else if(stat_k == 2)
{
L2 = 1;
stat_k = 0;
}
while(S6 == 0);
}
}
if(S5 == 0)
{
DelayK(100);
if(S5 == 0)
{
if(stat_k == 1)
{
L3 = 0;
while(S5 == 0);
L3 = 1;
}
else if(stat_k == 2)
{
L5 = 0;
while(S5 == 0);
L5 = 1;
}
}
}
if(S4 == 0)
{
DelayK(100);
if(S4 == 0)
{
if(stat_k == 1)
{
L4 = 0;
while(S4 == 0);
L4 = 1;
}
else if(stat_k == 2)
{
L6 = 0;
while(S4 == 0);
L6 = 1;
}
}
}
}
void main()
{
SelectHC573(4);
while(1)
{
ScanKeys_Alone();
}
}
### 07-矩阵键盘的扫描原理与基本应用
#include “reg52.h”
sfr P4 = 0xC0;
sbit R1 = P3^0;
sbit R2 = P3^1;
sbit R3 = P3^2;
sbit R4 = P3^3;
sbit C4 = P3^4;
sbit C3 = P3^5;
sbit C2 = P4^2;
sbit C1 = P4^4;
unsigned char code SMG_duanma[18]=
{0xc0,0xf9,0xa4,0xb0,0x99,0x92,0x82,0xf8,
0x80,0x90,0x88,0x80,0xc6,0xc0,0x86,0x8e,
0xbf,0x7f};
void SelectHC573(unsigned char channel)
{
switch(channel)
{
case 4:
P2 = (P2 & 0x1f) | 0x80;
break;
case 5:
P2 = (P2 & 0x1f) | 0xa0;
break;
case 6:
P2 = (P2 & 0x1f) | 0xc0;
break;
case 7:
P2 = (P2 & 0x1f) | 0xe0;
break;
}
}
void DisplayKeyNum(unsigned char value)
{
P0 = 0xff;
SelectHC573(6);
P0 = 0x01;
SelectHC573(7);
P0 = value;
}
unsigned char key_num;
void ScanKeysMulti()
{
R1 = 0;
R2 = R3 = R4 = 1;
C1 = C2 = C3 = C4 =1;
if(C1 == 0)
{
while(C1 == 0);
key_num = 0;
DisplayKeyNum(SMG_duanma[key_num]);
}
else if(C2 == 0)
{
while(C2 == 0);
key_num = 1;
DisplayKeyNum(SMG_duanma[key_num]);
}
else if(C3 == 0)
{
while(C3 == 0);
key_num = 2;
DisplayKeyNum(SMG_duanma[key_num]);
}
else if(C4 == 0)
{
while(C4 == 0);
key_num = 3;
DisplayKeyNum(SMG_duanma[key_num]);
}
R2 = 0;
R1 = R3 = R4 = 1;
C1 = C2 = C3 = C4 =1;
if(C1 == 0)
{
	while(C1 == 0);
	key_num = 4;
	DisplayKeyNum(SMG_duanma[key_num]);
}
else if(C2 == 0)
{
	while(C2 == 0);
	key_num = 5;
	DisplayKeyNum(SMG_duanma[key_num]);
}
else if(C3 == 0)
{
	while(C3 == 0);
	key_num = 6;
	DisplayKeyNum(SMG_duanma[key_num]);
}
else if(C4 == 0)
{
	while(C4 == 0);
	key_num = 7;
	DisplayKeyNum(SMG_duanma[key_num]);
}

R3 = 0;
R2 = R1 = R4 = 1;
C1 = C2 = C3 = C4 =1;
if(C1 == 0)
{
	while(C1 == 0);
	key_num = 8;
	DisplayKeyNum(SMG_duanma[key_num]);
}
else if(C2 == 0)
{
	while(C2 == 0);
	key_num = 9;
	DisplayKeyNum(SMG_duanma[key_num]);
}
else if(C3 == 0)
{
	while(C3 == 0);
	key_num = 10;
	DisplayKeyNum(SMG_duanma[key_num]);
}
else if(C4 == 0)
{
	while(C4 == 0);
	key_num = 11;
	DisplayKeyNum(SMG_duanma[key_num]);
}

R4 = 0;
R2 = R3 = R1 = 1;
C1 = C2 = C3 = C4 =1;
if(C1 == 0)
{
	while(C1 == 0);
	key_num = 12;
	DisplayKeyNum(SMG_duanma[key_num]);
}
else if(C2 == 0)
{
	while(C2 == 0);
	key_num = 13;
	DisplayKeyNum(SMG_duanma[key_num]);
}
else if(C3 == 0)
{
	while(C3 == 0);
	key_num = 14;
	DisplayKeyNum(SMG_duanma[key_num]);
}
else if(C4 == 0)
{
	while(C4 == 0);
	key_num = 15;
	DisplayKeyNum(SMG_duanma[key_num]);
}
}
void main()
{
while(1)
{
ScanKeysMulti();
}
}
### 08-外部中断的基本操作
#include “reg52.h”
sbit L1 = P0^0;
sbit L8 = P0^7;
void Delay(unsigned int t)
{
while(t–);
while(t–);
while(t–);
}
void SelectHC573()
{
P2 = (P2 & 0x1f) | 0x80;
}
void Working()
{
SelectHC573();
L1 = 0;
Delay(60000);
L1 = 1;
Delay(60000);
}
//================================
void Init_INT0()
{
IT0 = 1;
EX0 = 1;
EA = 1;
}
unsigned char stat_int = 0;
void ServiceINT0() interrupt 0
{
stat_int = 1;
}
void LEDINT()
{
if(stat_int == 1)
{
L8 = 0;
Delay(60000);
Delay(60000);
Delay(60000);
Delay(60000);
Delay(60000);
Delay(60000);
L8 = 1;
}
stat_int = 0;
}
//================================
void main()
{
Init_INT0();
while(1)
{
Working();
LEDINT();
}
}
### 09-定时器实现秒闪功能
#include “reg52.h”
sbit L1 = P0^0;
sbit L8 = P0^7;
void SelectHC573()
{
P2 = (P2 & 0x1f) | 0x80;
}
//=================================
void InitTimer0()
{
TMOD = 0x01;
TH0 = (65535 - 50000) / 256;
TL0 = (65535 - 50000) % 256;
ET0 = 1;
EA = 1;
TR0 = 1;
}
unsigned char count = 0;
void ServiceTimer0() interrupt 1
{
TH0 = (65535 - 50000) / 256;
TL0 = (65535 - 50000) % 256;
count++;
if(count % 10 == 0)
{
	L1 = ~L1;
}
if(count == 100)
{
	L8 = ~L8;
	count = 0;
}
}
//================================
void main()
{
SelectHC573();
InitTimer0();
while(1)
{
}
}
### 10-定时器的进阶综合案例
#include “reg52.h”
sbit S4 = P3^3;
sbit S5 = P3^2;
unsigned char t_m = 0;
unsigned char t_s = 0;
unsigned char t_005s = 0;
unsigned char code SMG_NoDot[18] =
{0xc0,0xf9,0xa4,0xb0,0x99,0x92,0x82,0xf8,
0x80,0x90,0x88,0x80,0xc6,0xc0,0x86,0x8e,
0xbf,0x7f};
void SelectHC573(unsigned char channel)
{
switch(channel)
{
case 4:
P2 = (P2 & 0x1f) | 0x80;
break;
case 5:
P2 = (P2 & 0x1f) | 0xa0;
break;
case 6:
P2 = (P2 & 0x1f) | 0xc0;
break;
case 7:
P2 = (P2 & 0x1f) | 0xe0;
break;
}
}
void DisplaySMG_Bit(unsigned char value, unsigned char pos)
{
P0 = 0xff;
SelectHC573(6);
P0 = 0x01 << pos;
SelectHC573(7);
P0 = value;
}
void DelaySMG(unsigned int t)
{
while(t–);
}
void DisplayTime()
{
DisplaySMG_Bit(SMG_NoDot[t_005s%10],7);
DelaySMG(500);
DisplaySMG_Bit(SMG_NoDot[t_005s/10],6);
DelaySMG(500);
DisplaySMG_Bit(SMG_NoDot[16],5);
DelaySMG(500);
DisplaySMG_Bit(SMG_NoDot[t_s%10],4);
DelaySMG(500);
DisplaySMG_Bit(SMG_NoDot[t_s/10],3);
DelaySMG(500);
DisplaySMG_Bit(SMG_NoDot[16],2);
DelaySMG(500);

DisplaySMG_Bit(SMG_NoDot[t_m%10],1);
DelaySMG(500);
DisplaySMG_Bit(SMG_NoDot[t_m/10],0);
DelaySMG(500);
}
//=定时器相关函数============
void InitTimer0()
{
TMOD = 0x01;
TH0 = (65535 - 50000) / 256;
TL0 = (65535 - 50000) % 256;
ET0 = 1;
EA = 1;
TR0 = 1;
}
void ServiceTimer0() interrupt 1
{
TH0 = (65535 - 50000) / 256;
TL0 = (65535 - 50000) % 256;
t_005s++;
if(t_005s == 20)
{
	t_s++;
	t_005s = 0;
	if(t_s == 60)
	{
		t_m++;
		t_s = 0;
	}
	if(t_m == 99)
	{
		t_m = 0;
	}
}
}
//===================================================
void DelayK(unsigned char t)
{
while(t–);
}
void ScanKeys()
{
if(S4 == 0) //秒表启动与暂停
{
DelayK(100);
if(S4 == 0)
{
TR0 = ~TR0;
while(S4 == 0)
{
DisplayTime();
}
}
}
if(S5 == 0)					//秒表清零
{
	DelayK(100);
	if(S5 == 0)
	{
		t_005s = 0;
		t_s = 0;
		t_m = 0;
		while(S5 == 0)
		{
			DisplayTime();
		}
	}
}
}
void main()
{
InitTimer0();
while(1)
{
DisplayTime();
ScanKeys();
}
}
### 11-利用PWM控制灯光亮度
#include “reg52.h”
sbit L1 = P0^0;
sbit S7 = P3^0;
void SelectHC573()
{
P2 = (P2 & 0x1f) | 0x80;
}
//定时相关的函数====
unsigned char count = 0;
unsigned char pwm_duty = 0;
void InitTimer0()
{
TMOD = 0x01;
TH0 = (65535 - 100) / 256;
TL0 = (65535 - 100) % 256;
ET0 = 1;
EA = 1;
}
void ServiceTimer0() interrupt 1
{
TH0 = (65535 - 100) / 256;
TL0 = (65535 - 100) % 256;
count++;
if(count == pwm_duty)
{
	L1 = 1;
}
else if(count == 100)
{
	L1 = 0;
	count = 0;
}
}
//==========================================
//按键相关的函数====
void Delay(unsigned int t)
{
while(t–);
}
unsigned char stat = 0;
void ScanKeys()
{
if(S7 == 0)
{
Delay(100);
if(S7 == 0)
{
switch(stat)
{
case 0:
L1 = 0;
TR0 = 1;
pwm_duty = 10;
stat = 1;
break;
			case 1:
				pwm_duty = 50;
				stat = 2;
			break;

			case 2:
				pwm_duty = 90;
			  stat = 3;
			break;

			case 3:
				L1 = 1;
			  TR0 = 0;
			  stat = 0;
			break;
		}
		while(S7 == 0);
	}
}
}
//============================================
void main()
{
SelectHC573();
L1 = 1;
InitTimer0();
while(1)
{
ScanKeys();
}
}
### 12-串口通信的基本操作
#include “reg52.h”
sfr AUXR = 0x8e;
unsigned char urdat;
void SendByte(unsigned char dat);
void InitUart()
{
TMOD = 0x20;
TH1 = 0xfd;
TL1 = 0xfd;
TR1 = 1;
SCON = 0x50;
AUXR = 0x00;

ES = 1;
EA = 1;
}
void ServiceUart() interrupt 4
{
if(RI == 1)
{
RI = 0;
urdat = SBUF;
SendByte(urdat + 1);
}
}
void SendByte(unsigned char dat)
{
SBUF = dat;
while(TI == 0);
TI = 0;
}
void main()
{
InitUart();
SendByte(0x5a);
SendByte(0xa5);
while(1);
}
### 13-串口通信进阶应用案例
#include “reg52.h”
sfr AUXR = 0x8e;
void SelectHC573(unsigned char channel)
{
switch(channel)
{
case 4:
P2 = (P2 & 0x1f) | 0x80;
break;
case 5:
P2 = (P2 & 0x1f) | 0xa0;
break;
case 6:
P2 = (P2 & 0x1f) | 0xc0;
break;
case 7:
P2 = (P2 & 0x1f) | 0xe0;
break;
case 0:
P2 = (P2 & 0x1f) | 0x00;
break;
}
}
void InitSystem()
{
SelectHC573(5);
P0 = 0x00;
SelectHC573(4);
P0 = 0xff;
}
//=======================================
void InitUart()
{
TMOD = 0x20;
TH1 = 0xfd;
TL1 = 0xfd;
TR1 = 1;
SCON = 0x50;
AUXR = 0x00;

ES = 1;
EA = 1;
}
unsigned char command = 0x00;
void ServiceUart() interrupt 4
{
if(RI == 1)
{
command = SBUF;
RI = 0;
}
}
void SendByte(unsigned char dat)
{
SBUF = dat;
while(TI == 0);
TI = 0;
}
void SendString(unsigned char *str)
{
while(*str != ‘\0’)
{
SendByte(*str++);
}
}
//=======================================
void Working()
{
if(command != 0x00)
{
switch(command & 0xf0)
{
case 0xa0:
P0 = (P0 | 0x0f) & (~command | 0xf0);
command = 0x00;
break;
		case 0xb0:
			P0 = (P0 | 0xf0) & ((~command << 4)| 0x0f);
			command = 0x00;
		break;

		case 0xc0:
			SendString("The System is Running...\r\n");
			command = 0x00;
		break;
	}
}
}
void main()
{
InitSystem();
InitUart();
SendString(“Welcome to XMF system!\r\n”);
while(1)
{
Working();
}
}
### 14-存储器映射扩展应用
#include “reg52.h”
void Delay(unsigned int t)
{
while(t–);
while(t–);
}
void SelectHC573(unsigned char channel)
{
switch(channel)
{
case 4:
P2 = (P2 & 0x1f) | 0x80;
break;
	case 5:
		P2 = (P2 & 0x1f) | 0xa0;
	break;

	case 6:
		P2 = (P2 & 0x1f) | 0xc0;
	break;

	case 7:
		P2 = (P2 & 0x1f) | 0xe0;
	break;
}
}
void LEDRuning()
{
SelectHC573(4);
P0 = 0xf0;
Delay(60000);
Delay(60000);
P0 = 0x0f;
Delay(60000);
Delay(60000);
P0 = 0xff;
Delay(60000);
Delay(60000);
}
void SMGRunning()
{
unsigned char i;
for(i = 0; i < 8; i++)
{
SelectHC573(6);
P0 = 0x01 << i;
SelectHC573(7);
P0 = 0x00;
Delay(60000);
Delay(60000);
}
P0 = 0xff;
Delay(60000);
Delay(60000);
}
void main()
{
while(1)
{
LEDRuning();
SMGRunning();
}
}
### 15-基础技能综合实训案例(IO扩展版)
#include “reg52.h”
sfr AUXR = 0x8e; //定义辅助寄存器
sbit S5 = P3^2; //定义按键S5引脚
sbit S4 = P3^3; //定义按键S4引脚
unsigned char count = 0; //定义50ms定时中断累计变量
unsigned char t_h = 0; //定义运行时间的时变量
unsigned char t_m = 0; //定义运行时间的分变量
unsigned char t_s = 0; //定义运行时间的秒变量
unsigned char command = 0; //定义串口命令字接收变量
unsigned char stat_led = 0xff; //定义LED灯当前开关状态
//-----共阳数码管的段码编码表(无小数点)----
unsigned char code SMG_NoDot[18]={0xc0,0xf9,
0xa4,0xb0,0x99,0x92,0x82,0xf8,0x80,0x90,
0x88,0x80,0xc6,0xc0,0x86,0x8e,0xbf,0x7f};
/普通的延时函数====
功能:普通的非精确延时函数。
参数:t–延时长度。
返回:空。
=======================================================/
void Delay(unsigned int t)
{
while(t–);
while(t–);
}
/数码管专用延时函数====
功能:数码管动态显示专用延时函数。
参数:t–延时长度。
返回:空。
=======================================================/
void DelaySMG(unsigned int t)
{
while(t–);
}
/=锁存器选择函数======
功能:选择要打通的锁存器。
参数:t–延时长度。
返回:空。
=======================================================/
void SelectHC573(unsigned channel)
{
switch(channel)
{
case 4:
P2 = (P2 & 0x1f) | 0x80; //Y4输出0,选择LED控制
break;
case 5:
P2 = (P2 & 0x1f) | 0xa0; //Y5输出0,选择蜂鸣器和继电器控制
break;
case 6:
P2 = (P2 & 0x1f) | 0xc0; //Y6输出0,选择数码管位选
break;
case 7:
P2 = (P2 & 0x1f) | 0xe0; //Y7输出0,选择数码管段码
break;
case 0:
P2 = (P2 & 0x1f) | 0x00; //所有锁存器不选择
break;
}
}
/=单个数码管显示函数====
功能:在指定的数码管位置上显示指定的内容。
参数value–数码管显示的内容
pos–数码管位选,即要点亮的数码管位置。
返回:空。
=======================================================/
void DisplaySMG_Bit(unsigned char value, unsigned char pos)
{
P0 = 0xff; //消隐
SelectHC573(6);
P0 = 0x01 << pos; //数码管的段位
SelectHC573(7);
P0 = value; //数码管显示内容
}
/=系统运行时间显示函数=====
功能:在数码管上显示系统运行的时间。
参数:无。
返回:空。
=======================================================/
void DisplayTime()
{
DisplaySMG_Bit(SMG_NoDot[t_s%10],7); //秒个位
DelaySMG(500);
DisplaySMG_Bit(SMG_NoDot[t_s/10],6); //秒十位
DelaySMG(500);
DisplaySMG_Bit(SMG_NoDot[16],5); //分隔符
DelaySMG(500);
DisplaySMG_Bit(SMG_NoDot[t_m%10],4);		//分个位
DelaySMG(500);
DisplaySMG_Bit(SMG_NoDot[t_m/10],3);		//分十位
DelaySMG(500);
DisplaySMG_Bit(SMG_NoDot[16],2);				//分隔符
DelaySMG(500);

DisplaySMG_Bit(SMG_NoDot[t_h%10],1);		//时个位
DelaySMG(500);
DisplaySMG_Bit(SMG_NoDot[t_h/10],0);		//时十位
DelaySMG(500);
}
/定时器T0初始化函数====
功能:将定时器T0设置为16位模式,计数初值为50ms。
参数:无。
返回:空。
=======================================================/
void InitTimer0()
{
TMOD = 0x21; //必须注意,T0和T1的工作模式一起赋值
TH0 = (65535 - 50000) / 256;
TL0 = (65535 - 50000) % 256;
ET0 = 1; //使能定时器T0
EA = 1; //使能总中断
TR0 = 1; //启动定时器T0
}
/=定时器T0中断服务函数=====
功能:进行系统运行时间的逻辑处理。
参数:无。
返回:空。
=======================================================/
void ServiceTimer0() interrupt 1
{
TH0 = (65535 - 50000) / 256;
TL0 = (65535 - 50000) % 256;
count++;
if(count == 20)
{
	count = 0;
	t_s++;
}
if(t_s == 60)
{
	t_s = 0;
	t_m++;
	if(t_m == 60)
	{
		t_m = 0;
		t_h++;
	}
}
}
/=串口初始化函数========
功能:将串口初始化为模式1,波特率为9600,允许接收。
参数:无。
返回:空。
=======================================================/
void InitUart()
{
TMOD = 0x21; //必须注意,T0和T1的工作模式一起赋值
TH1 = 0xfd; //设置9600波特率的参数
TL1 = 0xfd;
TR1 = 1; //启动定时器T1
SCON = 0x50;			//8位UART模式,允许接收
AUXR = 0x00;			//辅助寄存器设置(89C82系列不需要)

ES = 1;						//使能串口中断
EA = 1;						//使能总中断
}
/=串口中断服务函数====
功能:接收上位机的数据并保持在command变量中。
参数:无。
返回:空。
=======================================================/
void ServiceUart() interrupt 4
{
if(RI == 1)
{
command = SBUF; //将接收到的数据保存到command变量
RI = 0; //将接收完成标志RI清0
}
}
/=串口发送单字节函数====
功能:串口向上位机发生一个字节。
参数:dat–要发送到内容。
返回:空。
=======================================================/
void SendByte(unsigned char dat)
{
SBUF = dat;
while(TI == 0);
TI = 0;
}
/=上位机命令解析执行函数====
功能:接收上位机的数据并保持在command变量中。
参数:无。
返回:空。
=======================================================/
void ExecuteCommand()
{
if(command != 0x00) //接收到一个上位机命令
{
switch(command & 0xf0) //将命令类型取出来
{
case 0xa0: //远程灯光控制命令
SelectHC573(4);
stat_led = (stat_led | 0x0f) & (~command | 0xf0);
P0 = stat_led;
SelectHC573(0);
command = 0x00;
break;
		case 0xb0:									//读取现场系统运行时间命令
			SendByte((t_h / 10 << 4) | (t_h % 10));
			SendByte((t_m / 10 << 4) | (t_m % 10));
			SendByte((t_s / 10 << 4) | (t_s % 10));
			command = 0x00;
		break;
	}
}
}
/=独立按键扫描函数====
功能:扫描S5和S4按键并执行现场灯光控制。
参数:无。
返回:空。
=======================================================/
void ScanKeys()
{
if(S5 == 0) //发现按键S5信号
{
DisplayTime(); //去抖动处理
if(S5 == 0) //确认按键S5信号
{
while(S5 == 0) //等待按键S5松开
{
DisplayTime();
}
SelectHC573(4);
stat_led = (stat_led | 0x40) & (~stat_led | 0xbf);
P0 = stat_led; //执行现场灯光控制
SelectHC573(0);
}
}
if(S4 == 0)							//发现按键S4信号
{
	DisplayTime();				//去抖动处理
	if(S4 == 0)						//确认按键S4信号
	{
		while(S4 == 0)			//等待按键S4松开
		{
			DisplayTime();
		}
		SelectHC573(4);
		stat_led = (stat_led | 0x80) & (~stat_led | 0x7f);
		P0 = stat_led;			//执行现场灯光控制
		SelectHC573(0);
	}
}
}
/=工厂灯光检测函数====
功能:逐个检测工厂灯光的工作状态。
参数:无。
返回:空。
=======================================================/
void CheckLED()
{
char i;
SelectHC573(4);
for(i = 0; i < 9; i++)
{
stat_led = 0xfe << i; //逐个点亮LED灯
P0 = stat_led;
Delay(60000);
}
for(i = 0; i < 9; i++)
{
stat_led = ~(0xfe << i); //逐个熄灭LED灯
P0 = stat_led;
Delay(60000);
}
SelectHC573(0);
}
/时间显示模块检测函数==
功能:逐个检测数码管的工作状态。
参数:无。
返回:空。
=======================================================/
void CheckSMG()
{
char i;
SelectHC573(7);
P0 = 0x00;
for(i = 0; i < 9; i++)
{
SelectHC573(6);
P0 = ~(0xfe << i); //逐个点亮数码管
Delay(60000);
}
for(i = 0; i < 9; i++)
{
SelectHC573(6);
P0 = 0xfe << i; //逐个熄灭数码管
Delay(60000);
}
SelectHC573(0);
}
/系统初始化函数====
功能:将蜂鸣器和继电器等无关设备关闭。
参数:无。
返回:空。
=======================================================/
void InitSystem()
{
SelectHC573(5);
P0 = 0x00;
SelectHC573(4);
P0 = stat_led;
SelectHC573(0);
}
/主函数=====
功能:整个工厂灯光控制系统的主函数。
参数:无。
返回:空。
=======================================================/
void main()
{
InitSystem();
CheckLED();
CheckSMG();
InitTimer0();
InitUart();
while(1)
{
	ExecuteCommand();
	DisplayTime();
	ScanKeys();
}
}
### 15-基础技能综合实训案例(存储器扩展版)
#include “reg52.h”
#include “absacc.h”
sfr AUXR = 0x8e; //定义辅助寄存器
sbit S5 = P3^2; //定义按键S5引脚
sbit S4 = P3^3; //定义按键S4引脚
unsigned char count = 0; //定义50ms定时中断累计变量
unsigned char t_h = 0; //定义运行时间的时变量
unsigned char t_m = 0; //定义运行时间的分变量
unsigned char t_s = 0; //定义运行时间的秒变量
unsigned char command = 0; //定义串口命令字接收变量
unsigned char stat_led = 0xff; //定义LED灯当前开关状态
//-----共阳数码管的段码编码表(无小数点)----
unsigned char code SMG_NoDot[18]={0xc0,0xf9,
0xa4,0xb0,0x99,0x92,0x82,0xf8,0x80,0x90,
0x88,0x80,0xc6,0xc0,0x86,0x8e,0xbf,0x7f};
/普通的延时函数====
功能:普通的非精确延时函数。
参数:t–延时长度。
返回:空。
=======================================================/
void Delay(unsigned int t)
{
while(t–);
while(t–);
}
/数码管专用延时函数====
功能:数码管动态显示专用延时函数。
参数:t–延时长度。
返回:空。
=======================================================/
void DelaySMG(unsigned int t)
{
while(t–);
}
/=单个数码管显示函数====
功能:在指定的数码管位置上显示指定的内容。
参数value–数码管显示的内容
pos–数码管位选,即要点亮的数码管位置。
返回:空。
=======================================================/
void DisplaySMG_Bit(unsigned char value, unsigned char pos)
{
XBYTE[0xe000] = 0xff; //消隐
XBYTE[0xc000] = 0x01 << pos; //数码管的段位
XBYTE[0xe000] = value; //数码管显示内容
}
/=系统运行时间显示函数=====
功能:在数码管上显示系统运行的时间。
参数:无。
返回:空。
=======================================================/
void DisplayTime()
{
最后
自我介绍一下,小编13年上海交大毕业,曾经在小公司待过,也去过华为、OPPO等大厂,18年进入阿里一直到现在。
深知大多数Java工程师,想要提升技能,往往是自己摸索成长,自己不成体系的自学效果低效漫长且无助。
因此收集整理了一份《2024年嵌入式&物联网开发全套学习资料》,初衷也很简单,就是希望能够帮助到想自学提升又不知道该从何学起的朋友,同时减轻大家的负担。

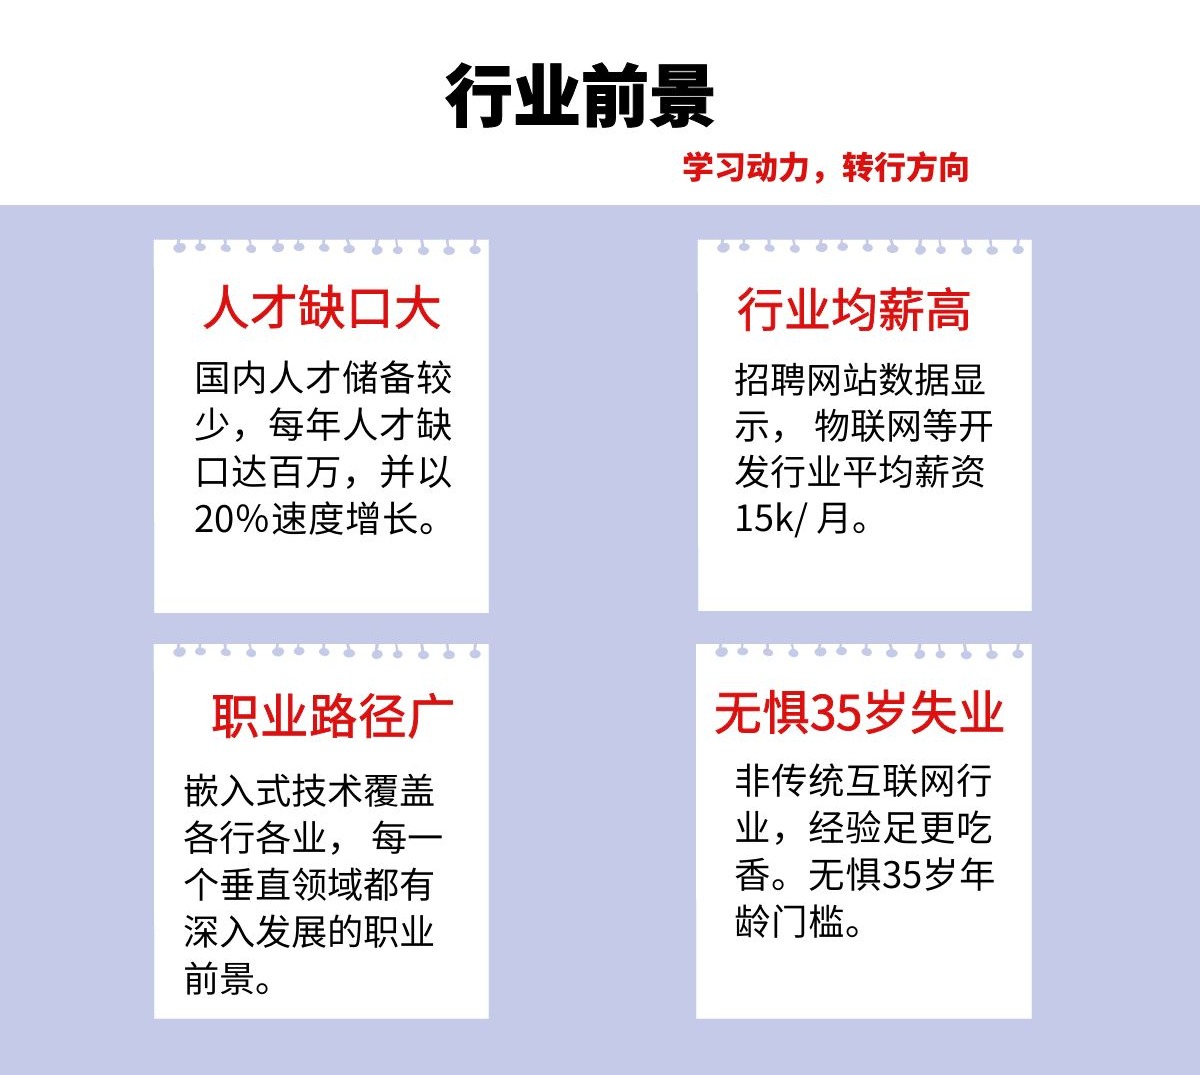

既有适合小白学习的零基础资料,也有适合3年以上经验的小伙伴深入学习提升的进阶课程,基本涵盖了95%以上嵌入式&物联网开发知识点,真正体系化!
如果你觉得这些内容对你有帮助,需要这份全套学习资料的朋友可以戳我获取!!
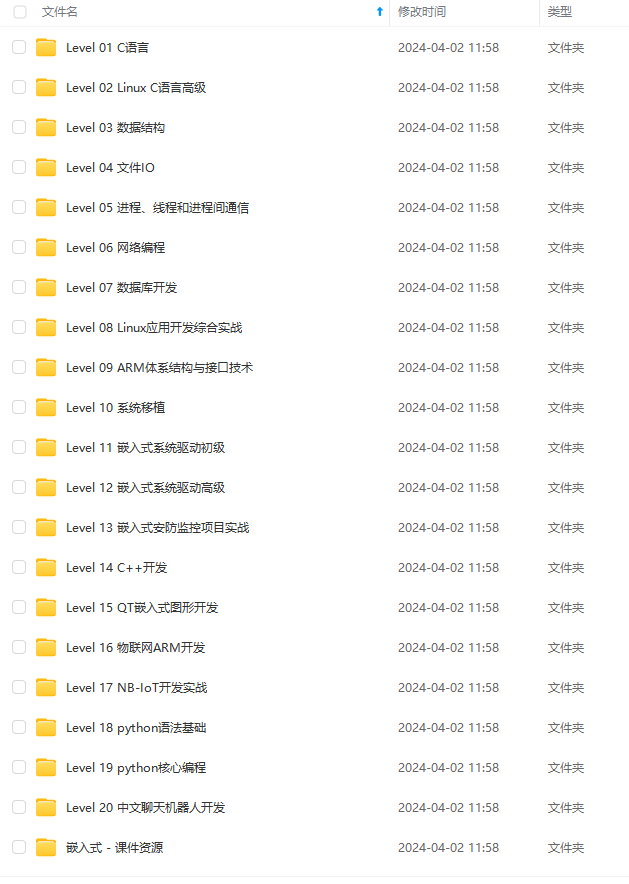
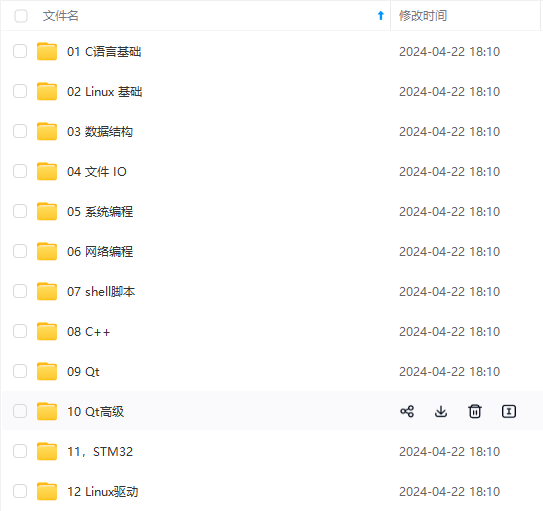
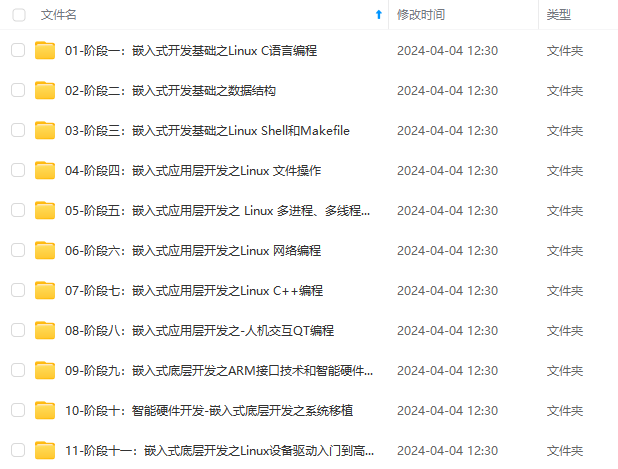
由于文件比较大,这里只是将部分目录大纲截图出来,每个节点里面都包含大厂面经、学习笔记、源码讲义、实战项目、讲解视频,并且后续会持续更新!!
xbf,0x7f};
/普通的延时函数====
功能:普通的非精确延时函数。
参数:t–延时长度。
返回:空。
=======================================================/
void Delay(unsigned int t)
{
while(t–);
while(t–);
}
/数码管专用延时函数====
功能:数码管动态显示专用延时函数。
参数:t–延时长度。
返回:空。
=======================================================/
void DelaySMG(unsigned int t)
{
while(t–);
}
/=单个数码管显示函数====
功能:在指定的数码管位置上显示指定的内容。
参数value–数码管显示的内容
pos–数码管位选,即要点亮的数码管位置。
返回:空。
=======================================================/
void DisplaySMG_Bit(unsigned char value, unsigned char pos)
{
XBYTE[0xe000] = 0xff; //消隐
XBYTE[0xc000] = 0x01 << pos; //数码管的段位
XBYTE[0xe000] = value; //数码管显示内容
}
/=系统运行时间显示函数=====
功能:在数码管上显示系统运行的时间。
参数:无。
返回:空。
=======================================================/
void DisplayTime()
{
最后
自我介绍一下,小编13年上海交大毕业,曾经在小公司待过,也去过华为、OPPO等大厂,18年进入阿里一直到现在。
深知大多数Java工程师,想要提升技能,往往是自己摸索成长,自己不成体系的自学效果低效漫长且无助。
因此收集整理了一份《2024年嵌入式&物联网开发全套学习资料》,初衷也很简单,就是希望能够帮助到想自学提升又不知道该从何学起的朋友,同时减轻大家的负担。
[外链图片转存中…(img-yg8LkZ1y-1715798341395)]
[外链图片转存中…(img-okpNNlPx-1715798341396)]
[外链图片转存中…(img-Hcz1rxch-1715798341397)]
[外链图片转存中…(img-MxKOckbF-1715798341397)]
[外链图片转存中…(img-iJWrpDZh-1715798341398)]
[外链图片转存中…(img-sNLCi2ia-1715798341399)]
[外链图片转存中…(img-AQg1GH4O-1715798341399)]
既有适合小白学习的零基础资料,也有适合3年以上经验的小伙伴深入学习提升的进阶课程,基本涵盖了95%以上嵌入式&物联网开发知识点,真正体系化!
如果你觉得这些内容对你有帮助,需要这份全套学习资料的朋友可以戳我获取!!
由于文件比较大,这里只是将部分目录大纲截图出来,每个节点里面都包含大厂面经、学习笔记、源码讲义、实战项目、讲解视频,并且后续会持续更新!!


 7189
7189


 被折叠的 条评论
为什么被折叠?
被折叠的 条评论
为什么被折叠?
 到【灌水乐园】发言


