


相信大家都和我一样,下载后,都在考虑那怎么样集成进去项目里试一试了?因为这个库文件还是很大的。我们选择自己想要的即可。
首先你得找到zxing.jar包,并添加到项目库中,其次你需要这几个包和里面的文件,包名我改了点。然后将对应的资源也引进去,注意其是放在values文件夹下的。
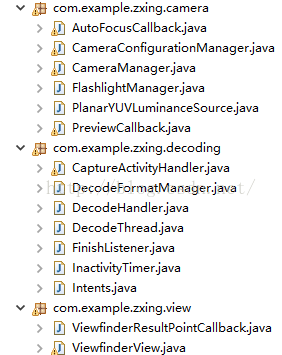
其中carmera包,是对相机的初始化和一些配置处理;decoding是对相机扫描回的结果的分析处理;view是扫描框和接口处理回调。
项目里还有其他2个包,里面结构如下:

其中MainActivity是程序主入口,CustomScanViewActivity是自定义扫描窗口的FragmentActivity,CaptureFragment是自定义扫描窗口的view,在这进行相机的初始化,和处理扫描结果。扫描成功后将扫描的结果和二维码当作参数传递到handleDecode方法里进行处理,这里采用的是接口回调的方式,进行处理:
 /**

     * 处理扫描结果

     *

     * @param result

     * @param barcode

     */

    public void handleDecode(Result result, Bitmap barcode) {

        inactivityTimer.onActivity();

        playBeepSoundAndVibrate();


        if (result == null || TextUtils.isEmpty(result.getText())) {

            if (analyzeCallback != null) {

                analyzeCallback.onAnalyzeFailed();

            }

        } else {

            if (analyzeCallback != null) {

                analyzeCallback.onAnalyzeSuccess(barcode, result.getText());

            }

        }

    }
接口函数
 /**

     * 解析二维码结果接口函数

     */

    public interface AnalyticCallback{


        public void onAnalyzeSuccess(Bitmap mBitmap, String result);


        public void onAnalyzeFailed();

    }
解析方法
/**

     * 解析二维码图片方法

     * @param mBitmap

     * @param analyzeCallback

     */

    public static void analyticBitmap(Bitmap mBitmap, AnalyticCallback analyzeCallback) {


        MultiFormatReader multiFormatReader = new MultiFormatReader();


        // 解码的参数

        Hashtable<DecodeHintType, Object> hints = new Hashtable<DecodeHintType, Object>(2);

        // 可以解析的编码类型

        Vector<BarcodeFormat> decodeFormats = new Vector<BarcodeFormat>();

        if (decodeFormats == null || decodeFormats.isEmpty()) {

            decodeFormats = new Vector<BarcodeFormat>();


            // 这里设置可扫描的类型

            decodeFormats.addAll(DecodeFormatManager.ONE_D_FORMATS);//条形码

            decodeFormats.addAll(DecodeFormatManager.QR_CODE_FORMATS);//二维码

            decodeFormats.addAll(DecodeFormatManager.DATA_MATRIX_FORMATS);//其他码

        }

        hints.put(DecodeHintType.POSSIBLE_FORMATS, decodeFormats);


        // 设置解析配置参数

        multiFormatReader.setHints(hints);


        // 开始对图像资源解码

        Result rawResult = null;

        try {


            int width = mBitmap.getWidth();

            int height = mBitmap.getHeight();

            int[] pixels = new int[width * height];

            mBitmap.getPixels(pixels, 0, width, 0, 0, width, height);

            RGBLuminanceSource source = new RGBLuminanceSource(width, height, pixels);

        	rawResult = multiFormatReader.decode(new BinaryBitmap(new HybridBinarizer(source)));

        } catch (Exception e) {

            e.printStackTrace();

        }


        if (rawResult != null) {

            if (analyzeCallback != null) {

                analyzeCallback.onAnalyzeSuccess(mBitmap, rawResult.getText());

            }

        } else {

            if (analyzeCallback != null) {

                analyzeCallback.onAnalyzeFailed();

            }

        }

    }
由上面可以看出,我把一维码也添加进去了,也就支持扫条形码了。当然还可以扫描本地的二维码图片,首先我们要打开本地的图库,这里有2个方法,但是有个方法有点小bug,他打不开我自己的截图,因为他打开的是手机里的图库(相册)应用,而截图不在图库里,所以不能添加(我华为荣耀手机是这样的,不知道其他型号手机是否是这样),为此我采用了另外一个方法,列出系统图片文件夹表,让用户自己选择。
方法一:
   Intent intent = new Intent(Intent.ACTION_GET_CONTENT);

   intent.addCategory(Intent.CATEGORY_OPENABLE);

   intent.setType("image/*");//打开的是相册

   startActivityForResult(intent, REQUEST_IMAGE);
然后在onActivityResult里进行接收处理
      Uri uri = data.getData();

      ContentResolver mContentResolver= getContentResolver();

      Bitmap mBitmap = MediaStore.Images.Media.getBitmap(mContentResolver, uri);//根据给定的图片uri,将其转换为bitmap
通过给定的uri转换为Bitmap,接着调用我们的接口函数
       QRCodeUtils.analyticBitmap(mBitmap, new QRCodeUtils.AnalyticCallback() {

		                        @Override

		                     public void onAnalyzeSuccess(Bitmap mBitmap, String result) {

		                            Toast.makeText(MainActivity.this, "解析结果: " + result,1).show();


		                        }


		                        @Override

		                     public void onAnalyzeFailed() {

		                           Toast.makeText(MainActivity.this, "解析图片失败", 1).show();


		                        }

		                    });
但是通过上面的那个打开本地图库的方法找不到截图文件,于是我采用了这个方法
      Intent intent = new Intent(Intent.ACTION_PICK,

                        android.provider.MediaStore.Images.Media.EXTERNAL_CONTENT_URI);//打开的是所有图片文件夹列表

                startActivityForResult(intent, REQUEST_IMAGE);
处理时换成这样的
           Cursor cursor = getContentResolver().query(data.getData(), null, null, null, null);

    				if (cursor.moveToFirst()) {

    					photo_path = cursor.getString(cursor.getColumnIndex(MediaStore.Images.Media.DATA));

    				    Log.e("图片路径-----》", photo_path);


    				}

    				cursor.close();

             Bitmap mBitmap= getDecodeAbleBitmap(photo_path);
通过uri去查询ContntResolver,返回的是个coursor对象,然后将其类似于读取数据库一样读出来,得到路径名,接着将本地图片文件转换为bitmao,为避免图片过大,先进行压缩处理。
 private static Bitmap getDecodeAbleBitmap(String picturePath) {

        try {

            BitmapFactory.Options options = new BitmapFactory.Options();

            options.inJustDecodeBounds = true;

            BitmapFactory.decodeFile(picturePath, options);

            int sampleSize = options.outHeight / 400;

            if (sampleSize <= 0)

                sampleSize = 1;

            options.inSampleSize = sampleSize;

            options.inJustDecodeBounds = false;


            return BitmapFactory.decodeFile(picturePath, options);

        } catch (Exception e) {

            return null;

        }

    }
得到bitmap对象后,接下来的步骤就一样了,调用工具类进行解析。
如果对扫描框想更改大小、刷新速度或者外观的,可以在viewfinderView中进行修改
/*
* Copyright (C) 2008 ZXing authors
*
* Licensed under the Apache License, Version 2.0 (the "License");
* you may not use this file except in compliance with the License.
* You may obtain a copy of the License at
*
* http://www.apache.org/licenses/LICENSE-2.0
*
* Unless required by applicable law or agreed to in writing, software
* distributed under the License is distributed on an "AS IS" BASIS,
* WITHOUT WARRANTIES OR CONDITIONS OF ANY KIND, either express or implied.
* See the License for the specific language governing permissions and
* limitations under the License.
*/
package com.example.zxing.view;
import android.content.Context;
import android.content.res.Resources;
import android.content.res.TypedArray;
import android.graphics.Bitmap;
import android.graphics.BitmapFactory;
import android.graphics.Canvas;
import android.graphics.Color;
import android.graphics.Paint;
import android.graphics.PixelFormat;
import android.graphics.Point;
import android.graphics.Rect;
import android.graphics.drawable.Drawable;
import android.util.AttributeSet;
import android.util.Log;
import android.view.View;
import com.example.qrcodedemo.R;
import com.google.zxing.ResultPoint;
import com.example.zxing.camera.CameraManager;
import java.util.Collection;
import java.util.HashSet;
/**
* 自定义组件实现,扫描功能
*/
public final class ViewfinderView extends View {
/**
* 刷新界面的时间
*/
private static final long ANIMATION_DELAY = 10L;
private static final int OPAQUE = 0xFF;
private final Paint paint;
private Bitmap resultBitmap;
private final int maskColor;
private final int resultColor;
private final int resultPointColor;
private Collection<ResultPoint> possibleResultPoints;
private Collection<ResultPoint> lastPossibleResultPoints;
// 扫描框边角颜色
private int innercornercolor;
// 扫描框边角长度
private int innercornerlength;
// 扫描框边角宽度
private int innercornerwidth;
// 扫描线移动的y
private int scanLineTop;
// 扫描线移动速度
private int SCAN_VELOCITY;
// 扫描线
Bitmap scanLight;
public ViewfinderView(Context context, AttributeSet attrs) {
super(context, attrs);
paint = new Paint();
Resources resources = getResources();
maskColor = resources.getColor(R.color.viewfinder_mask);
resultColor = resources.getColor(R.color.result_view);
resultPointColor = resources.getColor(R.color.possible_result_points);
possibleResultPoints = new HashSet<ResultPoint>(5);
scanLight = BitmapFactory.decodeResource(resources,
R.drawable.scan_light);//扫描线
initInnerRect(context, attrs);
}
/**
* 初始化内部框的大小
*
* @param context
* @param attrs
*/
private void initInnerRect(Context context, AttributeSet attrs) {
TypedArray ta = context.obtainStyledAttributes(attrs,
R.styleable.innerrect);
// 扫描框距离顶部
int innerMarginTop = ta.getInt(R.styleable.innerrect_inner_margintop,
-1);
if (innerMarginTop != -1) {
CameraManager.FRAME_MARGINTOP = dip2px(context, innerMarginTop);
}
// 扫描框的宽度
int innerrectWidth = ta.getInt(R.styleable.innerrect_inner_width, 210);
CameraManager.FRAME_WIDTH = dip2px(context, innerrectWidth);
// 扫描框的高度
int innerrectHeight = ta
.getInt(R.styleable.innerrect_inner_height, 210);
CameraManager.FRAME_HEIGHT = dip2px(context, innerrectHeight);
// 扫描框边角颜色
innercornercolor = ta.getColor(
R.styleable.innerrect_inner_corner_color,
Color.parseColor("#45DDDD"));
// 扫描框边角长度
innercornerlength = ta.getInt(
R.styleable.innerrect_inner_corner_length, 65);
// 扫描框边角宽度
innercornerwidth = ta.getInt(R.styleable.innerrect_inner_corner_width,
15);
// 扫描bitmap
Drawable drawable = ta
.getDrawable(R.styleable.innerrect_inner_scan_bitmap);
if (drawable != null) {
}
// 扫描控件
scanLight = BitmapFactory.decodeResource(getResources(), ta
.getResourceId(R.styleable.innerrect_inner_scan_bitmap,
R.drawable.scan_light));
// 扫描速度
SCAN_VELOCITY = ta.getInt(R.styleable.innerrect_inner_scan_speed, 10);
ta.recycle();
}
@Override
public void onDraw(Canvas canvas) {
Rect frame = CameraManager.get().getFramingRect();
if (frame == null) {
return;
}
int width = canvas.getWidth();
int height = canvas.getHeight();
// Draw the exterior (i.e. outside the framing rect) darkened
paint.setColor(resultBitmap != null ? resultColor : maskColor);
canvas.drawRect(0, 0, width, frame.top, paint);
canvas.drawRect(0, frame.top, frame.left, frame.bottom + 1, paint);
canvas.drawRect(frame.right + 1, frame.top, width, frame.bottom + 1,
paint);
canvas.drawRect(0, frame.bottom + 1, width, height, paint);
if (resultBitmap != null) {
// Draw the opaque result bitmap over the scanning rectangle
paint.setAlpha(OPAQUE);
canvas.drawBitmap(resultBitmap, frame.left, frame.top, paint);
} else {
drawFrameBounds(canvas, frame);
drawScanLight(canvas, frame);
Collection<ResultPoint> currentPossible = possibleResultPoints;
Collection<ResultPoint> currentLast = lastPossibleResultPoints;
if (currentPossible.isEmpty()) {
lastPossibleResultPoints = null;
} else {
possibleResultPoints = new HashSet<ResultPoint>(5);
lastPossibleResultPoints = currentPossible;
paint.setAlpha(OPAQUE);
paint.setColor(resultPointColor);
for (ResultPoint point : currentPossible) {
canvas.drawCircle(frame.left + point.getX(), frame.top
+ point.getY(), 6.0f, paint);
}
}
if (currentLast != null) {
paint.setAlpha(OPAQUE / 2);
paint.setColor(resultPointColor);
for (ResultPoint point : currentLast) {
canvas.drawCircle(frame.left + point.getX(), frame.top
+ point.getY(), 3.0f, paint);
}
}
postInvalidateDelayed(ANIMATION_DELAY, frame.left, frame.top,
frame.right, frame.bottom);
}
}
/**
* 绘制移动扫描线
*
* @param canvas
* @param frame
*/
private void drawScanLight(Canvas canvas, Rect frame) {
if (scanLineTop == 0) {
scanLineTop = frame.top;
}
if (scanLineTop >= frame.bottom - 30) {
scanLineTop = frame.top;
} else {
scanLineTop += SCAN_VELOCITY;
}
Rect scanRect = new Rect(frame.left, scanLineTop, frame.right,
scanLineTop + 30);
canvas.drawBitmap(scanLight, null, scanRect, paint);
}
/**
* 绘制取景框边框
*
* @param canvas
* @param frame
*/
private void drawFrameBounds(Canvas canvas, Rect frame) {
paint.setColor(innercornercolor);
paint.setStyle(Paint.Style.FILL);
int corWidth = innercornerwidth;
int corLength = innercornerlength;
// 左上角
canvas.drawRect(frame.left, frame.top, frame.left + corWidth, frame.top
+ corLength, paint);
canvas.drawRect(frame.left, frame.top, frame.left + corLength,
### 资源分享
网上学习 Android的资料一大堆,但如果学到的知识不成体系,遇到问题时只是浅尝辄止,不再深入研究,那么很难做到真正的技术提升。希望这份系统化的技术体系对大家有一个方向参考。
> 2020年虽然路途坎坷,都在说Android要没落,但是,不要慌,做自己的计划,学自己的习,竞争无处不在,每个行业都是如此。相信自己,没有做不到的,只有想不到的。祝大家2021年万事大吉。
**网上学习资料一大堆,但如果学到的知识不成体系,遇到问题时只是浅尝辄止,不再深入研究,那么很难做到真正的技术提升。**
**[需要这份系统化学习资料的朋友,可以戳这里获取](https://bbs.csdn.net/topics/618156601)**
**一个人可以走的很快,但一群人才能走的更远!不论你是正从事IT行业的老鸟或是对IT行业感兴趣的新人,都欢迎加入我们的的圈子(技术交流、学习资源、职场吐槽、大厂内推、面试辅导),让我们一起学习成长!**
int.Style.FILL);
int corWidth = innercornerwidth;
int corLength = innercornerlength;
// 左上角
canvas.drawRect(frame.left, frame.top, frame.left + corWidth, frame.top
+ corLength, paint);
canvas.drawRect(frame.left, frame.top, frame.left + corLength,
### 资源分享
[外链图片转存中...(img-il0NbWkF-1714360239489)]
[外链图片转存中...(img-FMSurCs3-1714360239489)]
[外链图片转存中...(img-GwNiha1G-1714360239490)]
网上学习 Android的资料一大堆,但如果学到的知识不成体系,遇到问题时只是浅尝辄止,不再深入研究,那么很难做到真正的技术提升。希望这份系统化的技术体系对大家有一个方向参考。
> 2020年虽然路途坎坷,都在说Android要没落,但是,不要慌,做自己的计划,学自己的习,竞争无处不在,每个行业都是如此。相信自己,没有做不到的,只有想不到的。祝大家2021年万事大吉。
**网上学习资料一大堆,但如果学到的知识不成体系,遇到问题时只是浅尝辄止,不再深入研究,那么很难做到真正的技术提升。**
**[需要这份系统化学习资料的朋友,可以戳这里获取](https://bbs.csdn.net/topics/618156601)**
**一个人可以走的很快,但一群人才能走的更远!不论你是正从事IT行业的老鸟或是对IT行业感兴趣的新人,都欢迎加入我们的的圈子(技术交流、学习资源、职场吐槽、大厂内推、面试辅导),让我们一起学习成长!**


 6356
6356

 被折叠的 条评论
为什么被折叠?
被折叠的 条评论
为什么被折叠?
 到【灌水乐园】发言


