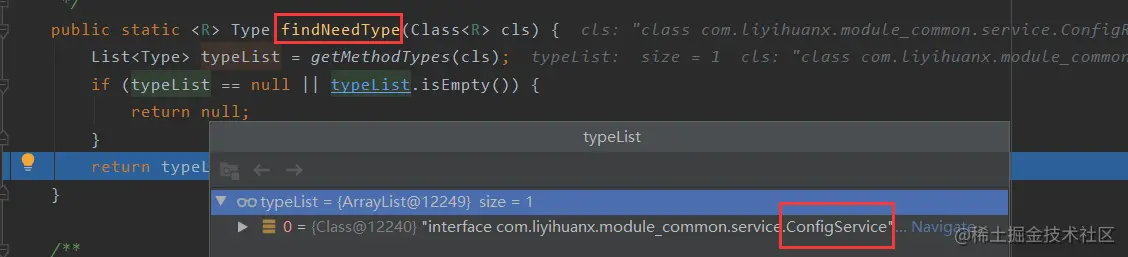
Android开发:使用Kotlin+协程+自定义注解+Retrofit的网络框架

findNeedType方法就会将ConfigRepository对应的ConfigService得到并且返回出去

所以apiService就相当于这样,好像有点Retrofit的create方法的样子了

var apiService: T = HttpProvider.defaultCreate(ConfigService) as Class)

我们继续进入 HttpProvider.defaultCreate

可以看到newRetrofit(),并且传入了一个HttpConfig,看到这个名字就知道这是Http的配置 接着是newCreate(),接收了我们的接口service类

首先看看newRetrofit方法


这几行代码就是创建了一个Retrofit对象并且保存起来,最后返回出去。 但是他是怎么和HttpConfig联系起来的呢?

我们可以看到这里将生成的Retrofit.Builder()传给了HttpConfig的方法build里,我们进去看一看

可以看到这里就是我们再熟悉不过的Retrofit的配置环节

所以通过newRetrofit方法,我们就将Retrofit对象配置好并且拿到Retrofit对象,还保存起来方便下次复用

在看看newCreate()方法


这是个扩展函数,是Retrofit的扩展函数 将传入的ConfigService通过Retrofit.create()生成代理类,并且保存起来复用

注解的介绍

============================================================

  • 8
    点赞
  • 13
    收藏
    觉得还不错? 一键收藏
  • 0
    评论
当然,我很愿意回答您的问题。下面是一个 Kotlin + 协程 + Retrofit + MVVM 实现网络请求的示例: 1. 在 build.gradle 中添加以下依赖: ``` implementation 'androidx.lifecycle:lifecycle-viewmodel-ktx:2.2.0' implementation 'androidx.lifecycle:lifecycle-livedata-ktx:2.2.0' implementation 'com.squareup.retrofit2:retrofit:2.8.1' implementation 'com.squareup.retrofit2:converter-gson:2.8.1' implementation 'org.jetbrains.kotlinx:kotlinx-coroutines-core:1.3.9' implementation 'org.jetbrains.kotlinx:kotlinx-coroutines-android:1.3.9' ``` 2. 创建 Retrofit 接口: ```kotlin interface ApiService { @GET("users/{user}/repos") suspend fun getRepos(@Path("user") user: String): List<Repo> } ``` 3. 创建数据模型: ```kotlin data class Repo(val name: String) ``` 4. 创建 Repository: ```kotlin class MainRepository(private val apiService: ApiService) { suspend fun getRepos(user: String): List<Repo> { return apiService.getRepos(user) } } ``` 5. 创建 ViewModel: ```kotlin class MainViewModel(private val repository: MainRepository) : ViewModel() { private val _repos = MutableLiveData<List<Repo>>() val repos: LiveData<List<Repo>> = _repos fun getRepos(user: String) { viewModelScope.launch { _repos.value = repository.getRepos(user) } } } ``` 6. 创建 Activity/Fragment: ```kotlin class MainActivity : AppCompatActivity() { private lateinit var viewModel: MainViewModel override fun onCreate(savedInstanceState: Bundle?) { super.onCreate(savedInstanceState) setContentView(R.layout.activity_main) val apiService = Retrofit.Builder() .baseUrl("https://api.github.com/") .addConverterFactory(GsonConverterFactory.create()) .build() .create(ApiService::class.java) val repository = MainRepository(apiService) viewModel = ViewModelProvider(this, MainViewModelFactory(repository))[MainViewModel::class.java] viewModel.repos.observe(this, Observer { repos -> // do something with repos }) viewModel.getRepos("octocat") } } ``` 以上就是一个使用 Kotlin + 协程 + Retrofit + MVVM 实现网络请求的示例。希望对您有所帮助!

“相关推荐”对你有帮助么?

  • 非常没帮助
  • 没帮助
  • 一般
  • 有帮助
  • 非常有帮助
提交
评论
添加红包

请填写红包祝福语或标题

红包个数最小为10个

红包金额最低5元

当前余额3.43前往充值 >
需支付:10.00
成就一亿技术人!
领取后你会自动成为博主和红包主的粉丝 规则
hope_wisdom
发出的红包
实付
使用余额支付
点击重新获取
扫码支付
钱包余额 0

抵扣说明:

1.余额是钱包充值的虚拟货币,按照1:1的比例进行支付金额的抵扣。
2.余额无法直接购买下载,可以购买VIP、付费专栏及课程。

余额充值