


给大家的福利
零基础入门
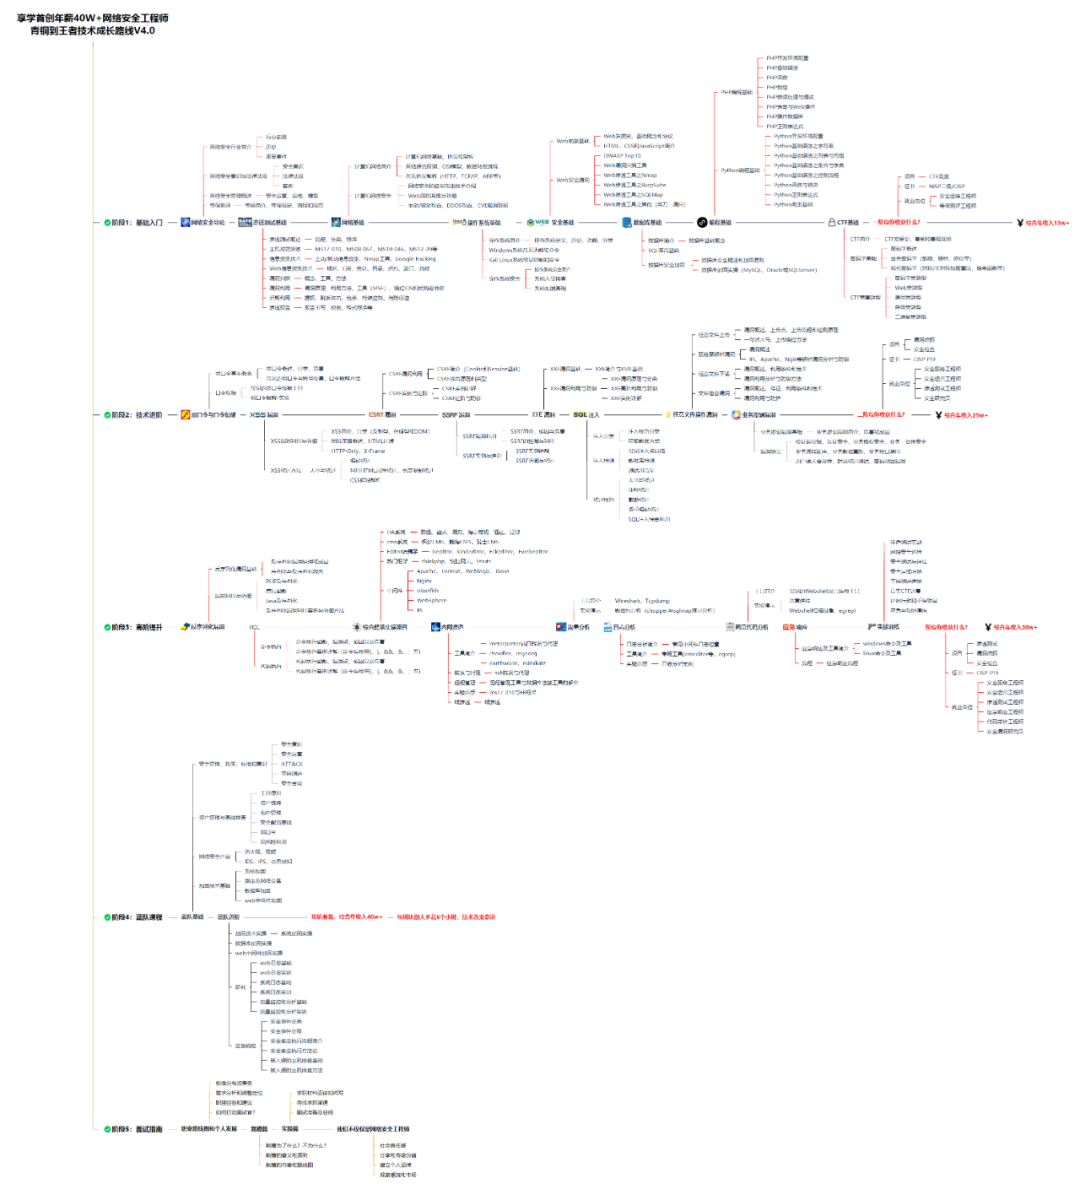
对于从来没有接触过网络安全的同学,我们帮你准备了详细的学习成长路线图。可以说是最科学最系统的学习路线,大家跟着这个大的方向学习准没问题。
同时每个成长路线对应的板块都有配套的视频提供:

因篇幅有限,仅展示部分资料
网上学习资料一大堆,但如果学到的知识不成体系,遇到问题时只是浅尝辄止,不再深入研究,那么很难做到真正的技术提升。
一个人可以走的很快,但一群人才能走的更远!不论你是正从事IT行业的老鸟或是对IT行业感兴趣的新人,都欢迎加入我们的的圈子(技术交流、学习资源、职场吐槽、大厂内推、面试辅导),让我们一起学习成长!
 --mail-auth <address>  Originator address of the original email
 --mail-from <address>  Mail from this address
 --mail-rcpt <address>  Mail to this address
 --mail-rcpt-allowfails  Allow RCPT TO command to fail for some recipients
-M, --manual Display the full manual
–max-filesize Maximum file size to download
–max-redirs Maximum number of redirects allowed
-m, --max-time Maximum time allowed for the transfer
–metalink Process given URLs as metalink XML file
–negotiate Use HTTP Negotiate (SPNEGO) authentication
-n, --netrc Must read .netrc for user name and password
–netrc-file Specify FILE for netrc
–netrc-optional Use either .netrc or URL
-:, --next Make next URL use its separate set of options
–no-alpn Disable the ALPN TLS extension
-N, --no-buffer Disable buffering of the output stream
–no-keepalive Disable TCP keepalive on the connection
–no-npn Disable the NPN TLS extension
–no-progress-meter Do not show the progress meter
–no-sessionid Disable SSL session-ID reusing
–noproxy List of hosts which do not use proxy
–ntlm Use HTTP NTLM authentication
–ntlm-wb Use HTTP NTLM authentication with winbind
–oauth2-bearer OAuth 2 Bearer Token
-o, --output Write to file instead of stdout
–output-dir
-Z, --parallel Perform transfers in parallel
–parallel-immediate Do not wait for multiplexing (with --parallel)
–parallel-max Maximum concurrency for parallel transfers
–pass Pass phrase for the private key
–path-as-is Do not squash … sequences in URL path
–pinnedpubkey FILE/HASHES Public key to verify peer against
–post301 Do not switch to GET after following a 301
–post302 Do not switch to GET after following a 302
–post303 Do not switch to GET after following a 303
–preproxy [protocol://]host[:port] Use this proxy first
-#, --progress-bar Display transfer progress as a bar
–proto Enable/disable PROTOCOLS
–proto-default Use PROTOCOL for any URL missing a scheme
–proto-redir Enable/disable PROTOCOLS on redirect
-x, --proxy [protocol://]host[:port] Use this proxy
–proxy-anyauth Pick any proxy authentication method
–proxy-basic Use Basic authentication on the proxy
–proxy-cacert CA certificate to verify peer against for proxy
–proxy-capath
–proxy-cert <cert[:passwd]> Set client certificate for proxy
–proxy-cert-type Client certificate type for HTTPS proxy
–proxy-ciphers SSL ciphers to use for proxy
–proxy-crlfile Set a CRL list for proxy
–proxy-digest Use Digest authentication on the proxy
–proxy-header header/@file Pass custom header(s) to proxy
–proxy-insecure Do HTTPS proxy connections without verifying the proxy
–proxy-key Private key for HTTPS proxy
–proxy-key-type Private key file type for proxy
–proxy-negotiate Use HTTP Negotiate (SPNEGO) authentication on the proxy
–proxy-ntlm Use NTLM authentication on the proxy
–proxy-pass Pass phrase for the private key for HTTPS proxy
–proxy-pinnedpubkey FILE/HASHES public key to verify proxy with
–proxy-service-name SPNEGO proxy service name
–proxy-ssl-allow-beast Allow security flaw for interop for HTTPS proxy
–proxy-ssl-auto-client-cert Use auto client certificate for proxy (Schannel)
–proxy-tls13-ciphers TLS 1.3 proxy cipher suites
–proxy-tlsauthtype TLS authentication type for HTTPS proxy
–proxy-tlspassword TLS password for HTTPS proxy
–proxy-tlsuser TLS username for HTTPS proxy
–proxy-tlsv1 Use TLSv1 for HTTPS proxy
-U, --proxy-user user:password Proxy user and password
–proxy1.0 <host[:port]> Use HTTP/1.0 proxy on given port
-p, --proxytunnel Operate through an HTTP proxy tunnel (using CONNECT)
–pubkey SSH Public key file name
-Q, --quote Send command(s) to server before transfer
–random-file File for reading random data from
-r, --range Retrieve only the bytes within RANGE
–raw Do HTTP “raw”; no transfer decoding
-e, --referer Referrer URL
-J, --remote-header-name Use the header-provided filename
-O, --remote-name Write output to a file named as the remote file
–remote-name-all Use the remote file name for all URLs
-R, --remote-time Set the remote file’s time on the local output
-X, --request Specify request command to use
–request-target
–resolve <[+]host:port:addr[,addr]…> Resolve the host+port to this address
–retry Retry request if transient problems occur
–retry-all-errors Retry all errors (use with --retry)
–retry-connrefused Retry on connection refused (use with --retry)
–retry-delay Wait time between retries
–retry-max-time Retry only within this period
–sasl-authzid Identity for SASL PLAIN authentication
–sasl-ir Enable initial response in SASL authentication
–service-name SPNEGO service name
-S, --show-error Show error even when -s is used
-s, --silent Silent mode
–socks4 <host[:port]> SOCKS4 proxy on given host + port
–socks4a <host[:port]> SOCKS4a proxy on given host + port
–socks5 <host[:port]> SOCKS5 proxy on given host + port
–socks5-basic Enable username/password auth for SOCKS5 proxies
–socks5-gssapi Enable GSS-API auth for SOCKS5 proxies
–socks5-gssapi-nec Compatibility with NEC SOCKS5 server
–socks5-gssapi-service SOCKS5 proxy service name for GSS-API
–socks5-hostname <host[:port]> SOCKS5 proxy, pass host name to proxy
-Y, --speed-limit Stop transfers slower than this
-y, --speed-time Trigger ‘speed-limit’ abort after this time
–ssl Try SSL/TLS
–ssl-allow-beast Allow security flaw to improve interop
–ssl-auto-client-cert Use auto client certificate (Schannel)
–ssl-no-revoke Disable cert revocation checks (Schannel)
–ssl-reqd Require SSL/TLS
–ssl-revoke-best-effort Ignore missing/offline cert CRL dist points
-2, --sslv2 Use SSLv2
-3, --sslv3 Use SSLv3
–stderr Where to redirect stderr
–styled-output Enable styled output for HTTP headers
–suppress-connect-headers Suppress proxy CONNECT response headers
–tcp-fastopen Use TCP Fast Open
–tcp-nodelay Use the TCP_NODELAY option
-t, --telnet-option <opt=val> Set telnet option
–tftp-blksize Set TFTP BLKSIZE option
–tftp-no-options Do not send any TFTP options
-z, --time-cond
通过curl --help all帮助命令,我们可以看到所有的选项,这里学几个常用的选项


## 无选项


### 命令
curl http://httpbin.org
### 结果
**命令行结果**

可以看到返回了html页面
**wireshark抓包结果**

可以看到curl发送了一个HTTP1.1的GET请求,添加了请求头HOST、User-Agent和Accept。其中User-Agent是版本。

可以看到httpbin.org的响应包含了头部和数据,数据就是curl显示的html页面代码。那么头部curl如何显示呢?请继续阅读。
## 请求头
### 仅显示返回的头部
-I选项
#### 命令
curl http://httpbin.org -I
#### 结果

可以看到仅显示了头部
### 保存返回的头部
-D
#### 命令
curl http://httpbin.org -D recv_head.txt
#### 结果

可以看到添加了将返回数据包的头部保存到E盘下recv\_head.txt文件的选项,打开文件

可以看到和前面抓包的结果一样。
### 添加请求头
-H header/@file
请求头使用key: value的形式


#### 命令
curl -H “blog: lady_killer9” -H “User-Agent: firefox” http://httpbin.org
#### 结果


可以看到覆盖了自带的User-Agent,添加了新的请求头部blog
### 覆盖User-Agent的值
UserAgent是经常用的,可以使用-A直接替换value
-A
#### 命令
curl -A chrome http://httpbin.org
#### 结果


可以看到User-Agent修改了
## GET请求
默认发送的就是GET请求,这里说一下如何添加参数。一般在url上使用?添加参数即可,注意,如果不转义的话,使用双引号。


也可以使用-G选项配合-d选项添加


## POST请求
-X指定请求,-d添加数据
-X
-d
#### 表单
curl -X POST -d “blog=lady_killer&name=9” http://httpbin.org/post


可以看到添加了curl相比GET又添加了两个请求头Content-Length和Content-Type
#### json
### 如何自学黑客&网络安全
#### 黑客零基础入门学习路线&规划
**初级黑客**
**1、网络安全理论知识(2天)**
①了解行业相关背景,前景,确定发展方向。
②学习网络安全相关法律法规。
③网络安全运营的概念。
④等保简介、等保规定、流程和规范。(非常重要)
**2、渗透测试基础(一周)**
①渗透测试的流程、分类、标准
②信息收集技术:主动/被动信息搜集、Nmap工具、Google Hacking
③漏洞扫描、漏洞利用、原理,利用方法、工具(MSF)、绕过IDS和反病毒侦察
④主机攻防演练:MS17-010、MS08-067、MS10-046、MS12-20等
**3、操作系统基础(一周)**
①Windows系统常见功能和命令
②Kali Linux系统常见功能和命令
③操作系统安全(系统入侵排查/系统加固基础)
**4、计算机网络基础(一周)**
①计算机网络基础、协议和架构
②网络通信原理、OSI模型、数据转发流程
③常见协议解析(HTTP、TCP/IP、ARP等)
④网络攻击技术与网络安全防御技术
⑤Web漏洞原理与防御:主动/被动攻击、DDOS攻击、CVE漏洞复现
**5、数据库基础操作(2天)**
①数据库基础
②SQL语言基础
③数据库安全加固
**6、Web渗透(1周)**
①HTML、CSS和JavaScript简介
②OWASP Top10
③Web漏洞扫描工具
④Web渗透工具:Nmap、BurpSuite、SQLMap、其他(菜刀、漏扫等)
恭喜你,如果学到这里,你基本可以从事一份网络安全相关的工作,比如渗透测试、Web 渗透、安全服务、安全分析等岗位;如果等保模块学的好,还可以从事等保工程师。薪资区间6k-15k
到此为止,大概1个月的时间。你已经成为了一名“脚本小子”。那么你还想往下探索吗?
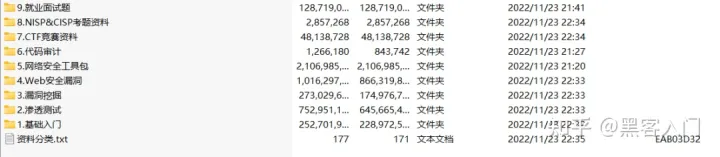
如果你想要入坑黑客&网络安全,笔者给大家准备了一份:282G全网最全的网络安全资料包评论区留言即可领取!
**7、脚本编程(初级/中级/高级)**
在网络安全领域。是否具备编程能力是“脚本小子”和真正黑客的本质区别。在实际的渗透测试过程中,面对复杂多变的网络环境,当常用工具不能满足实际需求的时候,往往需要对现有工具进行扩展,或者编写符合我们要求的工具、自动化脚本,这个时候就需要具备一定的编程能力。在分秒必争的CTF竞赛中,想要高效地使用自制的脚本工具来实现各种目的,更是需要拥有编程能力.
如果你零基础入门,笔者建议选择脚本语言Python/PHP/Go/Java中的一种,对常用库进行编程学习;搭建开发环境和选择IDE,PHP环境推荐Wamp和XAMPP, IDE强烈推荐Sublime;·Python编程学习,学习内容包含:语法、正则、文件、 网络、多线程等常用库,推荐《Python核心编程》,不要看完;·用Python编写漏洞的exp,然后写一个简单的网络爬虫;·PHP基本语法学习并书写一个简单的博客系统;熟悉MVC架构,并试着学习一个PHP框架或者Python框架 (可选);·了解Bootstrap的布局或者CSS。
**8、超级黑客**
这部分内容对零基础的同学来说还比较遥远,就不展开细说了,附上学习路线。

#### 网络安全工程师企业级学习路线

如图片过大被平台压缩导致看不清的话,评论区点赞和评论区留言获取吧。我都会回复的
视频配套资料&国内外网安书籍、文档&工具
当然除了有配套的视频,同时也为大家整理了各种文档和书籍资料&工具,并且已经帮大家分好类了。
一些笔者自己买的、其他平台白嫖不到的视频教程。

**网上学习资料一大堆,但如果学到的知识不成体系,遇到问题时只是浅尝辄止,不再深入研究,那么很难做到真正的技术提升。**
**[需要这份系统化资料的朋友,可以点击这里获取](https://bbs.csdn.net/forums/4f45ff00ff254613a03fab5e56a57acb)**
**一个人可以走的很快,但一群人才能走的更远!不论你是正从事IT行业的老鸟或是对IT行业感兴趣的新人,都欢迎加入我们的的圈子(技术交流、学习资源、职场吐槽、大厂内推、面试辅导),让我们一起学习成长!**


 923
923


 被折叠的 条评论
为什么被折叠?
被折叠的 条评论
为什么被折叠?
 到【灌水乐园】发言


