


3、SpringMVC框架代码的编写
1. 在web.xml中配置DispatcherServlet前端控制器
2. 在web.xml中配置DispatcherServlet过滤器解决中文乱码
3. web.xml中配置的整体效果
4. 创建springmvc.xml的配置文件,编写配置文件
5.创建jsp页面,并编写controller代码
6.部署Tomcat进行测试
7.测试运行
4. Spring整合SpringMVC的框架
1、Spring整合SpringMVC的框架原理分析
2、在web.xml中配置ContextLoaderListener监听器
3. controller中注入service对象,调用service对象方法并测试
5、MyBatis框架代码的编写
1、在IAccountdao接口方法上添加注解,编写SQL语句
2.创建SqlMapConfig.xml的配置文件并编写
3. 创建并编写Mybatis测试方法
6. Spring整合MyBatis框架
1、在applicationContext.xml中配置数据库连接池
2、在applicationContext.xml中配置SqlSessionFactory工厂
3、在applicationContext.xml中配置IAccountdao接口所在包
4、小结上面的三个配置
5、完善Service层代码
6、完善Controller层代码
7、完善list.jsp页面
8、运行测试
7.spring整合mybatis框架配置事务(Spring的声明式事务管理)
1、在applicationContext.xml中配置Spring框架声明式事务管理
2、完善index.jsp页面
3、完善Service层、Controller层代码
4、测试运行
8、源码、源码、源码~重要的标题发三遍
1. 搭建整合环境
1. 整合说明
整合说明:SSM整合可以使用多种方式,咱们选择XML + 注解的方式,不要觉得不妥,这样其实最便捷-
2. 整合的思路:
1、先搭建整合的环境
2、先把Spring的配置搭建完成
3、再使用Spring整合SpringMVC框架
4、之后使用Spring整合MyBatis框架
5、最后spring整合mybatis框架配置事务(Spring的声明式事务管理)
3. 创建数据库和表结构语句:
复制在MySQL中运行即可:
create database ssm;
use ssm;
create table account (
id int primary key auto_increment,
name varchar(50),
money double
);
4. 创建maven的工程
具体的使用idea创建maven,请看这篇使用IntelliJ IDEA创建第一个Mawen项目
创建Twossm_parent父工程(打包方式选择pom,必须的)
创建Twossm_web子模块(打包方式是war包)
创建Twossm_service子模块(打包方式是jar包)
创建Twossm_dao子模块(打包方式是jar包)
创建Twossm_domain子模块(打包方式是jar包)
web依赖于service,service依赖于dao,dao依赖于domain
在Twossm_parent的pom.xml文件中引入坐标依赖
找到对应的< properties >标签,以及< dependencies >标签,复制粘贴即可
版本控制是在< properties >标签中控制,从坐标依赖中可以看出版本号:spring5X、MySQL3.1.6、mybatis3.4.5
<project.build.sourceEncoding>UTF-8</project.build.sourceEncoding>
<maven.compiler.source>1.7</maven.compiler.source>
<maven.compiler.target>1.7</maven.compiler.target>
<spring.version>5.0.2.RELEASE</spring.version>
<slf4j.version>1.6.6</slf4j.version>
<log4j.version>1.2.12</log4j.version>
<mysql.version>5.1.6</mysql.version>
<mybatis.version>3.4.5</mybatis.version>
org.aspectj
aspectjweaver
1.6.8
org.springframework
spring-aop
${spring.version}
org.springframework
spring-context
${spring.version}
org.springframework
spring-web
${spring.version}
org.springframework
spring-webmvc
${spring.version}
org.springframework
spring-test
${spring.version}
org.springframework
spring-tx
${spring.version}
org.springframework
spring-jdbc
${spring.version}
junit
junit
4.12
compile
mysql
mysql-connector-java
${mysql.version}
javax.servlet
servlet-api
2.5
provided
javax.servlet.jsp
jsp-api
2.0
provided
jstl
jstl
1.2
log4j
log4j
${log4j.version}
org.slf4j
slf4j-api
${slf4j.version}
org.slf4j
slf4j-log4j12
${slf4j.version}
org.mybatis
mybatis
${mybatis.version}
org.mybatis
mybatis-spring
1.3.0
c3p0
c3p0
0.9.1.2
jar
compile
部署Twossm_web的项目,只要把Twossm_web项目加入到tomcat服务器中即可
5. 编写实体类,在Twossm_domain项目中编写
在这里,我提醒一下,可能各位不熟悉idea快捷键,就比如说getset方法搞不出来哈哈,就这篇整合SSM的文章所用到的idea快捷键可以参考下面蓝色字体文章(点击蓝色字体即可),熟悉idea的哥们可以当我没说,当我在放pi(快快快捂住鼻子…)
IDEA快速实现接口、查找接口的实现、getSet方法快速生成等等常用快捷键
package com.gx.domain;
import java.io.Serializable;
public class Account implements Serializable {
private Integer id;
private String name;
private Double money;
public Integer getId() {
return id;
}
public void setId(Integer id) {
this.id = id;
}
public String getName() {
return name;
}
public void setName(String name) {
this.name = name;
}
public Double getMoney() {
return money;
}
public void setMoney(Double money) {
this.money = money;
}
@Override
public String toString() {
return “Account{” +
“id=” + id +
“, name='” + name + ‘\’’ +
“, money=” + money +
‘}’;
}
}
6. 编写dao接口
在dao包中编写dao接口IAccountdao
package com.gx.dao;
import com.gx.domain.Account;
import org.apache.ibatis.annotations.Insert;
import org.apache.ibatis.annotations.Select;
import org.springframework.stereotype.Repository;
import java.util.List;
public interface IAccountdao {
public List findAll();
public void saveAccount(Account account);
}
7. 编写service接口和实现类
service接口:
package com.gx.service;
import com.gx.domain.Account;
import java.util.List;
public interface AccountService {
// 查询所有账户
public List findAll();
// 保存帐户信息
public void saveAccount(Account account);
}
service接口实现类:
package com.gx.service.Impl;
import com.gx.domain.Account;
import com.gx.service.AccountService;
import org.springframework.stereotype.Service;
import java.util.List;
@Service(“accountService”)
public class AccountServiceImpl implements AccountService {
@Override
public List findAll() {
System.out.println(“Service业务层:查询所有账户…”);
return null;
}
@Override
public void saveAccount(Account account) {
System.out.println(“Service业务层:保存帐户…”);
}
}
到这里,整合环境就搭建好了效果如下,接下来搭建Spring的配置!
2、Spring框架代码的编写
搭建和测试Spring的开发环境
1、创建resources的资源文件目录管理XML配置文件
创建一个叫resources的资源文件目录,用来管理放置XML配置文件
2、编写applicationContext.xml的配置文件
在resources资源文件中创建applicationContext.xml的配置文件,编写具体的配置信息
applicationContext.xml中的配置信息
<?xml version="1.0" encoding="UTF-8"?><beans xmlns=“http://www.springframework.org/schema/beans”
xmlns:xsi=“http://www.w3.org/2001/XMLSchema-instance”
xmlns:context=“http://www.springframework.org/schema/context”
xmlns:aop=“http://www.springframework.org/schema/aop”
xmlns:tx=“http://www.springframework.org/schema/tx”
xsi:schemaLocation="http://www.springframework.org/schema/beans
http://www.springframework.org/schema/beans/spring-beans.xsd
http://www.springframework.org/schema/context
http://www.springframework.org/schema/context/spring-context.xsd
http://www.springframework.org/schema/aop
http://www.springframework.org/schema/aop/spring-aop.xsd
http://www.springframework.org/schema/tx
http://www.springframework.org/schema/tx/spring-tx.xsd">
3. 在项目中编写测试方法,进行测试
1、创建Test包
2、在test包中创建一个叫TestSpring的class类,具体的内容如下:
package com.gx.test;
import com.gx.domain.Account;
import com.gx.service.AccountService;
import org.junit.Test;
import org.springframework.context.ApplicationContext;
import org.springframework.context.support.ClassPathXmlApplicationContext;
public class TestSpring {
@Test
public void run1(){
ApplicationContext ac = new ClassPathXmlApplicationContext(“classpath:applicationContext.xml”);
AccountService as = (AccountService) ac.getBean(“accountService”);
as.findAll();
}
}
运行如下效果,说明搭建Spring的开发环境成功!
到这里,Spring的开发环境成功!接下来搭建SpringMVC框架环境。
3、SpringMVC框架代码的编写
搭建和测试SpringMVC的开发环境
1. 在web.xml中配置DispatcherServlet前端控制器
dispatcherServlet
org.springframework.web.servlet.DispatcherServlet
contextConfigLocation
classpath:springmvc.xml
1
dispatcherServlet
/
2. 在web.xml中配置DispatcherServlet过滤器解决中文乱码
characterEncodingFilter
org.springframework.web.filter.CharacterEncodingFilter
encoding
UTF-8
characterEncodingFilter
/*
3. web.xml中配置的整体效果
<web-app xmlns:xsi=“http://www.w3.org/2001/XMLSchema-instance”
xmlns=“http://java.sun.com/xml/ns/javaee”
xsi:schemaLocation=“http://java.sun.com/xml/ns/javaee http://java.sun.com/xml/ns/javaee/web-app_3_0.xsd”
version=“3.0”>
Archetype Created Web Application
dispatcherServlet
org.springframework.web.servlet.DispatcherServlet
contextConfigLocation
classpath:springmvc.xml
1
dispatcherServlet
/
characterEncodingFilter
org.springframework.web.filter.CharacterEncodingFilter
encoding
UTF-8
characterEncodingFilter
/*
4. 创建springmvc.xml的配置文件,编写配置文件
同样是在resources资源文件夹中创建springmvc.xml配置文件
springmvc.xml的配置文件内容:
<?xml version="1.0" encoding="UTF-8"?><beans xmlns=“http://www.springframework.org/schema/beans”
xmlns:mvc=“http://www.springframework.org/schema/mvc”
xmlns:context=“http://www.springframework.org/schema/context”
xmlns:xsi=“http://www.w3.org/2001/XMLSchema-instance”
xsi:schemaLocation="
http://www.springframework.org/schema/beans
http://www.springframework.org/schema/beans/spring-beans.xsd
http://www.springframework.org/schema/mvc
http://www.springframework.org/schema/mvc/spring-mvc.xsd
http://www.springframework.org/schema/context
http://www.springframework.org/schema/context/spring-context.xsd">
<context:component-scan base-package=“com.gx”>
<context:include-filter type=“annotation” expression=“org.springframework.stereotype.Controller”/>
</context:component-scan>
<mvc:resources location=“/css” mapping=“/css/**”/>
<mvc:resources location=“/images/” mapping=“/images/**”/>
<mvc:resources location=“/js/” mapping=“/js/**”/>
mvc:annotation-driven/
5.创建jsp页面,并编写controller代码
编写index.jsp页面
<%@ page contentType=“text/html;charset=UTF-8” language=“java” %>
在controller层中的AccountController的class类中编写代码
package com.gx.controller;
import com.gx.domain.Account;
import com.gx.service.AccountService;
import org.springframework.beans.factory.annotation.Autowired;
import org.springframework.stereotype.Controller;
import org.springframework.ui.Model;
import org.springframework.web.bind.annotation.RequestMapping;
import java.util.List;
@Controller
public class AccountController {
@RequestMapping(“/account/findAll”)
public String findAll(){
System.out.println(“Controller表现层:查询所有账户…”);
return “list”; //在视图解析器中配置了前缀后缀
}
}
这时候就要创建controller跳转的list.jsp页面了:
list.jsp页面创建好了,编写一下内容,只是看是否跳转成功,输出一句话即可:
<%@ taglib prefix=“c” uri=“http://java.sun.com/jsp/jstl/core” %>
<%–
Created by IntelliJ IDEA.
User: Bule
Date: 2019/9/2
Time: 7:32
To change this template use File | Settings | File Templates.
–%>
<%@ page contentType=“text/html;charset=UTF-8” language=“java” %>
查询所有的账户
6.部署Tomcat进行测试
7.测试运行
到这里,spring、springmvc的开发环境就都搭建好了,不容易啊,都坚持看到这里了,给你点个赞,接下来是整合spring和springmvc了!
自我介绍一下,小编13年上海交大毕业,曾经在小公司待过,也去过华为、OPPO等大厂,18年进入阿里一直到现在。
深知大多数同学面临毕业设计项目选题时,很多人都会感到无从下手,尤其是对于计算机专业的学生来说,选择一个合适的题目尤为重要。因为毕业设计不仅是我们在大学四年学习的一个总结,更是展示自己能力的重要机会。
因此收集整理了一份《2024年计算机毕业设计项目大全》,初衷也很简单,就是希望能够帮助提高效率,同时减轻大家的负担。
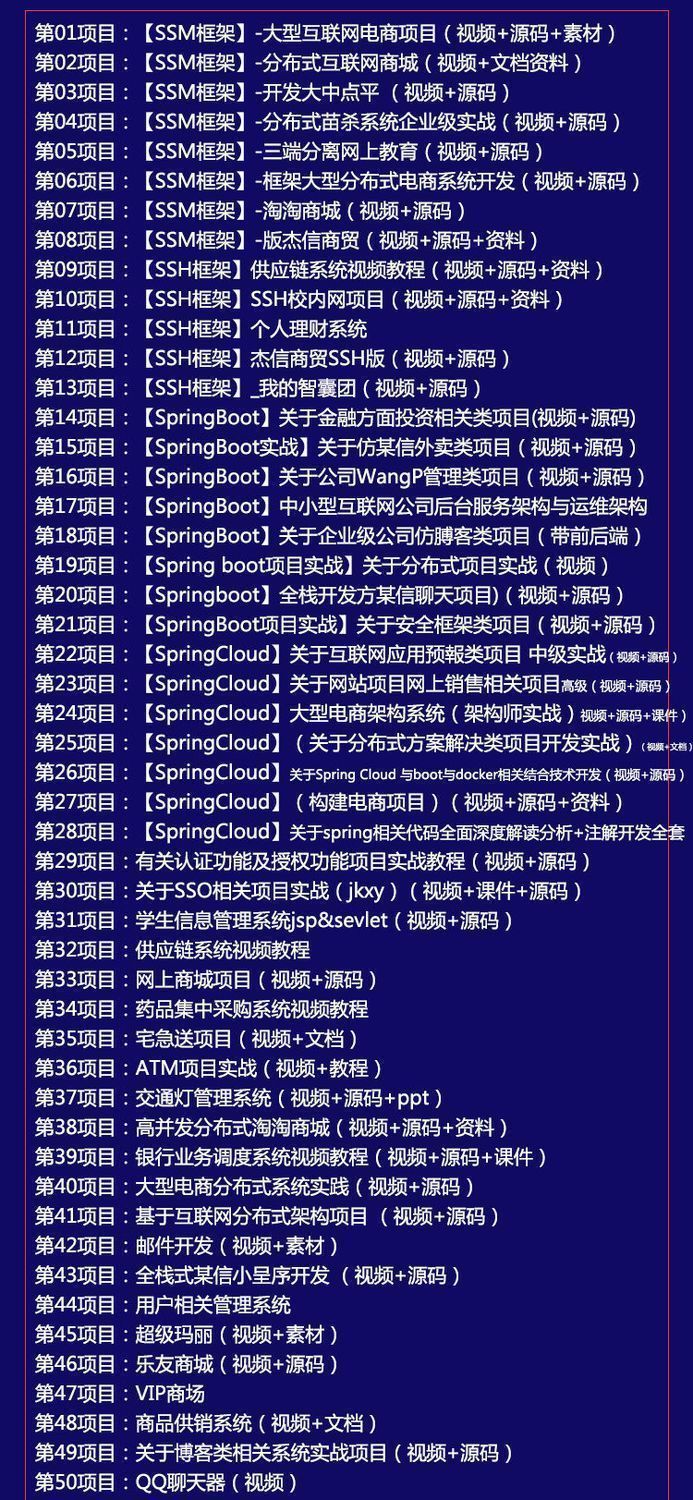

既有Java、Web、PHP、也有C、小程序、Python等项目供你选择,真正体系化!
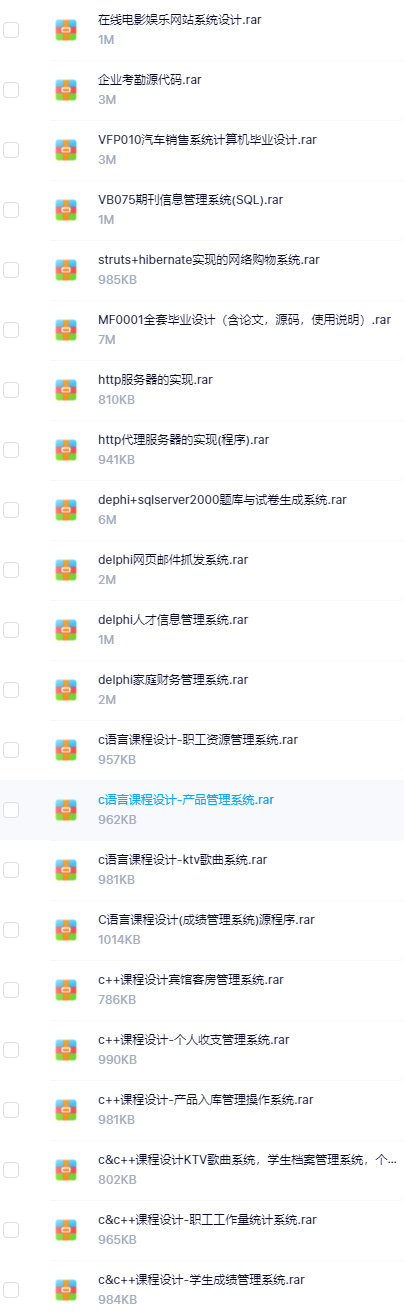
由于项目比较多,这里只是将部分目录截图出来,每个节点里面都包含素材文档、项目源码、讲解视频
如果你觉得这些内容对你有帮助,可以添加VX:vip1024c (备注项目大全获取)

)
list.jsp页面创建好了,编写一下内容,只是看是否跳转成功,输出一句话即可:
<%@ taglib prefix=“c” uri=“http://java.sun.com/jsp/jstl/core” %>
<%–
Created by IntelliJ IDEA.
User: Bule
Date: 2019/9/2
Time: 7:32
To change this template use File | Settings | File Templates.
–%>
<%@ page contentType=“text/html;charset=UTF-8” language=“java” %>
查询所有的账户
6.部署Tomcat进行测试
7.测试运行
到这里,spring、springmvc的开发环境就都搭建好了,不容易啊,都坚持看到这里了,给你点个赞,接下来是整合spring和springmvc了!
自我介绍一下,小编13年上海交大毕业,曾经在小公司待过,也去过华为、OPPO等大厂,18年进入阿里一直到现在。
深知大多数同学面临毕业设计项目选题时,很多人都会感到无从下手,尤其是对于计算机专业的学生来说,选择一个合适的题目尤为重要。因为毕业设计不仅是我们在大学四年学习的一个总结,更是展示自己能力的重要机会。
因此收集整理了一份《2024年计算机毕业设计项目大全》,初衷也很简单,就是希望能够帮助提高效率,同时减轻大家的负担。
[外链图片转存中…(img-f2l72vLu-1712582847757)]
[外链图片转存中…(img-iO0I48pB-1712582847758)]
[外链图片转存中…(img-bx7oYa9x-1712582847758)]
既有Java、Web、PHP、也有C、小程序、Python等项目供你选择,真正体系化!
由于项目比较多,这里只是将部分目录截图出来,每个节点里面都包含素材文档、项目源码、讲解视频
如果你觉得这些内容对你有帮助,可以添加VX:vip1024c (备注项目大全获取)
[外链图片转存中…(img-xGEKeDMM-1712582847759)]


 1637
1637


 被折叠的 条评论
为什么被折叠?
被折叠的 条评论
为什么被折叠?
 到【灌水乐园】发言


