首先回顾一下创建线程的几种写法:
1.直接通过继承Thread来实现多线程.
 class MyThread extends Thread{
        public void run(){
            while(true){
                System.out.println("hello,Thread");
                try {
                    Thread.sleep(1000);//就是让线程主动进入"阻塞状态",主动放弃去CPU上执行.时间到了
                    //之后,线程才会解除阻塞状态,重新被调度到CPU上执行.
                } catch (InterruptedException e) {
                    throw new RuntimeException(e);
                }
            }
        }
    }
    public class Demo1{
        public static void main(String[] args){
            Thread t=new MyThread();
            t.start();
            while(true){
                System.out.println("hello,main");
                try {
                    Thread.sleep(1000);
                } catch (InterruptedException e) {
                    throw new RuntimeException(e);
                }
            }
        }
    }
2.通过实现Runnable接口,重写run,把Runnable实例传入到Thread中.
class MyRunnable implements Runnable{
    public void run(){
        while(true){
            System.out.println("hello,Thread");
            try {
                Thread.sleep(1000);
            } catch (InterruptedException e) {
                throw new RuntimeException(e);
           }
        }
    }
}
public class Demo2 {
    public static void main(String[] args){
        Thread T=new Thread(new MyRunnable());
        T.start();
        while(true){
            System.out.println("hello,main");
            try {
                Thread.sleep(1000);
            } catch (InterruptedException e) {
                throw new RuntimeException(e);
            }
        }
    }
}
3.针对1进行变形,使用匿名内部类继承Thread并重写run方法.
public class Demo3 {
    public static void main(String[] args){
        Thread t=new Thread(){
            public void run(){
                while(true){
                    System.out.println("hello,Thread");
                    try {
                        Thread.sleep(1000);
                    } catch (InterruptedException e) {
                        throw new RuntimeException(e);
                    }
                }
            }
        };
        t.start();
        while(true){
            System.out.println("hello,main");
            try {
                Thread.sleep(1000);
            } catch (InterruptedException e) {
                throw new RuntimeException(e);
            }
        }
    }
}
4.还是匿名内部类,这一次是针对Runnable
public class Demo4 {
    public static void main(String[] args){
        Thread T=new Thread(new Runnable(){
            public void run(){
                while(true){
                    System.out.println("hello,Thread");
                    try {
                        Thread.sleep(1000);//休眠,就是让线程主动进入"阻塞状态",主动放弃进入CPU上去执行.
                        //时间到了之后,线程才会解除阻塞状态,重新被调度到CPU上去执行.
                    } catch (InterruptedException e) {
                        throw new RuntimeException(e);
                    }
                }

            }

        });
        T.start();
        while(true){
            System.out.println("hello,main");
            try {
                Thread.sleep(1000);
            } catch (InterruptedException e) {
                throw new RuntimeException(e);
            }
        }
    }
}
5.也是最常用的方法,使用lambda表达式,lambda本质上就是针对匿名内部类的平替.
public class Demo5{
    public static void main(String[] args){
        Thread t=new Thread(()->{
           //lambda相当于平替了run,匿名内部类
           while(true){
               System.out.println("hello,Thread");
               try {
                   Thread.sleep(1000);
               } catch (InterruptedException e) {
                   throw new RuntimeException(e);
               }
           }
        });
        t.start();
        while(true){
            System.out.println("hello,main");
            try {
                Thread.sleep(1000);
            } catch (InterruptedException e) {
                throw new RuntimeException(e);
            }
        }
    }
}
上述这五种写法本质上都是,1.要把线程执行的任务内容列出来 2.通过Thread的start来创建/启动系统中的线程.Thread对象和操作系统内核中的线程是一一对应的.
接下来介绍Thread这个类的一些方法和属性.
1.Thread() 说明:创建线程对象. 2.Thread(Runnable xxx) 说明:使用Runnable对象创建线程对象
3.Thread(String name) 说明: 创建线程对象,并给线程对象命名.
4.Thread(Runnable xxx,String name) 说明:使用Runnable对象创建线程,并对线程进行命名.
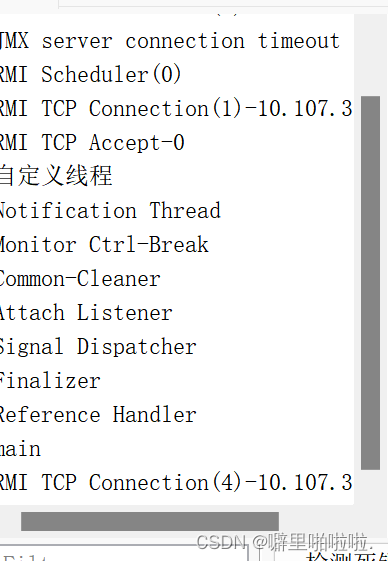
1,2已经介绍过了,这里介绍一下3.4 代码如下:
public class Demo6 {
    public static void main(String[] args){
        Thread t=new Thread("自定义线程"){
          public void run(){
              while(true){
                  System.out.println("hello,Thread");
                  try {
                      Thread.sleep(1000);
                  } catch (InterruptedException e) {
                      throw new RuntimeException(e);
                  }
              }
          }
        };
        t.start();
        while(true){
            System.out.println("hello,main");
            try {
                Thread.sleep(1000);
            } catch (InterruptedException e) {
                throw new RuntimeException(e);
            }
        }
    }
}
public class Demo7 {
    public static void main(String[] args){
        Thread t=new Thread(new Runnable(){
            public void run(){
                while(true){
                    System.out.println("hello,Thread");
                    try {
                        Thread.sleep(1000);
                    } catch (InterruptedException e) {
                        throw new RuntimeException(e);
                    }
                }
            }
        },"自定义线程");
        t.start();
    }
}
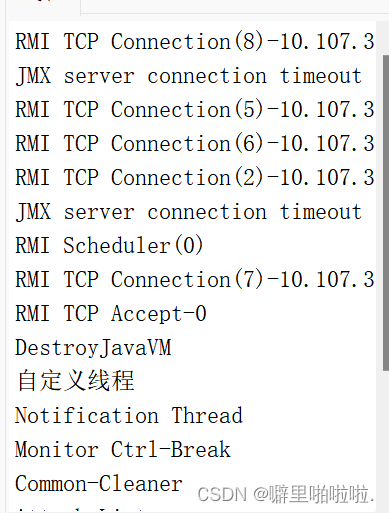
通过下面可以看到成功给创建的进程命名了


第二个代码并没有看到main线程,原因是main线程执行的太快了,已经执行完毕.main线程执行完毕之后就会销毁.
Thread类的属性
ID :注意这里的ID是和PCB上的ID不同,是JVM自己的.获取方法是 getId()
public class Demo8 {
    public static void main(String[] args){
        Thread t=new Thread(()->{
           while(true){
               System.out.println("一个线程");
               try {
                   Thread.sleep(1000);
               } catch (InterruptedException e) {
                   throw new RuntimeException(e);
               }
           }
        });
        t.start();
        System.out.println(t.getId());

    }
}
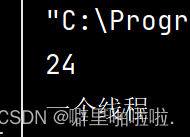
可以看到这个线程的ID是24.
名称:获取方法是 getName()
public class Demo8 {
    public static void main(String[] args){
        Thread t=new Thread(()->{
           while(true){
               System.out.println("一个线程");
               try {
                   Thread.sleep(1000);
               } catch (InterruptedException e) {
                   throw new RuntimeException(e);
               }
           }
        });
        t.start();
        System.out.println(t.getId());
        System.out.println(t.getName());
    }
} 
状态:获取方法 getState()
public class Demo8 {
    public static void main(String[] args){
        Thread t=new Thread(()->{
           while(true){
               System.out.println("一个线程");
               try {
                   Thread.sleep(1000);
               } catch (InterruptedException e) {
                   throw new RuntimeException(e);
               }
           }
        });
        System.out.println(t.getId());
        System.out.println(t.getName());
        System.out.println(t.getState());
    }
}
可以看到上述代码的状态是NEW

优先级:获取方法 getPriority()
public class Demo8 {
    public static void main(String[] args){
        Thread t=new Thread(()->{
           while(true){
               System.out.println("一个线程");
               try {
                   Thread.sleep(1000);
               } catch (InterruptedException e) {
                   throw new RuntimeException(e);
               }
           }
        });
        System.out.println(t.getId());
        System.out.println(t.getName());
        System.out.println(t.getState());
        System.out.println(t.getPriority());
    }
}
是否后台线程:获取方法 isDaemon() 还是刚才的代码,执行这个获取方法 isDaemin()得到的结果如下:
 表示创建的这个线程不是后台线程,这里介绍一下这个名词.
后台线程:这样的线程即使还在继续执行,也不能阻止java进程结束.
前台线程:这样的线程如果还没有执行完的话,此时java进程是一定不会结束的.
在java代码中,main线程就是前台线程.另外程序员创造出来的线程,默认情况下都是前台线程.可以通过setDaemon()的方法把线程设置为后台线程.
如下,t默认是前台线程,当main线程执行完后,进程不会结束,t线程还在执行会继续打印.但是当把t线程设置为后台线程的时候,当main线程执行完后,进程会立即结束,停止打印.
public class Demo8 {
    public static void main(String[] args) {
        Thread t = new Thread(() -> {
            while (true) {
                System.out.println("一个线程");
                try {
                    Thread.sleep(1000);
                } catch (InterruptedException e) {
                    throw new RuntimeException(e);
                }
            }
        });
        t.setDaemon(true);
        t.start();
    }
}
可以看到由于main线程执行完之后,进程就结束了,此时t线程还没有打印.这里要注意的是t.setDaemon()一定要在t.start()的前面. 但也有打印一次的情况.如下:
 出现的原因主要是,线程之间是抢占式执行的,调度顺序不确定.
是否存活:指的是系统中的线程(PCB)是否存在. Thread对象的生命周期和PCB的生命周期是不一样的.比如:
public class Demo9 {
    public static void main(String[] args) throws InterruptedException {
        Thread t=new Thread(()->{

        });
        //这里已经创建了Thread的实例,Thread对象已经诞生了.但是内核中的PCB还内有诞生.
        t.start();
        //通过t.start()才创建出线程.(PCB才真正创建出来并被加入到链表中.)
        Thread.sleep(100000);
        //由于t线程中的啥都没写,t线程的执行瞬间结束,内核中的线程和PCB被销毁.
        //但是在sleep结束之前,t指向的Thread对象还是存在的.此时,就看到,系统中的线程先结束了,但是t仍然存在.
        System.out.println(t.isAlive());
    }
}
中断一个线程:
1.纯自己来实现,控制线程结束
public class Demo10 {
    public static boolean isRunning=true;
    public static void main(String[] args){
        Thread t=new Thread(()->{
           while(isRunning){
               System.out.println("hello,Thread");
           }
            System.out.println("该线程结束执行");
        });
        t.start();

        System.out.println("结束执行创建的线程");
        isRunning=false;
    }
}
2.使用Thread提供的interrupt方法和isInterruptted方法,来实现上述的效果.
public class Demo11 {
    public static void main(String[] args){
        Thread t=new Thread(()->{
           while(!Thread.currentThread().isInterrupted()){
               System.out.println("hello,Thread");
               try {
                   Thread.sleep(1000);
               } catch (InterruptedException e) {
                   break;
               }
           }
            //Thread.currentThread是个静态方法,能够获取到当前线程即t引用.
            //isInterrupted 线程内置的标志位 boolean变量. true表示线程要终止了,false表示线程要继续执行.
        });

        t.start();
        try {
            Thread.sleep(3000);
        } catch (InterruptedException e) {
            throw new RuntimeException(e);
        }
        t.interrupt();
    }
}


 6131
6131

 被折叠的 条评论
为什么被折叠?


