


给大家的福利
零基础入门
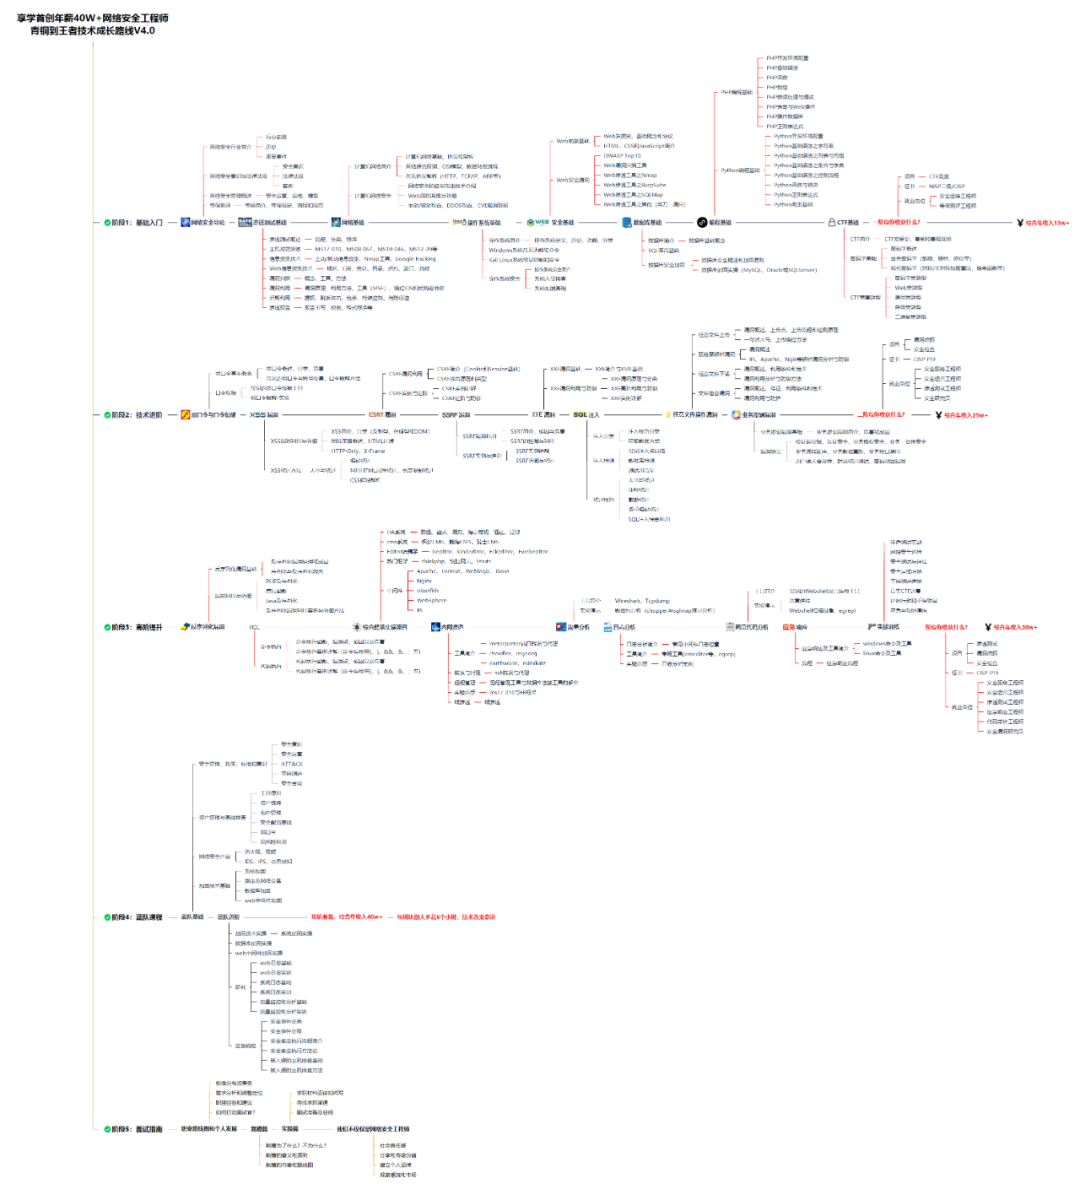
对于从来没有接触过网络安全的同学,我们帮你准备了详细的学习成长路线图。可以说是最科学最系统的学习路线,大家跟着这个大的方向学习准没问题。
同时每个成长路线对应的板块都有配套的视频提供:
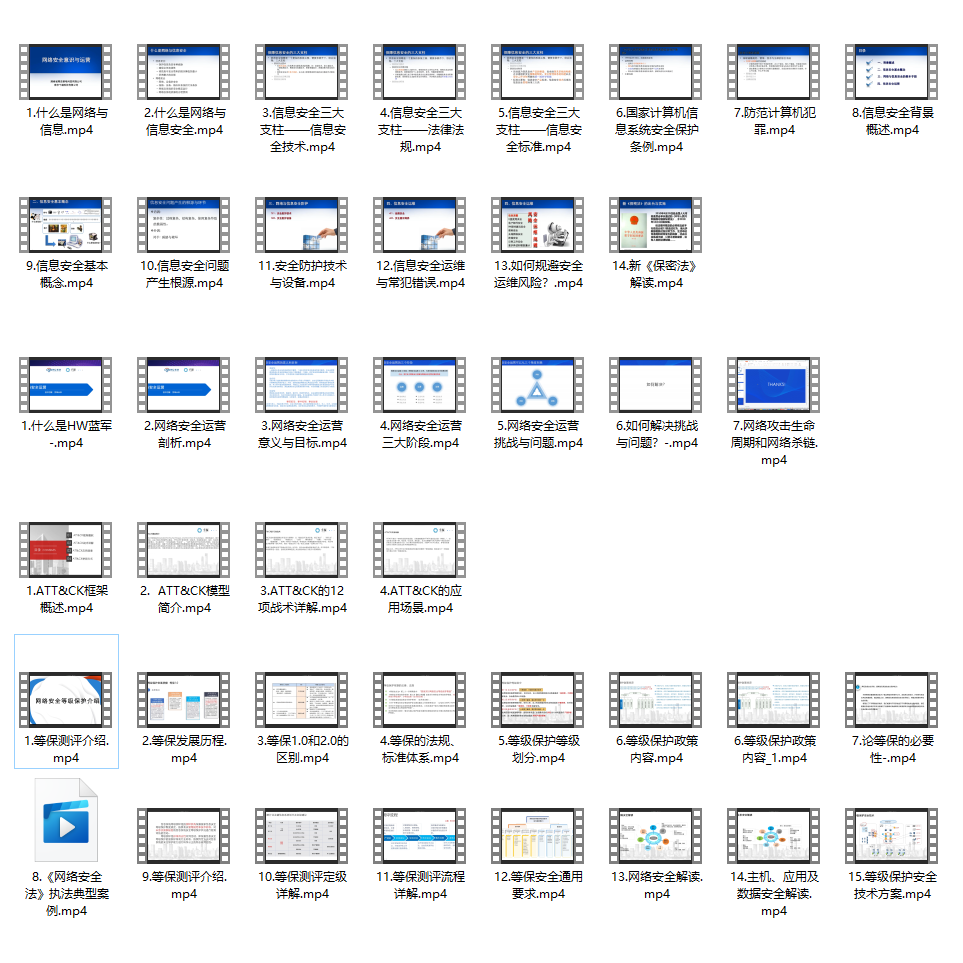
因篇幅有限,仅展示部分资料
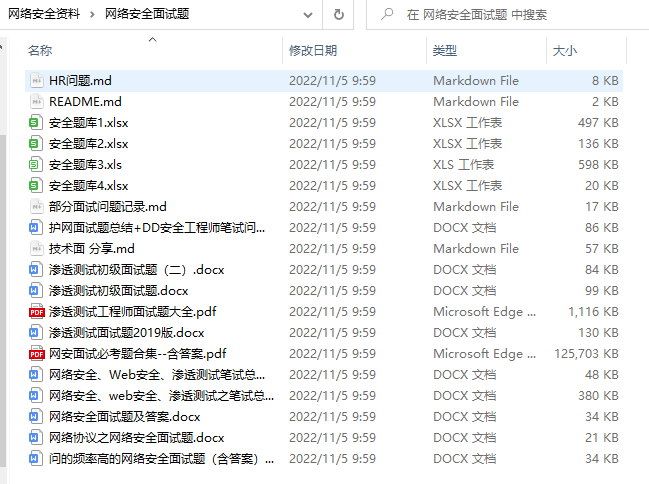
网络安全面试题
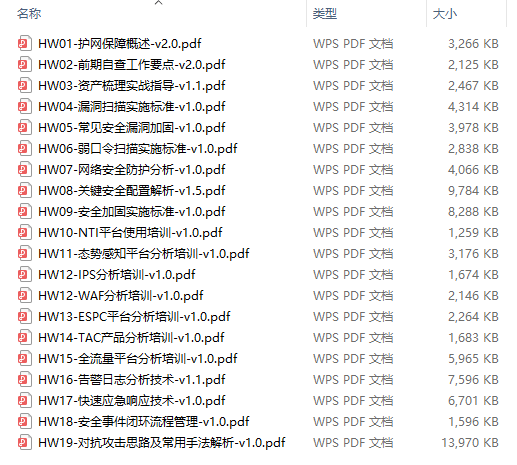
绿盟护网行动
还有大家最喜欢的黑客技术
网络安全源码合集+工具包
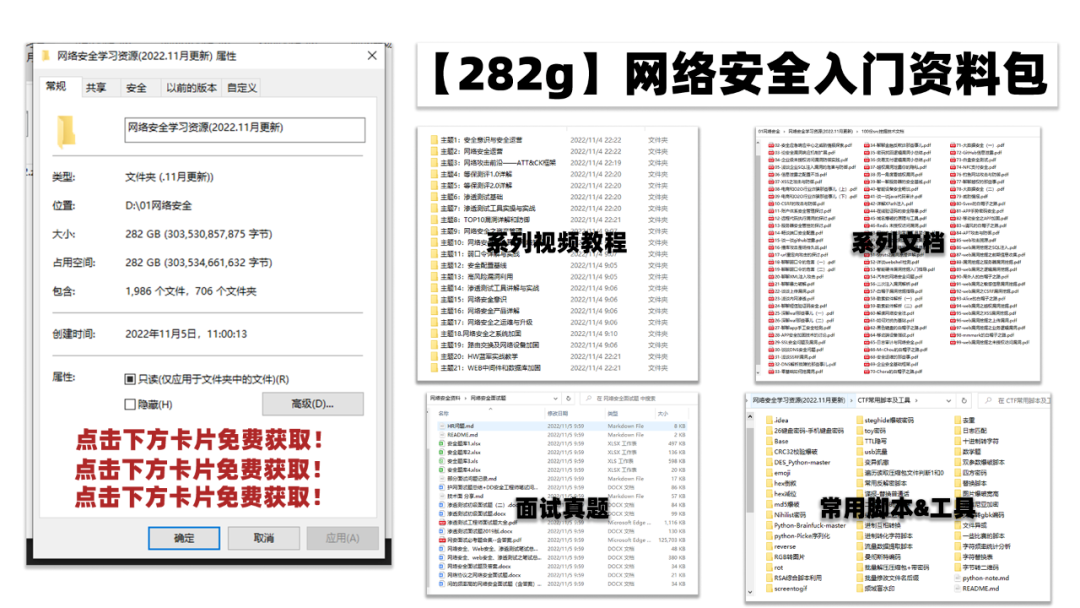
所有资料共282G,朋友们如果有需要全套《网络安全入门+黑客进阶学习资源包》,可以扫描下方二维码领取(如遇扫码问题,可以在评论区留言领取哦)~
网上学习资料一大堆,但如果学到的知识不成体系,遇到问题时只是浅尝辄止,不再深入研究,那么很难做到真正的技术提升。
一个人可以走的很快,但一群人才能走的更远!不论你是正从事IT行业的老鸟或是对IT行业感兴趣的新人,都欢迎加入我们的的圈子(技术交流、学习资源、职场吐槽、大厂内推、面试辅导),让我们一起学习成长!
[root@4-30 elasticsearch-8.1.0]# mkdir /elasticsearch/elastic-cluster1/eslogs
1、先简单配置一下,vim elasticsearch-8.1.0/config/elasticsearch.yml
cluster.name: elasticsearch-cluster
node.name: node-1
path.data: /elasticsearch/elastic-cluster1/esdata
path.logs: /elasticsearch/elastic-cluster1/eslogs
network.host: 0.0.0.0
http.port: 9200
2、配置文件属组权限,并启动
1、chown -R es:es /elasticsearch/elastic-cluster1/
2、切换到其它用户,root用户不能启动ES:su es
3、进入目录:/elasticsearch/elastic-cluster1/elasticsearch-8.1.0
4、启动:./bin/elasticsearch
后台启动可以加-d的方式,第一次初始化集群看一下启动过程
执行完后检查一下:ls -al /elasticsearch/elastic-cluster1/
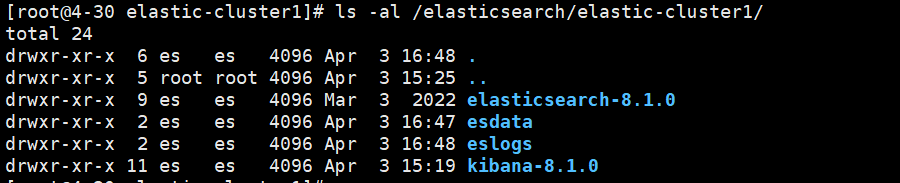
3、查看启动含义
启动的回显如下就代表成功了生成的信息如下:
━━━━━━━━━━━━━━━━━━━━━━━━━━━━━━━━━━━━━━━━━━━━━━━━━━━━━━━━━━━━━━━━━━━━━━━━━━━━━━━━━━━━━━━━━━━━━━━━━━━━━━━━━━━━━━━━━━━━━━━━━━━━━━━━━━━━━━━━━━━━━━━━━━━━━━━━━━━━━━━━━━━━━━━━━━━
? Elasticsearch security features have been automatically configured!
? Authentication is enabled and cluster connections are encrypted.
?? Password for the elastic user (reset with bin/elasticsearch-reset-password -u elastic): ##es登陆的密码
j6np-BzH3+xtJwyvwXjh
?? HTTP CA certificate SHA-256 fingerprint:
18efaa1f3bd314cbe40839b5472aba6af179f17b62b0d4c8631cc97229ccabe6
?? Configure Kibana to use this cluster:
? Run Kibana and click the configuration link in the terminal when Kibana starts.
? Copy the following enrollment token and paste it into Kibana in your browser (valid for the next 30 minutes): ##登陆kibana的注册令牌,时效30分钟
eyJ2ZXIiOiI4LjEuMCIsImFkciI6WyIxOTIuMTY4LjAuMjo5MjAwIl0sImZnciI6IjE4ZWZhYTFmM2JkMzE0Y2JlNDA4MzliNTQ3MmFiYTZhZjE3OWYxN2I2MmIwZDRjODYzMWNjOTcyMjljY2FiZTYiLCJrZXkiOiJXM3hiUm9jQjd5UlZ6QmJBR0xOSDp2NVZ5MjRDT1MwdVJjeVlIRlZKeDhRIn0=
?? Configure other nodes to join this cluster:
? Copy the following enrollment token and start new Elasticsearch nodes with bin/elasticsearch --enrollment-token <token> (valid for the next 30 minutes):
eyJ2ZXIiOiI4LjEuMCIsImFkciI6WyIxOTIuMTY4LjAuMjo5MjAwIl0sImZnciI6IjE4ZWZhYTFmM2JkMzE0Y2JlNDA4MzliNTQ3MmFiYTZhZjE3OWYxN2I2MmIwZDRjODYzMWNjOTcyMjljY2FiZTYiLCJrZXkiOiJYSHhiUm9jQjd5UlZ6QmJBR0xOSDp0Sm82RWNvYlQ4Nmc0WkNLX2w4SUp3In0=
If you’re running in Docker, copy the enrollment token and run:
docker run -e "ENROLLMENT_TOKEN=<token>" docker.elastic.co/elasticsearch/elasticsearch:8.1.0
━━━━━━━━━━━━━━━━━━━━━━━━━━━━━━━━━━━━━━━━━━━━━━━━━━━━━━━━━━━━━━━━━━━━━━━━━━━━━━━━━━━━━━━━━━━━━━━━━━━━━━━━━━━━━━━━━━━━━━━━━━━━━━━━━━━━━━━━━━━━━━━━━━━━━━━━━━━━━━━━━━━━━━━━━━━
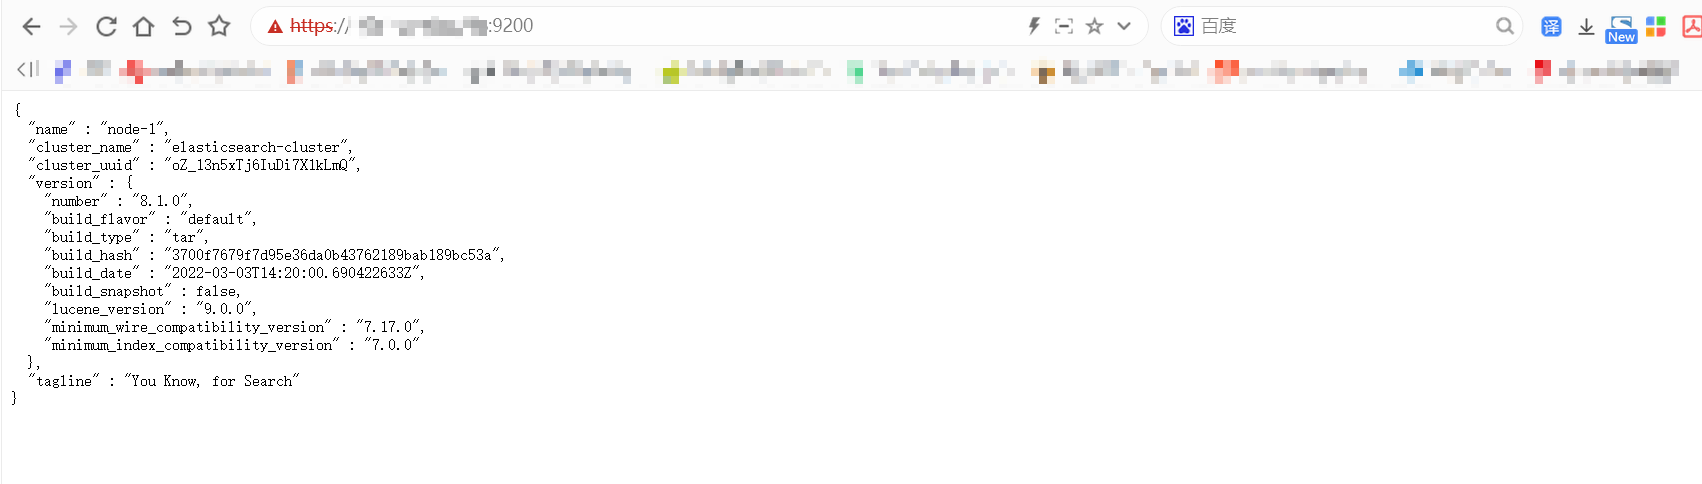
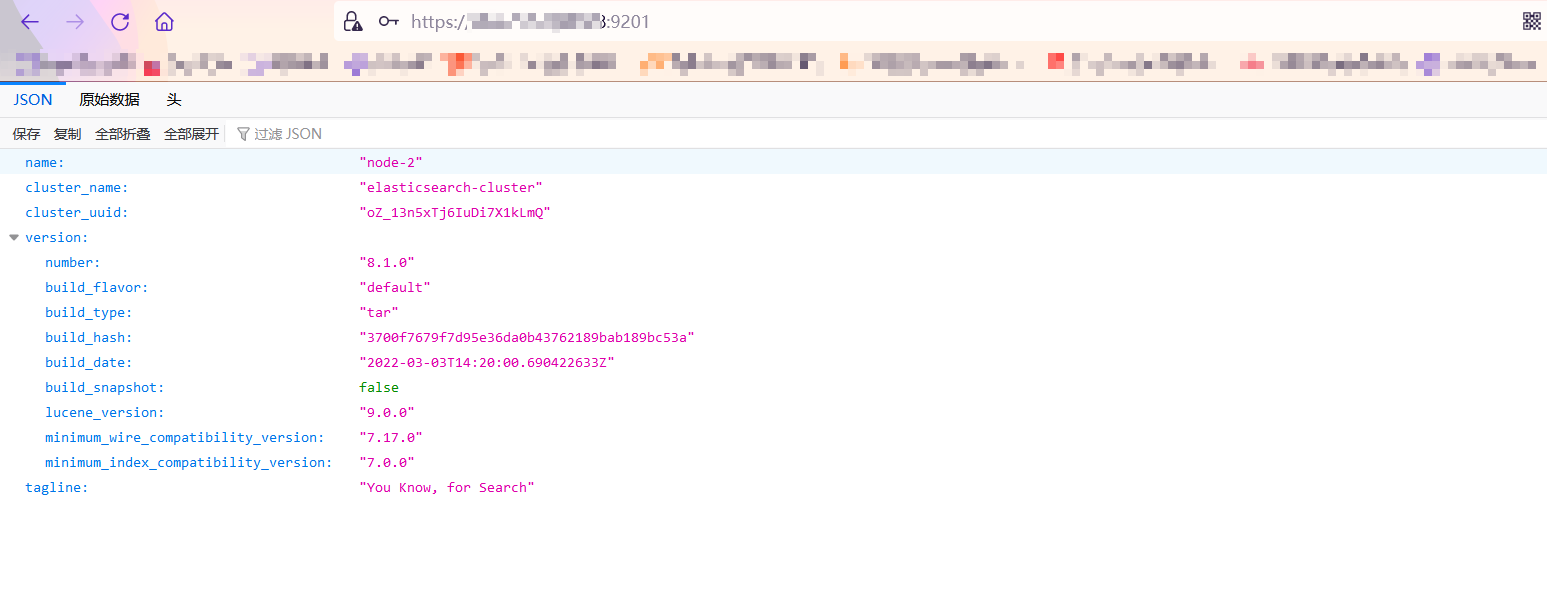
4、浏览器访问
输入你的公网IP加9200端口,注意要用https访问,输入前面生成的密码:j6np-BzH3+xtJwyvwXjh,用户是:elastic
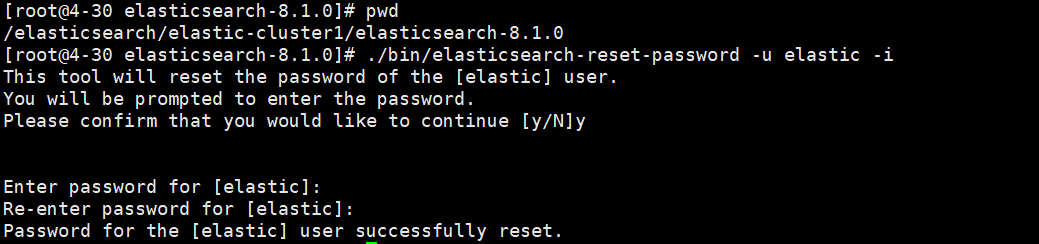
#### 2.3.1、重置密码
输入账户密码登陆,如果忘记密码,可以使用命令重新设置密码:/elasticsearch-reset-password -u elastic -i
注:集群得在启动的前提来修改,如果集群没有启动修改密码报错
#### 2.3.2、重新生成kibana令牌
生成命令:bin/elasticsearch-create-enrollment-token -s kibana

如果你的kibana不在同一台主机上就需要加上http或https的访问路径生成,用""扩起来
#### 2.3.3、转换成生产环境后默认的es配置说明
cluster.name: elasticsearch-cluster
node.name: node-1
path.data: /elasticsearch/elastic-cluster1/esdata
path.logs: /elasticsearch/elastic-cluster1/eslogs
network.host: 0.0.0.0
http.port: 9200
默认为true,启用 Elasticsearch 安全功能:xpack.security.enabled: true
xpack.security.enrollment.enabled: true
用于在 Elasticsearch 用于与其他客户端通信的 HTTP 网络层上启用或禁用 TLS/SSL。默认值为false:xpack.security.http.ssl:
表示开启:enabled: true
包含私钥和证书的密钥库文件的路径,目录在config/certs/http.p12:keystore.path: certs/http.p12
用于在传输网络层上启用或禁用 TLS/SSL,节点用于相互通信。默认值为false:xpack.security.transport.ssl:
表示开启:enabled: true
控制证书的验证。控制证书的验证:verification_mode: certificate
certificate:它验证提供的证书是否由可信机构 (CA) 签名,但不执行任何主机名验证
包含私钥和证书的密钥库文件的路径:keystore.path: certs/transport.p12
包含要信任的证书的密钥库的路径。它必须是 Java 密钥库 (jks) 或 PKCS#12 文件:truststore.path: certs/transport.p12
选举主节点master资格的节点:cluster.initial_master_nodes: [“node-1”]
## 3、配置kibana


### 3.1、下载安装


官网下载地址,选择对应版本的elasticsearch和kibana:https://www.elastic.co/cn/downloads/past-releases#kibana


官网文档:https://www.elastic.co/guide/en/kibana/8.1/introduction.html
解压:tar zxf /root/kibana-8.1.0-linux-x86_64.tar.gz -C /elasticsearch/elastic-cluster1
1、进入到解压目录

2、编辑配置文件:vim kibana-8.1.0/config/kibana.yml
设置kibana的访问端口:server.port: 5601
主机所在的IP:server.host: “”
指定连接Elasticsearch的连接地址:elasticsearch.hosts: [“http://IP:端口”]
我配置如下:

3、启动kibana
root用户启动:kibana-8.1.0/bin/kibana --allow-root
启动成功的截图如下,会生成一个url,复制下来把0.0.0.0换成IP地址,在访问

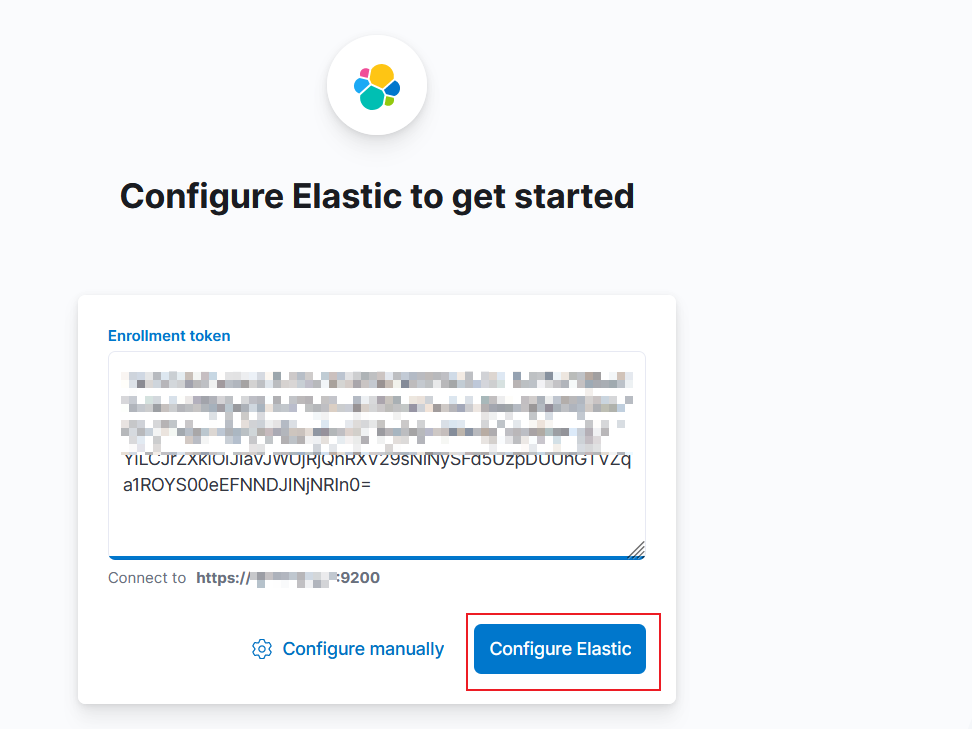
4、输入elasticsearch的kibana令牌登陆
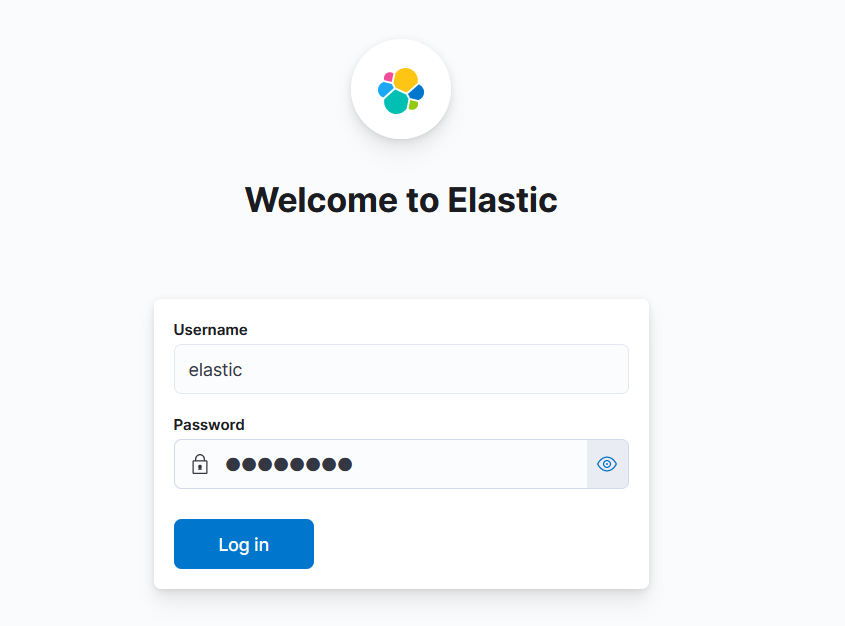
5、输入账号密码:内置超级用户elastic
6、添加或不添加都行,add或explore点哪个都行
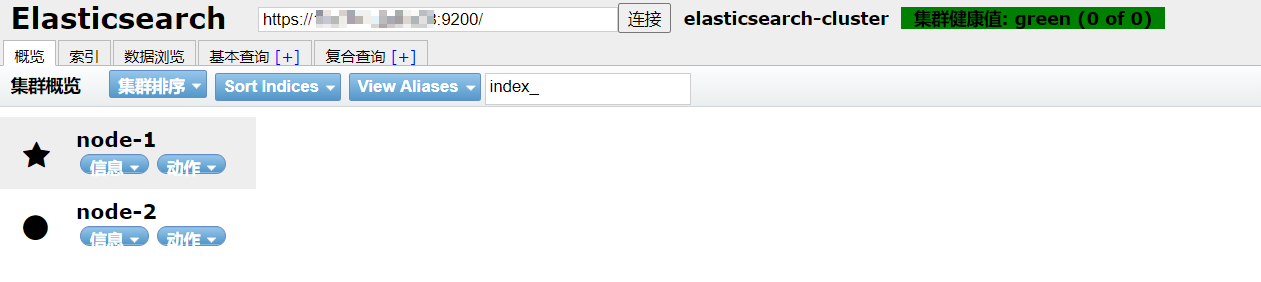
7、在kibana里验证一下,可以看到es的节点信息

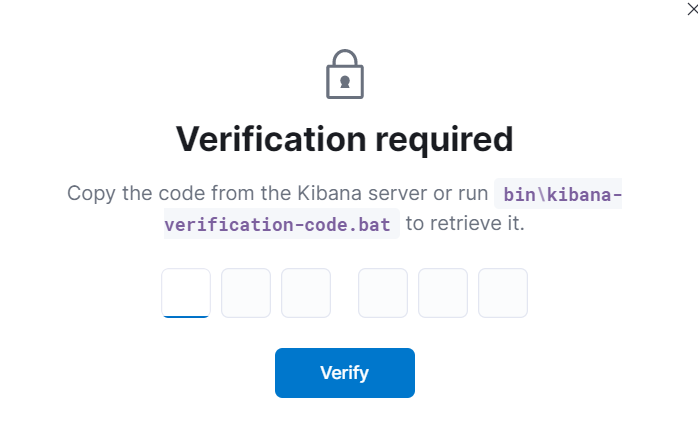
8、如果遇到这个信息,这个不是报错,可以看一下linux终端上的信息,kibana会输出6个数字,输入进去即可
## 4、同一台服务器的elastic集群配置
### 4.1、生成新的elastic
单点部署完毕后来生成一个新的elastic,把之前的单点部署先停掉
1、把原有的配置都复制过去:cp -R elastic-cluster1/\* elastic-cluster2/

2、设置权限
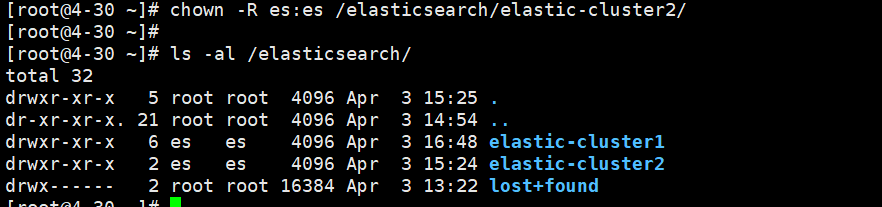
3、删除原有集群生成的数据和logs日志,不删除会报错:rm -rf esdata/\* eslogs/\*

4、配置文件对比如下:
集群node-1
cluster.name: elasticsearch-cluster
node.name: node-1
path.data: /elasticsearch/elastic-cluster1/esdata
path.logs: /elasticsearch/elastic-cluster1/eslogs
network.host: 0.0.0.0
http.port: 9200
transport.port: 9300
discovery.seed_hosts: [“192.168.0.2:9300”, “192.168.0.2:9301”]
cluster.initial_master_nodes: [“node-1”, “node-2”]
xpack.security.enabled: true
xpack.security.enrollment.enabled: true
xpack.security.http.ssl:
enabled: true
keystore.path: certs/http.p12
xpack.security.transport.ssl:
enabled: true
verification_mode: certificate
keystore.path: certs/transport.p12
truststore.path: certs/transport.p12
集群node-2
cluster.name: elasticsearch-cluster
node.name: node-2
path.data: /elasticsearch/elastic-cluster2/esdata
path.logs: /elasticsearch/elastic-cluster2/eslogs
network.host: 0.0.0.0
http.port: 9201
transport.port: 9301
discovery.seed_hosts: [“192.168.0.2:9300”, “192.168.0.2:9301”]
cluster.initial_master_nodes: [“node-1”, “node-2”]
xpack.security.enabled: true
xpack.security.enrollment.enabled: true
xpack.security.http.ssl:
enabled: true
keystore.path: certs/http.p12
xpack.security.transport.ssl:
enabled: true
verification_mode: certificate
keystore.path: certs/transport.p12
truststore.path: certs/transport.p12
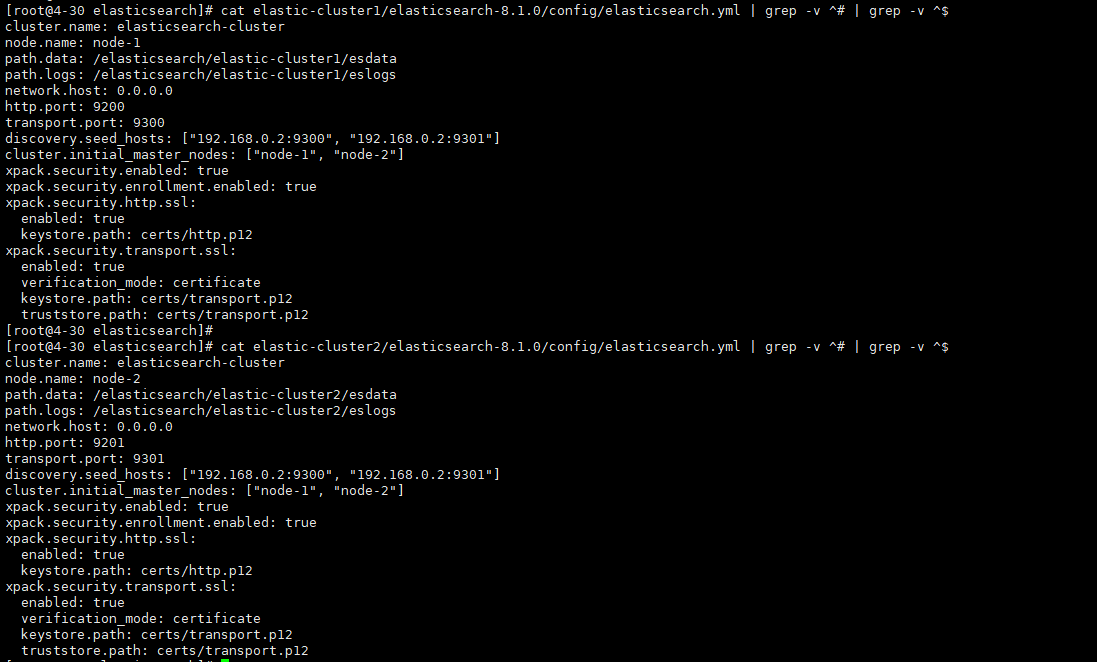
注:配置文件有两行:cluster.initial\_master\_nodes,把最后一行注释掉,保留前面的一行,设置es节点:: [“node-1”, “node-2”],仔细看文件差异,因为是同一台服务器部署多节点形成集群所以有部分设置是唯一性的
5、访问测试
把2个es都启动,不然无法访问
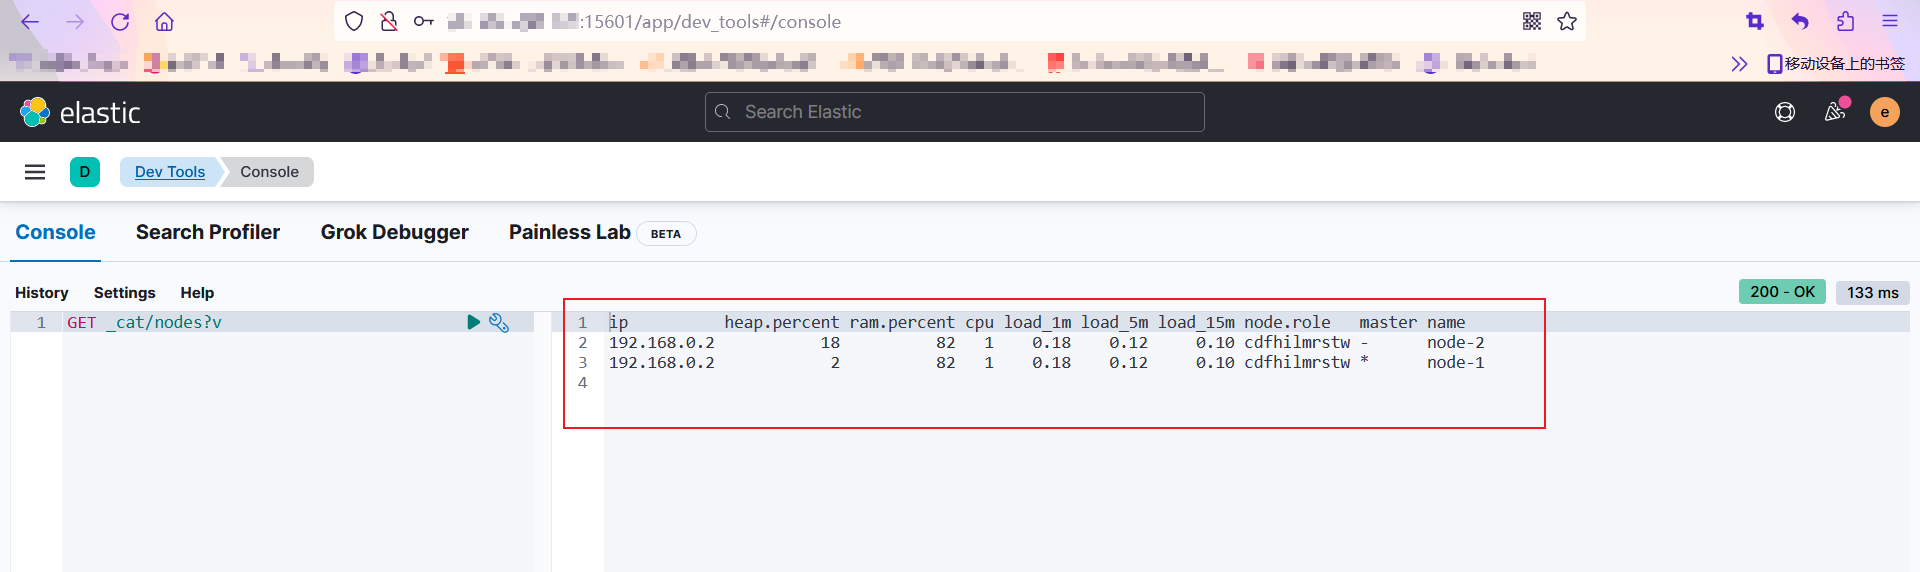
6、启动kibana:elastic-cluster1/kibana-8.1.0/bin/kibana --allow-root
查询结果如下
## 5、多服务器部署节点加入同一集群
因为生产环境的es是启动着安全设置的,使用TLS加密节点间进行通信,可以参考官网文档:https://www.elastic.co/guide/en/elasticsearch/reference/8.1/security-basic-setup.html#encrypt-internode-communication
### 5.1、方法论
注意事项:集群中的节点数量应该是奇数个,最少为3个,这样可以避免脑裂问题
就不放截图了,直接口述,跟上面配置没有太大出入,包括注意事项一样,当时这个问题卡了我几天后来把data目录下的数据删除后在启动就可以了
1、如果你是新集群,es内没有任何数据可以使用此方法,把es里面配置的的data和logs目录下的所有内容都删除
2、主机这两个内网主机是否能通信,首先保证通信正常,能ping就行
3、是否设置了node.roles:,如果默认不用管,如果设置了你要确保你设置的是否正确
4、确保你的ca证书,及tls设置是否正确,可以参考下面配置的生成证书然后分配到对应节点上在加入集群,或者用取巧的方法,直接把集群拷贝过去,然后修改一下启动即可
5、不用生成新的token node,新节点也不用指定token
* 我的操作步骤,复制已有集群到另外一台机器上,然后配置/etc/hosts文件把IP和主机名加入进去,然后,新节点下的data和logs目录内的文件全部删除,配置文件配置好集群信息,启动集群加入新节点即可
* 3个节点的配置文件:
主节点配置如下:
cluster.name: node-xiao
node.name: master
network.host: 0.0.0.0
http.port: 9200
transport.port: 9300
discovery.seed_hosts: [“192.168.0.160:9300”, “192.168.0.160:9302”, “192.168.0.183:9301”]
cluster.initial_master_nodes: [“master”]
xpack.security.enabled: true
xpack.security.enrollment.enabled: true
xpack.security.http.ssl:
enabled: true
keystore.path: certs/http.p12
xpack.security.transport.ssl:
enabled: true
verification_mode: certificate
keystore.path: certs/transport.p12
truststore.path: certs/transport.p12
node1节点配置如下:
cluster.name: node-xiao
node.name: node1
network.host: 0.0.0.0
http.port: 9202
transport.port: 9302
discovery.seed_hosts: [“192.168.0.160:9300”, “192.168.0.160:9302”, “192.168.0.183:9301”]
cluster.initial_master_nodes: [“master”]
xpack.security.enabled: true
xpack.security.enrollment.enabled: true
xpack.security.http.ssl:
enabled: true
keystore.path: certs/http.p12
xpack.security.transport.ssl:
enabled: true
verification_mode: certificate
keystore.path: certs/transport.p12
truststore.path: certs/transport.p12
node2节点配置如下:
cluster.name: node-xiao
node.name: node2
network.host: 0.0.0.0
http.port: 9201
transport.port: 9301
discovery.seed_hosts: [“192.168.0.183:9301”, “192.168.0.160:9302”, “192.168.0.160:9300”]
cluster.initial_master_nodes: [“master”]
xpack.security.enabled: true
xpack.security.enrollment.enabled: true
xpack.security.http.ssl:
enabled: true
keystore.path: certs/http.p12
xpack.security.transport.ssl:
enabled: true
verification_mode: certificate
keystore.path: certs/transport.p12
truststore.path: certs/transport.p12

* 我试了两种方法,第一种是集群全部是初始化新的状态,方法二是加入节点,没有太大的差异
跟方法1没有什么出入

### 5.3、生成设置证书
官网文档:https://www.elastic.co/guide/en/elasticsearch/reference/8.1/update-node-certs-same.html
我的报错如下:错误:跳过安全自动配置,因为此节点被配置为引导或加入不受支持的多节点群集
**注:我生成的是两个节点的证书,你需要最少配置3个节点,多加入个IP即可**
解决方案:
1、禁用群集中所有节点的安全性:xpack.security.enabled: false
2、禁止引导检查:discovery.type=single-node
3、配置集群通信密钥,让集群通信在加入
ERROR: Skipping security auto configuration because this node is configured to bootstrap or to join a multi-node cluster, which is not supported.
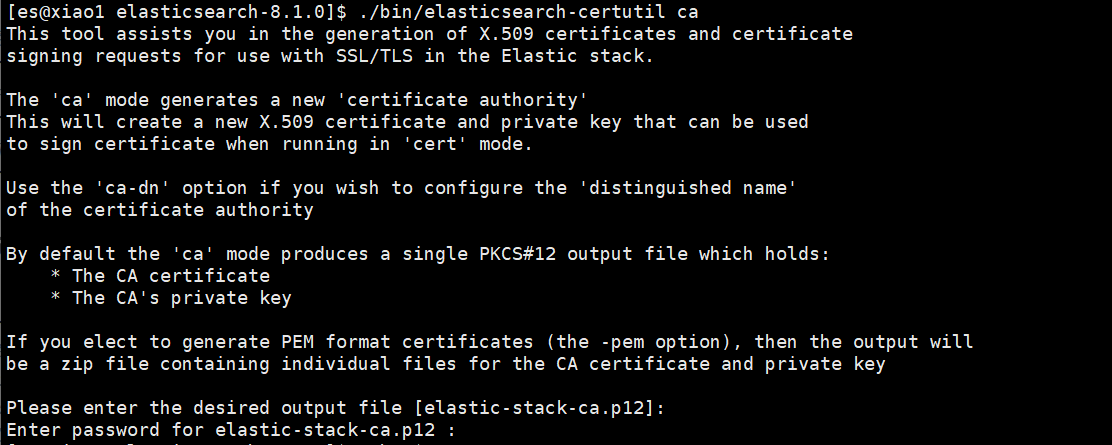
* 进入elastic的目录下,执行命令生成ca证书:elasticsearch-certutil ca,默认直接回车即可,第一个选项设置名称,第二个设置密码

* 为刚刚生成的ca证书生成一个密钥库:./bin/elasticsearch-certutil cert --ca elastic-stack-ca.p12,(elastic-stack-ca.p12为刚刚生成ca的名字)
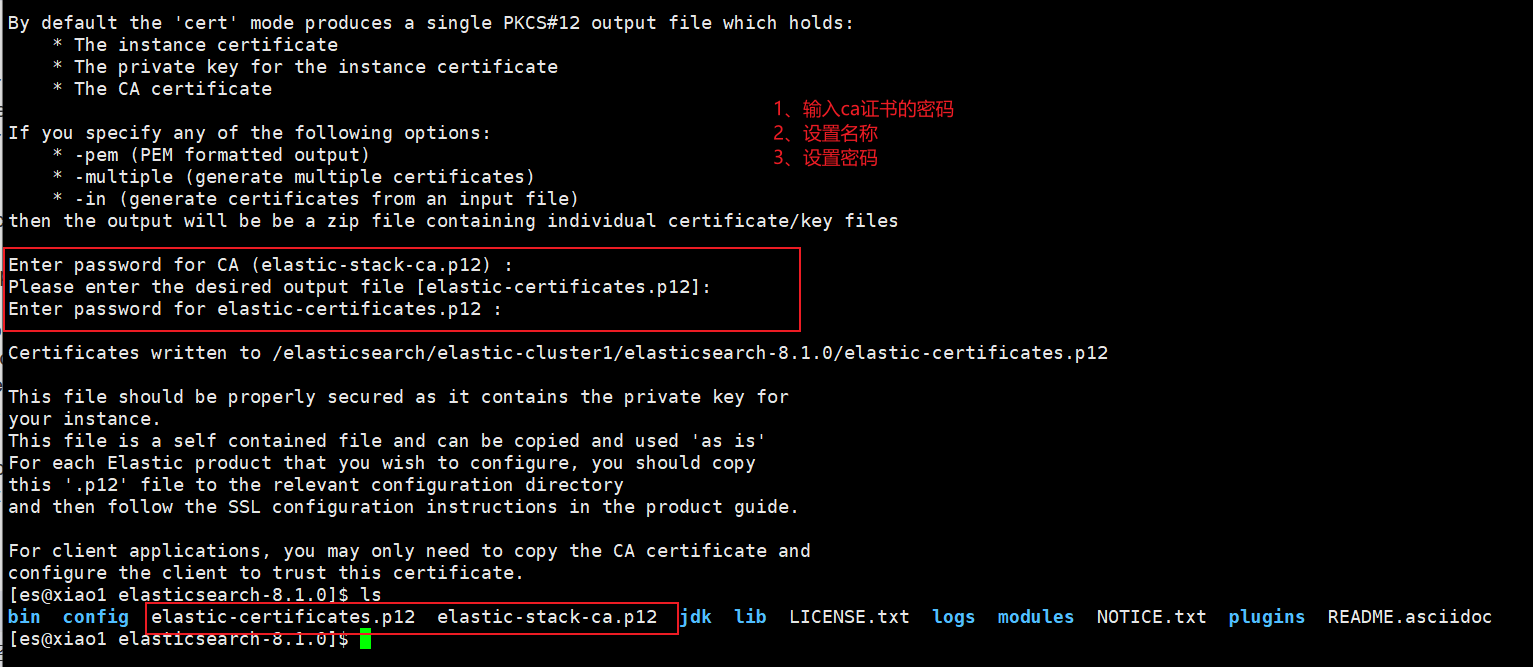
* 把生成的证书移动到certs目录下:mv elastic-certificates.p12 ./config/certs/,mv elastic-stack-ca.p12 ./config/certs/
* 生成http的证书:./bin/elasticsearch-certutil http
1、第一个选项询问你是否生成CSR选择:n
2、询问你是否使用现有CA选择是:y
3、输入ca证书的路径,我生成的ca证书名称是elastic-stack-ca.p12:certs/elastic-stack-ca.p12
4、输入ca证书的密码,没设置直接回车即可
5、设置证书的有效期,我输入的5y,等于5年
6、是否未每个节点生成证书输入:y
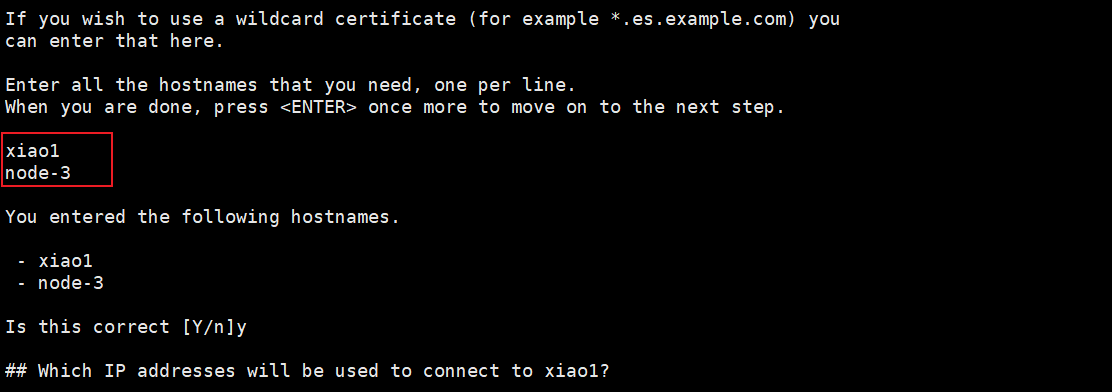
7、输入节点名称,我输入的xiao1,我的主机名,稍后把es的配置文件node.name和现在输入的节点名称一致,建议这样做
8、设置哪些节点可以连接,输入主机名,一行一个,输入完了回车即可
9、确认主机名是否正确,正确输入:y
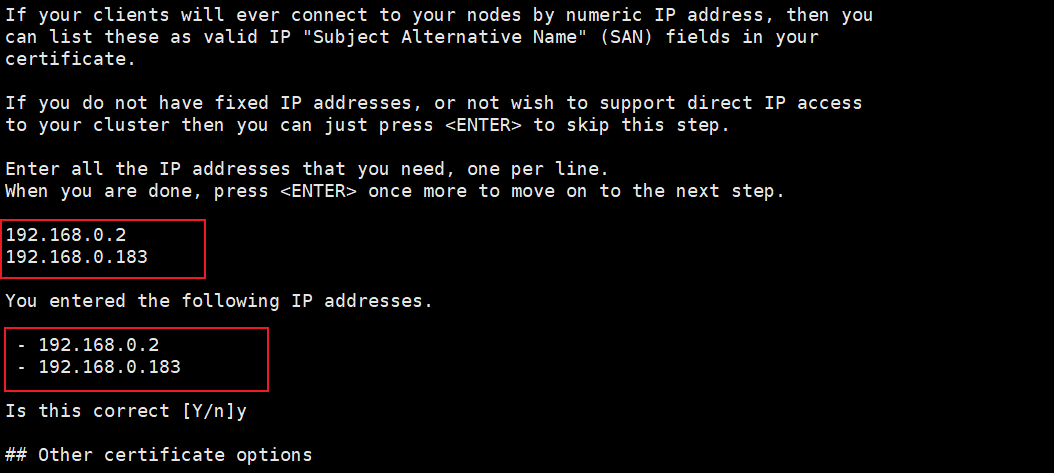
10、输入2台服务器的内网IP,每行一个,输入完了回车即可
11、确认IP是否正确,正确输入:y
12、会生成密钥的名称和大小让你确认,输入n即可,不需要更改:n
13、会在咨询你是否要生成其它证书,n,不需要
14、设置密码,我设置的空白直接回车
15、让你设置将要输出的文件名称,并会给到你一个路径这就是我们刚刚生成的证书
* 我使用的默认名称,解压一下:unzip elasticsearch-ssl-http.zip,会生成一个elasticsearch目录,移动到certs目录下:mv elasticsearch/http.p12 kibana/elasticsearch-ca.pem config/certs/
* 把certs目录传输到新节点,我新节点是全新刚解压的环境:scp -r /elasticsearch/elastic-cluster1/elasticsearch-8.1.0/config/certs/ node-3:/elasticsearch/elasticsearch-8.1.0/config/
## 6、冷热温节点部署
1、创建3个目录:冷节点:es-cold 、热节点:es-hot、温节点:es-warm
注:配置前先参考第2目录的安装前提,部分设置跳过,直接上3个节点的配置文件,及查询结果
配置冷热温节点必要的一步配置就是设置角色,使用node.roles参数进行设置
* 热节点:es-hot:
cluster.name: node-xiaoming1
node.name: node-1
network.host: 192.168.0.160
node.roles: [data_hot, data_content, master, ingest]
http.port: 9200
transport.port: 9300
discovery.seed_hosts: [“192.168.0.160:9300”]
cluster.initial_master_nodes: [“node-1”]
xpack.security.enabled: true
xpack.security.enrollment.enabled: true
xpack.security.http.ssl:
enabled: true
keystore.path: certs/http.p12
xpack.security.transport.ssl:
enabled: true
verification_mode: certificate
keystore.path: certs/transport.p12
truststore.path: certs/transport.p12
* 温节点:es-warm
cluster.name: node-xiaoming1
node.name: node-2
network.host: 192.168.0.160
node.roles: [data_warm, data_content, master, ingest]
http.port: 9201
transport.port: 9301
discovery.seed_hosts: [“192.168.0.160:9300”, “192.168.0.160:9301”]
cluster.initial_master_nodes: [“node-1”]
xpack.security.enabled: true
xpack.security.enrollment.enabled: true
xpack.security.http.ssl:
enabled: true
keystore.path: certs/http.p12
xpack.security.transport.ssl:
enabled: true
verification_mode: certificate
keystore.path: certs/transport.p12
truststore.path: certs/transport.p12
* 冷节点:es-cold:
cluster.name: node-xiaoming1
node.name: node-3
network.host: 192.168.0.160
node.roles: [data_cold, data_content, master, ingest]
http.port: 9202
transport.port: 9302
discovery.seed_hosts: [“192.168.0.160:9300”, “192.168.0.160:9301”, “192.168.0.160:9302”]
cluster.initial_master_nodes: [“node-1”]
xpack.security.enabled: true
xpack.security.enrollment.enabled: true
xpack.security.http.ssl:
enabled: true
keystore.path: certs/http.p12
xpack.security.transport.ssl:
enabled: true
verification_mode: certificate
keystore.path: certs/transport.p12
truststore.path: certs/transport.p12
## 写在最后

**在结束之际,我想重申的是,学习并非如攀登险峻高峰,而是如滴水穿石般的持久累积。尤其当我们步入工作岗位之后,持之以恒的学习变得愈发不易,如同在茫茫大海中独自划舟,稍有松懈便可能被巨浪吞噬。然而,对于我们程序员而言,学习是生存之本,是我们在激烈市场竞争中立于不败之地的关键。一旦停止学习,我们便如同逆水行舟,不进则退,终将被时代的洪流所淘汰。因此,不断汲取新知识,不仅是对自己的提升,更是对自己的一份珍贵投资。让我们不断磨砺自己,与时代共同进步,书写属于我们的辉煌篇章。**


需要完整版PDF学习资源私我


**网上学习资料一大堆,但如果学到的知识不成体系,遇到问题时只是浅尝辄止,不再深入研究,那么很难做到真正的技术提升。**

**[需要这份系统化资料的朋友,可以点击这里获取](https://bbs.csdn.net/forums/4f45ff00ff254613a03fab5e56a57acb)**

**一个人可以走的很快,但一群人才能走的更远!不论你是正从事IT行业的老鸟或是对IT行业感兴趣的新人,都欢迎加入我们的的圈子(技术交流、学习资源、职场吐槽、大厂内推、面试辅导),让我们一起学习成长!**


 1244
1244


 被折叠的 条评论
为什么被折叠?
被折叠的 条评论
为什么被折叠?
 到【灌水乐园】发言


