


专业技能
一般来说,面试官会根据你的简历内容去提问,但是技术基础还有需要自己去准备分类,形成自己的知识体系的。简单列一下我自己遇到的一些题
- HTML+CSS
- JavaScript
- 前端框架
- 前端性能优化
- 前端监控
- 模块化+项目构建
- 代码管理
- 信息安全
- 网络协议
- 浏览器
- 算法与数据结构
- 团队管理
- 开源分享:【大厂前端面试题解析+核心总结学习笔记+真实项目实战+最新讲解视频】
最近得空把之前遇到的面试题做了一个整理,包括我本人自己去面试遇到的,还有其他人员去面试遇到的,还有网上刷到的,我都统一的整理了一下,希望对大家有用。
其中包含HTML、CSS、JavaScript、服务端与网络、Vue、浏览器等等
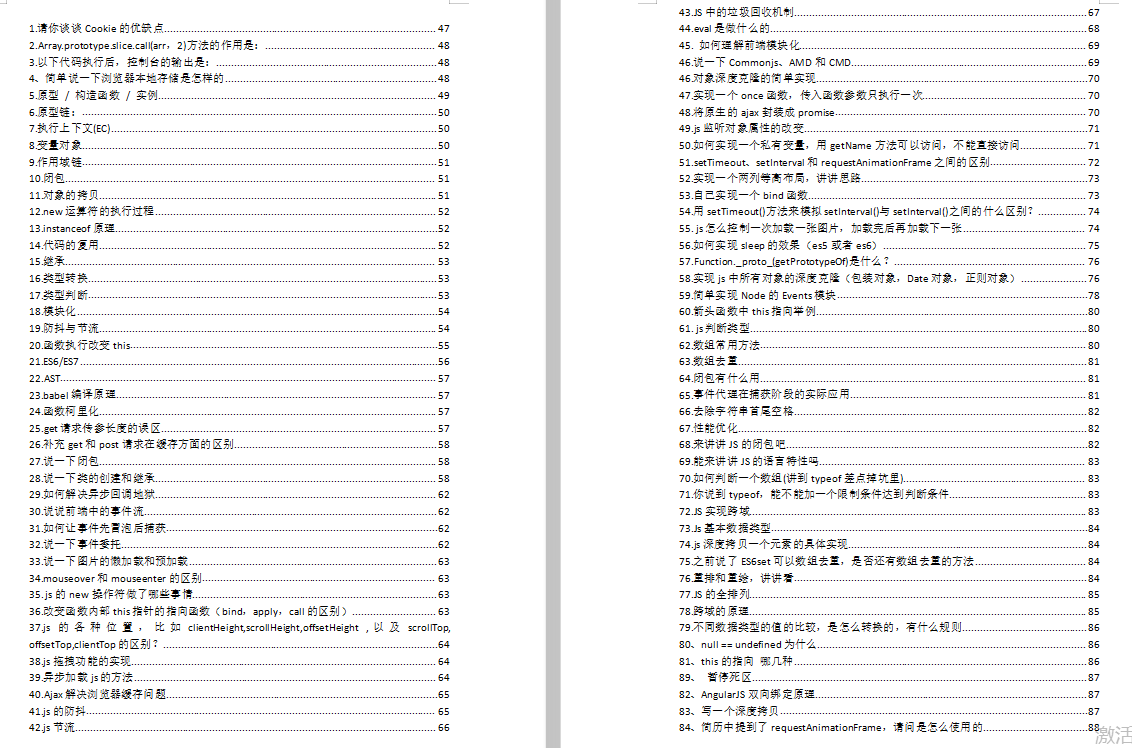
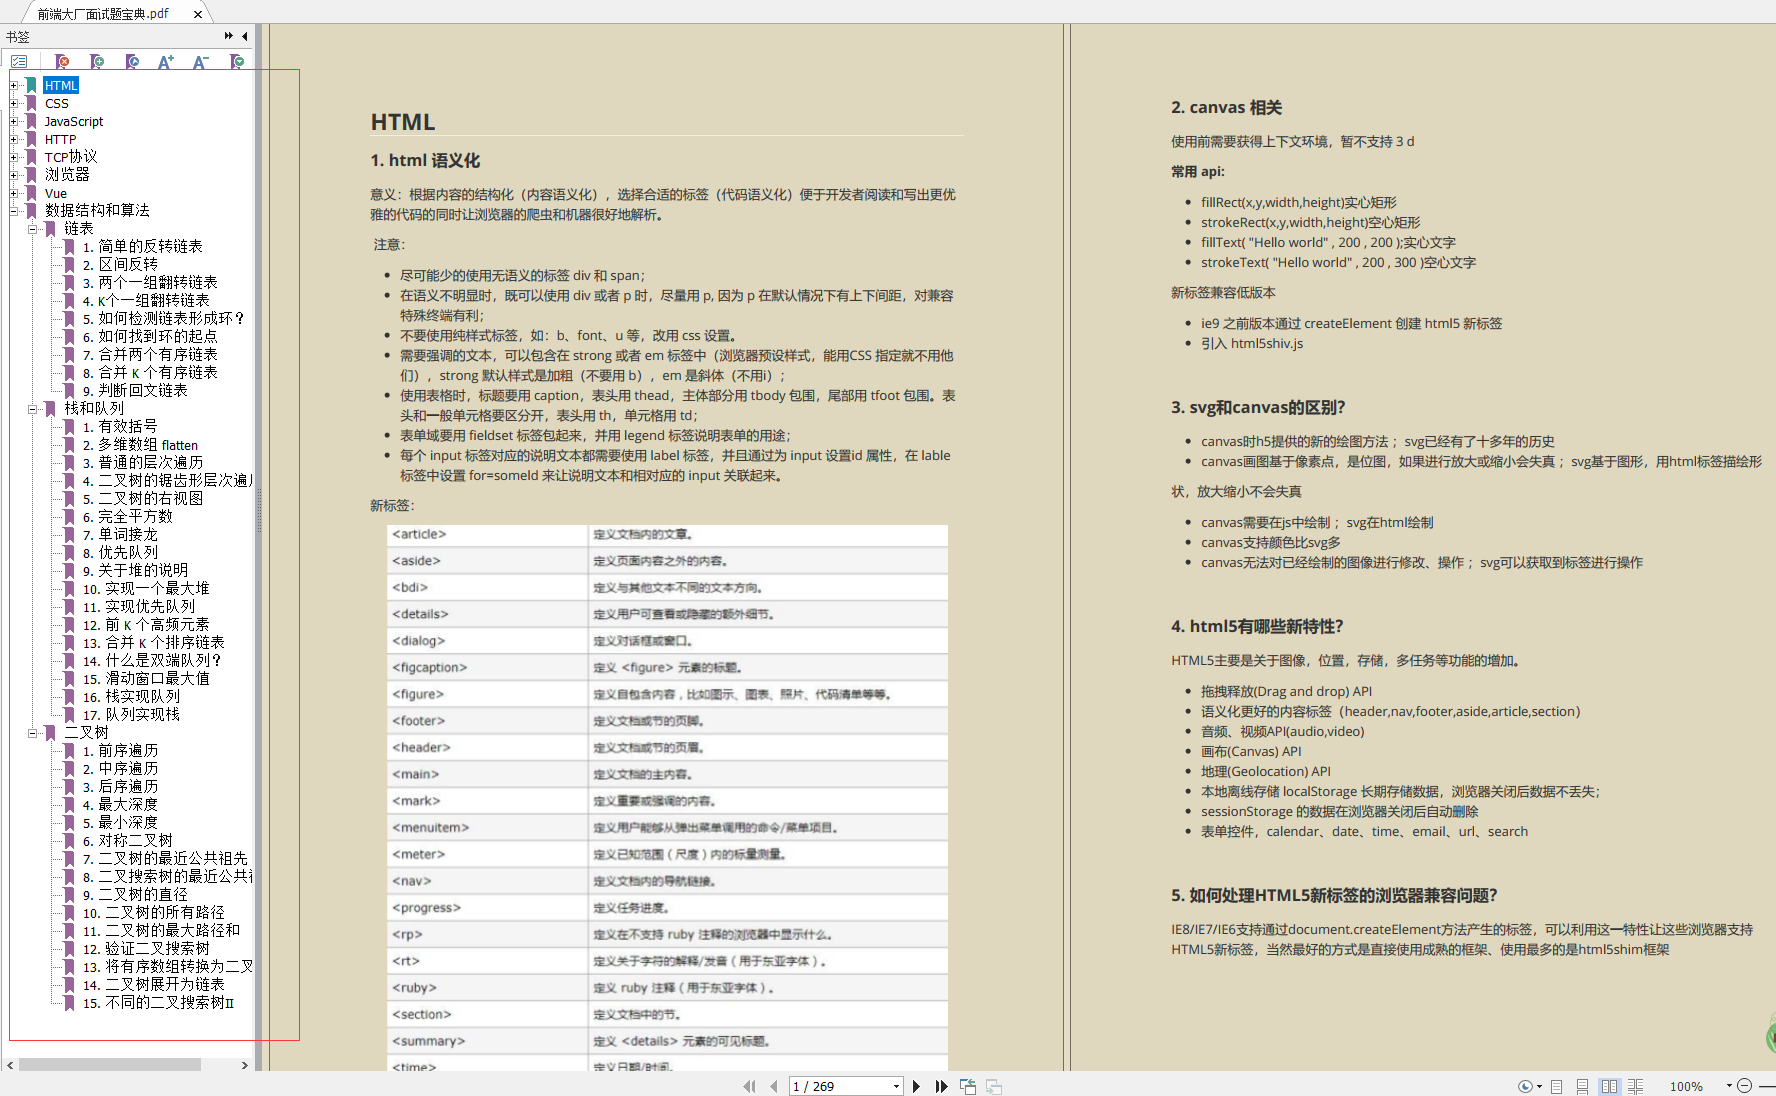
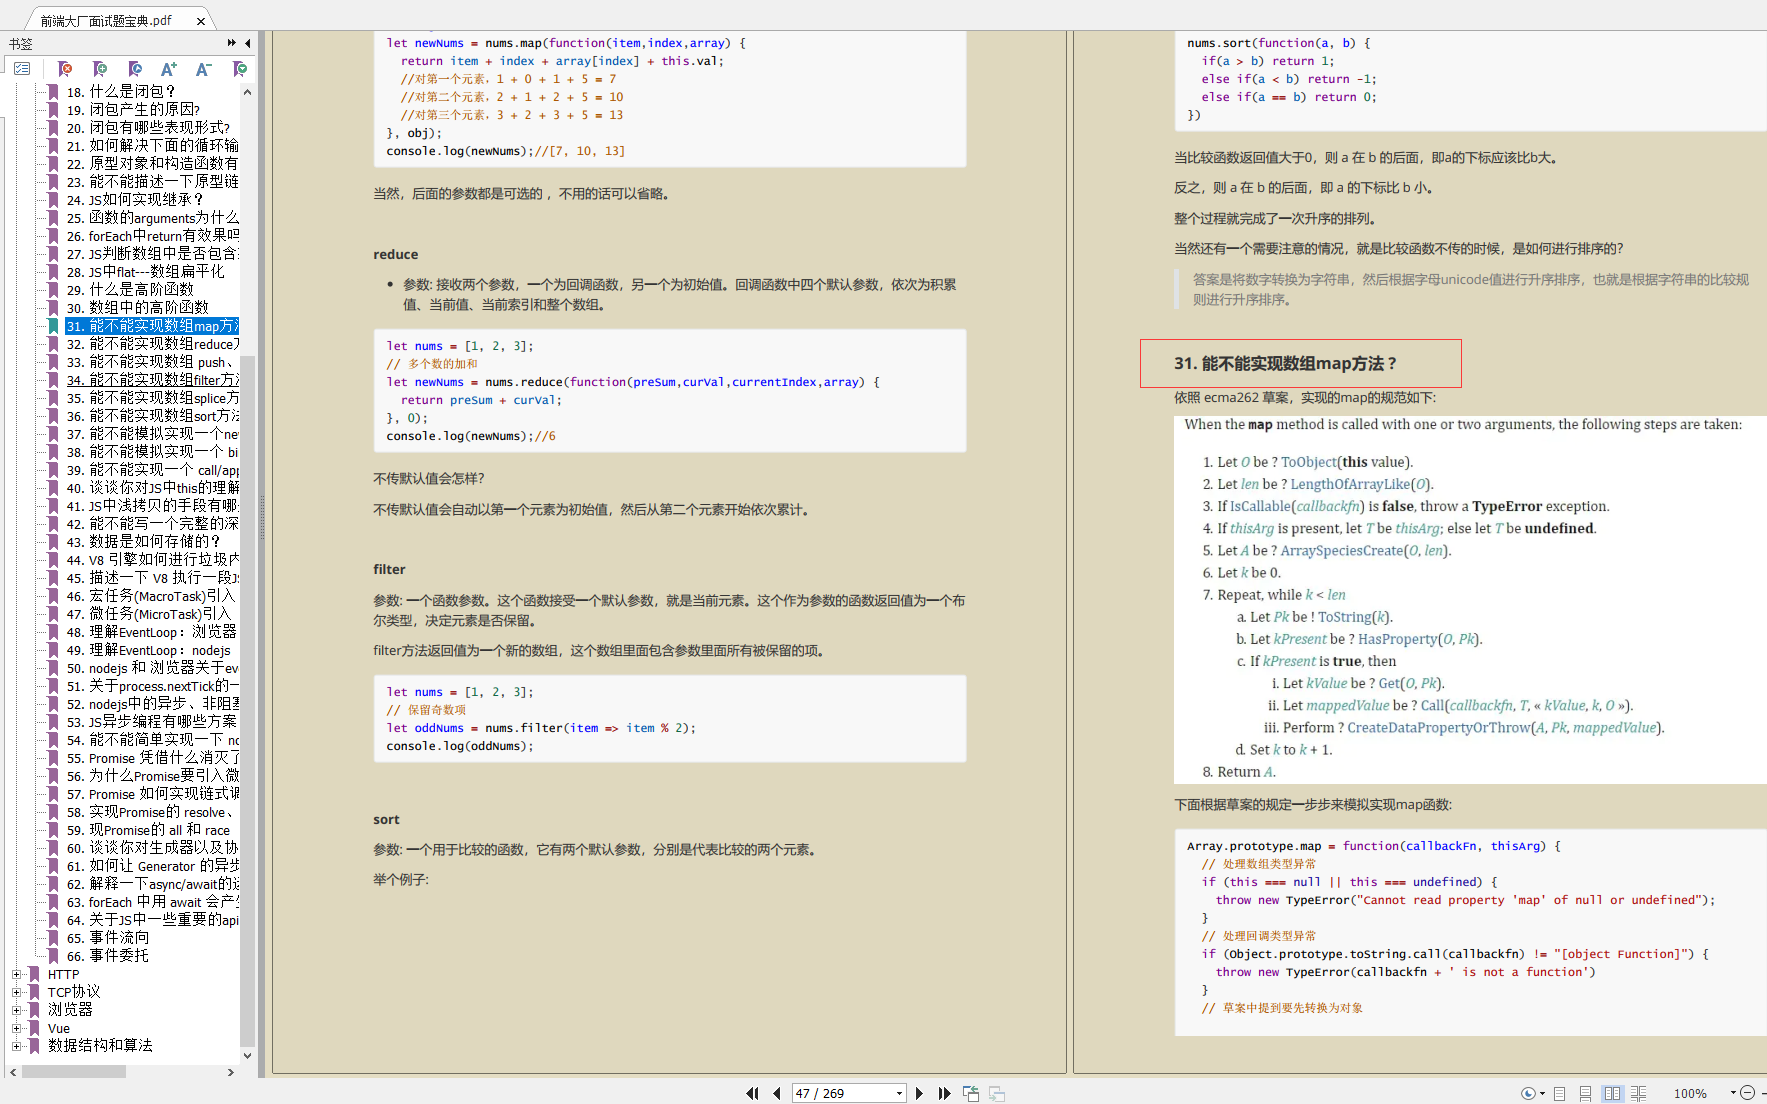
由于文章篇幅有限,仅展示部分内容
第一步: install方法
可以创建一个Vue项目,将router中的路由信息抽离出来,主要的源码在vue-router中。当Vue.use(vueRouter)时候,就会调用vue-router中的install方法
通过Vue.mixin()方法,全局注册一个混合,影响注册之后所有创建的每个 Vue 实例,该混合在beforeCreate钩子中通过Vue.util.defineReactive()定义了响应式的_route属性。所谓响应式属性,即当_route值改变时,会自动调用Vue实例的render()方法,更新视图。
Vue.mixin({ //mixin 混入
beforeCreate() {
// console.log(this.$options); //每一个vue组件
// console.log(this.$options);
//获取根组件 因为根组件下面 有router
if (this.KaTeX parse error: Expected 'EOF', got '&' at position 9: options &̲& this.options.router) {
// 找到根组件
// 把当前实例挂载到_root上
// console.log(this);
// 把router实例挂载到_router上面
this._router = this.$options.router
this._root = this // main 根组件
//监控路径的变化 为了让 _router 的变化能及时响应页面的更新,所以又接着又调用了 Vue.uti.defineReactive方法来进行get和set的响应式数据定义。
Vue.util.defineReactive(this, “xxx”, this._router, history)
} else {
// console.log(this); //app组件
this._root = this.$parent._root;
}
Object.defineProperty(this, “$router”, {
get() {
return this._root._router
},
push(){
}
})
Object.defineProperty(this, “$route”, {
get() {
return {
current: this._root._router.history.current
}
}
})
}
}),
第二步: crateMap转换路由格式
将路由信息转换格式,利用createmap转换路由信息格式。
createMap(routes) {
return routes.reduce((memo, current) => {
//meomo刚开始是一个空对象
memo[current.path] = current.component;
return memo;
}, {})
}
第三步: 创建VueRouter类,初始化mode routes routesMap对象
在路由里面new了,说明 vue-router中是一个类,此时 ,将new中的对象options 传到VueRouter类中。将mode routes routesMap history挂载到VueRouter上,并使用了init方法。
class HistoryRoute {
constructor() {
this.current = null;
}
}
constructor(options) {
// console.log(options);
this.mode = options.mode || “hash”;
this.routes = options.routes || [];
this.routesMap = this.createMap(this.routes);
this.history = new HistoryRoute();
this.init();
}
第四步: hash 和history
在constructor中使用this.init()方法,在init方法里面可以判断路由的mode是hash还是 history。
init() {
if (this.mode === “hash”) {
location.hash ? “” : location.hash = “/”; //#/会加上了
// console.log(location.hash);
window.addEventListener(“load”, () => {
this.history.current = location.hash.slice(1)
// console.log(“load–>”, this.history.current)
})
window.addEventListener(“hashchange”, () => {
this.history.current = location.hash.slice(1)
// console.log(“hashchange–>”, this.history.current)
})
} else {
//使用history
// console.log(“History”);
location.pathname ? “” : location.pathname = “/”;
window.addEventListener(“load”, () => {
this.history.current = location.pathname
// console.log(“load—>”, this.history.current)
})
window.addEventListener(“popstate”, () => {
this.history.current = location.pathname
// console.log(“popstate—>”, this.history.current)
})
}
}
// 把方法写到$router上去
push() { }
go() { }
back() { }
=======================================================================
通常构建一个Vue应用的时候, 我们会使用Vue.use以插件的形式安装VueRouter。同时会在Vue的实例上挂载router的实例。在vueRouter这个插件中有一个公共的方法install,这个方法的第一个参数是Vue构造器,第二个参数是一个可选的参数对象,其中在install文件中,并且混入了mixin,给每一个组件创建beforeCreate钩子,在Vue的实例上初始化了一些私有属性,其中_router指向了VueRouter的实例,_root指向了Vue的实例。
文末
篇幅有限没有列举更多的前端面试题,小编把整理的前端大厂面试题PDF分享出来,一共有269页


 11万+
11万+


 被折叠的 条评论
为什么被折叠?
被折叠的 条评论
为什么被折叠?
 到【灌水乐园】发言


