


学习路线:
这个方向初期比较容易入门一些,掌握一些基本技术,拿起各种现成的工具就可以开黑了。不过,要想从脚本小子变成黑客大神,这个方向越往后,需要学习和掌握的东西就会越来越多以下是网络渗透需要学习的内容:
需要体系化学习资料的朋友,可以加我V获取:vip204888 (备注网络安全)
网上学习资料一大堆,但如果学到的知识不成体系,遇到问题时只是浅尝辄止,不再深入研究,那么很难做到真正的技术提升。
一个人可以走的很快,但一群人才能走的更远!不论你是正从事IT行业的老鸟或是对IT行业感兴趣的新人,都欢迎加入我们的的圈子(技术交流、学习资源、职场吐槽、大厂内推、面试辅导),让我们一起学习成长!
开源中国:http://git.oschina.net/swoole/swoole/tags
1.自定义安装
# 下载

wget https://pecl.php.net/get/swoole-4.3.3.tgz

# 解压

tar zxf swoole-4.3.3.tgz

# 编译安装扩展

# 进入目录

cd swoole-4.3.3

# 执行phpize命令,产生出configure可执行文件
# 如果不知道phpize路径在哪里 可以使用which phpize查看相应路径

/usr/bin/phpize

# 进行配置  如果不知道php-config路径在哪里 可以使用which php-config   查看相应路径

./configure --with-php-config=/usr/bin/php-config

# 编译和安装

make && make install

vi /etc/php.ini

复制如下代码

extension=swoole.so

放到你所打开或新建的文件中即可,无需重启任何服务

# 查看扩展是否安装成功

php -m|grep swoole
2.宝塔面板安装PHP swoole扩展
如果感觉上述安装较为复杂,可以使用宝塔面板实现一键安装

三、配置nginx反向代理
- 使用xshell连接远程阿里云服务器
- 使用命令(find / -name nginx.conf)查找nginx.conf所在的配置文件

- 使用命令(vim /etc/nginx/nginx.conf)查找进入到vim编辑器


查看到可以引入/etc/nginx/conf.d/下的配置文件信息 - 使用命令(cd /etc/nginx/conf.d/)进入到该路径下,并新建配置文件:
study.lishuo.net.conf

- 配置nginx反向代理,实现访问
study.lishuo.net域名转发端口号到127.0.0.1:9511也就是转发到webscoket运行的端口号
# 反向代理的规则 study 这个名字自己随便起
upstream study{
  server 127.0.0.1:9511;
}
server {
        listen       80;
        server_name  study.lishuo.net;
        error_page 404 /404.html;
        location = /404.html {
        }
        location / {
          index index.php index.html index.htm;
          if (!-e $request\_filename) {
                rewrite  ^(.*)$  /index.php?s=/$1  last;
          }
        #wss配置
        client_max_body_size 100m;
        proxy_redirect off;
        proxy_set_header Host $host;# http请求的主机域名
        proxy_set_header X-Real-IP $remote\_addr;# 远程真实IP地址
        proxy_set_header X-Forwarded-For $proxy\_add\_x\_forwarded\_for;#反向代理之后转发之前的IP地址
        proxy_read_timeout 604800s;#websocket心跳时间,默认是60s
        proxy_http_version 1.1;
        proxy_set_header Upgrade $http\_upgrade;
        proxy_set_header Connection "Upgrade";
        proxy_pass http://study;
       }
        error_page 500 502 503 504 /50x.html;
        location = /50x.html {
        }
         #添加下列信息,配置Nginx通过fastcgi方式处理您的PHP请求。
        location ~ .php$ {
            fastcgi_pass 127.0.0.1:9001;   #Nginx通过本机的9000端口将PHP请求转发给PHP-FPM进行处理。
            fastcgi_index index.php;
            fastcgi_param  SCRIPT_FILENAME  $document\_root$fastcgi\_script\_name;
            include fastcgi_params;   #Nginx调用fastcgi接口处理PHP请求。
        }
    }
四、微信小程序socket合法域名配置
- 登录到微信开放平台https://mp.weixin.qq.com/
- 开发=>开发管理=>开发设置,完成合法域名设置

到此配置已经完成了,接下来就是功能实现了,微信小程序+PHP代码
五、效果演示加所有核心代码

1.小程序端代码
1.小程序页面代码所在路径 /pages/contact/contact.wxml
<!--pages/contact/contact.wxml-->

<view>

<scroll-view scroll-y scroll-into-view='{{toView}}' style='height: {{scrollHeight}};'>
  <!-- <view class='scrollMsg'> -->
  <block wx:key wx:for='{{msgList}}' wx:for-index="index">

    <!-- 单个消息1 客服发出(左) -->
    <view wx:if='{{item.speaker=="server"}}' id='msg-{{index}}' style='display: flex; padding: 2vw 11vw 2vw 2vw;'>
      <view style='width: 11vw; height: 11vw;'>
        <image style='width: 11vw; height: 11vw; border-radius: 10rpx;' src='https://cdn.pixabay.com/photo/2020/02/10/12/47/girl-4836394\_\_340.jpg'></image>
      </view>
      <view style='width: 4vw; height: 11vw; margin-left: 0.5vw; display: flex; align-items: center; z-index: 9;'>
        <view class="triangle\_border\_left"></view>
      </view>
      <view class='leftMsg'>{{item.content}}</view>
    </view>

    <!-- 单个消息2 用户发出(右) -->
    <view wx:else id='msg-{{index}}' style='display: flex; justify-content: flex-end; padding: 2vw 2vw 2vw 11vw;'>
      <view class='rightMsg'>{{item.content}}</view>
      <view style='width: 4vw; height: 11vw; margin-right: 0.5vw; display: flex; align-items: center; z-index: 9;'>
        <view class="triangle\_border\_right"></view>
      </view>
      <view style='width: 11vw; height: 11vw;'>
        <image style='width: 11vw; height: 11vw; border-radius: 10rpx;' src='https://cdn.pixabay.com/photo/2021/09/24/10/00/chick-6652163\_\_340.jpg'></image>
      </view>
    </view>

  </block>
  <!-- </view> -->

  <!-- 占位 -->
  <view style='width: 100%; height: 18vw;'></view>
</scroll-view>

<view class='inputRoom' style='bottom: {{inputBottom}}'>
  <image style='width: 7vw; margin-left: 3.2vw;' src='https://img95.699pic.com/element/40030/6429.png\_300.png' mode='widthFix'></image>
  <input bindconfirm='sendClick' adjust-position='{{false}}' value='{{inputVal}}' confirm-type='send' bindfocus='focus' bindblur='blur'></input>
</view>
</view>
2.小程序页面样式代码所在路径 /pages/contact/contact.wxss
/* pages/contact/contact.wxss */

page {
  background-color: #f1f1f1;
}

.inputRoom {
  width: 100vw;
  height: 16vw;
  border-top: 1px solid #cdcdcd;
  background-color: #f1f1f1;
  position: fixed;
  bottom: 0;
  display: flex;
  align-items: center;
  z-index: 20;
}

input {
  width: 76vw;
  height: 9.33vw;
  background-color: #fff;
  border-radius: 40rpx;
  margin-left: 2vw;
  padding: 0 3vw;
  font-size: 28rpx;
  color: #444;
}

.leftMsg {
  font-size: 35rpx;
  color: #444;
  line-height: 7vw;
  padding: 2vw 2.5vw;
  background-color: #fff;
  margin-left: -1.6vw;
  border-radius: 10rpx;
  z-index: 10;
}

.rightMsg {
  font-size: 35rpx;
  color: #444;
  line-height: 7vw;
  padding: 2vw 2.5vw;
  background-color: #96EB6A;
  margin-right: -1.6vw;
  border-radius: 10rpx;
  z-index: 10;
}

 /*向左*/
 .triangle_border_left {
  width: 0;
  height: 0;
  border-width: 10px 30px 30px 0;
  border-style: solid;
  border-color: transparent #fff transparent transparent;
          /*透明       黄   透明        透明 */
  margin: 40px auto;
  position: relative;
}


        /*向右*/
        .triangle_border_right {
          width: 0;
          height: 0;
          border-width: 0px 30px 20px 13px;
          border-style: solid;
          border-color: transparent transparent transparent #96EB6A;
                  /*透明       透明        透明         黄*/
          margin: 40px auto;
          position: relative;
      }
3.小程序配置文件代码所在路径 /pages/contact/contact.json
{
  "navigationBarTitleText":"柯作客服",
  "usingComponents": {

  }
}
4.小程序业务逻辑代码所在路径 /pages/contact/contact.js
// pages/contact/contact.js
const app = getApp();
var inputVal = '';
var msgList = [];
var windowWidth = wx.getSystemInfoSync().windowWidth;
var windowHeight = wx.getSystemInfoSync().windowHeight;
var keyHeight = 0;
/**
* 初始化数据
*/
function initData(that) {
//输入框的内容
inputVal = '';
//消息列表,包含客服和用户的聊天内容
msgList = [{
speaker: 'server',
contentType: 'text',
content: 'Hi,亲爱的小主,终于等到您啦!欢迎来到柯作店铺,很荣幸为您服务。'
},
{
speaker: 'customer',
contentType: 'text',
content: '你高兴的太早了'
}
]
that.setData({
msgList,
inputVal
})
}
Page({
/**
* 页面的初始数据
*/
data: {
scrollHeight: '100vh',
inputBottom: 0
},
/**
* 生命周期函数--监听页面加载
*/
onLoad: function(options) {
//初始化websocket连接
this.chat();
//监听心跳的方法
this.webSocketXin();
//聊天方法
initData(this);
//监听消息
wx.onSocketMessage(res=>{
//追加到消息列表里
msgList.push(JSON.parse(res.data))
inputVal = '';
this.setData({
msgList,
inputVal
});
})
},
//页面卸载时间
onUnload(){
wx.closeSocket();
},
/**
* 获取聚焦
*/
focus: function(e) {
keyHeight = e.detail.height;
this.setData({
scrollHeight: (windowHeight - keyHeight) + 'px'
});
this.setData({
toView: 'msg-' + (msgList.length - 1),
inputBottom: keyHeight + 'px'
})
//计算msg高度
// calScrollHeight(this, keyHeight);
},
//失去聚焦(软键盘消失)
blur: function(e) {
this.setData({
scrollHeight: '100vh',
inputBottom: 0
})
this.setData({
toView: 'msg-' + (msgList.length - 1)
})
},
/**
* 发送点击监听
*/
sendClick: function(e) {
//客户发的信息
let customerMsg = {
uid: 10,
speaker: 'customer',
contentType: 'text',
content: e.detail.value
};
//关闭心跳包
this.webSocketXin(60000, false)
//发送给websocket
wx.sendSocketMessage({
data: JSON.stringify(customerMsg),
success:res=>{
//重启心跳包
this.webSocketXin(40000, true)
}
### 给大家的福利
**零基础入门**
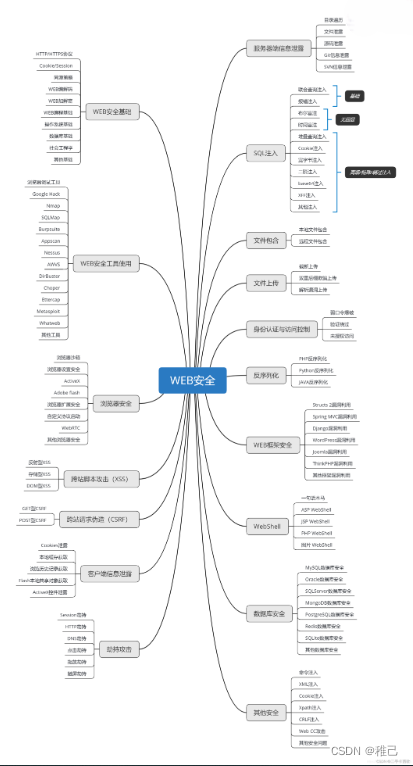
对于从来没有接触过网络安全的同学,我们帮你准备了详细的学习成长路线图。可以说是最科学最系统的学习路线,大家跟着这个大的方向学习准没问题。
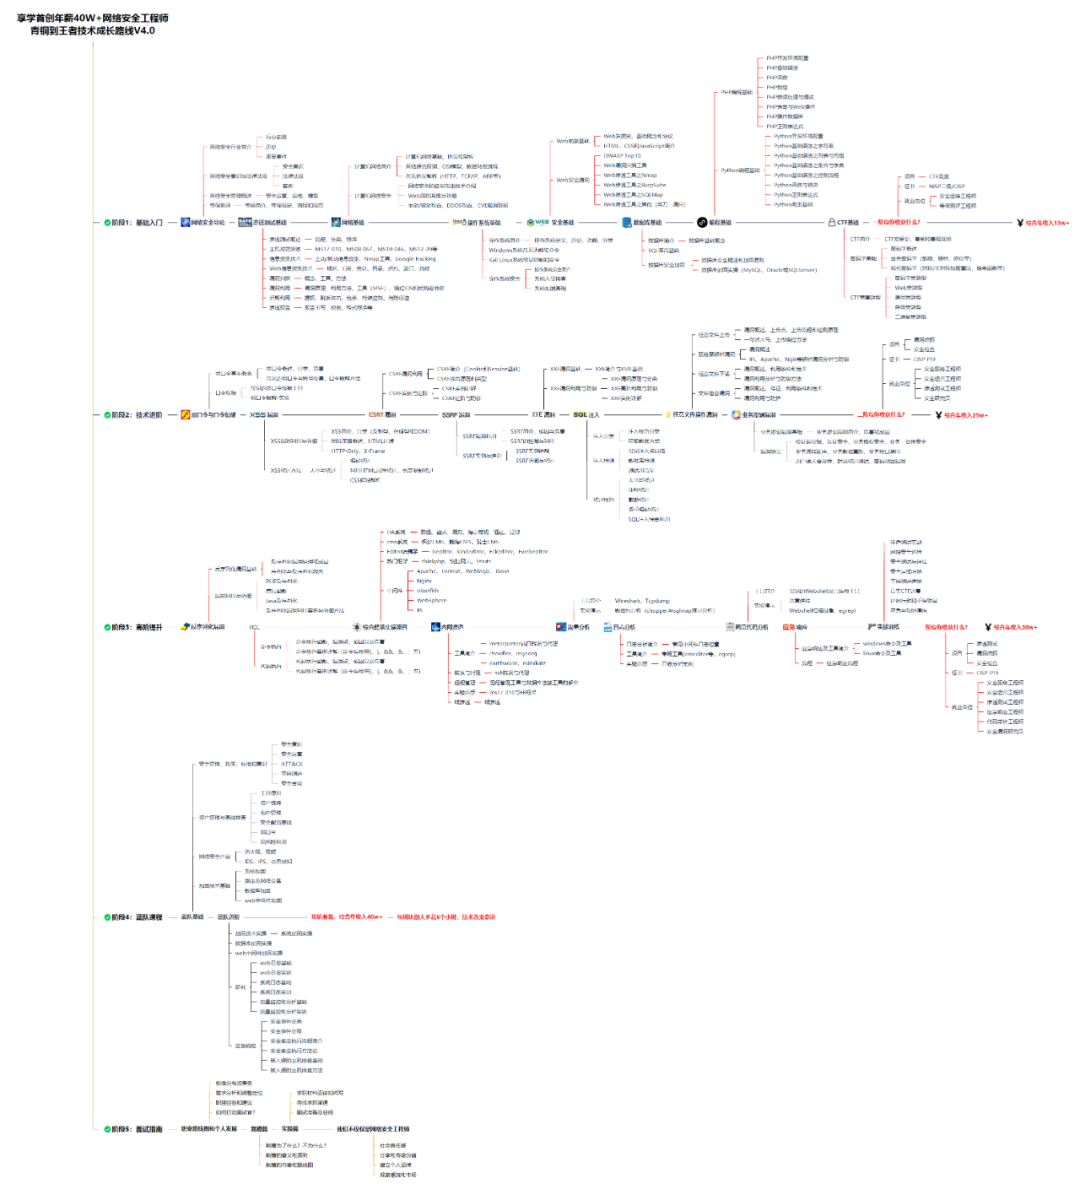
同时每个成长路线对应的板块都有配套的视频提供:
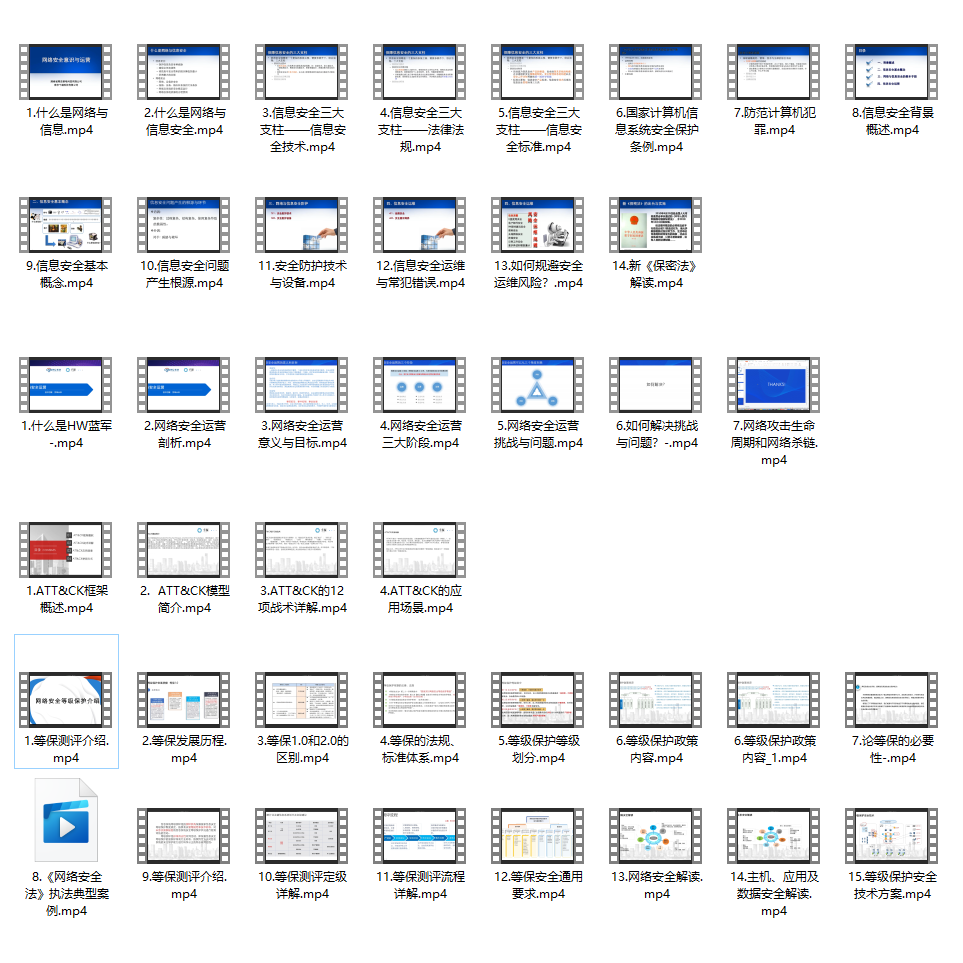
因篇幅有限,仅展示部分资料
**需要体系化学习资料的朋友,可以加我V获取:vip204888 (备注网络安全)**
**网上学习资料一大堆,但如果学到的知识不成体系,遇到问题时只是浅尝辄止,不再深入研究,那么很难做到真正的技术提升。**
**[需要这份系统化资料的朋友,可以点击这里获取](https://bbs.csdn.net/topics/618540462)**
**一个人可以走的很快,但一群人才能走的更远!不论你是正从事IT行业的老鸟或是对IT行业感兴趣的新人,都欢迎加入我们的的圈子(技术交流、学习资源、职场吐槽、大厂内推、面试辅导),让我们一起学习成长!**


 3663
3663


 被折叠的 条评论
为什么被折叠?
被折叠的 条评论
为什么被折叠?
 到【灌水乐园】发言


