


重要知识点
下面是有几位Android行业大佬对应上方技术点整理的一些进阶资料。

高级进阶篇——高级UI,自定义View(部分展示)
UI这块知识是现今使用者最多的。当年火爆一时的Android入门培训,学会这小块知识就能随便找到不错的工作了。不过很显然现在远远不够了,拒绝无休止的CV,亲自去项目实战,读源码,研究原理吧!

- 面试题部分合集

网上学习资料一大堆,但如果学到的知识不成体系,遇到问题时只是浅尝辄止,不再深入研究,那么很难做到真正的技术提升。
一个人可以走的很快,但一群人才能走的更远!不论你是正从事IT行业的老鸟或是对IT行业感兴趣的新人,都欢迎加入我们的的圈子(技术交流、学习资源、职场吐槽、大厂内推、面试辅导),让我们一起学习成长!
四大组件通信桥梁
上面以启动Service为例阐述了应用进程与ServiceManager、ActivityManagerService(AMS)的关系,实际最终的目的是为了调用AMS功能,简单看看AMS 提供了哪些功能:
#IActivityManager.aidl
{
//绑定Application
void attachApplication(in IApplicationThread app, long startSeq);
//启动服务
ComponentName startService(in IApplicationThread caller, in Intent service,
in String resolvedType, boolean requireForeground, in String callingPackage,
in String callingFeatureId, int userId);
//绑定服务
int bindService(in IApplicationThread caller, in IBinder token, in Intent service,
in String resolvedType, in IServiceConnection connection, int flags,
in String callingPackage, int userId);
//发布服务
void publishService(in IBinder token, in Intent intent, in IBinder service);
//启动Activity
int startActivity(in IApplicationThread caller, in String callingPackage, in Intent intent,
in String resolvedType, in IBinder resultTo, in String resultWho, int requestCode,
int flags, in ProfilerInfo profilerInfo, in Bundle options);
//发送广播
int broadcastIntent(in IApplicationThread caller, in Intent intent,
in String resolvedType, in IIntentReceiver resultTo, int resultCode,
in String resultData, in Bundle map, in String[] requiredPermissions,
int appOp, in Bundle options, boolean serialized, boolean sticky, int userId);
//获取contentProvider
ContentProviderHolder getContentProvider(in IApplicationThread caller, in String callingPackage,
in String name, int userId, boolean stable);
//发布contentProvider
void publishContentProviders(in IApplicationThread caller,
in List providers);
}
仅仅列出了与四大组件有关的部分方法,AMS还提供了很多其它方法。
你也许已经发现了,每个方法的第一个参数为:“in IApplicationThread caller”,这个参数非常重要,我们后面分析。
由以上方法可知,四大组件都需要与AMS打交道,由AMS控制它们的生命周期,因此AMS也被称为"大管家":
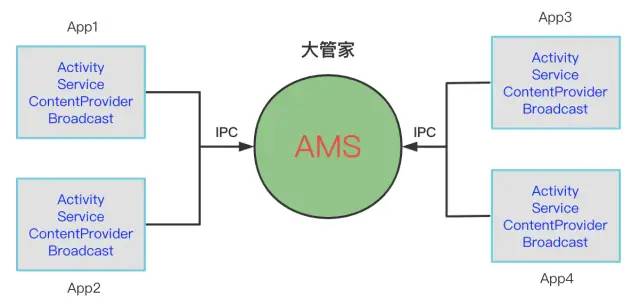
接下来就分别分析四大组件如何通过AMS 与自身(其它进程)通信的。
==============================================================================
现在有两个Activity,分别为AMSActivity、AMSTargetActivity。
AMSActivity 想要启动AMSTargetActivity,调用如下方法:
public static void start(Context context) {
//Context 为AMSActivity
Intent intent = new Intent(context, AMSTargetActivity.class);
context.startActivity(intent);
}
该方法在AMSActivity进程里的调用栈如下:
Activity.startActivity–>Activity.startActivityForResult
–>FragmentActivity.startActivityForResult
–>Instrumentation.execStartActivity
–>ActivityTaskManager.getService().startActivity(xx)
而ActivityTaskManager.getService() 前面已经分析过了,就是获取了AMS对外的接口: IActivityManager,拿到了引用后调用AMS startActivity(xx)方法:
#ActivityManagerService.java
public int startActivity(IApplicationThread caller, String callingPackage,
Intent intent, String resolvedType, IBinder resultTo, String resultWho, int requestCode,
int startFlags, ProfilerInfo profilerInfo, Bundle bOptions) {
return mActivityTaskManager.startActivity(caller, callingPackage, intent, resolvedType,
resultTo, resultWho, requestCode, startFlags, profilerInfo, bOptions);
}
重点关注两个参数:IApplicationThread caller和Intent intent。
Intent 我们很熟悉了,指明了要启动哪个Activity。
IApplicationThread 是个接口,里面定义了很多方法,列举部分如:
#IApplicationThread.java
{
//回调静态广播
void scheduleReceiver(in Intent intent, in ActivityInfo info,
in CompatibilityInfo compatInfo,
int resultCode, in String data, in Bundle extras, boolean sync,
int sendingUser, int processState);
@UnsupportedAppUsage
//回调创建服务
void scheduleCreateService(IBinder token, in ServiceInfo info,
in CompatibilityInfo compatInfo, int processState);
@UnsupportedAppUsage
//回调停止服务
void scheduleStopService(IBinder token);
//回调绑定Application
void bindApplication(in String packageName, in ApplicationInfo info,
in ProviderInfoList providerList, in ComponentName testName,
in ProfilerInfo profilerInfo, in Bundle testArguments,
IInstrumentationWatcher testWatcher, IUiAutomationConnection uiAutomationConnection,
int debugMode, boolean enableBinderTracking, boolean trackAllocation,
boolean restrictedBackupMode, boolean persistent, in Configuration config,
in CompatibilityInfo compatInfo, in Map services,
in Bundle coreSettings, in String buildSerial, in AutofillOptions autofillOptions,
in ContentCaptureOptions contentCaptureOptions, in long[] disabledCompatChanges);
//回调Service onStartCommand
void scheduleServiceArgs(IBinder token, in ParceledListSlice args);
//回调绑定服务
void scheduleBindService(IBinder token,
in Intent intent, boolean rebind, int processState);
@UnsupportedAppUsage
//回调解绑服务
void scheduleUnbindService(IBinder token,
in Intent intent);
//回调Activity 生命周期相关
void scheduleTransaction(in ClientTransaction transaction);
}
而ActivityThread.java 里实现了该接口(Android 8.0之后使用了AIDL 定义,此处以此为例分析)。
#ActivityThread.java
private class ApplicationThread extends IApplicationThread.Stub {
…
//实现了IApplicationThread 接口里定义的方法
}
IApplicationThread 有啥用呢?我们调用AMS方法后,有些方法并没有返回值或者仅仅只返回int,比如startActivity(xx),那么我们的进程如何接收Activity的生命周期的回调呢,不仅Activity的生命周期回调,还有Service等的回调。这个时候就得依靠IApplicationThread 接口回调了。
因此,当调用AMS方法的时候,传入IApplicationThread实例,当AMS完成某个动作后通过IApplicationThread 回调给应用进程。
实际上,AMS里针对每个应用进程只保存了一个IApplicationThread实例,而第一次传递给AMS是在进程启动的时候:
#ActivityThread.java
private void attach(boolean system, long startSeq) {
…
if (!system) {
//获取AMS引用
final IActivityManager mgr = ActivityManager.getService();
try {
//传入IApplicationThread 实例给AMS
mgr.attachApplication(mAppThread, startSeq);
} catch (RemoteException ex) {
throw ex.rethrowFromSystemServer();
}
}
…
}
此时AMS将IApplicationThread 实例保存下来,后续有应用进程调用AMS方法时,也会传入IApplicationThread 实例,AMS通过查找是否存在实例,存在就直接拿出来用。

当调用AMS startActivity()后,AMS 将检测目标Activity所在进程是否存活,若没有则启动进程,若有则将Activity移动到栈顶,而后处理之前被移出栈顶的Activity,做完了这些操作之后需要通知涉及到的各个应用进程,而这个通知是通过IApplicationThread 回调的。
假设 AMSActivity、AMSTargetActivity 处在同一个进程里,此时AMS会回调IApplicationThread里的scheduleTransaction()方法:
#ApplicationThread
public void scheduleTransaction(ClientTransaction transaction) throws RemoteException {
ActivityThread.this.scheduleTransaction(transaction);
}
public void handleMessage(Message msg) {
if (DEBUG_MESSAGES) Slog.v(TAG, ">>> handling: " + codeToString(msg.what));
switch (msg.what) {
case EXECUTE_TRANSACTION:
final ClientTransaction transaction = (ClientTransaction) msg.obj;
//最终调用到ActivityThread里的handleLaunchActivity()等方法
//进而回调目标Activity 的onCreate/onPause/onResume等方法
mTransactionExecutor.execute(transaction);
break;
}
#ClientTransactionHandler.java
void scheduleTransaction(ClientTransaction transaction) {
transaction.preExecute(this);
sendMessage(ActivityThread.H.EXECUTE_TRANSACTION, transaction);
}
可以看出,从AMS回调后,通过Handler发送到主线程执行了,在Handler处理Message时,会调用到Activity的onCreate()/onResume()/等方法。
这也是为什么我们经常说的Activity的重写方法都在主线程执行的原因了。

由上可知,当应用进程发起startActivity动作后,AMS 管理了目标Activity的生命周期,我们仅仅只需要在应用进程里重写目标Activity对应方法,并在里面处理相应的逻辑,即可实现一次Activity跳转的功能。
=============================================================================
start 启动Service
Intent intent = new Intent(AMSActivity.this, AMSTargetService.class);
startService(intent);
调用栈如下:
ContextWrapper.startService–>
ContextImpl.startServiceCommon
–>ActivityManager.getService().startService(xx)
依然是先拿到AMS 接口,进而调用startService(xx):
#ContextImpl.java
public ComponentName startService(IApplicationThread caller, Intent service,
String resolvedType, boolean requireForeground, String callingPackage,
String callingFeatureId, int userId)
假设AMSActivity 与AMSTargetService 在同一进程。
AMS 收到startService请求后,寻找目标Service,若是Service还没有创建,最终则通过回调 IApplicationThread 方法scheduleCreateService(xx)、scheduleServiceArgs(xx),这些方法处理如下:
#ActivityThread.java
public final void scheduleCreateService(IBinder token,
ServiceInfo info, CompatibilityInfo compatInfo, int processState) {
…
//切换到主线程执行
sendMessage(H.CREATE_SERVICE, s);
}
public final void scheduleServiceArgs(IBinder token, ParceledListSlice args) {
List list = args.getList();
for (int i = 0; i < list.size(); i++) {
…
//切换到主线程执行
sendMessage(H.SERVICE_ARGS, s);
}
}
public void handleMessage(Message msg) {
switch (msg.what) {
case CREATE_SERVICE:
//1、该方法里创建Service 实例
//2、回调Service onCreate 方法
handleCreateService((CreateServiceData)msg.obj);
break;
case SERVICE_ARGS:
//回调onStartCommand方法
handleServiceArgs((ServiceArgsData)msg.obj);
break;
}
}
与Activity 类似,Service 生命周期回调最终切换到主线程执行。
这也就是我们常说的为什么Service里不能执行耗时任务,否则容易发生ANR,因为回调方法在主线程执行的。
bind 启动Service
假设AMSActivity 与AMSTargetService 不在同一进程,以AMSActivity 所在进程为客户端,AMSTargetService所在进程 为服务端,有如下图:

前提是客户端、服务端已经绑定到AMS里了(传递IApplicationThread)。
1、客户端发起绑定请求。
2、AMS 寻找目标Service,通过IApplicationThread 回调scheduleCreateService 创建服务端Service,并通过scheduleBindService 绑定服务。
3、服务端创建、绑定成功并传递IBinder给AMS。
4、AMS收到IBinder引用通过IServiceConnection 回调connected方法告诉客户端服务绑定成功,也就是回调客户端绑定时注册的ServiceConnection.onServiceConnected 方法。
===============================================================================
静态注册
广播有两种注册方式:静态与动态。
先分析静态注册:
在AndroidManifest.xml 里声明广播,并指定接收的Action和处理该Action的类。
如下:
在AMSActivity里 发送广播,发送广播调用栈如下:
ContextWrapper.sendBroadcast–>ContextImpl.sendBroadcast
–>ActivityManager.getService().broadcastIntent(xx)
依然是先拿到AMS 接口,进而调用broadcastIntent(xx):
#ContextImpl.java
int broadcastIntent(in IApplicationThread caller, in Intent intent,
in String resolvedType, in IIntentReceiver resultTo, int resultCode,
in String resultData, in Bundle map, in String[] requiredPermissions,
int appOp, in Bundle options, boolean serialized, boolean sticky, int userId);
假设AMSActivity 与 AMSTargetBroadcast 在同一进程。
AMS 收到broadcastIntent 请求后,转发给BroadcastQueue 处理,若广播接收器是静态注册,则通过 回调IApplicationThread scheduleReceiver 方法。后面的处理过程与Activity/Service类似。
AMSActivity 所在进程收到scheduleReceiver 回调后,切换到主线程,然后反射构造AMSTargetBroadcast实例,并调用onReceive(xx)方法,而onReceive(xx) 方法里正是我们重写的接收广播后的处理逻辑。
因此,onReceive(xx) 方法也是在主线程执行的,不能执行耗时操作,否则容易发生ANR。
动态注册
动态注册如下:
IntentFilter intentFilter = new IntentFilter();
intentFilter.addAction(AMSTargetBroadcast.MY_ACTION);
registerReceiver(new AMSTargetBroadcast(), intentFilter);
registerReceiver(xx)最终调用到:
#ContextImpl.java
private Intent registerReceiverInternal(BroadcastReceiver receiver, int userId,
IntentFilter filter, String broadcastPermission,
Handler scheduler, Context context, int flags) {
//AIDL 实现
IIntentReceiver rd = null;
if (receiver != null) {
if (mPackageInfo != null && context != null) {
if (scheduler == null) {
scheduler = mMainThread.getHandler();
}
//构造接收器回调
rd = mPackageInfo.getReceiverDispatcher(
receiver, context, scheduler,
mMainThread.getInstrumentation(), true);
} else {
…
}
}
try {
//向AMS 注册
final Intent intent = ActivityManager.getService().registerReceiver(
mMainThread.getApplicationThread(), mBasePackageName, rd, filter,
broadcastPermission, userId, flags);
…
return intent;
} catch (RemoteException e) {
throw e.rethrowFromSystemServer();
}
}
在向AMS注册前,构造了IIntentReceiver 对象,该接口是AIDL声明的,也就是说向AMS注册了个回调接口,当AMS 接收到发送广播的请求后,发现是动态注册的,于是通过回调IIntentReceiver 接口的performReceive(xx)方法,进而调用BroadcastReceiver里的onReceive(xx)方法,貌似没有看到切换到主线程执行呢?看看IIntentReceiver performReceive(xx)的处理:
#LoadedApk.java
public void performReceive(Intent intent, int resultCode, String data,
Bundle extras, boolean ordered, boolean sticky, int sendingUser) {
…
//mActivityThread.post 切换到主线程执行
if (intent == null || !mActivityThread.post(args.getRunnable())) {
…
}
}
public final Runnable getRunnable() {
return () -> {
final BroadcastReceiver receiver = mReceiver;
…
try {
…
//注册时传入的BroadcastReceiver
receiver.onReceive(mContext, intent);
} catch (Exception e) {
…
}
};
}
很明显,此处是切换到主线程执行了。
可以看出,不管是静态注册,抑或是动态注册,最终都是在主线程回调onReceive(xx)方法。
Broadcast 与AMS 交互图如下:
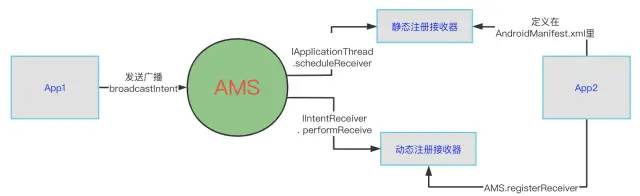
由上还可以总结出:
1、每发送一次广播,都需要走两次IPC(请求AMS/AMS回调),因此若是广播只在同一进程里发送/接收,没必要使用广播,推荐使用本地广播:LocalBroadcastManager。
2、若广播是静态注册的,AMS每次回调时都会反射重新创建BroadcastReceiver 实例,因此在广播发送/接收很频繁的情况下不建议使用静态注册,推荐使用动态注册。
=====================================================================================
ContentProvider 顾名思义:内容提供者。
以典型的手机通讯录为例,通讯录如何提供给其它进程使用其数据呢?根据前面的经验,通讯录需要暴露一个对外的接口,外部程序想使用通讯录那得拿到这个暴露出来的接口。
接下来看看如何实现自定义的ContentProvider:
声明ContentProvider
#AndroidManifest.xml
<provider
android:authorities=“com.fish.AMSTargetProvider”
android:name=“.ams.AMSTargetProvider”>
der>
public class AMSTargetProvider extends ContentProvider {
public static String AUTHORITY = “com.fish.AMSTargetProvider”;
private static int MATCH_CODE = 1000;
private static UriMatcher uriMatcher;
…
//重写增删改查方法,处理具体的逻辑
}
接口有了,处理逻辑也有了,那么需要对外展示自己的能力。当然这个过程不需要我们完成,系统自动处理了。
如何做好面试突击,规划学习方向?
面试题集可以帮助你查漏补缺,有方向有针对性的学习,为之后进大厂做准备。但是如果你仅仅是看一遍,而不去学习和深究。那么这份面试题对你的帮助会很有限。最终还是要靠资深技术水平说话。
网上学习 Android的资料一大堆,但如果学到的知识不成体系,遇到问题时只是浅尝辄止,不再深入研究,那么很难做到真正的技术提升。建议先制定学习计划,根据学习计划把知识点关联起来,形成一个系统化的知识体系。
学习方向很容易规划,但是如果只通过碎片化的学习,对自己的提升是很慢的。
同时我还搜集整理2020年字节跳动,以及腾讯,阿里,华为,小米等公司的面试题,把面试的要求和技术点梳理成一份大而全的“ Android架构师”面试 Xmind(实际上比预期多花了不少精力),包含知识脉络 + 分支细节。

在搭建这些技术框架的时候,还整理了系统的高级进阶教程,会比自己碎片化学习效果强太多。

网上学习 Android的资料一大堆,但如果学到的知识不成体系,遇到问题时只是浅尝辄止,不再深入研究,那么很难做到真正的技术提升。希望这份系统化的技术体系对大家有一个方向参考。
网上学习资料一大堆,但如果学到的知识不成体系,遇到问题时只是浅尝辄止,不再深入研究,那么很难做到真正的技术提升。
一个人可以走的很快,但一群人才能走的更远!不论你是正从事IT行业的老鸟或是对IT行业感兴趣的新人,都欢迎加入我们的的圈子(技术交流、学习资源、职场吐槽、大厂内推、面试辅导),让我们一起学习成长!
00;
private static UriMatcher uriMatcher;
…
//重写增删改查方法,处理具体的逻辑
}
接口有了,处理逻辑也有了,那么需要对外展示自己的能力。当然这个过程不需要我们完成,系统自动处理了。
如何做好面试突击,规划学习方向?
面试题集可以帮助你查漏补缺,有方向有针对性的学习,为之后进大厂做准备。但是如果你仅仅是看一遍,而不去学习和深究。那么这份面试题对你的帮助会很有限。最终还是要靠资深技术水平说话。
网上学习 Android的资料一大堆,但如果学到的知识不成体系,遇到问题时只是浅尝辄止,不再深入研究,那么很难做到真正的技术提升。建议先制定学习计划,根据学习计划把知识点关联起来,形成一个系统化的知识体系。
学习方向很容易规划,但是如果只通过碎片化的学习,对自己的提升是很慢的。
同时我还搜集整理2020年字节跳动,以及腾讯,阿里,华为,小米等公司的面试题,把面试的要求和技术点梳理成一份大而全的“ Android架构师”面试 Xmind(实际上比预期多花了不少精力),包含知识脉络 + 分支细节。
[外链图片转存中…(img-HphRD8PP-1715733607043)]
在搭建这些技术框架的时候,还整理了系统的高级进阶教程,会比自己碎片化学习效果强太多。
[外链图片转存中…(img-qIrtAIrM-1715733607043)]
网上学习 Android的资料一大堆,但如果学到的知识不成体系,遇到问题时只是浅尝辄止,不再深入研究,那么很难做到真正的技术提升。希望这份系统化的技术体系对大家有一个方向参考。
网上学习资料一大堆,但如果学到的知识不成体系,遇到问题时只是浅尝辄止,不再深入研究,那么很难做到真正的技术提升。
一个人可以走的很快,但一群人才能走的更远!不论你是正从事IT行业的老鸟或是对IT行业感兴趣的新人,都欢迎加入我们的的圈子(技术交流、学习资源、职场吐槽、大厂内推、面试辅导),让我们一起学习成长!


 被折叠的 条评论
为什么被折叠?
被折叠的 条评论
为什么被折叠?
 到【灌水乐园】发言


