


最后
答应大伙的备战金三银四,大厂面试真题来啦!
这份资料我从春招开始,就会将各博客、论坛。网站上等优质的Android开发中高级面试题收集起来,然后全网寻找最优的解答方案。每一道面试题都是百分百的大厂面经真题+最优解答。包知识脉络 + 诸多细节。
节省大家在网上搜索资料的时间来学习,也可以分享给身边好友一起学习。
《960全网最全Android开发笔记》

《379页Android开发面试宝典》
包含了腾讯、百度、小米、阿里、乐视、美团、58、猎豹、360、新浪、搜狐等一线互联网公司面试被问到的题目。熟悉本文中列出的知识点会大大增加通过前两轮技术面试的几率。
如何使用它?
1.可以通过目录索引直接翻看需要的知识点,查漏补缺。
2.五角星数表示面试问到的频率,代表重要推荐指数

《507页Android开发相关源码解析》
只要是程序员,不管是Java还是Android,如果不去阅读源码,只看API文档,那就只是停留于皮毛,这对我们知识体系的建立和完备以及实战技术的提升都是不利的。
真正最能锻炼能力的便是直接去阅读源码,不仅限于阅读各大系统源码,还包括各种优秀的开源库。

腾讯、字节跳动、阿里、百度等BAT大厂 2020-2021面试真题解析

资料收集不易,如果大家喜欢这篇文章,或者对你有帮助不妨多多点赞转发关注哦。文章会持续更新的。绝对干货!!!
网上学习资料一大堆,但如果学到的知识不成体系,遇到问题时只是浅尝辄止,不再深入研究,那么很难做到真正的技术提升。
一个人可以走的很快,但一群人才能走的更远!不论你是正从事IT行业的老鸟或是对IT行业感兴趣的新人,都欢迎加入我们的的圈子(技术交流、学习资源、职场吐槽、大厂内推、面试辅导),让我们一起学习成长!
    android:layout_alignParentLeft="true"

    android:layout_alignParentTop="true"

    android:text="未绑定设备"

    android:textAppearance="?android:attr/textAppearanceLarge" />
\-->第二个item:bonddevice\_item.xml


**\[html\]** [view plain]( ) [copy]( ) [print]( ) [?]( )


1.  <span style\="font-size: 14px;"\><?xml version\="1.0" encoding\="utf-8"?>

2.  <RelativeLayout

3.      android:layout\_width\="match\_parent"

4.      android:layout\_height\="match\_parent" \>


6.      <TextView

7.          android:id\="@+id/device\_name"

8.          android:layout\_width\="match\_parent"

9.          android:layout\_height\="wrap\_content"

10.          android:layout\_alignParentLeft\="true"

11.          android:layout\_alignParentTop\="true"

12.          android:text\="已绑定设备"

13.          android:textAppearance\="?android:attr/textAppearanceLarge" />


15.  </RelativeLayout\></span\>
<?xml version="1.0" encoding="utf-8"?>
<RelativeLayout
android:layout_width="match_parent"

android:layout_height="match_parent" >


<TextView

    android:id="@+id/device_name"

    android:layout_width="match_parent"

    android:layout_height="wrap_content"

    android:layout_alignParentLeft="true"

    android:layout_alignParentTop="true"

    android:text="已绑定设备"

    android:textAppearance="?android:attr/textAppearanceLarge" />
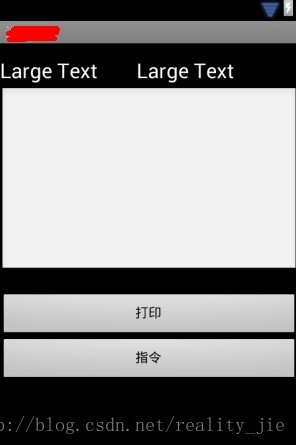
2.还有另外一个布局文件,就是当点击已绑定蓝牙设备下边的某个item时进入打印的界面,不多说,看图!
代码如下:printdata\_layout.xml
**\[html\]** [view plain]( ) [copy]( ) [print]( ) [?]( )
1. <?xml version\="1.0" encoding\="utf-8"?>
2. <RelativeLayout
3. android:layout\_width\="match\_parent"
4. android:layout\_height\="match\_parent" \>
6. <EditText
7. android:id\="@+id/print\_data"
8. android:layout\_width\="match\_parent"
9. android:layout\_height\="200dp"
10. android:layout\_alignParentLeft\="true"
11. android:layout\_alignParentTop\="true"
12. android:layout\_marginTop\="46dp" \>
13. </EditText\>
15. <TextView
16. android:id\="@+id/device\_name"
17. android:layout\_width\="wrap\_content"
18. android:layout\_height\="wrap\_content"
19. android:layout\_alignParentLeft\="true"
20. android:layout\_alignParentTop\="true"
21. android:layout\_marginTop\="16dp"
22. android:text\="Large Text"
23. android:textAppearance\="?android:attr/textAppearanceLarge" />
25. <TextView
26. android:id\="@+id/connect\_state"
27. android:layout\_width\="wrap\_content"
28. android:layout\_height\="wrap\_content"
29. android:layout\_alignBaseline\="@+id/device\_name"
30. android:layout\_alignBottom\="@+id/device\_name"
31. android:layout\_marginLeft\="42dp"
32. android:layout\_toRightOf\="@+id/device\_name"
33. android:text\="Large Text"
34. android:textAppearance\="?android:attr/textAppearanceLarge" />
36. <Button
37. android:id\="@+id/send"
38. android:layout\_width\="match\_parent"
39. android:layout\_height\="wrap\_content"
40. android:layout\_alignParentLeft\="true"
41. android:layout\_below\="@+id/print\_data"
42. android:layout\_marginTop\="21dp"
43. android:text\="打印" />
45. <Button
46. android:id\="@+id/command"
47. android:layout\_width\="match\_parent"
48. android:layout\_height\="wrap\_content"
49. android:layout\_alignParentLeft\="true"
50. android:layout\_below\="@+id/send"
51. android:text\="指令" />
53. </RelativeLayout\>
<RelativeLayout
android:layout_width="match_parent"

android:layout_height="match_parent" >


<EditText

    android:id="@+id/print_data"

    android:layout_width="match_parent"

    android:layout_height="200dp"

    android:layout_alignParentLeft="true"

    android:layout_alignParentTop="true"

    android:layout_marginTop="46dp" >

</EditText>


<TextView

    android:id="@+id/device_name"

    android:layout_width="wrap_content"

    android:layout_height="wrap_content"

    android:layout_alignParentLeft="true"

    android:layout_alignParentTop="true"

    android:layout_marginTop="16dp"

    android:text="Large Text"

    android:textAppearance="?android:attr/textAppearanceLarge" />


<TextView

    android:id="@+id/connect_state"

    android:layout_width="wrap_content"

    android:layout_height="wrap_content"

    android:layout_alignBaseline="@+id/device_name"

    android:layout_alignBottom="@+id/device_name"

    android:layout_marginLeft="42dp"

    android:layout_toRightOf="@+id/device_name"

    android:text="Large Text"

    android:textAppearance="?android:attr/textAppearanceLarge" />


<Button

    android:id="@+id/send"

    android:layout_width="match_parent"

    android:layout_height="wrap_content"

    android:layout_alignParentLeft="true"

    android:layout_below="@+id/print_data"

    android:layout_marginTop="21dp"

    android:text="打印" />


<Button

    android:id="@+id/command"

    android:layout_width="match_parent"

    android:layout_height="wrap_content"

    android:layout_alignParentLeft="true"

    android:layout_below="@+id/send"

    android:text="指令" />
至此,布局文件就搞定了,接下来就要编写java代码了。主要有一下这么几个类,一个一个来哈


**BluetoothActivity.java**


这个类的主要作用是初始化主界面,看代码


**\[java\]** [view plain]( ) [copy]( ) [print]( ) [?]( )


1.  public class BluetoothActivity extends Activity {

2.      private Context context = null;


4.      public void onCreate(Bundle savedInstanceState) {

5.          super.onCreate(savedInstanceState);

6.          this.context = this;

7.          setTitle("蓝牙打印");

8.          setContentView(R.layout.bluetooth\_layout);

9.          this.initListener();

10.      }


12.      private void initListener() {

13.          ListView unbondDevices = (ListView) this

14.                  .findViewById(R.id.unbondDevices);

15.          ListView bondDevices = (ListView) this.findViewById(R.id.bondDevices);

16.          Button switchBT = (Button) this.findViewById(R.id.openBluetooth\_tb);

17.          Button searchDevices = (Button) this.findViewById(R.id.searchDevices);


19.          BluetoothAction bluetoothAction = new BluetoothAction(this.context,

20.                  unbondDevices, bondDevices, switchBT, searchDevices,

21.                  BluetoothActivity.this);


23.          Button returnButton = (Button) this

24.                  .findViewById(R.id.return\_Bluetooth\_btn);

25.          bluetoothAction.setSearchDevices(searchDevices);

26.          bluetoothAction.initView();


28.          switchBT.setOnClickListener(bluetoothAction);

29.          searchDevices.setOnClickListener(bluetoothAction);

30.          returnButton.setOnClickListener(bluetoothAction);

31.      }

32.      //屏蔽返回键的代码:

33.      public boolean onKeyDown(int keyCode,KeyEvent event)

34.      {

35.          switch(keyCode)

36.          {

37.              case KeyEvent.KEYCODE\_BACK:return true;

38.          }

39.          return super.onKeyDown(keyCode, event);

40.      }

41.  }
public class BluetoothActivity extends Activity {
private Context context = null;


public void onCreate(Bundle savedInstanceState) {

    super.onCreate(savedInstanceState);

    this.context = this;

    setTitle("蓝牙打印");

    setContentView(R.layout.bluetooth_layout);

    this.initListener();

}


private void initListener() {

    ListView unbondDevices = (ListView) this

            .findViewById(R.id.unbondDevices);

    ListView bondDevices = (ListView) this.findViewById(R.id.bondDevices);

    Button switchBT = (Button) this.findViewById(R.id.openBluetooth_tb);

    Button searchDevices = (Button) this.findViewById(R.id.searchDevices);


    BluetoothAction bluetoothAction = new BluetoothAction(this.context,

            unbondDevices, bondDevices, switchBT, searchDevices,

            BluetoothActivity.this);


    Button returnButton = (Button) this

            .findViewById(R.id.return_Bluetooth_btn);

    bluetoothAction.setSearchDevices(searchDevices);

    bluetoothAction.initView();


    switchBT.setOnClickListener(bluetoothAction);

    searchDevices.setOnClickListener(bluetoothAction);

    returnButton.setOnClickListener(bluetoothAction);

}

//屏蔽返回键的代码:

public boolean onKeyDown(int keyCode,KeyEvent event)

{

    switch(keyCode)

    {

        case KeyEvent.KEYCODE_BACK:return true;

    }

    return super.onKeyDown(keyCode, event);

}
}
**BluetoothAction.java**


这个类顾名思义,是处理bluetoothActivity中各种操作事件的action类,看代码


**\[java\]** [view plain]( ) [copy]( ) [print]( ) [?]( )


1.  <span style="font-size: 14px;"\>public class BluetoothAction implements OnClickListener {


3.      private Button switchBT = null;

4.      private Button searchDevices = null;

5.      private Activity activity = null;


7.      private ListView unbondDevices = null;

8.      private ListView bondDevices = null;

9.      private Context context = null;

10.      private BluetoothService bluetoothService = null;


12.      public BluetoothAction(Context context, ListView unbondDevices,

13.              ListView bondDevices, Button switchBT, Button searchDevices,

14.              Activity activity) {

15.          super();

16.          this.context = context;

17.          this.unbondDevices = unbondDevices;

18.          this.bondDevices = bondDevices;

19.          this.switchBT = switchBT;

20.          this.searchDevices = searchDevices;

21.          this.activity = activity;

22.          this.bluetoothService = new BluetoothService(this.context,

23.                  this.unbondDevices, this.bondDevices, this.switchBT,

24.                  this.searchDevices);

25.      }


27.      public void setSwitchBT(Button switchBT) {

28.          this.switchBT = switchBT;

29.      }


31.      public void setSearchDevices(Button searchDevices) {

32.          this.searchDevices = searchDevices;

33.      }


35.      public void setUnbondDevices(ListView unbondDevices) {

36.          this.unbondDevices = unbondDevices;

37.      }


39.      /\*\*

40.       \* 初始化界面

41.       \*/

42.      public void initView() {


44.          if (this.bluetoothService.isOpen()) {

45.              System.out.println("蓝牙有开!");

46.              switchBT.setText("关闭蓝牙");

47.          }

48.          if (!this.bluetoothService.isOpen()) {

49.              System.out.println("蓝牙没开!");

50.              this.searchDevices.setEnabled(false);

51.          }

52.      }


54.      private void searchDevices() {

55.          bluetoothService.searchDevices();

56.      }


58.      /\*\*

59.       \* 各种按钮的监听

60.       \*/

61.      @Override

62.      public void onClick(View v) {

63.          if (v.getId() == R.id.searchDevices) {

64.              this.searchDevices();

65.          } else if (v.getId() == R.id.return\_Bluetooth\_btn) {

66.              activity.finish();

67.          } else if (v.getId() == R.id.openBluetooth\_tb) {

68.              if (!this.bluetoothService.isOpen()) {

69.                  // 蓝牙关闭的情况

70.                  System.out.println("蓝牙关闭的情况");

71.                  this.bluetoothService.openBluetooth(activity);

72.              } else {

73.                  // 蓝牙打开的情况

74.                  System.out.println("蓝牙打开的情况");

75.                  this.bluetoothService.closeBluetooth();


77.              }


79.          }

80.      }


82.  }</span>
public class BluetoothAction implements OnClickListener {
private Button switchBT = null;

private Button searchDevices = null;

private Activity activity = null;


private ListView unbondDevices = null;

private ListView bondDevices = null;

private Context context = null;

private BluetoothService bluetoothService = null;


public BluetoothAction(Context context, ListView unbondDevices,

        ListView bondDevices, Button switchBT, Button searchDevices,

        Activity activity) {

    super();

    this.context = context;

    this.unbondDevices = unbondDevices;

    this.bondDevices = bondDevices;

    this.switchBT = switchBT;

    this.searchDevices = searchDevices;

    this.activity = activity;

    this.bluetoothService = new BluetoothService(this.context,

            this.unbondDevices, this.bondDevices, this.switchBT,

            this.searchDevices);

}


public void setSwitchBT(Button switchBT) {

    this.switchBT = switchBT;

}


public void setSearchDevices(Button searchDevices) {

    this.searchDevices = searchDevices;

}


public void setUnbondDevices(ListView unbondDevices) {

    this.unbondDevices = unbondDevices;

}


/**

 * 初始化界面

 */

public void initView() {


    if (this.bluetoothService.isOpen()) {

        System.out.println("蓝牙有开!");

        switchBT.setText("关闭蓝牙");

    }

    if (!this.bluetoothService.isOpen()) {

        System.out.println("蓝牙没开!");

        this.searchDevices.setEnabled(false);

    }

}


private void searchDevices() {

    bluetoothService.searchDevices();

}


/**

 * 各种按钮的监听

 */

@Override

public void onClick(View v) {

    if (v.getId() == R.id.searchDevices) {

        this.searchDevices();

    } else if (v.getId() == R.id.return_Bluetooth_btn) {

        activity.finish();

    } else if (v.getId() == R.id.openBluetooth_tb) {

        if (!this.bluetoothService.isOpen()) {

            // 蓝牙关闭的情况

            System.out.println("蓝牙关闭的情况");

            this.bluetoothService.openBluetooth(activity);

        } else {

            // 蓝牙打开的情况

            System.out.println("蓝牙打开的情况");

            this.bluetoothService.closeBluetooth();


        }


    }

}
}
这个类会把各种请求动作分门别类,交给**BluetoothService.java**来处理,看代码


**\[java\]** [view plain]( ) [copy]( ) [print]( ) [?]( )


1.  public class BluetoothService {

2.      private Context context = null;

3.      private BluetoothAdapter bluetoothAdapter = BluetoothAdapter

4.              .getDefaultAdapter();

5.      private ArrayList<BluetoothDevice> unbondDevices = null; // 用于存放未配对蓝牙设备

6.      private ArrayList<BluetoothDevice> bondDevices = null;// 用于存放已配对蓝牙设备

7.      private Button switchBT = null;

8.      private Button searchDevices = null;

9.      private ListView unbondDevicesListView = null;

10.      private ListView bondDevicesListView = null;


12.      /\*\*

13.       \* 添加已绑定蓝牙设备到ListView

14.       \*/

15.      private void addBondDevicesToListView() {

16.          ArrayList<HashMap<String, Object>> data = new ArrayList<HashMap<String, Object>>();

17.          int count = this.bondDevices.size();

18.          System.out.println("已绑定设备数量:" + count);

19.          for (int i = 0; i < count; i++) {

20.              HashMap<String, Object> map = new HashMap<String, Object>();

21.              map.put("deviceName", this.bondDevices.get(i).getName());

22.              data.add(map);// 把item项的数据加到data中

23.          }

24.          String\[\] from = { "deviceName" };

25.          int\[\] to = { R.id.device\_name };

26.          SimpleAdapter simpleAdapter = new SimpleAdapter(this.context, data,

27.                  R.layout.bonddevice\_item, from, to);

28.          // 把适配器装载到listView中

29.          this.bondDevicesListView.setAdapter(simpleAdapter);


31.          this.bondDevicesListView

32.                  .setOnItemClickListener(new OnItemClickListener() {


34.                      @Override

35.                      public void onItemClick(AdapterView<?> arg0, View arg1,

36.                              int arg2, long arg3) {

37.                          BluetoothDevice device = bondDevices.get(arg2);

38.                          Intent intent = new Intent();

39.                          intent.setClassName(context,

40.                                  "com.lifeng.jdxt.view.PrintDataActivity");

41.                          intent.putExtra("deviceAddress", device.getAddress());

42.                          context.startActivity(intent);

43.                      }

44.                  });


46.      }


48.      /\*\*

49.       \* 添加未绑定蓝牙设备到ListView

50.       \*/

51.      private void addUnbondDevicesToListView() {

52.          ArrayList<HashMap<String, Object>> data = new ArrayList<HashMap<String, Object>>();

53.          int count = this.unbondDevices.size();

54.          System.out.println("未绑定设备数量:" + count);

55.          for (int i = 0; i < count; i++) {

56.              HashMap<String, Object> map = new HashMap<String, Object>();

57.              map.put("deviceName", this.unbondDevices.get(i).getName());

58.              data.add(map);// 把item项的数据加到data中

59.          }

60.          String\[\] from = { "deviceName" };

61.          int\[\] to = { R.id.device\_name };

62.          SimpleAdapter simpleAdapter = new SimpleAdapter(this.context, data,

63.                  R.layout.unbonddevice\_item, from, to);


65.          // 把适配器装载到listView中

66.          this.unbondDevicesListView.setAdapter(simpleAdapter);


68.          // 为每个item绑定监听,用于设备间的配对

69.          this.unbondDevicesListView

70.                  .setOnItemClickListener(new OnItemClickListener() {


72.                      @Override

73.                      public void onItemClick(AdapterView<?> arg0, View arg1,

74.                              int arg2, long arg3) {

75.                          try {

76.                              Method createBondMethod = BluetoothDevice.class

77.                                      .getMethod("createBond");

78.                              createBondMethod

79.                                      .invoke(unbondDevices.get(arg2));

80.                              // 将绑定好的设备添加的已绑定list集合

81.                              bondDevices.add(unbondDevices.get(arg2));

82.                              // 将绑定好的设备从未绑定list集合中移除

83.                              unbondDevices.remove(arg2);

84.                              addBondDevicesToListView();

85.                              addUnbondDevicesToListView();

86.                          } catch (Exception e) {

87.                              Toast.makeText(context, "配对失败!", Toast.LENGTH\_SHORT)

88.                                      .show();

89.                          }


91.                      }

92.                  });

93.      }


95.      public BluetoothService(Context context, ListView unbondDevicesListView,

96.              ListView bondDevicesListView, Button switchBT, Button searchDevices) {

97.          this.context = context;

98.          this.unbondDevicesListView = unbondDevicesListView;

99.          this.bondDevicesListView = bondDevicesListView;

100.          // this.bluetoothAdapter = BluetoothAdapter.getDefaultAdapter();

101.          this.unbondDevices = new ArrayList<BluetoothDevice>();

102.          this.bondDevices = new ArrayList<BluetoothDevice>();

103.          this.switchBT = switchBT;

104.          this.searchDevices = searchDevices;

105.          this.initIntentFilter();


107.      }


109.      private void initIntentFilter() {

110.          // 设置广播信息过滤

111.          IntentFilter intentFilter = new IntentFilter();

112.          intentFilter.addAction(BluetoothDevice.ACTION\_FOUND);

113.          intentFilter.addAction(BluetoothAdapter.ACTION\_DISCOVERY\_STARTED);

114.          intentFilter.addAction(BluetoothAdapter.ACTION\_DISCOVERY\_FINISHED);

115.          intentFilter.addAction(BluetoothAdapter.ACTION\_STATE\_CHANGED);

116.          // 注册广播接收器,接收并处理搜索结果

117.          context.registerReceiver(receiver, intentFilter);


119.      }


121.      /\*\*

122.       \* 打开蓝牙

123.       \*/

124.      public void openBluetooth(Activity activity) {

125.          Intent enableBtIntent = new Intent(

126.                  BluetoothAdapter.ACTION\_REQUEST\_ENABLE);

127.          activity.startActivityForResult(enableBtIntent, 1);


129.      }


131.      /\*\*

132.       \* 关闭蓝牙

133.       \*/

134.      public void closeBluetooth() {

135.          this.bluetoothAdapter.disable();

136.      }


138.      /\*\*

139.       \* 判断蓝牙是否打开

140.       \*

141.       \* @return boolean

142.       \*/

143.      public boolean isOpen() {

144.          return this.bluetoothAdapter.isEnabled();


146.      }


148.      /\*\*

149.       \* 搜索蓝牙设备

150.       \*/

151.      public void searchDevices() {

152.          this.bondDevices.clear();

153.          this.unbondDevices.clear();


155.          // 寻找蓝牙设备,android会将查找到的设备以广播形式发出去

156.          this.bluetoothAdapter.startDiscovery();

157.      }


159.      /\*\*

160.       \* 添加未绑定蓝牙设备到list集合

161.       \*

162.       \* @param device

163.       \*/

164.      public void addUnbondDevices(BluetoothDevice device) {

165.          System.out.println("未绑定设备名称:" + device.getName());

166.          if (!this.unbondDevices.contains(device)) {

167.              this.unbondDevices.add(device);

168.          }

169.      }


171.      /\*\*

172.       \* 添加已绑定蓝牙设备到list集合

173.       \*

174.       \* @param device

175.       \*/

176.      public void addBandDevices(BluetoothDevice device) {

177.          System.out.println("已绑定设备名称:" + device.getName());

178.          if (!this.bondDevices.contains(device)) {

179.              this.bondDevices.add(device);

180.          }

181.      }


183.      /\*\*

184.       \* 蓝牙广播接收器

185.       \*/

186.      private BroadcastReceiver receiver = new BroadcastReceiver() {


188.          ProgressDialog progressDialog = null;


190.          @Override

191.          public void onReceive(Context context, Intent intent) {

192.              String action = intent.getAction();

193.              if (BluetoothDevice.ACTION\_FOUND.equals(action)) {

194.                  BluetoothDevice device = intent

195.                          .getParcelableExtra(BluetoothDevice.EXTRA\_DEVICE);

196.                  if (device.getBondState() == BluetoothDevice.BOND\_BONDED) {

197.                      addBandDevices(device);

198.                  } else {

199.                      addUnbondDevices(device);

200.                  }

201.              } else if (BluetoothAdapter.ACTION\_DISCOVERY\_STARTED.equals(action)) {

202.                  progressDialog = ProgressDialog.show(context, "请稍等...",

203.                          "搜索蓝牙设备中...", true);


205.              } else if (BluetoothAdapter.ACTION\_DISCOVERY\_FINISHED

206.                      .equals(action)) {

207.                  System.out.println("设备搜索完毕");

208.                  progressDialog.dismiss();


210.                  addUnbondDevicesToListView();

211.                  addBondDevicesToListView();

212.                  // bluetoothAdapter.cancelDiscovery();

213.              }

214.              if (BluetoothAdapter.ACTION\_STATE\_CHANGED.equals(action)) {

215.                  if (bluetoothAdapter.getState() == BluetoothAdapter.STATE\_ON) {

216.                      System.out.println("--------打开蓝牙-----------");

217.                      switchBT.setText("关闭蓝牙");

218.                      searchDevices.setEnabled(true);

219.                      bondDevicesListView.setEnabled(true);

220.                      unbondDevicesListView.setEnabled(true);

221.                  } else if (bluetoothAdapter.getState() == BluetoothAdapter.STATE\_OFF) {

222.                      System.out.println("--------关闭蓝牙-----------");

223.                      switchBT.setText("打开蓝牙");

224.                      searchDevices.setEnabled(false);

225.                      bondDevicesListView.setEnabled(false);

226.                      unbondDevicesListView.setEnabled(false);

227.                  }

228.              }


230.          }


232.      };


234.  }
public class BluetoothService {
private Context context = null;

private BluetoothAdapter bluetoothAdapter = BluetoothAdapter

        .getDefaultAdapter();

private ArrayList<BluetoothDevice> unbondDevices = null; // 用于存放未配对蓝牙设备

private ArrayList<BluetoothDevice> bondDevices = null;// 用于存放已配对蓝牙设备

private Button switchBT = null;

private Button searchDevices = null;

private ListView unbondDevicesListView = null;

private ListView bondDevicesListView = null;


/**

 * 添加已绑定蓝牙设备到ListView

 */

private void addBondDevicesToListView() {

    ArrayList<HashMap<String, Object>> data = new ArrayList<HashMap<String, Object>>();

    int count = this.bondDevices.size();

    System.out.println("已绑定设备数量:" + count);

    for (int i = 0; i < count; i++) {

        HashMap<String, Object> map = new HashMap<String, Object>();

        map.put("deviceName", this.bondDevices.get(i).getName());

        data.add(map);// 把item项的数据加到data中

    }

    String[] from = { "deviceName" };

    int[] to = { R.id.device_name };

    SimpleAdapter simpleAdapter = new SimpleAdapter(this.context, data,

            R.layout.bonddevice_item, from, to);

    // 把适配器装载到listView中

    this.bondDevicesListView.setAdapter(simpleAdapter);


    this.bondDevicesListView

            .setOnItemClickListener(new OnItemClickListener() {


                @Override

                public void onItemClick(AdapterView<?> arg0, View arg1,

                        int arg2, long arg3) {

                    BluetoothDevice device = bondDevices.get(arg2);

                    Intent intent = new Intent();

                    intent.setClassName(context,

                            "com.lifeng.jdxt.view.PrintDataActivity");

                    intent.putExtra("deviceAddress", device.getAddress());

                    context.startActivity(intent);

                }

            });


}


/**

 * 添加未绑定蓝牙设备到ListView

 */

private void addUnbondDevicesToListView() {

    ArrayList<HashMap<String, Object>> data = new ArrayList<HashMap<String, Object>>();

    int count = this.unbondDevices.size();

    System.out.println("未绑定设备数量:" + count);

    for (int i = 0; i < count; i++) {

        HashMap<String, Object> map = new HashMap<String, Object>();

        map.put("deviceName", this.unbondDevices.get(i).getName());

        data.add(map);// 把item项的数据加到data中

    }

    String[] from = { "deviceName" };

    int[] to = { R.id.device_name };

    SimpleAdapter simpleAdapter = new SimpleAdapter(this.context, data,

            R.layout.unbonddevice_item, from, to);


    // 把适配器装载到listView中

    this.unbondDevicesListView.setAdapter(simpleAdapter);


    // 为每个item绑定监听,用于设备间的配对

    this.unbondDevicesListView

            .setOnItemClickListener(new OnItemClickListener() {


                @Override

                public void onItemClick(AdapterView<?> arg0, View arg1,

                        int arg2, long arg3) {

                    try {

                        Method createBondMethod = BluetoothDevice.class

                                .getMethod("createBond");

                        createBondMethod

                                .invoke(unbondDevices.get(arg2));

                        // 将绑定好的设备添加的已绑定list集合

                        bondDevices.add(unbondDevices.get(arg2));

                        // 将绑定好的设备从未绑定list集合中移除

                        unbondDevices.remove(arg2);

                        addBondDevicesToListView();

                        addUnbondDevicesToListView();

                    } catch (Exception e) {

                        Toast.makeText(context, "配对失败!", Toast.LENGTH_SHORT)

                                .show();

                    }


                }

            });

}


public BluetoothService(Context context, ListView unbondDevicesListView,

        ListView bondDevicesListView, Button switchBT, Button searchDevices) {

    this.context = context;

    this.unbondDevicesListView = unbondDevicesListView;

    this.bondDevicesListView = bondDevicesListView;

    // this.bluetoothAdapter = BluetoothAdapter.getDefaultAdapter();

    this.unbondDevices = new ArrayList<BluetoothDevice>();

    this.bondDevices = new ArrayList<BluetoothDevice>();

    this.switchBT = switchBT;

    this.searchDevices = searchDevices;

    this.initIntentFilter();


}


private void initIntentFilter() {

    // 设置广播信息过滤

    IntentFilter intentFilter = new IntentFilter();

    intentFilter.addAction(BluetoothDevice.ACTION_FOUND);

    intentFilter.addAction(BluetoothAdapter.ACTION_DISCOVERY_STARTED);

    intentFilter.addAction(BluetoothAdapter.ACTION_DISCOVERY_FINISHED);

    intentFilter.addAction(BluetoothAdapter.ACTION_STATE_CHANGED);

    // 注册广播接收器,接收并处理搜索结果

    context.registerReceiver(receiver, intentFilter);


}


/**

 * 打开蓝牙

 */

public void openBluetooth(Activity activity) {

    Intent enableBtIntent = new Intent(

            BluetoothAdapter.ACTION_REQUEST_ENABLE);

    activity.startActivityForResult(enableBtIntent, 1);


}


/**

 * 关闭蓝牙

 */

public void closeBluetooth() {

    this.bluetoothAdapter.disable();

}


/**

 * 判断蓝牙是否打开

 *

 * @return boolean

 */

public boolean isOpen() {

    return this.bluetoothAdapter.isEnabled();


}


/**

 * 搜索蓝牙设备

 */

public void searchDevices() {

    this.bondDevices.clear();

    this.unbondDevices.clear();


    // 寻找蓝牙设备,android会将查找到的设备以广播形式发出去

    this.bluetoothAdapter.startDiscovery();

}


/**

 * 添加未绑定蓝牙设备到list集合

 *

 * @param device

 */

public void addUnbondDevices(BluetoothDevice device) {

    System.out.println("未绑定设备名称:" + device.getName());

    if (!this.unbondDevices.contains(device)) {

        this.unbondDevices.add(device);

    }

}


/**

 * 添加已绑定蓝牙设备到list集合

 *

 * @param device

 */

public void addBandDevices(BluetoothDevice device) {

    System.out.println("已绑定设备名称:" + device.getName());

    if (!this.bondDevices.contains(device)) {

        this.bondDevices.add(device);

    }

}


/**

 * 蓝牙广播接收器

 */

private BroadcastReceiver receiver = new BroadcastReceiver() {


    ProgressDialog progressDialog = null;


    @Override

    public void onReceive(Context context, Intent intent) {

        String action = intent.getAction();

        if (BluetoothDevice.ACTION_FOUND.equals(action)) {

            BluetoothDevice device = intent

                    .getParcelableExtra(BluetoothDevice.EXTRA_DEVICE);

            if (device.getBondState() == BluetoothDevice.BOND_BONDED) {

                addBandDevices(device);

            } else {

                addUnbondDevices(device);

            }

        } else if (BluetoothAdapter.ACTION_DISCOVERY_STARTED.equals(action)) {

            progressDialog = ProgressDialog.show(context, "请稍等...",

                    "搜索蓝牙设备中...", true);


        } else if (BluetoothAdapter.ACTION_DISCOVERY_FINISHED

                .equals(action)) {

            System.out.println("设备搜索完毕");

            progressDialog.dismiss();


            addUnbondDevicesToListView();

            addBondDevicesToListView();

            // bluetoothAdapter.cancelDiscovery();

        }

        if (BluetoothAdapter.ACTION_STATE_CHANGED.equals(action)) {

            if (bluetoothAdapter.getState() == BluetoothAdapter.STATE_ON) {

                System.out.println("--------打开蓝牙-----------");

                switchBT.setText("关闭蓝牙");

                searchDevices.setEnabled(true);

                bondDevicesListView.setEnabled(true);

                unbondDevicesListView.setEnabled(true);

            } else if (bluetoothAdapter.getState() == BluetoothAdapter.STATE_OFF) {

                System.out.println("--------关闭蓝牙-----------");

                switchBT.setText("打开蓝牙");

                searchDevices.setEnabled(false);

                bondDevicesListView.setEnabled(false);

                unbondDevicesListView.setEnabled(false);

            }

        }


    }


};
}
到这里,第一个界面的代码就写完了,当我们点击要打印的蓝牙设备时就会跳转到打印页面,跳转代码在BluetoothService.java的addBondDevicesToListView()中


接下来让我们来看看第二个界面的代码,结构和第一个界面的代码一样,分类三个类,请看代码。。。。。


PrintDataActivity.java


**\[java\]** [view plain]( ) [copy]( ) [print]( ) [?]( )


1.  public class PrintDataActivity extends Activity {

2.      private Context context = null;


4.      public void onCreate(Bundle savedInstanceState) {

5.          super.onCreate(savedInstanceState);

6.          this.setTitle("蓝牙打印");

7.          this.setContentView(R.layout.printdata\_layout);

8.          this.context = this;

9.          this.initListener();

10.      }


12.      /\*\*

13.       \* 获得从上一个Activity传来的蓝牙地址

14.       \* @return String

15.       \*/

16.      private String getDeviceAddress() {

17.          // 直接通过Context类的getIntent()即可获取Intent

18.          Intent intent = this.getIntent();

19.          // 判断

20.          if (intent != null) {

21.              return intent.getStringExtra("deviceAddress");

22.          } else {

23.              return null;

24.          }

25.      }


27.      private void initListener() {

28.          TextView deviceName = (TextView) this.findViewById(R.id.device\_name);

29.          TextView connectState = (TextView) this

30.                  .findViewById(R.id.connect\_state);


32.          PrintDataAction printDataAction = new PrintDataAction(this.context,

33.                  this.getDeviceAddress(), deviceName, connectState);


35.          EditText printData = (EditText) this.findViewById(R.id.print\_data);

36.          Button send = (Button) this.findViewById(R.id.send);

37.          Button command = (Button) this.findViewById(R.id.command);

38.          printDataAction.setPrintData(printData);


40.          send.setOnClickListener(printDataAction);

41.          command.setOnClickListener(printDataAction);

42.      }


45.      @Override

46.      protected void onDestroy() {

47.          PrintDataService.disconnect();

48.          super.onDestroy();

49.      }


51.  }
public class PrintDataActivity extends Activity {
private Context context = null;


public void onCreate(Bundle savedInstanceState) {

    super.onCreate(savedInstanceState);

    this.setTitle("蓝牙打印");

    this.setContentView(R.layout.printdata_layout);

    this.context = this;

    this.initListener();

}


/**

 * 获得从上一个Activity传来的蓝牙地址

 * @return String

 */

private String getDeviceAddress() {

    // 直接通过Context类的getIntent()即可获取Intent

    Intent intent = this.getIntent();

    // 判断

    if (intent != null) {

        return intent.getStringExtra("deviceAddress");

    } else {
最后的最后
对于程序员来说,要学习的知识内容、技术有太多太多,要想不被环境淘汰就只有不断提升自己,从来都是我们去适应环境,而不是环境来适应我们!
当你有了学习线路,学习哪些内容,也知道以后的路怎么走了,理论看多了总要实践的

最后,互联网不存在所谓的寒冬,只是你没有努力罢了!
网上学习资料一大堆,但如果学到的知识不成体系,遇到问题时只是浅尝辄止,不再深入研究,那么很难做到真正的技术提升。
一个人可以走的很快,但一群人才能走的更远!不论你是正从事IT行业的老鸟或是对IT行业感兴趣的新人,都欢迎加入我们的的圈子(技术交流、学习资源、职场吐槽、大厂内推、面试辅导),让我们一起学习成长!
id.connect_state);
-
PrintDataAction printDataAction = new PrintDataAction(this.context,
-
this.getDeviceAddress(), deviceName, connectState);
-
EditText printData = (EditText) this.findViewById(R.id.print_data);
-
Button send = (Button) this.findViewById(R.id.send);
-
Button command = (Button) this.findViewById(R.id.command);
-
printDataAction.setPrintData(printData);
-
send.setOnClickListener(printDataAction);
-
command.setOnClickListener(printDataAction);
-
}
-
@Override
-
protected void onDestroy() {
-
PrintDataService.disconnect();
-
super.onDestroy();
-
}
-
}
public class PrintDataActivity extends Activity {

    private Context context = null;


    public void onCreate(Bundle savedInstanceState) {

        super.onCreate(savedInstanceState);

        this.setTitle("蓝牙打印");

        this.setContentView(R.layout.printdata_layout);

        this.context = this;

        this.initListener();

    }


    /**

     * 获得从上一个Activity传来的蓝牙地址

     * @return String

     */

    private String getDeviceAddress() {

        // 直接通过Context类的getIntent()即可获取Intent

        Intent intent = this.getIntent();

        // 判断

        if (intent != null) {

            return intent.getStringExtra("deviceAddress");

        } else {


## 最后的最后

对于程序员来说,要学习的知识内容、技术有太多太多,要想不被环境淘汰就只有不断提升自己,**从来都是我们去适应环境,而不是环境来适应我们!**

> 当你有了学习线路,学习哪些内容,也知道以后的路怎么走了,理论看多了总要实践的

[外链图片转存中...(img-xYgTjeZ7-1715445202947)]

**最后,互联网不存在所谓的寒冬,只是你没有努力罢了!**


**网上学习资料一大堆,但如果学到的知识不成体系,遇到问题时只是浅尝辄止,不再深入研究,那么很难做到真正的技术提升。**

**[需要这份系统化学习资料的朋友,可以戳这里获取](https://bbs.csdn.net/topics/618156601)**

**一个人可以走的很快,但一群人才能走的更远!不论你是正从事IT行业的老鸟或是对IT行业感兴趣的新人,都欢迎加入我们的的圈子(技术交流、学习资源、职场吐槽、大厂内推、面试辅导),让我们一起学习成长!**


 1792
1792

 被折叠的 条评论
为什么被折叠?
被折叠的 条评论
为什么被折叠?
 到【灌水乐园】发言


