


既有适合小白学习的零基础资料,也有适合3年以上经验的小伙伴深入学习提升的进阶课程,涵盖了95%以上Go语言开发知识点,真正体系化!
由于文件比较多,这里只是将部分目录截图出来,全套包含大厂面经、学习笔记、源码讲义、实战项目、大纲路线、讲解视频,并且后续会持续更新
[root@k8s-master ~]# kubectl get deploy -n kube-system
NAME READY UP-TO-DATE AVAILABLE AGE
calico-kube-controllers 1/1 1 1 22h
coredns 2/2 2 2 22h
2. 查看/编辑 指定命名空间指定名称的deployment配置文件(`coredns`)
kubectl edit deploy -n kube-system coredns
Please edit the object below. Lines beginning with a ‘#’ will be ignored,
and an empty file will abort the edit. If an error occurs while saving this file will be
reopened with the relevant failures.
apiVersion: apps/v1
kind: Deployment
metadata:
annotations:
deployment.kubernetes.io/revision: “1”
creationTimestamp: “2023-12-27T09:36:32Z”
generation: 1
labels:
k8s-app: kube-dns
name: coredns
namespace: kube-system
resourceVersion: “18183”
uid: 541272d1-9c5b-4868-a982-3273546f2456
spec:
progressDeadlineSeconds: 600
replicas: 2
revisionHistoryLimit: 10
selector:
matchLabels:
k8s-app: kube-dns
strategy:
rollingUpdate:
maxSurge: 25%
maxUnavailable: 1
type: RollingUpdate
template:
metadata:
creationTimestamp: null
labels:
k8s-app: kube-dns
spec:
containers:
- args:
- -conf
- /etc/coredns/Corefile
image: registry.aliyuncs.com/google_containers/coredns:v1.8.6
imagePullPolicy: IfNotPresent
livenessProbe:
failureThreshold: 5
httpGet:
path: /health
port: 8080
scheme: HTTP
initialDelaySeconds: 60
periodSeconds: 10
successThreshold: 1
timeoutSeconds: 5
name: coredns
ports:
- containerPort: 53
name: dns
protocol: UDP
- containerPort: 53
name: dns-tcp
protocol: TCP
- containerPort: 9153
name: metrics
protocol: TCP
readinessProbe:
failureThreshold: 3
httpGet:
path: /ready
port: 8181
scheme: HTTP
periodSeconds: 10
successThreshold: 1
timeoutSeconds: 1
resources:
limits:
memory: 170Mi
requests:
cpu: 100m
memory: 70Mi
securityContext:
allowPrivilegeEscalation: false
capabilities:
add:
- NET_BIND_SERVICE
drop:
- all
readOnlyRootFilesystem: true
terminationMessagePath: /dev/termination-log
terminationMessagePolicy: File
volumeMounts:
- mountPath: /etc/coredns
name: config-volume
readOnly: true
dnsPolicy: Default
nodeSelector:
kubernetes.io/os: linux
priorityClassName: system-cluster-critical
restartPolicy: Always
schedulerName: default-scheduler
securityContext: {}
serviceAccount: coredns
serviceAccountName: coredns
terminationGracePeriodSeconds: 30
tolerations:
- key: CriticalAddonsOnly
operator: Exists
- effect: NoSchedule
key: node-role.kubernetes.io/master
- effect: NoSchedule
key: node-role.kubernetes.io/control-plane
volumes:
- configMap:
defaultMode: 420
items:
- key: Corefile
path: Corefile
name: coredns
name: config-volume
status:
availableReplicas: 2
conditions:
- lastTransitionTime: “2023-12-27T09:36:47Z”
lastUpdateTime: “2023-12-27T09:43:51Z”
message: ReplicaSet “coredns-6d8c4cb4d” has successfully progressed.
reason: NewReplicaSetAvailable
status: “True”
type: Progressing - lastTransitionTime: “2023-12-28T03:08:25Z”
lastUpdateTime: “2023-12-28T03:08:25Z”
message: Deployment has minimum availability.
reason: MinimumReplicasAvailable
status: “True”
type: Available
observedGeneration: 1
readyReplicas: 2
replicas: 2
updatedReplicas: 2
3. 配置的探针
 **存活探针**:
    livenessProbe:
      failureThreshold: 5
      httpGet:
        path: /health
        port: 8080
        scheme: HTTP
      initialDelaySeconds: 60
      periodSeconds: 10
      successThreshold: 1
      timeoutSeconds: 5
**就绪探针**:
    readinessProbe:
      failureThreshold: 3
      httpGet:
        path: /ready
        port: 8181
        scheme: HTTP
      periodSeconds: 10
      successThreshold: 1
      timeoutSeconds: 1
#### 2.4.2 用到的相关命令


在 **`1 Pod 配置文件`** 中加入探针配置,用到的相关命令:
1 查看所有Pod
kubectl get po
或查看指定名称的Pod
kubectl get po nginx-demo
[root@k8s-master ~]# kubectl get po
NAME READY STATUS RESTARTS AGE
nginx-demo 0/1 Completed 0 9h
2 删除指定名称的Pod
kubectl delete po nginx-demo
3 查看/编辑指定名称的Pod配置文件
kubectl edit po nginx-demo
4 修改 nginx-demo.yaml 配置文件
vim /opt/k8s/nginx-demo.yaml
5 根据 nginx-demo.yaml 创建Pod应用(nginx-demo)
kubectl create -f nginx-demo.yaml
6 查看探针执行情况
kubectl describe po nginx-demo
#### 2.4.3 startupProbe(启动探针)


1. 先删除已创建的Pod应用(`nginx-demo`)
删除指定名称的Pod
kubectl delete po nginx-demo
2. 修改 nginx-demo.yaml 配置文件(加入 startupProbe 配置,探测方式:`HTTPGetAction`)
apiVersion: v1 # api 文档版本
kind: Pod # 资源对象类型,也可以配置为像Deployment、StatefulSet这一类的对象
metadata: # Pod 相关的元数据,用于描述 Pod 的数据
name: nginx-demo # Pod 的名称
labels: # 定义 Pod 的标签
type: app # 自定义 label 标签,名字为 type,值为 app
test: 1.0.0 # 自定义 label 标签,描述 Pod 版本号
namespace: ‘default’ # 命名空间的配置
spec: # 期望 Pod 按照这里面的描述进行创建
containers: # 对于 Pod 中的容器描述
- name: nginx # 容器的名称
image: nginx:1.7.9 # 指定容器的镜像
imagePullPolicy: IfNotPresent # 镜像拉取策略,指定如果本地有就用本地的,如果没有就拉取远程的
startupProbe: # 应用启动探针配置
httpGet: # 探测方式,基于 http 请求探测
path: /index.html # http 请求路径
port: 80 # 请求端口
failureThreshold: 3 # 请求失败多少次就表示真正失败
periodSeconds: 10 # 监测间隔时间。
successThreshold: 1 # 监测多少次成功就表示真正成功
timeoutSeconds: 5 # 请求的超时时间
command: # 指定容器启动时执行的命令
- nginx
- -g
- ‘daemon off;’ # nginx -g ‘daemon off;’
workingDir: /usr/share/nginx/html # 定义容器启动后的工作目录
ports:
- name: http # 端口名称
containerPort: 80 # 描述容器内要暴露什么端口
protocol: TCP # 描述该端口是基于哪种协议通信的
env: # 环境变量
- name: JVM_OPTS # 环境变量名称
value: ‘-Xms128m -Xmx128m’ # 环境变量的值
resources:
requests: # 最少需要多少资源
cpu: 100m # 限制 cpu 最少使用 0.1 个核心
memory: 128Mi # 限制内存最少使用 128兆
limits: # 最多可以用多少资源
cpu: 200m # 限制 cpu 最多使用 0.2 个核心
memory: 256Mi # 限制 最多使用 256兆
restartPolicy: OnFailure # 重启策略,只有失败的情况才会重启
3. 根据 nginx-demo.yaml 创建Pod应用(`nginx-demo`)
kubectl create -f nginx-demo.yaml
4. 查看探针执行情况
kubectl describe po nginx-demo

[root@k8s-master k8s]# kubectl describe po nginx-demo
Name: nginx-demo
Namespace: default
Priority: 0
Node: k8s-node1/192.168.3.242
Start Time: Thu, 28 Dec 2023 17:40:13 +0800
Labels: test=1.0.0
type=app
Annotations: cni.projectcalico.org/containerID: 78799c5edee21106551c37d5a75b9e0ce522d887161b1dda97ed71b0702930f9
cni.projectcalico.org/podIP: 10.244.36.74/32
cni.projectcalico.org/podIPs: 10.244.36.74/32
Status: Running
IP: 10.244.36.74
IPs:
IP: 10.244.36.74
Containers:
nginx:
Container ID: docker://21d1509903c8105cac47a49ee3f86cc3a138e6d2f0d4aa8d25c8119c20d8ca9a
Image: nginx:1.7.9
Image ID: docker-pullable://nginx@sha256:e3456c851a152494c3e4ff5fcc26f240206abac0c9d794affb40e0714846c451
Port: 80/TCP
Host Port: 0/TCP
Command:
nginx
-g
daemon off;
State: Running
Started: Thu, 28 Dec 2023 17:40:14 +0800
Ready: True
Restart Count: 0
Limits:
cpu: 200m
memory: 256Mi
Requests:
cpu: 100m
memory: 128Mi
Startup: http-get http://:80/index.html delay=0s timeout=5s period=10s #success=1 #failure=3
Environment:
JVM_OPTS: -Xms128m -Xmx128m
Mounts:
/var/run/secrets/kubernetes.io/serviceaccount from kube-api-access-k84gr (ro)
Conditions:
Type Status
Initialized True
Ready True
ContainersReady True
PodScheduled True
Volumes:
kube-api-access-k84gr:
Type: Projected (a volume that contains injected data from multiple sources)
TokenExpirationSeconds: 3607
ConfigMapName: kube-root-ca.crt
ConfigMapOptional:
DownwardAPI: true
QoS Class: Burstable
Node-Selectors:
Tolerations: node.kubernetes.io/not-ready:NoExecute op=Exists for 300s
node.kubernetes.io/unreachable:NoExecute op=Exists for 300s
Events:
Type Reason Age From Message
Normal Scheduled 5m9s default-scheduler Successfully assigned default/nginx-demo to k8s-node1
Normal Pulled 5m8s kubelet Container image “nginx:1.7.9” already present on machine
Normal Created 5m8s kubelet Created container nginx
Normal Started 5m8s kubelet Started container nginx
---


5. 修改 nginx-demo.yaml 配置文件(加入 startupProbe 配置,探测方式:`TCPSocketAction`)
具体步骤
1、先删除已创建的Pod应用(nginx-demo)
kubectl delete po nginx-demo
2、修改 nginx-demo.yaml 配置文件(加入 startupProbe 配置,探测方式:TCPSocketAction)
vim nginx-demo.yaml
3、根据 nginx-demo.yaml 创建Pod应用(nginx-demo)
kubectl create -f nginx-demo.yaml
4、查看探针执行情况
kubectl describe po nginx-demo
修改 nginx-demo.yaml 配置文件(加入 startupProbe 配置,探测方式:`TCPSocketAction`):
apiVersion: v1 # api 文档版本
kind: Pod # 资源对象类型,也可以配置为像Deployment、StatefulSet这一类的对象
metadata: # Pod 相关的元数据,用于描述 Pod 的数据
name: nginx-demo # Pod 的名称
labels: # 定义 Pod 的标签
type: app # 自定义 label 标签,名字为 type,值为 app
test: 1.0.0 # 自定义 label 标签,描述 Pod 版本号
namespace: ‘default’ # 命名空间的配置
spec: # 期望 Pod 按照这里面的描述进行创建
containers: # 对于 Pod 中的容器描述
- name: nginx # 容器的名称
image: nginx:1.7.9 # 指定容器的镜像
imagePullPolicy: IfNotPresent # 镜像拉取策略,指定如果本地有就用本地的,如果没有就拉取远程的
startupProbe: # 应用启动探针配置
httpGet: # 探测方式,基于 http 请求探测
path: /index.html # http 请求路径
    tcpSocket:
      port: 80 # 请求端口
    failureThreshold: 3 # 请求失败多少次就表示真正失败
    periodSeconds: 10 # 监测间隔时间。
    successThreshold: 1 # 监测多少次成功就表示真正成功
    timeoutSeconds: 5 # 请求的超时时间
  command: # 指定容器启动时执行的命令
    - nginx
    - -g
    - 'daemon off;' # nginx -g 'daemon off;'
  workingDir: /usr/share/nginx/html # 定义容器启动后的工作目录
  ports:
    - name: http # 端口名称
      containerPort: 80 # 描述容器内要暴露什么端口
      protocol: TCP # 描述该端口是基于哪种协议通信的
  env: # 环境变量
    - name: JVM_OPTS # 环境变量名称
      value: '-Xms128m -Xmx128m' # 环境变量的值
  resources:
    requests: # 最少需要多少资源
      cpu: 100m # 限制 cpu 最少使用 0.1 个核心
      memory: 128Mi # 限制内存最少使用 128兆
    limits: # 最多可以用多少资源
      cpu: 200m # 限制 cpu 最多使用 0.2 个核心
      memory: 256Mi # 限制 最多使用 256兆
restartPolicy: OnFailure # 重启策略,只有失败的情况才会重启
查看探针执行情况:

---
6. 修改 nginx-demo.yaml 配置文件(加入 startupProbe 配置,探测方式:`ExecAction`)
具体步骤
1、先删除已创建的Pod应用(nginx-demo)
kubectl delete po nginx-demo
2、修改 nginx-demo.yaml 配置文件(加入 startupProbe 配置,探测方式:ExecAction)
vim nginx-demo.yaml
3、根据 nginx-demo.yaml 创建Pod应用(nginx-demo)
kubectl create -f nginx-demo.yaml
4、查看探针执行情况
kubectl describe po nginx-demo
修改 nginx-demo.yaml 配置文件(加入 startupProbe 配置,探测方式:`ExecAction`):
apiVersion: v1 # api 文档版本
kind: Pod # 资源对象类型,也可以配置为像Deployment、StatefulSet这一类的对象
metadata: # Pod 相关的元数据,用于描述 Pod 的数据
name: nginx-demo # Pod 的名称
labels: # 定义 Pod 的标签
type: app # 自定义 label 标签,名字为 type,值为 app
test: 1.0.0 # 自定义 label 标签,描述 Pod 版本号
namespace: ‘default’ # 命名空间的配置
spec: # 期望 Pod 按照这里面的描述进行创建
containers: # 对于 Pod 中的容器描述
- name: nginx # 容器的名称
image: nginx:1.7.9 # 指定容器的镜像
imagePullPolicy: IfNotPresent # 镜像拉取策略,指定如果本地有就用本地的,如果没有就拉取远程的
startupProbe: # 应用启动探针配置
httpGet: # 探测方式,基于 http 请求探测
path: /index.html # http 请求路径
tcpSocket:
port: 80 # 请求端口
    exec:
      command:
        - sh
        - -c
        - "sleep 5;echo 'success'; > /inited;"
    failureThreshold: 3 # 请求失败多少次就表示真正失败
    periodSeconds: 10 # 监测间隔时间。
    successThreshold: 1 # 监测多少次成功就表示真正成功
    timeoutSeconds: 5 # 请求的超时时间
  command: # 指定容器启动时执行的命令
    - nginx
    - -g
    - 'daemon off;' # nginx -g 'daemon off;'
  workingDir: /usr/share/nginx/html # 定义容器启动后的工作目录
  ports:
    - name: http # 端口名称
      containerPort: 80 # 描述容器内要暴露什么端口
      protocol: TCP # 描述该端口是基于哪种协议通信的
  env: # 环境变量
    - name: JVM_OPTS # 环境变量名称
      value: '-Xms128m -Xmx128m' # 环境变量的值
  resources:
    requests: # 最少需要多少资源
      cpu: 100m # 限制 cpu 最少使用 0.1 个核心
      memory: 128Mi # 限制内存最少使用 128兆
    limits: # 最多可以用多少资源
      cpu: 200m # 限制 cpu 最多使用 0.2 个核心
      memory: 256Mi # 限制 最多使用 256兆
restartPolicy: OnFailure # 重启策略,只有失败的情况才会重启
查看探针执行情况:

#### 2.4.4 livenessProbe(存活探针)
`yaml`配置文件中粘贴内容格式混乱的解决办法:
1 按esc键
2 输入 :set paste
3 按 o(字母)然后粘贴内容
livenessProbe(存活探针)的配置和startupProbe(启动探针)一致,这里就不再重复。
#### 2.4.5 readinessProbe(就绪探针)
readinessProbe(存活探针)的配置和startupProbe(启动探针)一致,这里就不再重复。
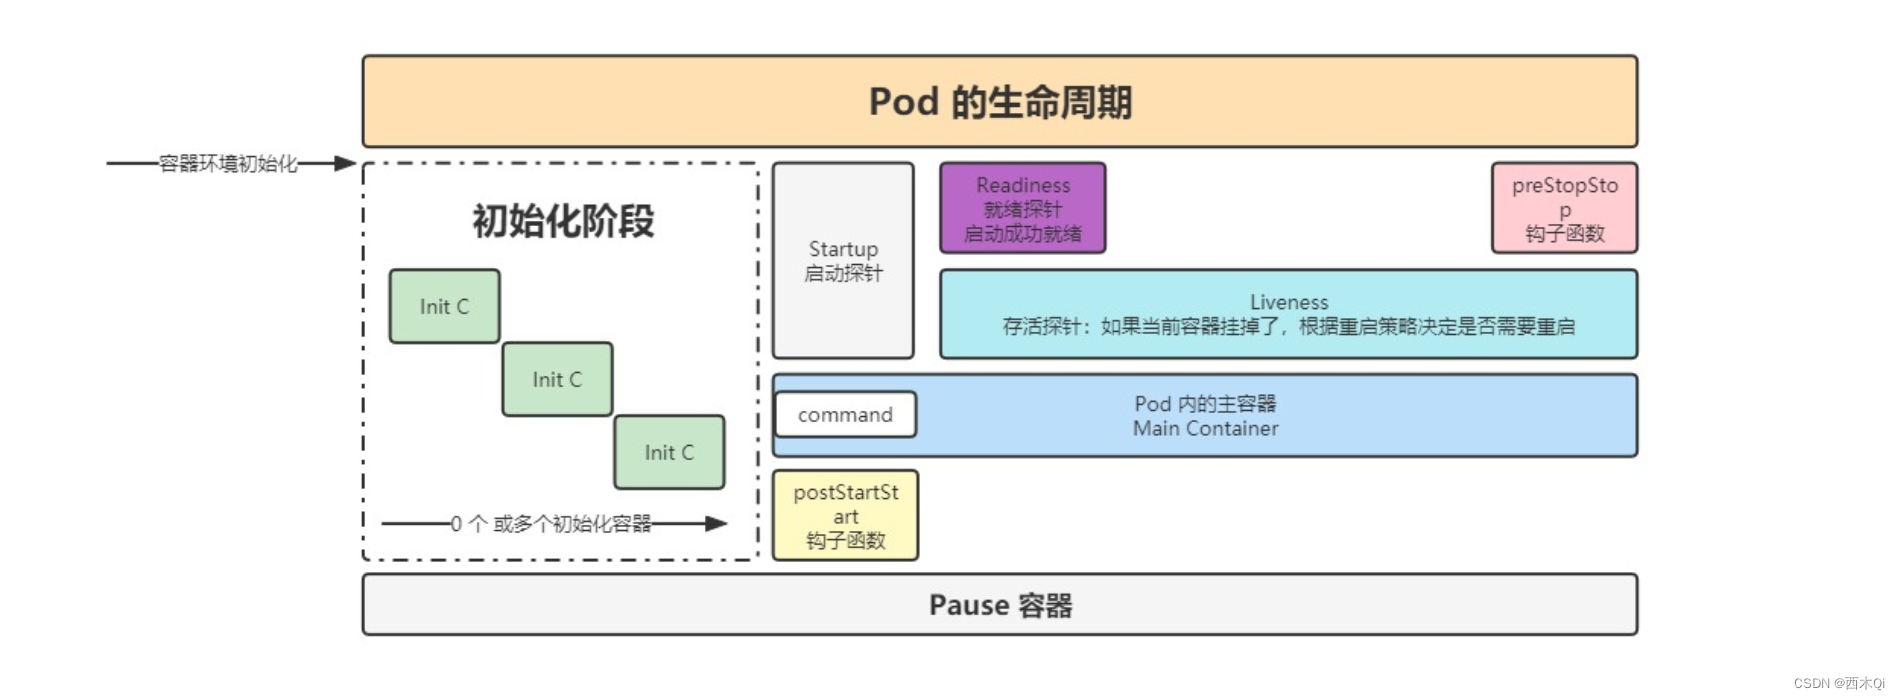
## 3 Pod 生命周期
---
lifecycle:
postStart: # 容创建完成后执行的动作,不能保证该操作一定在容器的 command 之前执行,一般不使用
exec: # 可以是 exec / httpGet / tcpSocket
command:
- sh
- -c
- ‘mkdir /data’
preStop: # 在容器停止前执行的动作
httpGet: # 发送一个 http 请求
path: /
port: 80
exec: # 执行一个命令
command:
- sh
- -c
- sleep 9
### 3.1 Pod 退出流程(删除操作)


1. Endpoint 删除 pod 的 ip 地址。
2. Pod 变成 Terminating 状态。
 变为删除中的状态后,会给 pod 一个宽限期,让 pod 去执行一些清理或销毁操作。

 配置参数:
作用与 pod 中的所有容器
terminationGracePeriodSeconds: 30
containers:
- xxx
3. 执行 preStop 的指令。


### 3.2 PreStop 的应用


如果应用销毁操作耗时需要比较长,可以在 preStop 按照如下方式进行配置。
preStop:
exec:
command:
- sh
- -c
- ‘sleep 20; kill pgrep java’
但是需要注意,`由于 k8s 默认给 pod 的停止宽限时间为 30s`,如果我们停止操作会超过 30s 时,不要光设置 sleep 50,还要将 terminationGracePeriodSeconds: 30 也更新成更长的时间,否则 k8s 最多只会在这个时间的基础上再宽限几秒,不会真正等待 50s。


---


**应用**:


1. 注册中心下线
2. 数据清理
3. 数据销毁


### 3.3 实际使用


1. 复制一份 nginx-demo.yaml 配置文件改为 nginx-prestop.yaml(去除探针的配置,加入 lifecycle 配置)
具体步骤
1 复制一份 nginx-demo.yaml 配置文件改为 nginx-prestop.yaml
cp nginx-demo.yaml nginx-prestop.yaml
2、先删除已创建的Pod应用(nginx-demo)
kubectl delete po nginx-demo
3、修改 nginx-prestop.yaml 配置文件(去除探针的配置,加入 lifecycle 配置)
vim nginx-prestop.yaml
4、根据 nginx-prestop.yaml 创建Pod应用(nginx-demo)
kubectl create -f nginx-prestop.yaml
5、查看探针执行情况
kubectl describe po nginx-demo
6、查看Pod的内部访问ip
kubectl get po -o wide
7、curl 访问ip:80/poststart.html
2. 修改 nginx-prestop.yaml 配置文件(去除探针的配置,加入 lifecycle 配置):


**网上学习资料一大堆,但如果学到的知识不成体系,遇到问题时只是浅尝辄止,不再深入研究,那么很难做到真正的技术提升。**
**[需要这份系统化的资料的朋友,可以添加戳这里获取](https://bbs.csdn.net/topics/618658159)**
**一个人可以走的很快,但一群人才能走的更远!不论你是正从事IT行业的老鸟或是对IT行业感兴趣的新人,都欢迎加入我们的的圈子(技术交流、学习资源、职场吐槽、大厂内推、面试辅导),让我们一起学习成长!**
x-demo
# 3、修改 nginx-prestop.yaml 配置文件(去除探针的配置,加入 lifecycle 配置)
vim nginx-prestop.yaml
# 4、根据 nginx-prestop.yaml 创建Pod应用(nginx-demo)
kubectl create -f nginx-prestop.yaml
# 5、查看探针执行情况
kubectl describe po nginx-demo
# 6、查看Pod的内部访问ip
kubectl get po -o wide
# 7、curl 访问ip:80/poststart.html
- 修改 nginx-prestop.yaml 配置文件(去除探针的配置,加入 lifecycle 配置):
[外链图片转存中…(img-X3dT9i5A-1715717391166)]
[外链图片转存中…(img-zavOZmuy-1715717391166)]
网上学习资料一大堆,但如果学到的知识不成体系,遇到问题时只是浅尝辄止,不再深入研究,那么很难做到真正的技术提升。
一个人可以走的很快,但一群人才能走的更远!不论你是正从事IT行业的老鸟或是对IT行业感兴趣的新人,都欢迎加入我们的的圈子(技术交流、学习资源、职场吐槽、大厂内推、面试辅导),让我们一起学习成长!


 1935
1935


 被折叠的 条评论
为什么被折叠?
被折叠的 条评论
为什么被折叠?
 到【灌水乐园】发言


