


网上学习资料一大堆,但如果学到的知识不成体系,遇到问题时只是浅尝辄止,不再深入研究,那么很难做到真正的技术提升。
一个人可以走的很快,但一群人才能走的更远!不论你是正从事IT行业的老鸟或是对IT行业感兴趣的新人,都欢迎加入我们的的圈子(技术交流、学习资源、职场吐槽、大厂内推、面试辅导),让我们一起学习成长!
	if is_training:
		d = d.repeat()
		d = d.shuffle(buffer_size=100)

	d = d.apply(
			tf.contrib.data.map_and_batch(
				lambda record: _decode_record(record, name_to_features),
				batch_size=batch_size,
				drop_remainder=drop_remainder))

	return d

return input_fn
这个函数返回一个函数input\_fn。这个input\_fn函数首先从文件得到TFRecordDataset,然后根据是否训练来shuffle和重复读取。然后用applay函数对每一个TFRecord进行map\_and\_batch,调用\_decode\_record函数对record进行parsing。从而把TFRecord的一条Record变成tf.Example对象,这个对象包括了input\_ids等4个用于训练的Tensor。


接下来是model\_fn\_builder,它用于构造Estimator使用的model\_fn。下面是它的主要代码(一些无关的log和TPU相关代码去掉了):
def model_fn_builder(bert_config, num_labels, init_checkpoint, learning_rate,
num_train_steps, num_warmup_steps, use_tpu,
use_one_hot_embeddings):
# 注意:在model_fn的设计里,features表示输入(特征),而labels表示输出
# 但是这里的实现有点不好,把label也放到了features里。
def model_fn(features, labels, mode, params):
input_ids = features[“input_ids”]
input_mask = features[“input_mask”]
segment_ids = features[“segment_ids”]
label_ids = features[“label_ids”]
	is_training = (mode == tf.estimator.ModeKeys.TRAIN)

	# 创建Transformer模型,这是最主要的代码。
	(total_loss, per_example_loss, logits, probabilities) = create_model(
		bert_config, is_training, input_ids, input_mask, segment_ids, label_ids,
		num_labels, use_one_hot_embeddings)

	tvars = tf.trainable_variables()

	# 从checkpoint恢复参数
	if init_checkpoint:
		(assignment_map, initialized_variable_names) =
			modeling.get_assignment_map_from_checkpoint(tvars, init_checkpoint)

		tf.train.init_from_checkpoint(init_checkpoint, assignment_map)


	output_spec = None
	# 构造训练的spec
	if mode == tf.estimator.ModeKeys.TRAIN:
		train_op = optimization.create_optimizer(total_loss, learning_rate,
						num_train_steps, num_warmup_steps, use_tpu)

		output_spec = tf.contrib.tpu.TPUEstimatorSpec(
				mode=mode,
				loss=total_loss,
				train_op=train_op,
				scaffold_fn=scaffold_fn)

	# 构造eval的spec
	elif mode == tf.estimator.ModeKeys.EVAL:
		def metric_fn(per_example_loss, label_ids, logits):
			predictions = tf.argmax(logits, axis=-1, output_type=tf.int32)
			accuracy = tf.metrics.accuracy(label_ids, predictions)
			loss = tf.metrics.mean(per_example_loss)
			return {
				"eval_accuracy": accuracy,
				"eval_loss": loss,
			}

		eval_metrics = (metric_fn, [per_example_loss, label_ids, logits])
		output_spec = tf.contrib.tpu.TPUEstimatorSpec(
			mode=mode,
			loss=total_loss,
			eval_metrics=eval_metrics,
			scaffold_fn=scaffold_fn)

	# 预测的spec
	else:
		output_spec = tf.contrib.tpu.TPUEstimatorSpec(
			mode=mode,
			predictions=probabilities,
			scaffold_fn=scaffold_fn)
	return output_spec

return model_fn
这里的代码都是一些boilerplate代码,没什么可说的,最重要的是调用create\_model”真正”的创建Transformer模型。下面我们来看这个函数的代码:
def create_model(bert_config, is_training, input_ids, input_mask, segment_ids,
labels, num_labels, use_one_hot_embeddings):
model = modeling.BertModel(
config=bert_config,
is_training=is_training,
input_ids=input_ids,
input_mask=input_mask,
token_type_ids=segment_ids,
use_one_hot_embeddings=use_one_hot_embeddings)
# 在这里,我们是用来做分类,因此我们只需要得到[CLS]最后一层的输出。
# 如果需要做序列标注,那么可以使用model.get_sequence_output()
# 默认参数下它返回的output_layer是[8, 768]
output_layer = model.get_pooled_output()

# 默认是768
hidden_size = output_layer.shape[-1].value


output_weights = tf.get_variable(
	"output_weights", [num_labels, hidden_size],
	initializer=tf.truncated_normal_initializer(stddev=0.02))

output_bias = tf.get_variable(
	"output_bias", [num_labels], initializer=tf.zeros_initializer())

with tf.variable_scope("loss"):
	if is_training:
		# 0.1的概率会dropout
		output_layer = tf.nn.dropout(output_layer, keep_prob=0.9)

	# 对[CLS]输出的768的向量再做一个线性变换,输出为label的个数。得到logits
	logits = tf.matmul(output_layer, output_weights, transpose_b=True)
	logits = tf.nn.bias_add(logits, output_bias)
	probabilities = tf.nn.softmax(logits, axis=-1)
	log_probs = tf.nn.log_softmax(logits, axis=-1)

	one_hot_labels = tf.one_hot(labels, depth=num_labels, dtype=tf.float32)

	per_example_loss = -tf.reduce_sum(one_hot_labels * log_probs, axis=-1)
	loss = tf.reduce_mean(per_example_loss)

return (loss, per_example_loss, logits, probabilities)
上面代码调用modeling.BertModel得到BERT模型,然后使用它的get\_pooled\_output方法得到[CLS]最后一层的输出,这是一个768(默认参数下)的向量,然后就是常规的接一个全连接层得到logits,然后softmax得到概率,之后就可以根据真实的分类标签计算loss。我们这时候发现关键的代码是modeling.BertModel。


### 八、BertModel类


这个类是最终定义模型的地方,代码比较多,我们会按照执行和调用的顺序逐个阅读。因为文字只能线性描述,但是函数的调用关系很复杂,所以建议读者对照源代码来阅读。


我们首先来看这个类的用法,把它当成黑盒。前面的create\_model也用到了BertModel,这里我们在详细的介绍一下。下面的代码演示了BertModel的使用方法:
假设输入已经分词并且变成WordPiece的id了
输入是[2, 3],表示batch=2,max_seq_length=3
input_ids = tf.constant([[31, 51, 99], [15, 5, 0]])
第一个例子实际长度为3,第二个例子长度为2
input_mask = tf.constant([[1, 1, 1], [1, 1, 0]])
第一个例子的3个Token中前两个属于句子1,第三个属于句子2
而第二个例子的第一个Token属于句子1,第二个属于句子2(第三个是padding)
token_type_ids = tf.constant([[0, 0, 1], [0, 1, 0]])
创建一个BertConfig,词典大小是32000,Transformer的隐单元个数是512
8个Transformer block,每个block有6个Attention Head,全连接层的隐单元是1024
config = modeling.BertConfig(vocab_size=32000, hidden_size=512,
num_hidden_layers=8, num_attention_heads=6, intermediate_size=1024)
创建BertModel
model = modeling.BertModel(config=config, is_training=True,
input_ids=input_ids, input_mask=input_mask, token_type_ids=token_type_ids)
label_embeddings用于把512的隐单元变换成logits
label_embeddings = tf.get_variable(…)
得到[CLS]最后一层输出,把它看成句子的Embedding(Encoding)
pooled_output = model.get_pooled_output()
计算logits
logits = tf.matmul(pooled_output, label_embeddings)
接下来我们看一下BertModel的构造函数:
def init(self,
config,
is_training,
input_ids,
input_mask=None,
token_type_ids=None,
use_one_hot_embeddings=True,
scope=None):
Args:
config: BertConfig 对象
is_training: bool 表示训练还是eval,是会影响dropout
input_ids: int32 Tensor shape是[batch_size, seq_length]
input_mask: (可选) int32 Tensor shape是[batch_size, seq_length]
token_type_ids: (可选) int32 Tensor shape是[batch_size, seq_length]
use_one_hot_embeddings: (可选) bool
如果True,使用矩阵乘法实现提取词的Embedding;否则用tf.embedding_lookup()
对于TPU,使用前者更快,对于GPU和CPU,后者更快。
scope: (可选) 变量的scope。默认是"bert"
Raises:
ValueError: 如果config或者输入tensor的shape有问题就会抛出这个异常
config = copy.deepcopy(config)
if not is_training:
config.hidden_dropout_prob = 0.0
config.attention_probs_dropout_prob = 0.0
input_shape = get_shape_list(input_ids, expected_rank=2)
batch_size = input_shape[0]
seq_length = input_shape[1]
if input_mask is None:
input_mask = tf.ones(shape=[batch_size, seq_length], dtype=tf.int32)
if token_type_ids is None:
token_type_ids = tf.zeros(shape=[batch_size, seq_length], dtype=tf.int32)
with tf.variable_scope(scope, default_name=“bert”):
with tf.variable_scope(“embeddings”):
# 词的Embedding lookup
(self.embedding_output, self.embedding_table) = embedding_lookup(
input_ids=input_ids,
vocab_size=config.vocab_size,
embedding_size=config.hidden_size,
initializer_range=config.initializer_range,
word_embedding_name=“word_embeddings”,
use_one_hot_embeddings=use_one_hot_embeddings)
	  # 增加位置embeddings和token type的embeddings,然后是
	  # layer normalize和dropout。
	  self.embedding_output = embedding_postprocessor(
			  input_tensor=self.embedding_output,
			  use_token_type=True,
			  token_type_ids=token_type_ids,
			  token_type_vocab_size=config.type_vocab_size,
			  token_type_embedding_name="token_type_embeddings",
			  use_position_embeddings=True,
			  position_embedding_name="position_embeddings",
			  initializer_range=config.initializer_range,
			  max_position_embeddings=config.max_position_embeddings,
			  dropout_prob=config.hidden_dropout_prob)

  with tf.variable_scope("encoder"):
	  # 把shape为[batch_size, seq_length]的2D mask变成
	  # shape为[batch_size, seq_length, seq_length]的3D mask
	  # 以便后向的attention计算,读者可以对比之前的Transformer的代码。
	  attention_mask = create_attention_mask_from_input_mask(
			  input_ids, input_mask)

	  # 多个Transformer模型stack起来。
	  # all_encoder_layers是一个list,长度为num_hidden_layers(默认12),每一层对应一个值。
	  # 每一个值都是一个shape为[batch_size, seq_length, hidden_size]的tensor。

	  self.all_encoder_layers = transformer_model(
		  input_tensor=self.embedding_output,
		  attention_mask=attention_mask,
		  hidden_size=config.hidden_size,
		  num_hidden_layers=config.num_hidden_layers,
		  num_attention_heads=config.num_attention_heads,
		  intermediate_size=config.intermediate_size,
		  intermediate_act_fn=get_activation(config.hidden_act),
		  hidden_dropout_prob=config.hidden_dropout_prob,
		  attention_probs_dropout_prob=config.attention_probs_dropout_prob,
		  initializer_range=config.initializer_range,
		  do_return_all_layers=True)

  # `sequence_output` 是最后一层的输出,shape是[batch_size, seq_length, hidden_size]
  self.sequence_output = self.all_encoder_layers[-1]

  with tf.variable_scope("pooler"):
	  # 取最后一层的第一个时刻[CLS]对应的tensor
	  # 从[batch_size, seq_length, hidden_size]变成[batch_size, hidden_size]
	  # sequence_output[:, 0:1, :]得到的是[batch_size, 1, hidden_size]
	  # 我们需要用squeeze把第二维去掉。
	  first_token_tensor = tf.squeeze(self.sequence_output[:, 0:1, :], axis=1)
	  # 然后再加一个全连接层,输出仍然是[batch_size, hidden_size]
	  self.pooled_output = tf.layers.dense(
			  first_token_tensor,
			  config.hidden_size,
			  activation=tf.tanh,
			  kernel_initializer=create_initializer(config.initializer_range))
代码很长,但是其实很简单。首先是对config(BertConfig对象)深度拷贝一份,如果不是训练,那么把dropout都置为零。如果输入的input\_mask为None,那么构造一个shape合适值全为1的input\_mask,这表示输入都是”真实”的输入,没有padding的内容。如果token\_type\_ids为None,那么构造一个shape合适并且值全为0的tensor,表示所有Token都属于第一个句子。


然后使用embedding\_lookup函数构造词的Embedding,用embedding\_postprocessor函数增加位置embeddings和token type的embeddings,然后是layer normalize和dropout。


接着用transformer\_model函数构造多个Transformer SubLayer然后stack在一起。得到的all\_encoder\_layers是一个list,长度为num\_hidden\_layers(默认12),每一层对应一个值。 每一个值都是一个shape为[batch\_size, seq\_length, hidden\_size]的tensor。


self.sequence\_output是最后一层的输出,shape是[batch\_size, seq\_length, hidden\_size]。first\_token\_tensor是第一个Token([CLS])最后一层的输出,shape是[batch\_size, hidden\_size]。最后对self.sequence\_output再加一个线性变换,得到的tensor仍然是[batch\_size, hidden\_size]。


embedding\_lookup函数用于实现Embedding,它有两种方式:使用tf.nn.embedding\_lookup和矩阵乘法(one\_hot\_embedding=True)。前者适合于CPU与GPU,后者适合于TPU。所谓的one-hot方法是把输入id表示成one-hot的向量,当然输入id序列就变成了one-hot的矩阵,然后乘以Embedding矩阵。而tf.nn.embedding\_lookup是直接用id当下标提取Embedding矩阵对应的向量。一般认为tf.nn.embedding\_lookup更快一点,但是TPU上似乎不是这样,作者也不太了解原因是什么,猜测可能是TPU的没有快捷的办法提取矩阵的某一行/列?
def embedding_lookup(input_ids,
vocab_size,
embedding_size=128,
initializer_range=0.02,
word_embedding_name=“word_embeddings”,
use_one_hot_embeddings=False):
“”"word embedding
Args:
	input_ids: int32 Tensor shape为[batch_size, seq_length],表示WordPiece的id
	vocab_size: int 词典大小,需要于vocab.txt一致
	embedding_size: int embedding后向量的大小
	initializer_range: float 随机初始化的范围
	word_embedding_name: string 名字,默认是"word_embeddings"
	use_one_hot_embeddings: bool 如果True,使用one-hot方法实现embedding;否则使用
		`tf.nn.embedding_lookup()`. TPU适合用One hot方法。

Returns:
	float Tensor shape为[batch_size, seq_length, embedding_size]
"""
# 这个函数假设输入的shape是[batch_size, seq_length, num_inputs]
# 普通的Embeding一般假设输入是[batch_size, seq_length],
# 增加num_inputs这一维度的目的是为了一次计算更多的Embedding
# 但目前的代码并没有用到,传入的input_ids都是2D的,这增加了代码的阅读难度。

# 如果输入是[batch_size, seq_length],
# 那么我们把它 reshape成[batch_size, seq_length, 1]
if input_ids.shape.ndims == 2:
	input_ids = tf.expand_dims(input_ids, axis=[-1])

# 构造Embedding矩阵,shape是[vocab_size, embedding_size]
embedding_table = tf.get_variable(
	name=word_embedding_name,
	shape=[vocab_size, embedding_size],
	initializer=create_initializer(initializer_range))

if use_one_hot_embeddings:
	flat_input_ids = tf.reshape(input_ids, [-1])
	one_hot_input_ids = tf.one_hot(flat_input_ids, depth=vocab_size)
	output = tf.matmul(one_hot_input_ids, embedding_table)
else:
	output = tf.nn.embedding_lookup(embedding_table, input_ids)

input_shape = get_shape_list(input_ids)
# 把输出从[batch_size, seq_length, num_inputs(这里总是1), embedding_size]
# 变成[batch_size, seq_length, num_inputs*embedding_size]
output = tf.reshape(output,
			input_shape[0:-1] + [input_shape[-1] * embedding_size])
return (output, embedding_table)
Embedding本来很简单,使用tf.nn.embedding\_lookup就行了。但是为了优化TPU,它还支持使用矩阵乘法来提取词向量。另外为了提高效率,输入的shape除了[batch\_size, seq\_length]外,它还增加了一个维度变成[batch\_size, seq\_length, num\_inputs]。如果不关心细节,我们把这个函数当成黑盒,那么我们只需要知道它的输入input\_ids(可能)是[8, 128],输出是[8, 128, 768]就可以了。


函数embedding\_postprocessor的代码如下,需要注意的部分都有注释。
def embedding_postprocessor(input_tensor,
use_token_type=False,
token_type_ids=None,
token_type_vocab_size=16,
token_type_embedding_name=“token_type_embeddings”,
use_position_embeddings=True,
position_embedding_name=“position_embeddings”,
initializer_range=0.02,
max_position_embeddings=512,
dropout_prob=0.1):
“”"对word embedding之后的tensor进行后处理
Args:
	input_tensor: float Tensor shape为[batch_size, seq_length, embedding_size]
	use_token_type: bool 是否增加`token_type_ids`的Embedding
	token_type_ids: (可选) int32 Tensor shape为[batch_size, seq_length]
		如果`use_token_type`为True则必须有值
	token_type_vocab_size: int Token Type的个数,通常是2
	token_type_embedding_name: string Token type Embedding的名字
	use_position_embeddings: bool 是否使用位置Embedding
	position_embedding_name: string,位置embedding的名字
	initializer_range: float,初始化范围
	max_position_embeddings: int,位置编码的最大长度,可以比最大序列长度大,但是不能比它小。
	dropout_prob: float. Dropout 概率

Returns:
	float tensor  shape和`input_tensor`相同。

"""
input_shape = get_shape_list(input_tensor, expected_rank=3)
batch_size = input_shape[0]
seq_length = input_shape[1]
width = input_shape[2]

if seq_length > max_position_embeddings:
	raise ValueError("The seq length (%d) cannot be greater than "
		"`max_position_embeddings` (%d)" %
				(seq_length, max_position_embeddings))

output = input_tensor

if use_token_type:
	if token_type_ids is None:
		raise ValueError("`token_type_ids` must be specified if"
			"`use_token_type` is True.")
	token_type_table = tf.get_variable(
			name=token_type_embedding_name,
			shape=[token_type_vocab_size, width],
			initializer=create_initializer(initializer_range))
	# 因为Token Type通常很小(2),所以直接用矩阵乘法(one-hot)更快
	flat_token_type_ids = tf.reshape(token_type_ids, [-1])
	one_hot_ids = tf.one_hot(flat_token_type_ids, depth=token_type_vocab_size)
	token_type_embeddings = tf.matmul(one_hot_ids, token_type_table)
	token_type_embeddings = tf.reshape(token_type_embeddings,
			[batch_size, seq_length, width])
	output += token_type_embeddings

if use_position_embeddings:
	full_position_embeddings = tf.get_variable(
				name=position_embedding_name,
				shape=[max_position_embeddings, width],
				initializer=create_initializer(initializer_range))
	# 位置Embedding是可以学习的参数,因此我们创建一个[max_position_embeddings, width]的矩阵
	# 但实际输入的序列可能并不会到max_position_embeddings(512),为了提高训练速度,
	# 我们通过tf.slice取出[0, 1, 2, ..., seq_length-1]的部分,。
	if seq_length < max_position_embeddings:
		position_embeddings = tf.slice(full_position_embeddings, [0, 0],
				[seq_length, -1])
	else:
		position_embeddings = full_position_embeddings

	num_dims = len(output.shape.as_list())

	# word embedding之后的tensor是[batch_size, seq_length, width]
	# 因为位置编码是与输入内容无关,它的shape总是[seq_length, width]
	# 我们无法把位置Embedding加到word embedding上
	# 因此我们需要扩展位置编码为[1, seq_length, width]
	# 然后就能通过broadcasting加上去了。
	position_broadcast_shape = []
	for _ in range(num_dims - 2):
		position_broadcast_shape.append(1)
	position_broadcast_shape.extend([seq_length, width])
	# 默认情况下position_broadcast_shape为[1, 128, 768]
	position_embeddings = tf.reshape(position_embeddings,
		position_broadcast_shape)
	# output是[8, 128, 768], position_embeddings是[1, 128, 768]
	# 因此可以通过broadcasting相加。
	output += position_embeddings

output = layer_norm_and_dropout(output, dropout_prob)
return output
create\_attention\_mask\_from\_input\_mask函数用于构造Mask矩阵。我们先了解一下它的作用然后再阅读其代码。比如调用它时的两个参数是是:
input_ids=[
[1,2,3,0,0],
[1,3,5,6,1]
]
input_mask=[
[1,1,1,0,0],
[1,1,1,1,1]
]
表示这个batch有两个样本,第一个样本长度为3(padding了2个0),第二个样本长度为5。在计算Self-Attention的时候每一个样本都需要一个Attention Mask矩阵,表示每一个时刻可以attend to的范围,1表示可以attend,0表示是padding的(或者在机器翻译的Decoder中不能attend to未来的词)。对于上面的输入,这个函数返回一个shape是[2, 5, 5]的tensor,分别代表两个Attention Mask矩阵。
[
[1, 1, 1, 0, 0], #它表示第1个词可以attend to 3个词
[1, 1, 1, 0, 0], #它表示第2个词可以attend to 3个词
[1, 1, 1, 0, 0], #它表示第3个词可以attend to 3个词
[1, 1, 1, 0, 0], #无意义,因为输入第4个词是padding的0
[1, 1, 1, 0, 0] #无意义,因为输入第5个词是padding的0
]
[
[1, 1, 1, 1, 1], # 它表示第1个词可以attend to 5个词
[1, 1, 1, 1, 1], # 它表示第2个词可以attend to 5个词
[1, 1, 1, 1, 1], # 它表示第3个词可以attend to 5个词
[1, 1, 1, 1, 1], # 它表示第4个词可以attend to 5个词
[1, 1, 1, 1, 1] # 它表示第5个词可以attend to 5个词
]
了解了它的用途之后下面的代码就很好理解了。
def create_attention_mask_from_input_mask(from_tensor, to_mask):
“”"Create 3D attention mask from a 2D tensor mask.
Args:
	from_tensor: 2D or 3D Tensor,shape为[batch_size, from_seq_length, ...].
	to_mask: int32 Tensor, shape为[batch_size, to_seq_length].

Returns:
	float Tensor,shape为[batch_size, from_seq_length, to_seq_length].
"""
from_shape = get_shape_list(from_tensor, expected_rank=[2, 3])
batch_size = from_shape[0]
from_seq_length = from_shape[1]

to_shape = get_shape_list(to_mask, expected_rank=2)
to_seq_length = to_shape[1]

to_mask = tf.cast(
	tf.reshape(to_mask, [batch_size, 1, to_seq_length]), tf.float32)

# `broadcast_ones` = [batch_size, from_seq_length, 1]
broadcast_ones = tf.ones(
	shape=[batch_size, from_seq_length, 1], dtype=tf.float32)

# Here we broadcast along two dimensions to create the mask.
mask = broadcast_ones * to_mask

return mask
比如前面举的例子,broadcast\_ones的shape是[2, 5, 1],值全是1,而to\_mask是
to_mask=[
[1,1,1,0,0],
[1,1,1,1,1]
]
shape是[2, 5],reshape为[2, 1, 5]。然后broadcast\_ones \* to\_mask就得到[2, 5, 5],正是我们需要的两个Mask矩阵,读者可以验证。注意[batch, A, B]\*[batch, B, C]=[batch, A, C],我们可以认为是batch个[A, B]的矩阵乘以batch个[B, C]的矩阵。接下来就是transformer\_model函数了,它就是构造Transformer的核心代码。
def transformer_model(input_tensor,
attention_mask=None,
hidden_size=768,
num_hidden_layers=12,
num_attention_heads=12,
intermediate_size=3072,
intermediate_act_fn=gelu,
hidden_dropout_prob=0.1,
attention_probs_dropout_prob=0.1,
initializer_range=0.02,
do_return_all_layers=False):
“”“Multi-headed, multi-layer的Transformer,参考"Attention is All You Need”.
这基本上是和原始Transformer encoder相同的代码。
原始论文为:
https://arxiv.org/abs/1706.03762
Also see:
https://github.com/tensorflow/tensor2tensor/blob/master/tensor2tensor/models/transformer.py
Args:
input_tensor: float Tensor,shape为[batch_size, seq_length, hidden_size]
attention_mask: (可选) int32 Tensor,shape [batch_size, seq_length,
seq_length], 1表示可以attend to,0表示不能。
hidden_size: int. Transformer隐单元个数
num_hidden_layers: int. 有多少个SubLayer
num_attention_heads: int. Transformer Attention Head个数。
intermediate_size: int. 全连接层的隐单元个数
intermediate_act_fn: 函数. 全连接层的激活函数。
hidden_dropout_prob: float. Self-Attention层残差之前的Dropout概率
attention_probs_dropout_prob: float. attention的Dropout概率
initializer_range: float. 初始化范围(truncated normal的标准差)
do_return_all_layers: 返回所有层的输出还是最后一层的输出。
Returns:
如果do_return_all_layers True,返回最后一层的输出,是一个Tensor,
shape为[batch_size, seq_length, hidden_size];
否则返回所有层的输出,是一个长度为num_hidden_layers的list,
list的每一个元素都是[batch_size, seq_length, hidden_size]。
“”"
if hidden_size % num_attention_heads != 0:
raise ValueError(
"The hidden size (%d) is not a multiple of the number of attention "
“heads (%d)” % (hidden_size, num_attention_heads))
因为最终要输出hidden_size,总共有num_attention_heads个Head,因此每个Head输出
为hidden_size / num_attention_heads
attention_head_size = int(hidden_size / num_attention_heads)
input_shape = get_shape_list(input_tensor, expected_rank=3)
batch_size = input_shape[0]
seq_length = input_shape[1]
input_width = input_shape[2]
因为需要残差连接,我们需要把输入加到Self-Attention的输出,因此要求它们的shape是相同的。
if input_width != hidden_size:
raise ValueError(“The width of the input tensor (%d) != hidden size (%d)” %
(input_width, hidden_size))
为了避免在2D和3D之间来回reshape,我们统一把所有的3D Tensor用2D来表示。
虽然reshape在GPU/CPU上很快,但是在TPU上却不是这样,这样做的目的是为了优化TPU
input_tensor是[8, 128, 768], prev_output是[8*128, 768]=[1024, 768]
prev_output = reshape_to_matrix(input_tensor)
all_layer_outputs = []
for layer_idx in range(num_hidden_layers):
# 每一层都有自己的variable scope
with tf.variable_scope(“layer_%d” % layer_idx):
layer_input = prev_output
# attention层
with tf.variable_scope(“attention”):
attention_heads = []
# self attention
with tf.variable_scope(“self”):
attention_head = attention_layer(
from_tensor=layer_input,
to_tensor=layer_input,
attention_mask=attention_mask,
num_attention_heads=num_attention_heads,
size_per_head=attention_head_size,
attention_probs_dropout_prob=attention_probs_dropout_prob,
initializer_range=initializer_range,
do_return_2d_tensor=True,
batch_size=batch_size,
from_seq_length=seq_length,
to_seq_length=seq_length)
attention_heads.append(attention_head)
    attention_output = None
    if len(attention_heads) == 1:
      attention_output = attention_heads[0]
    else:
      # 如果有多个head,那么需要把多个head的输出concat起来
      attention_output = tf.concat(attention_heads, axis=-1)

    # 使用线性变换把前面的输出变成`hidden_size`,然后再加上`layer_input`(残差连接)
    with tf.variable_scope("output"):
      attention_output = tf.layers.dense(
          attention_output,
          hidden_size,
          kernel_initializer=create_initializer(initializer_range))
      # dropout
      attention_output = dropout(attention_output, hidden_dropout_prob)
      # 残差连接再加上layer norm。
      attention_output = layer_norm(attention_output + layer_input)

  # 全连接层
  with tf.variable_scope("intermediate"):
    intermediate_output = tf.layers.dense(
      attention_output,
      intermediate_size,
      activation=intermediate_act_fn,
      kernel_initializer=create_initializer(initializer_range))

  # 然后是用一个线性变换把大小变回`hidden_size`,这样才能加残差连接
  with tf.variable_scope("output"):
    layer_output = tf.layers.dense(
        intermediate_output,
        hidden_size,
        kernel_initializer=create_initializer(initializer_range))
    layer_output = dropout(layer_output, hidden_dropout_prob)
    layer_output = layer_norm(layer_output + attention_output)
    prev_output = layer_output
    all_layer_outputs.append(layer_output)
if do_return_all_layers:
final_outputs = []
for layer_output in all_layer_outputs:
final_output = reshape_from_matrix(layer_output, input_shape)
final_outputs.append(final_output)
return final_outputs
else:
final_output = reshape_from_matrix(prev_output, input_shape)
return final_output
如果对照Transformer的论文,非常容易阅读,里面实现Self-Attention的函数就是attention\_layer。
def attention_layer(from_tensor,
to_tensor,
attention_mask=None,
num_attention_heads=1,
size_per_head=512,
query_act=None,
key_act=None,
value_act=None,
attention_probs_dropout_prob=0.0,
initializer_range=0.02,
do_return_2d_tensor=False,
batch_size=None,
from_seq_length=None,
to_seq_length=None):
“”"用from_tensor(作为Query)去attend to to_tensor(提供Key和Value)
这个函数实现论文"Attention
is all you Need"里的multi-head attention。
如果`from_tensor`和`to_tensor`是同一个tensor,那么就实现Self-Attention。
`from_tensor`的每个时刻都会attends to `to_tensor`,
    也就是用from的Query去乘以所有to的Key,得到weight,然后把所有to的Value加权求和起来。

这个函数首先把`from_tensor`变换成一个"query" tensor,
    然后把`to_tensor`变成"key"和"value" tensors。
    总共有`num_attention_heads`组Query、Key和Value,
    每一个Query,Key和Value的shape都是[batch_size(8), seq_length(128), size_per_head(512/8=64)].

然后计算query和key的内积并且除以size_per_head的平方根(8)。
    然后softmax变成概率,最后用概率加权value得到输出。
    因为有多个Head,每个Head都输出[batch_size, seq_length, size_per_head],
    最后把8个Head的结果concat起来,就最终得到[batch_size(8), seq_length(128), size_per_head*8=512]

实际上我们是把这8个Head的Query,Key和Value都放在一个Tensor里面的,
    因此实际通过transpose和reshape就达到了上面的效果。

Args:
	from_tensor: float Tensor,shape [batch_size, from_seq_length, from_width]
	to_tensor: float Tensor,shape [batch_size, to_seq_length, to_width].
	attention_mask: (可选) int32 Tensor, shape[batch_size,from_seq_length,to_seq_length]。
                值可以是0或者1,在计算attention score的时候,
                我们会把0变成负无穷(实际是一个绝对值很大的负数),而1不变,
                这样softmax的时候进行exp的计算,前者就趋近于零,从而间接实现Mask的功能。
	num_attention_heads: int. Attention heads的数量。
	size_per_head: int. 每个head的size
	query_act: (可选) query变换的激活函数
	key_act: (可选) key变换的激活函数
	value_act: (可选) value变换的激活函数
	attention_probs_dropout_prob: (可选) float. attention的Dropout概率。
	initializer_range: float. 初始化范围
	do_return_2d_tensor: bool. 如果True,返回2D的Tensor其shape是
                [batch_size * from_seq_length, num_attention_heads * size_per_head];
                否则返回3D的Tensor其shape为[batch_size, from_seq_length,
                                            num_attention_heads * size_per_head].
	batch_size: (可选) int. 如果输入是3D的,那么batch就是第一维,
                但是可能3D的压缩成了2D的,所以需要告诉函数batch_size
	from_seq_length: (可选) 同上,需要告诉函数from_seq_length
	to_seq_length: (可选) 同上,to_seq_length

Returns:
	float Tensor,shape [batch_size,from_seq_length,num_attention_heads * size_per_head]。
	如果`do_return_2d_tensor`为True,则返回的shape是
                   [batch_size * from_seq_length, num_attention_heads * size_per_head].

"""

def transpose_for_scores(input_tensor, batch_size, num_attention_heads,
		seq_length, width):
	output_tensor = tf.reshape(
			input_tensor, [batch_size, seq_length, num_attention_heads, width])

	output_tensor = tf.transpose(output_tensor, [0, 2, 1, 3])
	return output_tensor

from_shape = get_shape_list(from_tensor, expected_rank=[2, 3])
to_shape = get_shape_list(to_tensor, expected_rank=[2, 3])

if len(from_shape) != len(to_shape):
	raise ValueError(
		"The rank of `from_tensor` must match the rank of `to_tensor`.")
# 如果输入是3D的(没有压缩),那么我们可以推测出batch_size、from_seq_length和to_seq_length
# 即使参数传入也会被覆盖。
if len(from_shape) == 3:
	batch_size = from_shape[0]
	from_seq_length = from_shape[1]
	to_seq_length = to_shape[1]

# 如果是压缩成2D的,那么一定要传入这3个参数,否则抛异常。
elif len(from_shape) == 2:
	if (batch_size is None or from_seq_length is None or to_seq_length is None):
		raise ValueError(
			"When passing in rank 2 tensors to attention_layer, the values "
			"for `batch_size`, `from_seq_length`, and `to_seq_length` "
			"must all be specified.")

#   B = batch size (number of sequences) 默认配置是8
#   F = `from_tensor` sequence length 默认配置是128
#   T = `to_tensor` sequence length 默认配置是128
#   N = `num_attention_heads` 默认配置是12
#   H = `size_per_head` 默认配置是64

# 把from和to压缩成2D的。
# [8*128, 768]
from_tensor_2d = reshape_to_matrix(from_tensor)
# [8*128, 768]
to_tensor_2d = reshape_to_matrix(to_tensor)

# 计算Query `query_layer` = [B*F, N*H] =[8*128, 12*64]
# batch_size=8,共128个时刻,12和head,每个head的query向量是64
# 因此最终得到[8*128, 12*64]
query_layer = tf.layers.dense(
		from_tensor_2d,
		num_attention_heads * size_per_head,
		activation=query_act,
		name="query",
		kernel_initializer=create_initializer(initializer_range))

# 和query类似,`key_layer` = [B*T, N*H]
key_layer = tf.layers.dense(
		to_tensor_2d,
		num_attention_heads * size_per_head,
		activation=key_act,
		name="key",
		kernel_initializer=create_initializer(initializer_range))

# 同上,`value_layer` = [B*T, N*H]
value_layer = tf.layers.dense(
		to_tensor_2d,
		num_attention_heads * size_per_head,
		activation=value_act,
		name="value",
		kernel_initializer=create_initializer(initializer_range))

# 把query从[B*F, N*H] =[8*128, 12*64]变成[B, N, F, H]=[8, 12, 128, 64]
query_layer = transpose_for_scores(query_layer, batch_size,
		num_attention_heads, from_seq_length,
		size_per_head)

# 同上,key也变成[8, 12, 128, 64]
key_layer = transpose_for_scores(key_layer, batch_size, num_attention_heads,
		to_seq_length, size_per_head)

# 计算query和key的内积,得到attention scores.
# [8, 12, 128, 64]*[8, 12, 64, 128]=[8, 12, 128, 128]
# 最后两维[128, 128]表示from的128个时刻attend to到to的128个score。
# `attention_scores` = [B, N, F, T]
attention_scores = tf.matmul(query_layer, key_layer, transpose_b=True)
attention_scores = tf.multiply(attention_scores,
		1.0 / math.sqrt(float(size_per_head)))

if attention_mask is not None:
	# 从[8, 128, 128]变成[8, 1, 128, 128]
	# `attention_mask` = [B, 1, F, T]
	attention_mask = tf.expand_dims(attention_mask, axis=[1])

	# 这个小技巧前面也用到过,如果mask是1,那么(1-1)*-10000=0,adder就是0,
	# 如果mask是0,那么(1-0)*-10000=-10000。
	adder = (1.0 - tf.cast(attention_mask, tf.float32)) * -10000.0

	# 我们把adder加到attention_score里,mask是1就相当于加0,mask是0就相当于加-10000。
	# 通常attention_score都不会很大,因此mask为0就相当于把attention_score设置为负无穷
	# 后面softmax的时候就趋近于0,因此相当于不能attend to Mask为0的地方。
	attention_scores += adder

# softmax
# `attention_probs` = [B, N, F, T] =[8, 12, 128, 128]
attention_probs = tf.nn.softmax(attention_scores)

# 对attention_probs进行dropout,这虽然有点奇怪,但是Transformer的原始论文就是这么干的。
attention_probs = dropout(attention_probs, attention_probs_dropout_prob)

# 把`value_layer` reshape成[B, T, N, H]=[8, 128, 12, 64]
value_layer = tf.reshape(
	value_layer,
	[batch_size, to_seq_length, num_attention_heads, size_per_head])

# `value_layer`变成[B, N, T, H]=[8, 12, 128, 64]
value_layer = tf.transpose(value_layer, [0, 2, 1, 3])

# 计算`context_layer` = [8, 12, 128, 128]*[8, 12, 128, 64]=[8, 12, 128, 64]=[B, N, F, H]
context_layer = tf.matmul(attention_probs, value_layer)

# `context_layer` 变换成 [B, F, N, H]=[8, 128, 12, 64]
context_layer = tf.transpose(context_layer, [0, 2, 1, 3])

if do_return_2d_tensor:
	# `context_layer` = [B*F, N*V]
	context_layer = tf.reshape(
		context_layer,
		[batch_size * from_seq_length, num_attention_heads * size_per_head])
else:
	# `context_layer` = [B, F, N*V]
	context_layer = tf.reshape(
		context_layer,
		[batch_size, from_seq_length, num_attention_heads * size_per_head])

return context_layer
### 九、自己进行Pretraining


虽然Google提供了Pretraining的模型,但是我们可以也会需要自己通过Mask LM和Next Sentence Prediction进行Pretraining。当然如果我们数据和计算资源都足够多,那么我们可以从头开始Pretraining,如果我们有一些领域的数据,那么我们也可以进行Pretraining,但是可以用Google提供的checkpoint作为初始值。


要进行Pretraining首先需要有数据,前面讲过,数据由很多”文档”组成,每篇文档的句子之间是有关系的。如果只能拿到没有关系的句子则是无法训练的。我们的训练数据需要变成如下的格式:
~/codes/bert$ cat sample_text.txt
This text is included to make sure Unicode is handled properly: 力加勝北区ᴵᴺᵀᵃছজটডণত
Text should be one-sentence-per-line, with empty lines between documents.
This sample text is public domain and was randomly selected from Project Guttenberg.
The rain had only ceased with the gray streaks of morning at Blazing Star, and the settlement awoke to a moral sense of cleanliness, and the finding of forgotten knives, tin cups, and smaller camp utensils, where the heavy showers had washed away the debris and dust heaps before the cabin doors.
Indeed, it was recorded in Blazing Star that a fortunate early riser had once picked up on the highway a solid chunk of gold quartz which the rain had freed from its incumbering soil, and washed into immediate and glittering popularity.
Possibly this may have been the reason why early risers in that locality, during the rainy season, adopted a thoughtful habit of body, and seldom lifted their eyes to the rifted or india-ink washed skies above them.
“Cass” Beard had risen early that morning, but not with a view to discovery.
…省略了很多行
数据是文本文件,每一行表示一个句子,空行表示一个文档的结束(新文档的开始),比如上面的例子,总共有2个文档,第一个文档只有3个句子,第二个文档有很多句子。


我们首先需要使用create\_pretraining\_data.py把文本文件变成TFRecord格式,便于后面的代码进行Pretraining。由于这个脚本会把整个文本文件加载到内存,因此这个文件不能太大。如果读者有很多文档要训练,比如1000万。那么我们可以把这1000万文档拆分成1万个文件,每个文件1000个文档,从而生成1000个TFRecord文件。


我们先看create\_pretraining\_data.py的用法:
python create_pretraining_data.py --input_file=./sample_text.txt --output_file=./imdb/tf_examples.tfrecord --vocab_file=./vocab.txt --do_lower_case=True --max_seq_length=128 --max_predictions_per_seq=20 --masked_lm_prob=0.15 --random_seed=12345 --dupe_factor=5
* max\_seq\_length Token序列的最大长度
* max\_predictions\_per\_seq 最多生成多少个MASK
* masked\_lm\_prob 多少比例的Token变成MASK
* dupe\_factor 一个文档重复多少次


首先说一下参数dupe\_factor,比如一个句子”it is a good day”,为了充分利用数据,我们可以多次随机的生成MASK,比如第一次可能生成”it is a [MASK] day”,第二次可能生成”it [MASK] a good day”。这个参数控制重复的次数。


masked\_lm\_prob就是论文里的参数15%。max\_predictions\_per\_seq是一个序列最多MASK多少个Token,它通常等于max\_seq\_length \* masked\_lm\_prob。这么看起来这个参数没有必要提供,但是后面的脚本也需要用到这个同样的值,而后面的脚本并没有这两个参数。


我们先看main函数。
def main(_):
tokenizer = tokenization.FullTokenizer(
vocab_file=FLAGS.vocab_file, do_lower_case=FLAGS.do_lower_case)
input_files = []
# 省略了文件通配符的处理,我们假设输入的文件已经传入input_files

rng = random.Random(FLAGS.random_seed)
instances = create_training_instances(
	input_files, tokenizer, FLAGS.max_seq_length, FLAGS.dupe_factor,
	FLAGS.short_seq_prob, FLAGS.masked_lm_prob, FLAGS.max_predictions_per_seq,
	rng)

output_files = ....

write_instance_to_example_files(instances, tokenizer, FLAGS.max_seq_length,
	FLAGS.max_predictions_per_seq, output_files)
main函数很简单,输入文本文件列表是input\_files,通过函数create\_training\_instances构建训练的instances,然后调用write\_instance\_to\_example\_files以TFRecord格式写到output\_files。


我们先来看一个训练样本的格式,这是用类TrainingInstance来表示的:
class TrainingInstance(object):
def init(self, tokens, segment_ids, masked_lm_positions, masked_lm_labels,
is_random_next):
self.tokens = tokens
self.segment_ids = segment_ids
self.is_random_next = is_random_next
self.masked_lm_positions = masked_lm_positions
self.masked_lm_labels = masked_lm_labels
假设原始两个句子为:”it is a good day”和”I want to go out”,那么处理后的TrainingInstance可能为:
- tokens = ["[CLS], “it”, “is” “a”, “[MASK]”, “day”, “[SEP]”, “I”, “apple”, “to”, “go”, “out”, “[SEP]”]
- segment_ids=[0, 0, 0, 0, 0, 0, 0, 1, 1, 1, 1, 1, 1]
- is_random_next=False
- masked_lm_positions=[4, 8, 9]
表示Mask后为["[CLS], “it”, “is” “a”, “[MASK]”, “day”, “[SEP]”, “I”, “[MASK]”, “to”, “go”, “out”, “[SEP]”] - masked_lm_labels=[“good”, “want”, “to”]
is\_random\_next表示这两句话是有关联的,预测句子关系的分类器应该把这个输入判断为1。masked\_lm\_positions记录哪些位置被Mask了,而masked\_lm\_labels记录被Mask之前的词。


注意:tokens已经处理过了,good被替换成[MASK],而want被替换成apple,而to还是被替换成它自己,原因前面的理论部分已经介绍过了。因此根据masked\_lm\_positions、masked\_lm\_labels和tokens是可以恢复出原始(分词后的)句子的。


create\_training\_instances函数的代码为:
def create_training_instances(input_files, tokenizer, max_seq_length,
dupe_factor, short_seq_prob, masked_lm_prob,
max_predictions_per_seq, rng):
“”“从原始文本创建TrainingInstance”“”
all_documents = [[]]
# 输入文件格式:
# (1) 每行一个句子。这应该是实际的句子,不应该是整个段落或者段落的随机片段(span),因为我们需
# 要使用句子边界来做下一个句子的预测。
# (2) 文档之间有一个空行。我们会认为同一个文档的相邻句子是有关系的。

# 下面的代码读取所有文件,然后根据空行切分Document
# all_documents是list的list,第一层list表示document,第二层list表示document里的多个句子。
for input_file in input_files:
	with tf.gfile.GFile(input_file, "r") as reader:
		while True:
			line = tokenization.convert_to_unicode(reader.readline())
			if not line:
				break
			line = line.strip()

			# 空行表示旧文档的结束和新文档的开始。
			if not line:
				#添加一个新的空文档
				all_documents.append([])
			tokens = tokenizer.tokenize(line)
			if tokens:
				all_documents[-1].append(tokens)

# 删除空文档
all_documents = [x for x in all_documents if x]
rng.shuffle(all_documents)

vocab_words = list(tokenizer.vocab.keys())
instances = []
# 重复dup_factor次
for _ in range(dupe_factor):
	# 遍历所有文档
	for document_index in range(len(all_documents)):
		# 从一个文档(下标为document_index)里抽取多个TrainingInstance
		instances.extend(create_instances_from_document(
			all_documents, document_index, max_seq_length, short_seq_prob,
			masked_lm_prob, max_predictions_per_seq, vocab_words, rng))

rng.shuffle(instances)
return instances
上面的函数会调用create\_instances\_from\_document来从一个文档里抽取多个训练数据(TrainingInstance)。普通的语言模型只要求连续的字符串就行,通常是把所有的文本(比如维基百科的内容)拼接成一个很大很大的文本文件,然后训练的时候随机的从里面抽取固定长度的字符串作为一个”句子”。但是BERT要求我们的输入是一个一个的Document,每个Document有很多句子,这些句子是连贯的真实的句子,需要正确的分句,而不能随机的(比如按照固定长度)切分句子。代码如下:
def create_instances_from_document(
all_documents, document_index, max_seq_length, short_seq_prob,
masked_lm_prob, max_predictions_per_seq, vocab_words, rng):
“”“从一个文档里创建多个TrainingInstance。”“”
document = all_documents[document_index]
为[CLS], [SEP], [SEP]预留3个位置。
max_num_tokens = max_seq_length - 3
我们通常希望Token序列长度为最大的max_seq_length,否则padding后的计算是无意义的,浪费计
算资源。但是有的时候我们有希望生成一些短的句子,因为在实际应用中会有短句,如果都是
长句子,那么就很容易出现Mismatch,所有我们以short_seq_prob == 0.1 == 10%的概率生成
短句子。
target_seq_length = max_num_tokens
以0.1的概率生成随机(2-max_num_tokens)的长度。
if rng.random() < short_seq_prob:
target_seq_length = rng.randint(2, max_num_tokens)
我们不能把一个文档的所有句子的Token拼接起来,然后随机的选择两个片段。
因为这样很可能这两个片段是同一个句子(至少很可能第二个片段的开头和第一个片段的结尾是同一个
句子),这样预测是否相关句子的任务太简单,学习不到深层的语义关系。
这里我们使用"真实"的句子边界。
instances = []
current_chunk = []
current_length = 0
i = 0
while i < len(document):
segment = document[i]
current_chunk.append(segment)
current_length += len(segment)
if i == len(document) - 1 or current_length >= target_seq_length:
if current_chunk:
# a_end是第一个句子A(在current_chunk里)结束的下标
a_end = 1
# 随机选择切分边界
if len(current_chunk) >= 2:
a_end = rng.randint(1, len(current_chunk) - 1)
    tokens_a = []
    for j in range(a_end):
      tokens_a.extend(current_chunk[j])

    tokens_b = []
    # 是否Random next
    is_random_next = False
    if len(current_chunk) == 1 or rng.random() < 0.5:
      is_random_next = True
      target_b_length = target_seq_length - len(tokens_a)

      # 随机的挑选另外一篇文档的随机开始的句子
      # 但是理论上有可能随机到的文档就是当前文档,因此需要一个while循环
      # 这里只while循环10次,理论上还是有重复的可能性,但是我们忽略

      for _ in range(10):
        random_document_index = rng.randint(0, len(all_documents) - 1)
        # 不是当前文档,则找到了random_document_index
        if random_document_index != document_index:
          break

      # 随机挑选的文档
      random_document = all_documents[random_document_index]
      # 随机选择开始句子
      random_start = rng.randint(0, len(random_document) - 1)
      # 把Token加到tokens_b里,如果Token数量够了(target_b_length)就break。
      for j in range(random_start, len(random_document)):
        tokens_b.extend(random_document[j])
        if len(tokens_b) >= target_b_length:
          break
      # 之前我们虽然挑选了len(current_chunk)个句子,但是a_end之后的句子替换成随机的其它
      # 文档的句子,因此我们并没有使用a_end之后的句子,因此我们修改下标i,使得下一次循环
      # 可以再次使用这些句子(把它们加到新的chunk里),避免浪费。
      num_unused_segments = len(current_chunk) - a_end
      i -= num_unused_segments
    # 真实的下一句
    else:
      is_random_next = False
      for j in range(a_end, len(current_chunk)):
        tokens_b.extend(current_chunk[j])

    # 如果太多了,随机去掉一些。
    truncate_seq_pair(tokens_a, tokens_b, max_num_tokens, rng)

    tokens = []
    segment_ids = []

    # 处理句子A
    tokens.append("[CLS]")
    segment_ids.append(0)
    for token in tokens_a:
      tokens.append(token)
      segment_ids.append(0)
    # A的结束
    tokens.append("[SEP]")
    segment_ids.append(0)

    # 处理句子B
    for token in tokens_b:
      tokens.append(token)
      segment_ids.append(1)
    # B的结束
    tokens.append("[SEP]")
    segment_ids.append(1)

    (tokens, masked_lm_positions,masked_lm_labels) = create_masked_lm_predictions(
        tokens, masked_lm_prob, max_predictions_per_seq, vocab_words, rng)
    instance = TrainingInstance(
        tokens=tokens,
        segment_ids=segment_ids,
        is_random_next=is_random_next,
        masked_lm_positions=masked_lm_positions,
        masked_lm_labels=masked_lm_labels)
    instances.append(instance)
  current_chunk = []
  current_length = 0
i += 1
return instances
代码有点长,但是逻辑很简单,比如有一篇文档有n个句子:
w11,w12,…,
w21,w22,…
wn1,wn2,…
那么算法首先找到一个chunk,它会不断往chunk加入一个句子的所有Token,使得chunk里的token数量大于等于target\_seq\_length。通常我们期望target\_seq\_length为max\_num\_tokens(128-3),这样padding的尽量少,训练的效率高。但是有时候我们也需要生成一些短的序列,否则会出现训练与实际使用不匹配的问题。


找到一个chunk之后,比如这个chunk有5个句子,那么我们随机的选择一个切分点,比如3。把前3个句子当成句子A,后两个句子当成句子B。这是两个句子A和B有关系的样本(is\_random\_next=False)。为了生成无关系的样本,我们还以50%的概率把B用随机从其它文档抽取的句子替换掉,这样就得到无关系的样本(is\_random\_next=True)。如果是这种情况,后面两个句子需要放回去,以便在下一层循环中能够被再次利用。


有了句子A和B之后,我们就可以填充tokens和segment\_ids,这里会加入特殊的[CLS]和[SEP]。接下来使用create\_masked\_lm\_predictions来随机的选择某些Token,把它变成[MASK]。其代码为:
def create_masked_lm_predictions(tokens, masked_lm_prob,
max_predictions_per_seq, vocab_words, rng):
# 首先找到可以被替换的下标,[CLS]和[SEP]是不能用于MASK的。
cand_indexes = []
for (i, token) in enumerate(tokens):
if token == “[CLS]” or token == “[SEP]”:
continue
cand_indexes.append(i)
# 随机打散
rng.shuffle(cand_indexes)

output_tokens = list(tokens)

# 构造一个namedtuple,包括index和label两个属性。
masked_lm = collections.namedtuple("masked_lm", ["index", "label"])

# 需要被模型预测的Token个数:min(max_predictions_per_seq(20),实际Token数*15%)
num_to_predict = min(max_predictions_per_seq,
		max(1, int(round(len(tokens) * masked_lm_prob))))

masked_lms = []
covered_indexes = set()
# 随机的挑选num_to_predict个需要预测的Token
# 因为cand_indexes打散过,因此顺序的取就行
for index in cand_indexes:
	# 够了
	if len(masked_lms) >= num_to_predict:
		break
	# 已经挑选过了?似乎没有必要判断,因为set会去重。
	if index in covered_indexes:
		continue
	covered_indexes.add(index)

	masked_token = None
	# 80%的概率把它替换成[MASK]
	if rng.random() < 0.8:
		masked_token = "[MASK]"
	else:
		# 10%的概率保持不变
		if rng.random() < 0.5:
			masked_token = tokens[index]
		# 10%的概率随机替换成词典里的一个词。
		else:
			masked_token = vocab_words[rng.randint(0, len(vocab_words) - 1)]

	output_tokens[index] = masked_token

	masked_lms.append(masked_lm(index=index, label=tokens[index]))

# 按照下标排序,保证是句子中出现的顺序。
masked_lms = sorted(masked_lms, key=lambda x: x.index)

masked_lm_positions = []
masked_lm_labels = []
for p in masked_lms:
	masked_lm_positions.append(p.index)
	masked_lm_labels.append(p.label)

return (output_tokens, masked_lm_positions, masked_lm_labels)
最后是使用函数write\_instance\_to\_example\_files把前面得到的TrainingInstance用TFRecord的个数写到文件里,这个函数的核心代码是:
def write_instance_to_example_files(instances, tokenizer, max_seq_length,
max_predictions_per_seq, output_files):
features = collections.OrderedDict()
features[“input_ids”] = create_int_feature(input_ids)
features[“input_mask”] = create_int_feature(input_mask)
features[“segment_ids”] = create_int_feature(segment_ids)
features[“masked_lm_positions”] = create_int_feature(masked_lm_positions)
features[“masked_lm_ids”] = create_int_feature(masked_lm_ids)
features[“masked_lm_weights”] = create_float_feature(masked_lm_weights)
features[“next_sentence_labels”] = create_int_feature([next_sentence_label])
tf_example = tf.train.Example(features=tf.train.Features(feature=features))

writers[writer_index].write(tf_example.SerializeToString())
接下来我们使用run\_pretraining.py脚本进行Pretraining。用法为:
python run_pretraining.py
–input_file=/tmp/tf_examples.tfrecord
–output_dir=/tmp/pretraining_output
–do_train=True
–do_eval=True
–bert_config_file=
B
E
R
T
B
A
S
E
D
I
R
/
b
e
r
t
c
o
n
f
i
g
.
j
s
o
n
−
−
i
n
i
t
c
h
e
c
k
p
o
i
n
t
=
BERT_BASE_DIR/bert_config.json \ --init_checkpoint=
BERTBASEDIR/bertconfig.json −−initcheckpoint=BERT_BASE_DIR/bert_model.ckpt
–train_batch_size=32
–max_seq_length=128
–max_predictions_per_seq=20
–num_train_steps=20
–num_warmup_steps=10
–learning_rate=2e-5
参数都比较容易理解,通常我们需要调整的是num\_train\_steps、num\_warmup\_steps和learning\_rate。run\_pretraining.py的代码和run\_classifier.py很类似,都是用BertModel构建Transformer模型,唯一的区别在于损失函数不同:
def model_fn(features, labels, mode, params):
input_ids = features[“input_ids”]
input_mask = features[“input_mask”]
segment_ids = features[“segment_ids”]
masked_lm_positions = features[“masked_lm_positions”]
masked_lm_ids = features[“masked_lm_ids”]
masked_lm_weights = features[“masked_lm_weights”]
next_sentence_labels = features[“next_sentence_labels”]
is_training = (mode == tf.estimator.ModeKeys.TRAIN)
model = modeling.BertModel(
config=bert_config,
is_training=is_training,
input_ids=input_ids,
input_mask=input_mask,
token_type_ids=segment_ids,
use_one_hot_embeddings=use_one_hot_embeddings)
(masked_lm_loss,
masked_lm_example_loss, masked_lm_log_probs) = get_masked_lm_output(
bert_config, model.get_sequence_output(), model.get_embedding_table(),
masked_lm_positions, masked_lm_ids, masked_lm_weights)
(next_sentence_loss, next_sentence_example_loss,
next_sentence_log_probs) = get_next_sentence_output(
bert_config, model.get_pooled_output(), next_sentence_labels)
total_loss = masked_lm_loss + next_sentence_loss
get\_masked\_lm\_output函数用于计算语言模型的Loss(Mask位置预测的词和真实的词是否相同)。
def get_masked_lm_output(bert_config, input_tensor, output_weights, positions,
label_ids, label_weights):
“”“得到masked LM的loss和log概率”“”
# 只需要Mask位置的Token的输出。
input_tensor = gather_indexes(input_tensor, positions)
with tf.variable_scope("cls/predictions"):
	# 在输出之前再加一个非线性变换,这些参数只是用于训练,在Fine-Tuning的时候就不用了。
	with tf.variable_scope("transform"):
		input_tensor = tf.layers.dense(
				input_tensor,
				units=bert_config.hidden_size,
				activation=modeling.get_activation(bert_config.hidden_act),
				kernel_initializer=modeling.create_initializer(
					bert_config.initializer_range))
		input_tensor = modeling.layer_norm(input_tensor)

	# output_weights是复用输入的word Embedding,所以是传入的,
	# 这里再多加一个bias。
	output_bias = tf.get_variable(
			"output_bias",
			shape=[bert_config.vocab_size],
			initializer=tf.zeros_initializer())
	logits = tf.matmul(input_tensor, output_weights, transpose_b=True)
	logits = tf.nn.bias_add(logits, output_bias)
	log_probs = tf.nn.log_softmax(logits, axis=-1)

	# label_ids的长度是20,表示最大的MASK的Token数
	# label_ids里存放的是MASK过的Token的id
	label_ids = tf.reshape(label_ids, [-1])
	label_weights = tf.reshape(label_weights, [-1])

	one_hot_labels = tf.one_hot(
		label_ids, depth=bert_config.vocab_size, dtype=tf.float32)

	# 但是由于实际MASK的可能不到20,比如只MASK18,那么label_ids有2个0(padding)
	# 而label_weights=[1, 1, ...., 0, 0],说明后面两个label_id是padding的,计算loss要去掉。
	per_example_loss = -tf.reduce_sum(log_probs * one_hot_labels, axis=[-1])
	numerator = tf.reduce_sum(label_weights * per_example_loss)
	denominator = tf.reduce_sum(label_weights) + 1e-5
	loss = numerator / denominator

return (loss, per_example_loss, log_probs)
get\_next\_sentence\_output函数用于计算预测下一个句子的loss,代码为:
def get_next_sentence_output(bert_config, input_tensor, labels):
“”“预测下一个句子是否相关的loss和log概率”“”
# 简单的2分类,0表示真的下一个句子,1表示随机的。这个分类器的参数在实际的Fine-Tuning
# 会丢弃掉。
with tf.variable_scope("cls/seq_relationship"):
	output_weights = tf.get_variable(
			"output_weights",
			shape=[2, bert_config.hidden_size],
			initializer=modeling.create_initializer(bert_config.initializer_range))
	output_bias = tf.get_variable(
			"output_bias", shape=[2], initializer=tf.zeros_initializer())

	logits = tf.matmul(input_tensor, output_weights, transpose_b=True)
	logits = tf.nn.bias_add(logits, output_bias)
	log_probs = tf.nn.log_softmax(logits, axis=-1)
	labels = tf.reshape(labels, [-1])
	one_hot_labels = tf.one_hot(labels, depth=2, dtype=tf.float32)
	per_example_loss = -tf.reduce_sum(one_hot_labels * log_probs, axis=-1)
	loss = tf.reduce_mean(per_example_loss)
	return (loss, per_example_loss, log_probs)
### 十、性能测试
本节主要对BERT在工业部署情况的性能测评。性能测试部分主要参考肖涵大神的本篇[文章](https://bbs.csdn.net/topics/618658159)(github上[bert-as-service](https://bbs.csdn.net/topics/618658159)的作者)。因个人硬件配置有限,后续有机会再进行测试补充。
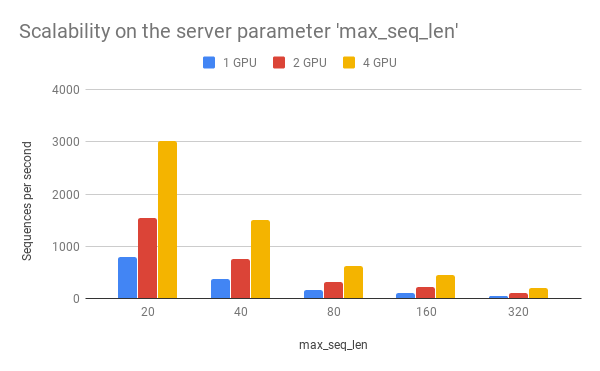
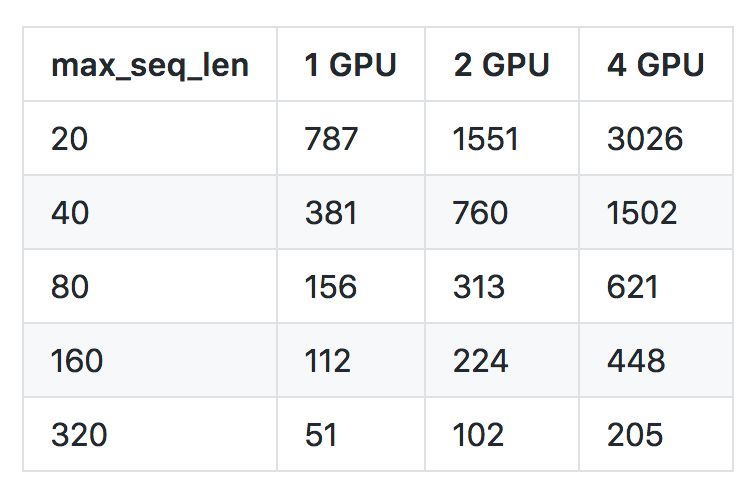
#### (一)关于max\_seq\_len对速度的影响
从性能上来讲,过大的max\_seq\_len 会拖慢计算速度,并很有可能造成内存 OOM。
#### (二)client\_batch\_size对速度的影响
出于性能考虑,请尽可能每次传入较多的句子而非一次只传一个。比如,使用下列方法调用:
# prepare your sent in advance
bc = BertClient()
my_sentences = [s for s in my_corpus.iter()]
# doing encoding in one-shot
vec = bc.encode(my_sentences)
而不要使用:
bc = BertClient()
vec = []
for s in my_corpus.iter():
    vec.append(bc.encode(s))


**网上学习资料一大堆,但如果学到的知识不成体系,遇到问题时只是浅尝辄止,不再深入研究,那么很难做到真正的技术提升。**
**[需要这份系统化的资料的朋友,可以添加戳这里获取](https://bbs.csdn.net/topics/618658159)**
**一个人可以走的很快,但一群人才能走的更远!不论你是正从事IT行业的老鸟或是对IT行业感兴趣的新人,都欢迎加入我们的的圈子(技术交流、学习资源、职场吐槽、大厂内推、面试辅导),让我们一起学习成长!**
= tf.reduce_mean(per_example_loss)
return (loss, per_example_loss, log_probs)
十、性能测试
本节主要对BERT在工业部署情况的性能测评。性能测试部分主要参考肖涵大神的本篇文章(github上bert-as-service的作者)。因个人硬件配置有限,后续有机会再进行测试补充。
(一)关于max_seq_len对速度的影响
从性能上来讲,过大的max_seq_len 会拖慢计算速度,并很有可能造成内存 OOM。
(二)client_batch_size对速度的影响
出于性能考虑,请尽可能每次传入较多的句子而非一次只传一个。比如,使用下列方法调用:
# prepare your sent in advance
bc = BertClient()
my_sentences = [s for s in my_corpus.iter()]
# doing encoding in one-shot
vec = bc.encode(my_sentences)
而不要使用:
bc = BertClient()
vec = []
for s in my_corpus.iter():
vec.append(bc.encode(s))
[外链图片转存中…(img-ur90SSIO-1715890484413)]
[外链图片转存中…(img-iaeWB9t8-1715890484413)]
网上学习资料一大堆,但如果学到的知识不成体系,遇到问题时只是浅尝辄止,不再深入研究,那么很难做到真正的技术提升。
一个人可以走的很快,但一群人才能走的更远!不论你是正从事IT行业的老鸟或是对IT行业感兴趣的新人,都欢迎加入我们的的圈子(技术交流、学习资源、职场吐槽、大厂内推、面试辅导),让我们一起学习成长!


 被折叠的 条评论
为什么被折叠?
被折叠的 条评论
为什么被折叠?
 到【灌水乐园】发言


