


网上学习资料一大堆,但如果学到的知识不成体系,遇到问题时只是浅尝辄止,不再深入研究,那么很难做到真正的技术提升。
一个人可以走的很快,但一群人才能走的更远!不论你是正从事IT行业的老鸟或是对IT行业感兴趣的新人,都欢迎加入我们的的圈子(技术交流、学习资源、职场吐槽、大厂内推、面试辅导),让我们一起学习成长!
1.2、对屏幕视频流解码后需要转换成YUV
首先是需要使用sws_getCachedContext、sws_scale的ffmpeg里面的视频转换库函数 转换指定像素格式。
第二需要注意转换过来的存放格式需要定义 如果自定义的话需要计算 如YUV格式则data需要定义三维指针数组 并且每一维数据行的大小要定义好否则就会提示bad dst image pointers,坏帧的情况。
解决方法
//定义转换的存放区以及每行大小
AVFrame	\*pFrameYUV = NULL;
pFrameYUV = av\_frame\_alloc();
//这一步十分重要 之前知道
//后面使用sws\_scale 需要内存和指定每行大小存放 使用avpicture\_fill就可以不用自定义计算了
	pFrame = av\_frame\_alloc();
	uint8\_t \*out_buffer = (uint8\_t \*)av\_malloc(avpicture\_get\_size(AV_PIX_FMT_YUV420P, pCodecCtx->width, pCodecCtx->height));
//avpicture\_fill((AVPicture \*)pFrameYUV, out\_buffer, AV\_PIX\_FMT\_YUV420P, pCodecCtx->width, pCodecCtx->height); 新版本被遗弃
//存储一帧像素数据缓冲区
av\_image\_fill\_arrays(pFrameYUV->data, pFrameYUV->linesize, out_buffer, AV_PIX_FMT_YUV420P, pCodecCtx->width, pCodecCtx->height, 1);

//使用swr视频尺寸像素转换
//这一步十分重要 之前知道 解码出来的进行SDL显示 像素格式需要转换,否则就是绿屏
struct SwsContext \*img_convert_ctx = NULL;
img_convert_ctx = sws\_getCachedContext(img_convert_ctx, pCodecCtx->width, pCodecCtx->height, pCodecCtx->pix_fmt, pCodecCtx->width, pCodecCtx->height, AV_PIX_FMT_YUV420P, SWS_BICUBIC, NULL, NULL, NULL);
sws\_scale(img_convert_ctx, (const uint8\_t\* const\*)pFrame->data, pFrame->linesize, 0, pCodecCtx->height, pFrameYUV->data, pFrameYUV->linesize);
1.3、未解决问题
1)显示的SDL大小问题及windows缩放比存在问题导致显示的时候很卡或者不全面。
2)使用dshow的时候提示错误
real real-time buffer [screen-capture-recorder] [video input] too full or near too full (340% of size: 3041280 [rtbufsize parameter])! frame dropped!
3) 在里面进行读取avformat_find_stream_info(acformatCon, 0);奔溃
2、录屏+SDL显示
2.1、整体流程
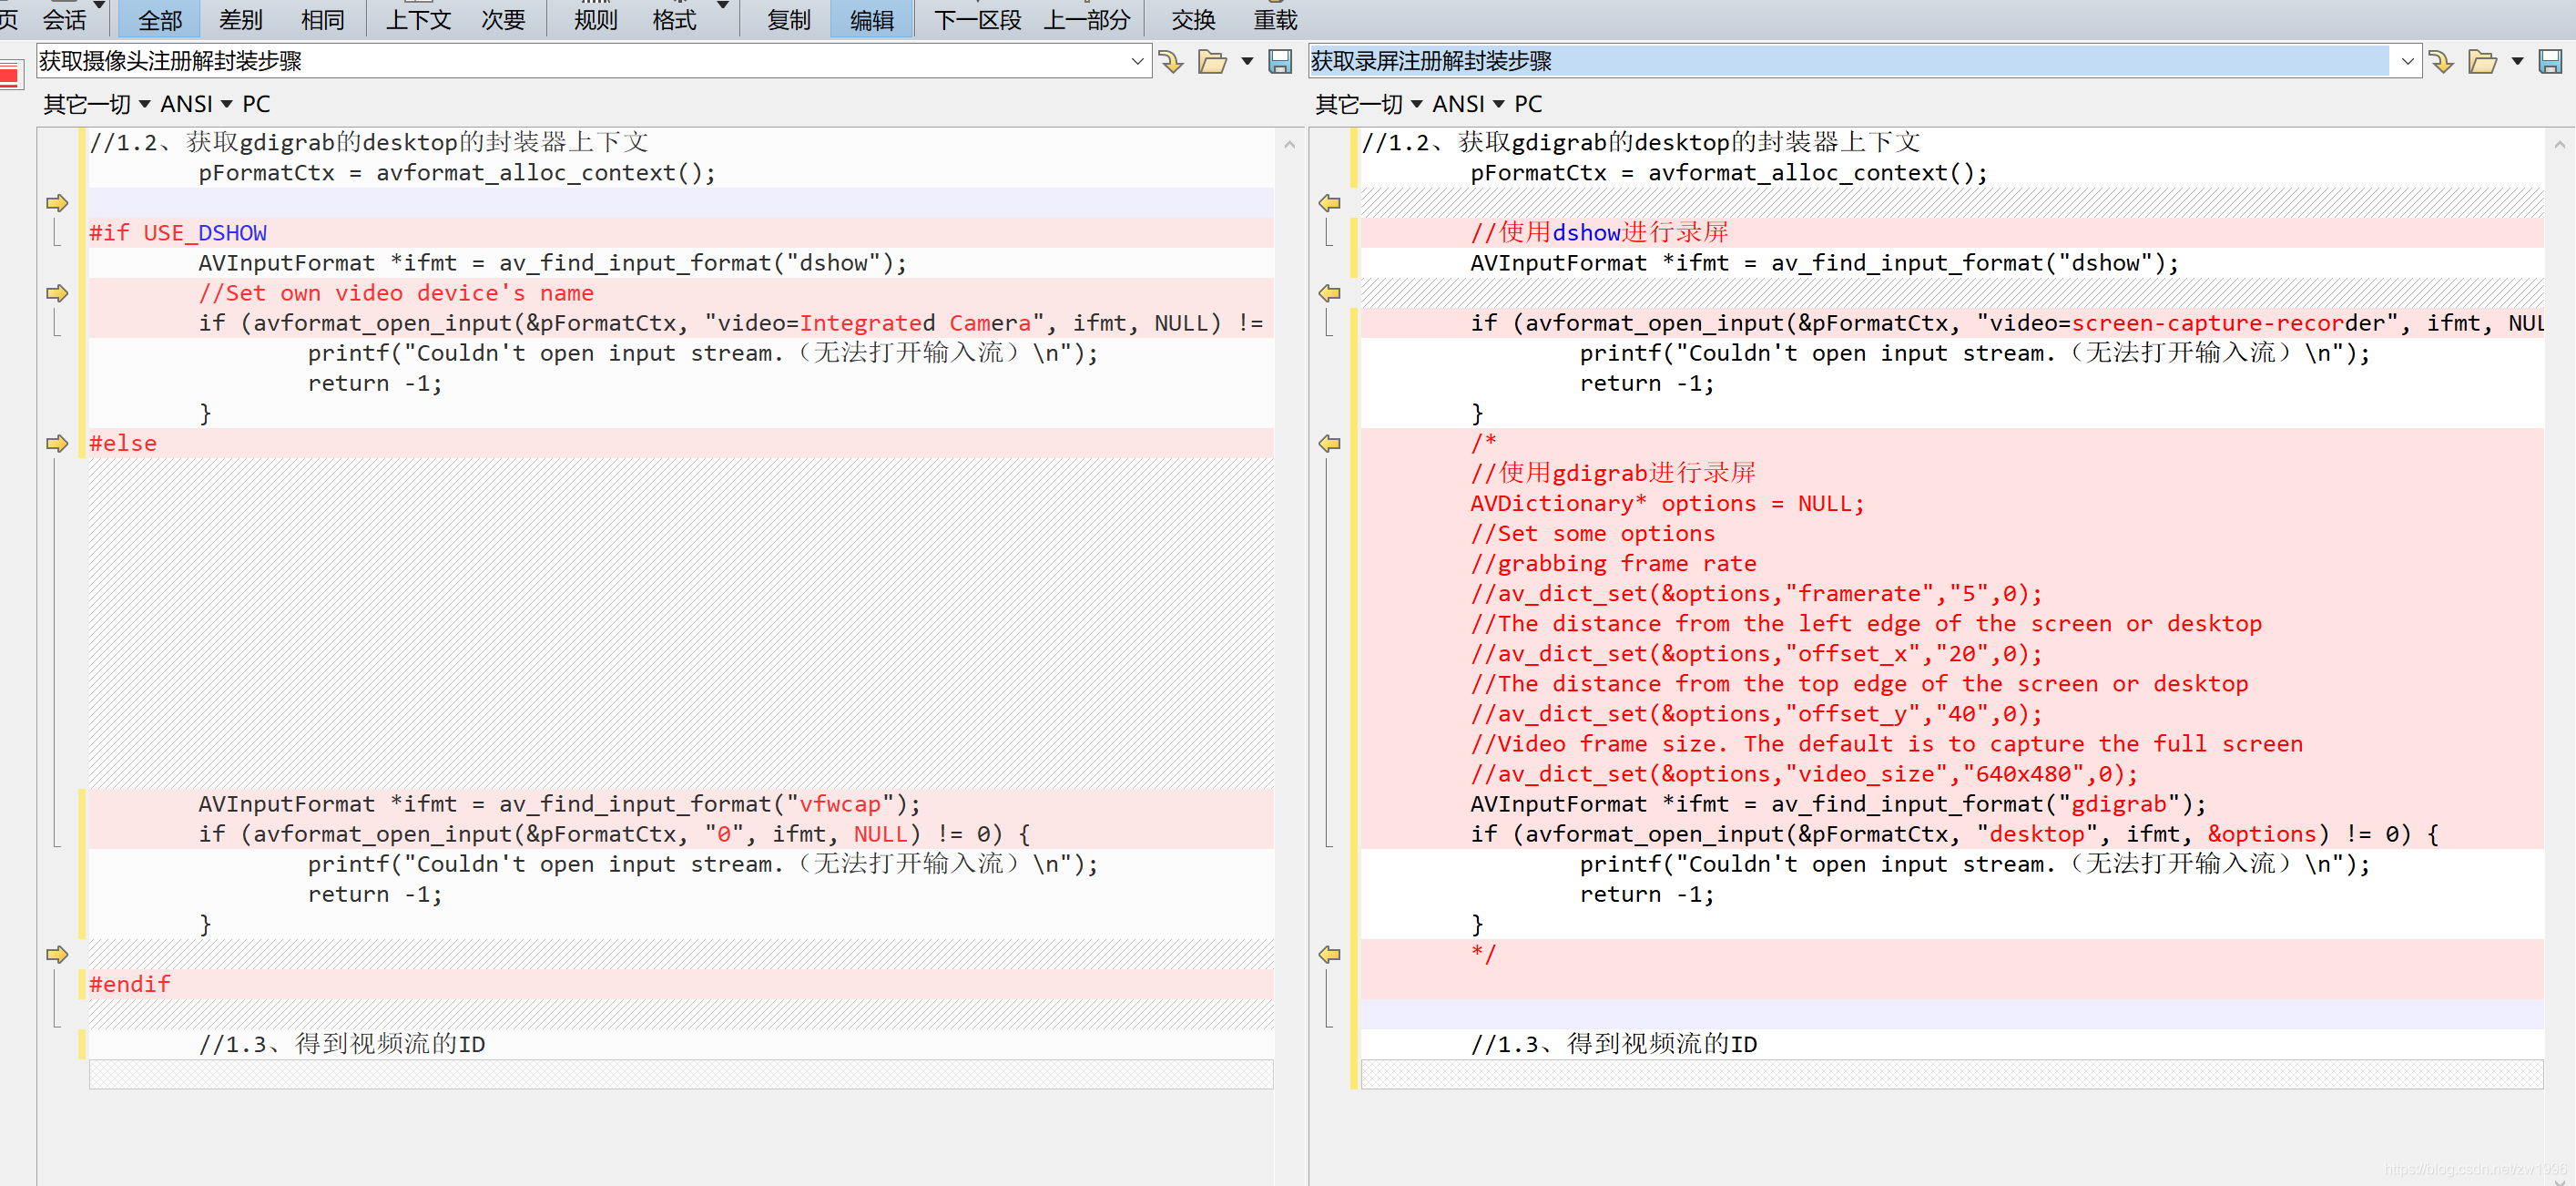
1、首先ffmpeg的gdigrab/dshow解封装器对desktop进行解码获取对应的视频流
 1.1、注册设备
 1.2、获取gdigrab的desktop的封装器上下文或者dshow的screen-capture-recorder上下文
 1.3、得到视频流的ID
 1.4、获取打开对应视频流的解码器和解码器上下文
 2、SDL显示相关初始化
 2.1、初始化init
 2.2、创建窗口
 2.3、创建渲染器
 2.4、创建纹理
 3、读取编解码数据并SDL显示
 3.1、创建SDL管理线程 进行事件发送
 3.2、播放
 3.2.1、定义AVPacket、AVFrame,设置rect纹理显示的位置,宽高
 3.2.2、定义存储转换后一帧像素数据缓冲区
 3.2.3、sws进行视频尺寸像素转换定义
 3.2.4、循环播放
	SDL_WaitEvent等待事件
	if (event.type == REFRESH_EVENT)//刷新事件进入
	{
		//预处理 读完或者读到视频帧才下一步
		//解码发送packet接收帧frame
		//进行sws\_scale转换输出YUV类型
		SDL_UpdateYUVTexture 填充纹理
		//进行SDL刷新显示
		SDL\_RenderClear(renderer);
		SDL\_RenderCopy(renderer, texture, NULL, &rect);
		SDL\_RenderPresent(renderer);
	}
 4、释放内存
2.2、使用ffmpeg中gdigrab或dshow+SDL进行录屏工程代码
#include <iostream>
#include <thread>

using namespace std;

#ifdef \_\_cplusplus
extern "C"
{
#endif // !\_\_cplusplus

#include "libavformat/avformat.h"
#include "libavcodec/avcodec.h"
#include "libswscale/swscale.h"
#include "libswresample/swresample.h"//包含头文件
#include "libavdevice/avdevice.h"
#include "libavutil/imgutils.h"

#include "SDL.h"
#include "SDL\_thread.h"

#ifdef \_\_cplusplus
}
#endif // !\_\_cplusplus

#pragma comment(lib,"avformat.lib")//添加库文件,也可以在属性处添加
#pragma comment(lib,"avutil.lib")
#pragma comment(lib,"avcodec.lib")
#pragma comment(lib,"swresample.lib")
#pragma comment(lib,"swscale.lib")
#pragma comment(lib,"avdevice.lib")

#pragma comment(lib,"SDL2.lib")
#pragma comment(lib,"SDL2main.lib")
#pragma comment(lib,"SDL2test.lib")

//SDL的事件定义
#define REFRESH\_EVENT (SDL\_USEREVENT + 1) //刷新事件
#define BREAK\_EVENT (SDL\_USEREVENT + 2) // 退出事件
int thread_exit = 0;//相应变量定义
int thread_pause = 0;

//解决vs2015链接错误
#pragma comment(lib,"legacy\_stdio\_definitions.lib")
extern "C" { FILE __iob_func[3] = { \*stdin,\*stdout,\*stderr }; }

//SDL线程函数
int video\_refresh\_thread(void \*data) {
	thread_exit = 0;
	thread_pause = 0;

	while (!thread_exit) {
		if (!thread_pause) {
			SDL_Event event;
			event.type = REFRESH_EVENT;
			SDL\_PushEvent(&event);// 发送刷新事件
		}
		SDL\_Delay(40);
	}
	thread_exit = 0;
	thread_pause = 0;
	//Break
	SDL_Event event;
	event.type = BREAK_EVENT;
	SDL\_PushEvent(&event);

	return 0;
}
int main(int argc, char \*argv[])
{
	AVFormatContext	\*pFormatCtx;
	int				i, videoindex;
	AVCodecContext	\*pCodecCtx;
	AVCodec			\*pCodec;
	int ret;

	//SDL相关变量
	int w_width = 640;	//默认窗口大小
	int w_height = 480;
	SDL_Rect rect;
	Uint32 pixformat;
	SDL_Window \*win = NULL;
	SDL_Renderer \*renderer = NULL;
	SDL_Texture \*texture = NULL;

	//1、首先ffmpeg的gdigrab解封装器对desktop进行解码获取对应的视频流
	//1.1、注册设备
	av\_register\_all();
	avformat\_network\_init();
	avdevice\_register\_all();//添加一个avdevice设备注册
	//1.2、获取gdigrab的desktop的封装器上下文
	pFormatCtx = avformat\_alloc\_context();
	/\*
 //使用gdigrab进行录屏
 AVDictionary\* options = NULL;
 //Set some options
 //grabbing frame rate
 //av\_dict\_set(&options,"framerate","5",0);
 //The distance from the left edge of the screen or desktop
 //av\_dict\_set(&options,"offset\_x","20",0);
 //The distance from the top edge of the screen or desktop
 //av\_dict\_set(&options,"offset\_y","40",0);
 //Video frame size. The default is to capture the full screen
 //av\_dict\_set(&options,"video\_size","640x480",0);
 AVInputFormat \*ifmt = av\_find\_input\_format("gdigrab");
 if (avformat\_open\_input(&pFormatCtx, "desktop", ifmt, &options) != 0) {
 printf("Couldn't open input stream.(无法打开输入流)\n");
 return -1;
 }
 \*/
	//使用dshow进行录屏
	AVInputFormat \*ifmt = av\_find\_input\_format("dshow");
	if (avformat\_open\_input(&pFormatCtx, "video=screen-capture-recorder", ifmt, NULL) != 0) {
		printf("Couldn't open input stream.(无法打开输入流)\n");
		return -1;
	}

	//1.3、得到视频流的ID
	if (avformat\_find\_stream\_info(pFormatCtx, NULL)<0)//有时候要调用一下 不然一些数据可能未读取到
	{
		printf("Couldn't find stream information.(无法获取流信息)\n");
		return -1;
	}
	videoindex = -1;
	videoindex = av\_find\_best\_stream(pFormatCtx, AVMEDIA_TYPE_VIDEO, -1, -1, NULL, 0);//直接获取 未使用循环
	if (videoindex == -1)
	{
		printf("Didn't find a video stream.(没有找到视频流)\n");
		return -1;
	}
	//1.4、获取打开对应视频流的解码器和解码器上下文
	AVCodec \*vcodec = avcodec\_find\_decoder(pFormatCtx->streams[videoindex]->codecpar->codec_id);
	if (!vcodec)
	{
		cout << "Codec not found.(没有找到解码器" << endl;
		return -1;
	}
	pCodecCtx = avcodec\_alloc\_context3(vcodec);
	avcodec\_parameters\_to\_context(pCodecCtx, pFormatCtx->streams[videoindex]->codecpar);
	pCodecCtx->thread_count = 8;
	ret = avcodec\_open2(pCodecCtx, NULL, 0);
	if (ret != 0)
	{
		cout << "Could not open codec.(无法打开解码器" << endl;
		return -1;
	}
	//avformat\_find\_stream\_info(pFormatCtx, NULL);
	//2、SDL显示相关初始化
	//2.1、初始化init
	if (SDL\_Init(SDL_INIT_VIDEO | SDL_INIT_AUDIO | SDL_INIT_TIMER)) {
		SDL\_LogError(SDL_LOG_CATEGORY_APPLICATION, "Could not initialize SDL - %s\n", SDL\_GetError());
		return ret;
	}

	//2.2、创建窗口
	w_width = pFormatCtx->streams[videoindex]->codecpar->width;//关于屏幕这里还不知道怎么设置屏幕大小
	w_height = pFormatCtx->streams[videoindex]->codecpar->height;
	win = SDL\_CreateWindow("Media Player",
		SDL_WINDOWPOS_UNDEFINED,
		SDL_WINDOWPOS_UNDEFINED,
		w_width, w_height,
		SDL_WINDOW_OPENGL | SDL_WINDOW_RESIZABLE);
	if (!win) {
		SDL\_LogError(SDL_LOG_CATEGORY_APPLICATION, "Failed to create window by SDL");
		//要释放ffmpeg的相关内存
		return -1;
	}

	//2.3、创建渲染器
	renderer = SDL\_CreateRenderer(win, -1, 0);
	if (!renderer) {
		SDL\_LogError(SDL_LOG_CATEGORY_APPLICATION, "Failed to create Renderer by SDL");
		//要释放ffmpeg的相关内存
		return -1;
	}
	//2.4、创建纹理
	pixformat = SDL_PIXELFORMAT_IYUV;//YUV格式
	texture = SDL\_CreateTexture(renderer,
		pixformat,
		SDL_TEXTUREACCESS_STREAMING,
		w_width,
		w_height);

	//3、读取编解码数据并SDL显示
	//3.1、创建SDL管理线程
	SDL_Event event;
	SDL\_CreateThread(video_refresh_thread, "Video Thread", NULL);
	//3.2、播放
	//3.2.1、定义AVPacket、AVFrame设置纹理显示的位置,宽高
	AVPacket \*packet = av\_packet\_alloc();
	AVFrame \*pFrame = NULL;
	AVFrame	\*pFrameYUV = NULL;
	pFrameYUV = av\_frame\_alloc();

	//3.2.2、定义存储转换后一帧像素数据缓冲区
	//这一步十分重要 之前知道
	//后面使用sws\_scale 需要内存和指定每行大小存放 使用avpicture\_fill就可以不用自定义计算了
	pFrame = av\_frame\_alloc();
	uint8\_t \*out_buffer = (uint8\_t \*)av\_malloc(avpicture\_get\_size(AV_PIX_FMT_YUV420P, pCodecCtx->width, pCodecCtx->height));
	//avpicture\_fill((AVPicture \*)pFrameYUV, out\_buffer, AV\_PIX\_FMT\_YUV420P, pCodecCtx->width, pCodecCtx->height); 新版本被遗弃2
	//存储一帧像素数据缓冲区
	av\_image\_fill\_arrays(pFrameYUV->data, pFrameYUV->linesize, out_buffer, AV_PIX_FMT_YUV420P, pCodecCtx->width, pCodecCtx->height, 1);

	rect.x = 0;
	rect.y = 0;
	rect.w = w_width;
	rect.h = w_height;
	//3.2.3、sws进行视频尺寸像素转换定义
	//这一步十分重要 之前知道 解码出来的进行SDL显示 像素格式需要转换,否则就是绿屏
	struct SwsContext \*img_convert_ctx = NULL;
	img_convert_ctx = sws\_getCachedContext(img_convert_ctx, pCodecCtx->width, pCodecCtx->height, pCodecCtx->pix_fmt, pCodecCtx->width, pCodecCtx->height, AV_PIX_FMT_YUV420P, SWS_BICUBIC, NULL, NULL, NULL);

	//写入文件中
	//FILE \*fp\_yuv=fopen("output.yuv","wb+");

	//3.2.4、循环播放
	for (;;)
	{
		SDL\_WaitEvent(&event);//使用时间驱动,每40ms执行一次 等SDL\_PushEvent
		 //是刷新事件REFRESH\_EVENT才进入
		if (event.type == REFRESH_EVENT)
		{
			//预处理一下
			while (1) {
				if (av\_read\_frame(pFormatCtx, packet) < 0)//读完了
					thread_exit = 1;

				if (packet->stream_index == videoindex)
					break;
			}
			//接收的包是视频包则进入SDL显示
			if (packet->stream_index == videoindex) {
				avcodec\_send\_packet(pCodecCtx, packet);//发送packet到解码线程 返回多帧
				while (avcodec\_receive\_frame(pCodecCtx, pFrame) == 0) {//循环读取解码返回的帧

					sws\_scale(img_convert_ctx, (const uint8\_t\* const\*)pFrame->data, pFrame->linesize, 0, pCodecCtx->height, pFrameYUV->data, pFrameYUV->linesize);

					/\*
 //写入文件中
 int y\_size=pCodecCtx->width\*pCodecCtx->height;
 fwrite(pFrameYUV->data[0],1,y\_size,fp\_yuv); //Y
 fwrite(pFrameYUV->data[1],1,y\_size/4,fp\_yuv); //U
 fwrite(pFrameYUV->data[2],1,y\_size/4,fp\_yuv); //V
 \*/

					//将返回的数据更新到SDL纹理当中
					SDL\_UpdateYUVTexture(texture, NULL,
						pFrameYUV->data[0], pFrameYUV->linesize[0],
						pFrameYUV->data[1], pFrameYUV->linesize[1],
						pFrameYUV->data[2], pFrameYUV->linesize[2]);

					//进行SDL刷新显示
					SDL\_RenderClear(renderer);
					SDL\_RenderCopy(renderer, texture, NULL, &rect);
					SDL\_RenderPresent(renderer);
				}
				av\_packet\_unref(packet);
			}
		}
		else if (event.type == SDL_KEYDOWN)
		{
			if (event.key.keysym.sym == SDLK_SPACE) { //空格键暂停
				thread_pause = !thread_pause;
			}
			if (event.key.keysym.sym == SDLK_ESCAPE) { // ESC键退出
				thread_exit = 1;
			}
		}
		else if (event.type == SDL_QUIT)
		{
			thread_exit = 1;
		}
		else if (event.type == BREAK_EVENT)
		{
			break;
		}
	}
	//4、释放内存
	if (pFrame)
	{
		av\_frame\_free(&pFrame);
	}
	if (pFrameYUV)
	{
		av\_frame\_free(&pFrameYUV);
	}
	if (packet)
	{
		av\_packet\_free(&packet);
	}
	// Close the codec
	if (pCodecCtx)
	{
		avcodec\_close(pCodecCtx);
	}
	// Close the video file
	if (pFormatCtx)
	{
		avformat\_close\_input(&pFormatCtx);
	}
	if (win)
	{
		SDL\_DestroyWindow(win);
	}
	if (renderer)
	{
		SDL\_DestroyRenderer(renderer);
	}
	if (texture)
	{
		SDL\_DestroyTexture(texture);
	}

	SDL\_Quit();

	return 0;
}
3、摄像头数据+SDL显示
在Windows下可以使用2种方式读取摄像头数据;
1.VFW: Video for Windows 屏幕捕捉设备。注意输入URL是设备的序号, 从0至9。
2.dshow: 使用Directshow。注意作者机器上的摄像头设备名称是 “Integrated Camera”,使用的时候需要改成自己电脑上摄像头设备的名称。
命令行中使用在上面已经描述了但是注意在代码中进行获取的时候要先进行代码识别,再作为解封装器传入。
获取摄像头与录屏基本都是一致的,只是摄像头这边多出需要提前show一下,但是如果提前在命令行中运行过则是可以找到不需要提前show的,然后就是注册打开解封装器上下文那里传入的数据不一致
只有这一部分不一样 其余编码显示流程都可以不变可以直接显示摄像头的简单demo
工程代码
#include <iostream>
#include <thread>
using namespace std;
#ifdef \_\_cplusplus
extern "C"
{
#endif // !\_\_cplusplus
#include "libavformat/avformat.h"
#include "libavcodec/avcodec.h"
#include "libswscale/swscale.h"
#include "libswresample/swresample.h"//包含头文件
#include "libavdevice/avdevice.h"
#include "libavutil/imgutils.h"
#include "SDL.h"
#include "SDL\_thread.h"
#ifdef \_\_cplusplus
}
#endif // !\_\_cplusplus
#pragma comment(lib,"avformat.lib")//添加库文件,也可以在属性处添加
#pragma comment(lib,"avutil.lib")
#pragma comment(lib,"avcodec.lib")
#pragma comment(lib,"swresample.lib")
#pragma comment(lib,"swscale.lib")
#pragma comment(lib,"avdevice.lib")
#pragma comment(lib,"SDL2.lib")
#pragma comment(lib,"SDL2main.lib")
#pragma comment(lib,"SDL2test.lib")
//SDL的事件定义
#define REFRESH\_EVENT (SDL\_USEREVENT + 1) //刷新事件
#define BREAK\_EVENT (SDL\_USEREVENT + 2) // 退出事件
int thread_exit = 0;//相应变量定义
int thread_pause = 0;
//解决vs2015链接错误
#pragma comment(lib,"legacy\_stdio\_definitions.lib")
extern "C" { FILE __iob_func[3] = { \*stdin,\*stdout,\*stderr }; }
#define USE\_DSHOW 1
//Show Device
void show\_dshow\_device() {
AVFormatContext \*pFormatCtx = avformat\_alloc\_context();
AVDictionary\* options = NULL;
av\_dict\_set(&options, "list\_devices", "true", 0);
AVInputFormat \*iformat = av\_find\_input\_format("dshow");
printf("Device Info=============\n");
avformat\_open\_input(&pFormatCtx, "video=dummy", iformat, &options);
printf("========================\n");
}
//Show Device Option
void show\_dshow\_device\_option() {
AVFormatContext \*pFormatCtx = avformat\_alloc\_context();
AVDictionary\* options = NULL;
av\_dict\_set(&options, "list\_options", "true", 0);
AVInputFormat \*iformat = av\_find\_input\_format("dshow");
printf("Device Option Info======\n");
avformat\_open\_input(&pFormatCtx, "video=Integrated Camera", iformat, &options);
printf("========================\n");
}
//Show VFW Device
void show\_vfw\_device() {
AVFormatContext \*pFormatCtx = avformat\_alloc\_context();
AVInputFormat \*iformat = av\_find\_input\_format("vfwcap");
printf("VFW Device Info======\n");
avformat\_open\_input(&pFormatCtx, "list", iformat, NULL);
printf("=====================\n");
}
//SDL线程函数
int video\_refresh\_thread(void \*data) {
thread_exit = 0;
thread_pause = 0;
while (!thread_exit) {
if (!thread_pause) {
SDL_Event event;
event.type = REFRESH_EVENT;
SDL\_PushEvent(&event);// 发送刷新事件
}
SDL\_Delay(40);
}
thread_exit = 0;
thread_pause = 0;
//Break
SDL_Event event;
event.type = BREAK_EVENT;
SDL\_PushEvent(&event);
return 0;
}
int main(int argc, char \*argv[])
{
AVFormatContext \*pFormatCtx;
int i, videoindex;
AVCodecContext \*pCodecCtx;
AVCodec \*pCodec;
int ret;
//SDL相关变量
int w_width = 640; //默认窗口大小
int w_height = 480;
SDL_Rect rect;
Uint32 pixformat;
SDL_Window \*win = NULL;
SDL_Renderer \*renderer = NULL;
SDL_Texture \*texture = NULL;
//1、首先ffmpeg的gdigrab解封装器对desktop进行解码获取对应的视频流
//1.1、注册设备
av\_register\_all();
avformat\_network\_init();
avdevice\_register\_all();//添加一个avdevice设备注册


**网上学习资料一大堆,但如果学到的知识不成体系,遇到问题时只是浅尝辄止,不再深入研究,那么很难做到真正的技术提升。**
**[需要这份系统化的资料的朋友,可以添加戳这里获取](https://bbs.csdn.net/topics/618668825)**
**一个人可以走的很快,但一群人才能走的更远!不论你是正从事IT行业的老鸟或是对IT行业感兴趣的新人,都欢迎加入我们的的圈子(技术交流、学习资源、职场吐槽、大厂内推、面试辅导),让我们一起学习成长!**
n = NULL;
SDL_Renderer \*renderer = NULL;
SDL_Texture \*texture = NULL;
//1、首先ffmpeg的gdigrab解封装器对desktop进行解码获取对应的视频流
//1.1、注册设备
av\_register\_all();
avformat\_network\_init();
avdevice\_register\_all();//添加一个avdevice设备注册
[外链图片转存中...(img-7d5PPd7Y-1715745262877)]
[外链图片转存中...(img-fQwkOGQb-1715745262878)]
**网上学习资料一大堆,但如果学到的知识不成体系,遇到问题时只是浅尝辄止,不再深入研究,那么很难做到真正的技术提升。**
**[需要这份系统化的资料的朋友,可以添加戳这里获取](https://bbs.csdn.net/topics/618668825)**
**一个人可以走的很快,但一群人才能走的更远!不论你是正从事IT行业的老鸟或是对IT行业感兴趣的新人,都欢迎加入我们的的圈子(技术交流、学习资源、职场吐槽、大厂内推、面试辅导),让我们一起学习成长!**


 1849
1849


 被折叠的 条评论
为什么被折叠?
被折叠的 条评论
为什么被折叠?
 到【灌水乐园】发言


