


android:layout_width=“match_parent”
android:layout_height=“wrap_content”
android:text=“TextView” />
<TextView
android:layout_width=“match_parent”
android:layout_height=“wrap_content”
android:text=“@string/str_setting_color_size”
android:layout_marginTop=“@dimen/dimen_10”
android:textColor=“@color/color_ff0000”
android:textSize=“@dimen/text_size_20” />
<TextView
android:layout_width=“match_parent”
android:layout_height=“wrap_content”
android:drawableLeft=“@mipmap/ic_launcher”
android:layout_marginTop=“@dimen/dimen_10”
android:gravity=“center_vertical”
android:shadowColor=“@color/color_FF773D”
android:shadowDx=“30”
android:shadowDy=“-20”
android:shadowRadius=“2”
android:text=“右侧添加图片和使用阴影”
android:textColor=“@color/color_188FFF”
android:textSize=“@dimen/text_size_20” />
<TextView
android:layout_width=“match_parent”
android:layout_height=“wrap_content”
android:autoLink=“email|phone”
android:gravity=“center_vertical”
android:layout_marginTop=“@dimen/dimen_10”
android:text=“可点击跳转邮件:SCC5201314@qq.com\n可点击跳转电话:0215201314”
android:textColor=“@color/color_188FFF”
android:textSize=“@dimen/text_size_14” />
<TextView
android:layout_width=“match_parent”
android:layout_height=“wrap_content”
android:ellipsize=“end”
android:gravity=“center_vertical”
android:lineSpacingMultiplier=“1.2”
android:layout_marginTop=“@dimen/dimen_10”
android:maxLength=“2”
android:text="TxtView继承了View,它还是Button、EditText两个UI组件类的父类。它的作用是在用户界面上显示文本素。从功能上来看TextView就是个文本编辑器,只不过Android关闭的它的可编辑功能。如果需要一个可编辑的文本框,就要使用到它的子类Editext了,Editext允许用户编辑文本框中的内容。TextView和Editext它俩最大的区别就在于TextView不允许用户编辑文本内容,Editext允许用户编辑文本内容。
下面咱写几个实例来详细了解一下TextView的。"
android:textColor=“@color/color_188FFF”
android:textSize=“@dimen/text_size_14” />
<TextView
android:layout_width=“wrap_content”
android:layout_height=“wrap_content”
android:background=“@color/color_ff0000”
android:layout_marginTop=“@dimen/dimen_10”
android:padding=“10dp”
android:text=“背景色红色的文本”
android:textColor=“@color/white” />
<TextView
android:layout_width=“wrap_content”
android:layout_height=“wrap_content”
android:layout_marginTop=“@dimen/dimen_10”
android:background=“@drawable/bg_tv_frame_red”
android:padding=“10dp”
android:text=“带着红色边框的文本” />
<TextView
android:layout_width=“wrap_content”
android:layout_height=“wrap_content”
android:layout_marginTop=“@dimen/dimen_10”
android:background=“@drawable/bg_tv_frame_gradient”
android:padding=“10dp”
android:textColor=“@color/white”
android:text=“带着边框和背景色渐变的文本” />
background设置边框的文件 android:background=“@drawable/bg_tv_frame_red”
<?xml version="1.0" encoding="utf-8"?>带着边框和背景色渐变 android:background=“@drawable/bg_tv_frame_gradient”
<?xml version="1.0" encoding="utf-8"?><gradient
android:startColor=“@color/color_188FFF”
android:centerColor=“@color/color_FF773D”
android:endColor=“@color/color_ff0000”
android:type=“linear”
/>
2.在xml中创建,在代码中设置属性
- 布局文件
<LinearLayout xmlns:android=“http://schemas.android.com/apk/res/android”
android:layout_width=“match_parent”
android:layout_height=“match_parent”
android:layout_margin=“@dimen/dimen_20”
android:orientation=“vertical”>
<TextView
android:layout_width=“match_parent”
android:layout_height=“wrap_content”
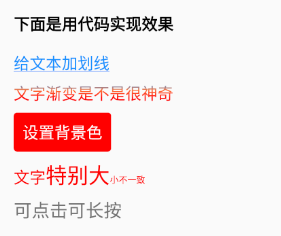
android:text=“下面是用代码实现效果”
android:textSize=“@dimen/text_size_18”
android:layout_marginTop=“@dimen/dimen_20”
android:layout_marginBottom=“@dimen/dimen_10”
android:textColor=“@color/black”
android:textStyle=“bold” />
<TextView
android:id=“@+id/tv_flag”
android:layout_width=“match_parent”
android:layout_height=“wrap_content”
android:textColor=“@color/color_188FFF”
android:layout_marginTop=“@dimen/dimen_10”
android:text=“给文本加划线”
android:textSize=“@dimen/text_size_18” />
<TextView
android:id=“@+id/tv_gradient”
android:layout_width=“match_parent”
android:layout_height=“wrap_content”
android:layout_marginTop=“@dimen/dimen_10”
android:textColor=“@color/white”
android:text=“文字渐变是不是很神奇”
android:textSize=“@dimen/text_size_18” />
<TextView
android:id=“@+id/tv_bg”
android:layout_width=“wrap_content”
android:layout_height=“wrap_content”
android:layout_marginTop=“@dimen/dimen_10”
android:padding=“10dp”
android:text=“设置背景色”
android:textColor=“@color/white”
android:textSize=“@dimen/text_size_18” />
<TextView
android:id=“@+id/tv_size”
android:layout_width=“match_parent”
android:layout_height=“wrap_content”
android:layout_marginTop=“@dimen/dimen_10”
android:textColor=“@color/color_ff0000”
android:text=“文字特别大小不一致” />
<TextView
android:id=“@+id/tv_onclick”
android:layout_width=“match_parent”
android:layout_marginTop=“@dimen/dimen_10”
android:layout_height=“wrap_content”
android:textSize=“@dimen/dimen_20”
android:text=“可点击可长按” />
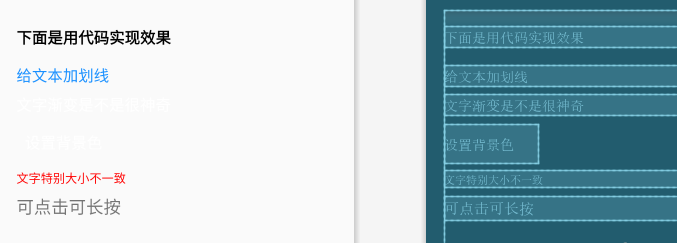
- 运行结果
- 在代码中实现
//下划线并加清晰
tv_flag.getPaint().setFlags(Paint.UNDERLINE_TEXT_FLAG | Paint.ANTI_ALIAS_FLAG);
tv_flag.getPaint().setAntiAlias(true);//抗锯齿
int[] colors = {0xff188fff, 0xffff773D, 0xffff0000};//颜色的数组
LinearGradient mLinearGradient = new LinearGradient(0, 0, 0,
tv_gradient.getPaint().getTextSize(), colors, null, Shader.TileMode.CLAMP);
tv_gradient.getPaint().setShader(mLinearGradient);
tv_gradient.invalidate();
int fillColor = Color.parseColor(“#ff0000”);//内部填充颜色
GradientDrawable gd = new GradientDrawable();//创建drawable
gd.setColor(fillColor);//设置背景色
gd.setCornerRadius(10);//设置圆角
tv_bg.setBackground(gd);//设置背景
Spannable wordtoSpan = new SpannableString(tv_size.getText().toString());
//setSpan:参数1,设置文字大小;参数2,开始的文字位置;参数3,结束改变文字位置不包含这个位置
wordtoSpan.setSpan(new AbsoluteSizeSpan(DensityUtil.dip2px(this, 18)), 0, 2, Spannable.SPAN_EXCLUSIVE_EXCLUSIVE);
wordtoSpan.setSpan(new AbsoluteSizeSpan(DensityUtil.dip2px(this, 24)), 2, 5, Spannable.SPAN_EXCLUSIVE_EXCLUSIVE);
wordtoSpan.setSpan(new AbsoluteSizeSpan(DensityUtil.dip2px(this, 10)), 5, tv_size.length(), Spannable.SPAN_EXCLUSIVE_EXCLUSIVE);
tv_size.setText(wordtoSpan);
//TextView其实也是有点击事件的毕竟它的爸爸Veiew
tv_onclick.setOnClickListener(new View.OnClickListener() {
@Override
public void onClick(View v) {
MLog.e(“这里是点击事件”);
Toast.makeText(TextViewActivity.this,“这里是点击事件”,Toast.LENGTH_SHORT).show();
}
});
tv_onclick.setOnLongClickListener(new View.OnLongClickListener() {
@Override
public boolean onLongClick(View v) {
MLog.e(“这里长按事件”);
Toast.makeText(TextViewActivity.this,“这里长按事件”,Toast.LENGTH_SHORT).show();
//true表示事件已消费
return true;
}
});
- 运行结果分析


 701
701

 被折叠的 条评论
为什么被折叠?
被折叠的 条评论
为什么被折叠?
 到【灌水乐园】发言


