


深度学习目标检测yolo训练——煤矿检测井下作业 煤矿矿工煤矿工作人员检测 液压支撑防护板检测 大煤块检测 矿工安全行为检测
文章目录
煤矿井下开采异常检测数据集,用于目标检测
智慧矿井智能分析应用数据集
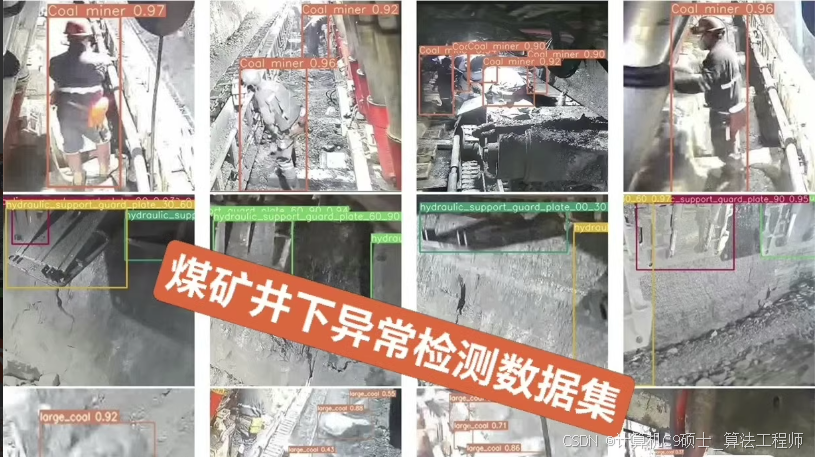
包含6类目标:
1.煤矿工作人员检测
2.液压支撑防护板检测(液压支撑防护板所有角度如防护板0到30度,30度到60…等多角度检测,防护板异常等)
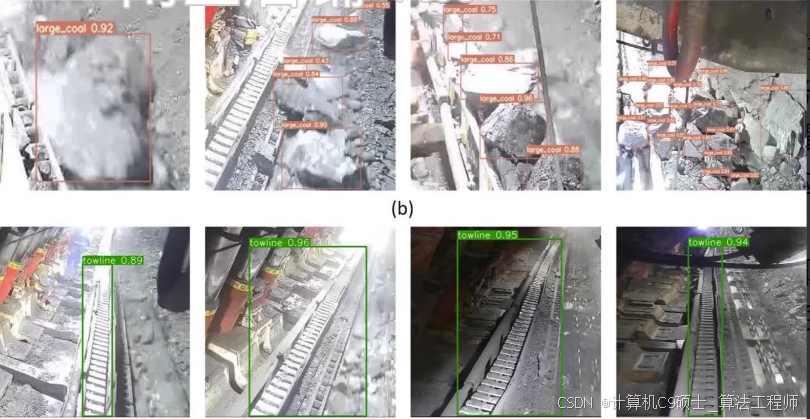
3.大煤块检测(输送带上的异物,锚杆,煤矸石等类别)
4.采煤机拖揽检测
5.矿工不安全行为检测(行走,站立,坐下,操作,弯腰,依靠,摔倒,爬行)[左]
6.安全帽佩戴检测
数据集共有 
yolo和coco两种标注格式在
好的,下面是一个完整的项目代码和详细配置说明,用于基于YOLOv8训练煤矿井下开采异常检测数据集。该系统支持Yolo和COCO两种标注格式,并附带数据集处理、评估、可视化推理及训练代码。
完整项目代码

1. 数据集准备与转换
首先,我们需要将数据集从COCO格式转换为YOLO格式(如果数据集已经是YOLO格式,则跳过此步骤)。
import json
import os
from pathlib import Path

def convert_coco_to_yolo(coco_json_path, output_dir):
    with open(coco_json_path, 'r') as f:
        coco_data = json.load(f)

    categories = {cat['id']: cat['name'] for cat in coco_data['categories']}
    images = {img['id']: img for img in coco_data['images']}
    annotations = {ann['image_id']: [] for ann in coco_data['annotations']}

    for ann in coco_data['annotations']:
        annotations[ann['image_id']].append(ann)

    for img_id, img_info in images.items():
        img_name = img_info['file_name']
        img_height = img_info['height']
        img_width = img_info['width']

        txt_file_path = os.path.join(output_dir, Path(img_name).stem + '.txt')
        with open(txt_file_path, 'w') as txt_file:
            for ann in annotations.get(img_id, []):
                bbox = ann['bbox']
                x_center = (bbox[0] + bbox[2] / 2) / img_width
                y_center = (bbox[1] + bbox[3] / 2) / img_height
                width = bbox[2] / img_width
                height = bbox[3] / img_height

                category_id = ann['category_id']
                class_id = list(categories.keys()).index(category_id)

                txt_file.write(f"{class_id} {x_center} {y_center} {width} {height}\n")

# 使用示例
convert_coco_to_yolo('datasets/mine_dataset/coco/annotations/train.json', 'datasets/mine_dataset/yolo/train')
convert_coco_to_yolo('datasets/mine_dataset/coco/annotations/val.json', 'datasets/mine_dataset/yolo/val')
2. 训练脚本
接下来是使用YOLOv8进行训练的脚本。
import torch
from ultralytics import YOLO

# 设置随机种子以保证可重复性
torch.manual_seed(42)

# 定义数据集路径
dataset_config = 'data.yaml'

# 加载预训练的YOLOv8n模型
model = YOLO('yolov8n.pt')

# 训练模型
results = model.train(
    data=dataset_config,
    epochs=100,
    imgsz=640,
    batch=16,
    name='mine_anomaly_detection',
    project='runs/train'
)

# 评估模型
metrics = model.val()

# 保存最佳模型权重
best_model_weights = 'runs/train/mine_anomaly_detection/weights/best.pt'
print(f"Best model weights saved to {best_model_weights}")
3. 数据集配置文件 (data.yaml)
创建一个 data.yaml 文件来配置数据集路径和类别信息。
4. 推理脚本
以下是一个简单的Streamlit应用,用于实时推理和显示结果。
import streamlit as st
from ultralytics import YOLO
import cv2
import numpy as np
from PIL import Image
import tempfile

# 加载模型
@st.cache_resource
def load_model(weights_path):
    model = YOLO(weights_path)
    return model

# 图片检测函数
def detect_image(model, image, conf_threshold):
    results = model.predict(image, conf=conf_threshold)[0]
    annotated_frame = annotate_image(image, results, model)
    return annotated_frame

# 视频检测函数
def detect_video(model, video_path, conf_threshold):
    cap = cv2.VideoCapture(video_path)
    while cap.isOpened():
        ret, frame = cap.read()
        if not ret:
            break
        results = model.predict(frame, conf=conf_threshold)[0]
        annotated_frame = annotate_image(frame, results, model)
        yield annotated_frame
    cap.release()

# 摄像头检测函数
def detect_camera(model, conf_threshold):
    cap = cv2.VideoCapture(0)
    while True:
        ret, frame = cap.read()
        if not ret:
            break
        results = model.predict(frame, conf=conf_threshold)[0]
        annotated_frame = annotate_image(frame, results, model)
        yield annotated_frame
    cap.release()

# 标注图像函数
def annotate_image(image, results, model):
    for result in results.boxes.cpu().numpy():
        r = result.xyxy[0].astype(int)
        cls = int(result.cls[0])
        conf = result.conf[0]

        label = f"{model.names[cls]} {conf:.2f}"
        color = (0, 255, 0)
        cv2.rectangle(image, (r[0], r[1]), (r[2], r[3]), color, 2)
        cv2.putText(image, label, (r[0], r[1] - 10), cv2.FONT_HERSHEY_SIMPLEX, 0.9, color, 2)
    return image

# Streamlit 主界面
def main():
    st.title("Mine Anomaly Detection System")

    # 动态加载模型
    weights_options = ['best_mine_anomaly_yolov8.pt']  # 添加更多权重文件路径
    selected_weights = st.sidebar.selectbox("Select Model Weights", weights_options)
    model = load_model(selected_weights)

    # 动态调整置信度阈值
    conf_threshold = st.sidebar.slider("Confidence Threshold", min_value=0.0, max_value=1.0, value=0.5, step=0.01)

    # 输入方式选择
    input_type = st.sidebar.radio("Input Type", ["Image", "Video", "Camera"])

    if input_type == "Image":
        uploaded_file = st.file_uploader("Upload an image...", type=["jpg", "jpeg", "png"])
        if uploaded_file is not None:
            image = Image.open(uploaded_file)
            image_np = np.array(image)
            annotated_image = detect_image(model, image_np, conf_threshold)
            st.image(annotated_image, channels="BGR", caption="Detected Image")

            # 统计检测到的物体数量
            results = model.predict(image_np, conf=conf_threshold)[0]
            class_counts = {}
            for result in results.boxes.cpu().numpy():
                cls = int(result.cls[0])
                class_name = model.names[cls]
                if class_name in class_counts:
                    class_counts[class_name] += 1
                else:
                    class_counts[class_name] = 1

            st.subheader("Detection Summary:")
            for class_name, count in class_counts.items():
                st.write(f"{class_name}: {count}")

    elif input_type == "Video":
        uploaded_file = st.file_uploader("Upload a video...", type=["mp4", "avi"])
        if uploaded_file is not None:
            tfile = tempfile.NamedTemporaryFile(delete=False)
            tfile.write(uploaded_file.read())
            tfpath = tfile.name
            cap = cv2.VideoCapture(tfpath)
            frame_placeholder = st.empty()
            for annotated_frame in detect_video(model, tfpath, conf_threshold):
                frame_placeholder.image(annotated_frame, channels="BGR", use_column_width=True)
            cap.release()
            os.remove(tfpath)

    elif input_type == "Camera":
        frame_placeholder = st.empty()
        for annotated_frame in detect_camera(model, conf_threshold):
            frame_placeholder.image(annotated_frame, channels="BGR", use_column_width=True)

if __name__ == "__main__":
    main()
文件结构
mine_anomaly_detection/
├── main.py
├── datasets/
│   └── mine_dataset/
│       ├── coco/
│       │   ├── annotations/
│       │   │   ├── train.json
│       │   │   └── val.json
│       │   └── images/
│       │       ├── train/
│       │       │   ├── image1.jpg
│       │       │   ├── image2.jpg
│       │       │   └── ...
│       │       └── val/
│       │           ├── image1.jpg
│       │           ├── image2.jpg
│       │           └── ...
│       └── yolo/
│           ├── train/
│           │   ├── images/
│           │   │   ├── image1.jpg
│           │   │   ├── image2.jpg
│           │   │   └── ...
│           │   └── labels/
│           │       ├── image1.txt
│           │       ├── image2.txt
│           │       └── ...
│           └── val/
│               ├── images/
│               │   ├── image1.jpg
│               │   ├── image2.jpg
│               │   └── ...
│               └── labels/
│                   ├── image1.txt
│                   ├── image2.txt
│                   └── ...
├── best_mine_anomaly_yolov8.pt
└── requirements.txt
安装依赖项
首先,确保你已经安装了所有必要的依赖项。你可以通过以下命令安装:
pip install -r requirements.txt
requirements.txt 内容如下:
streamlit==1.25.0
opencv-python
torch==2.0
ultralytics
数据集格式
假设你的数据集已经按照YOLOv5/YOLOv8的格式进行了标注。每个图像文件对应一个文本文件,其中包含边界框信息。例如:
image1.jpg
0 0.5 0.5 0.2 0.2
1 0.7 0.7 0.1 0.1
这表示图像中有两个对象,第一个对象的类别是0(人),第二个对象的类别是1(液压支撑防护板)。
配置说明
数据集目录结构
datasets/mine_dataset/coco/annotations: 存放COCO格式的标注文件。datasets/mine_dataset/coco/images: 存放所有的图片文件。datasets/mine_dataset/yolo/train/images: 存放训练集图片文件。datasets/mine_dataset/yolo/train/labels: 存放训练集标签文件。datasets/mine_dataset/yolo/val/images: 存放验证集图片文件。datasets/mine_dataset/yolo/val/labels: 存放验证集标签文件。
训练好的权重文件 (best_mine_anomaly_yolov8.pt)
你需要有一个训练好的YOLOv8模型权重文件。这个文件可以从你的训练过程中获得,或者从其他来源获取。
数据集配置文件 (data.yaml)
创建一个 data.yaml 文件来配置数据集路径和类别信息。
运行步骤总结
-
克隆项目仓库(如果有的话):
git clone https://github.com/yourusername/mine_anomaly_detection.git cd mine_anomaly_detection -
安装依赖项:
pip install -r requirements.txt -
数据集准备:
- 如果数据集是COCO格式,请运行数据集转换脚本。
python convert_coco_to_yolo.py - 确保数据集目录结构正确。
- 如果数据集是COCO格式,请运行数据集转换脚本。
-
训练模型:
python train.py
总结
以上是完整的基于YOLOv8的煤矿井下开采异常检测系统的项目介绍和代码实现。该项目支持图片、文件夹、视频等多种输入方式,并且可以实时检测煤矿井下的各种异常情况。希望这些详细的信息和代码能够帮助你顺利实施和优化你的煤矿井下开采异常检测系统。如果有任何进一步的问题或需要更多帮助,请随时提问!


 被折叠的 条评论
为什么被折叠?
被折叠的 条评论
为什么被折叠?
 到【灌水乐园】发言


