


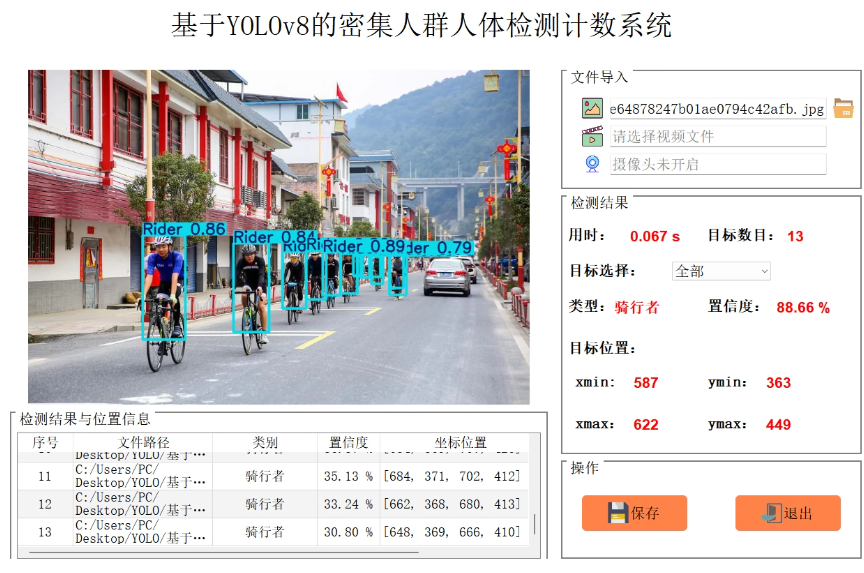
基于深度学习YOLOv8+PyQt5的密集人群人体检测识别计数系统
文章目录
技术栈:目标检测、深度学习、PyTorch、YOLOv8、Python、PyQt5
使用的工具:Anaconda、PyCharm、Qt Designer、Labelimg

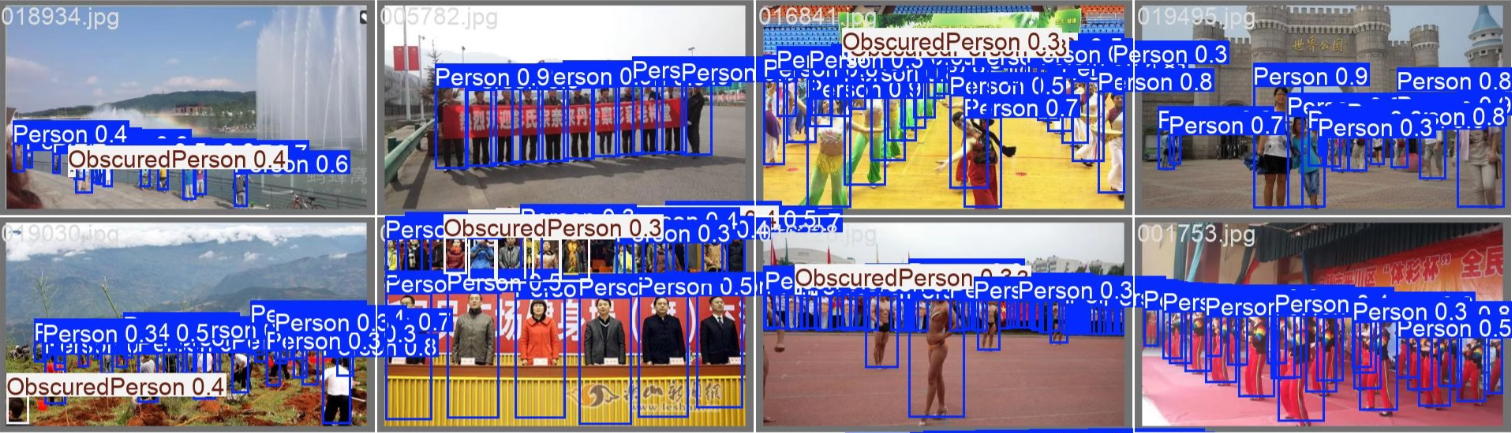
识别3类:人体(Person)、骑行者(Rider)、被遮挡的人(ObscuredPerson)
数量9000张标注好的数据集,如何训练?、包含3种目标对象(人体(Person)、骑行者(Rider)、被遮挡的人(ObscuredPerson))
构建一个基于深度学习YOLOv8和PyQt5的密集人群人体检测识别计数系统是一个涉及多个步骤的过程,包括数据准备、模型训练、界面设计和结果展示等。以下是详细的步骤和代码示例。
1. 环境搭建
环境已经安装了必要的库和工具。这里以Anaconda和PyCharm为例。
安装依赖
# 创建并激活虚拟环境
conda create -n crowd_detection python=3.8
conda activate crowd_detection

# 安装YOLOv8和相关库
pip install ultralytics
pip install PyQt5
pip install opencv-python
2. 数据准备
收集和标注9000张包含人体(Person)、骑行者(Rider)和被遮挡的人(ObscuredPerson)的数据集。使用Labelimg进行标注,并将标注文件保存为YOLO格式。
数据集结构
dataset/
├── images/
│   ├── train/
│   ├── val/
│   └── test/
└── labels/
    ├── train/
    ├── val/
    └── test/
3. 模型训练
使用YOLOv8进行模型训练。
训练配置文件
创建一个crowd.yaml文件,定义数据集和类别信息。
train: dataset/images/train
val: dataset/images/val
test: dataset/images/test

nc: 3
names: ['Person', 'Rider', 'ObscuredPerson']
训练模型
使用以下命令进行模型训练。
yolo train model=yolov8s.yaml data=crowd.yaml epochs=100 imgsz=640
4. 界面设计与结果展示
使用PyQt5设计用户界面,并展示检测结果。
设计界面
使用Qt Designer设计界面,并导出为.ui文件,然后使用pyuic5转换为Python代码。
pyuic5 -x your_design.ui -o ui_design.py
主程序代码
import sys
from PyQt5.QtWidgets import QApplication, QMainWindow, QFileDialog
from PyQt5.QtGui import QImage, QPixmap
from PyQt5.QtCore import QTimer
import cv2
from ultralytics import YOLO
import numpy as np

from ui_design import Ui_MainWindow

class CrowdDetectionApp(QMainWindow, Ui_MainWindow):
    def __init__(self):
        super().__init__()
        self.setupUi(self)
        self.model = YOLO('best.pt')  # 加载训练好的模型

        self.loadImageButton.clicked.connect(self.load_image)
        self.loadVideoButton.clicked.connect(self.load_video)
        self.startCameraButton.clicked.connect(self.start_camera)

        self.saveButton.clicked.connect(self.save_results)
        self.exitButton.clicked.connect(self.close)

        self.timer = QTimer()
        self.timer.timeout.connect(self.update_frame)
        self.cap = None

    def load_image(self):
        file_name, _ = QFileDialog.getOpenFileName(self, "选择图片文件", "", "Images (*.png *.xpm *.jpg)")
        if file_name:
            self.detect_and_show(file_name)

    def load_video(self):
        file_name, _ = QFileDialog.getOpenFileName(self, "选择视频文件", "", "Videos (*.mp4 *.avi)")
        if file_name:
            self.cap = cv2.VideoCapture(file_name)
            self.timer.start(30)

    def start_camera(self):
        self.cap = cv2.VideoCapture(0)
        self.timer.start(30)

    def update_frame(self):
        ret, frame = self.cap.read()
        if ret:
            results = self.model(frame)
            annotated_frame = results[0].plot()
            height, width, channel = annotated_frame.shape
            bytes_per_line = 3 * width
            q_img = QImage(annotated_frame.data, width, height, bytes_per_line, QImage.Format_RGB888)
            self.imageLabel.setPixmap(QPixmap.fromImage(q_img))

    def detect_and_show(self, file_path):
        image = cv2.imread(file_path)
        results = self.model(image)
        annotated_image = results[0].plot()
        height, width, channel = annotated_image.shape
        bytes_per_line = 3 * width
        q_img = QImage(annotated_image.data, width, height, bytes_per_line, QImage.Format_RGB888)
        self.imageLabel.setPixmap(QPixmap.fromImage(q_img))

        self.show_results(results)

    def show_results(self, results):
        for result in results:
            boxes = result.boxes
            for box in boxes:
                class_id = int(box.cls[0])
                confidence = float(box.conf[0])
                x1, y1, x2, y2 = map(int, box.xyxy[0])

                self.resultTable.insertRow(self.resultTable.rowCount())
                row = self.resultTable.rowCount() - 1
                self.resultTable.setItem(row, 0, QTableWidgetItem(str(class_id)))
                self.resultTable.setItem(row, 1, QTableWidgetItem(f'{confidence:.2f}'))
                self.resultTable.setItem(row, 2, QTableWidgetItem(f'({x1}, {y1}) ({x2}, {y2})'))

    def save_results(self):
        file_name, _ = QFileDialog.getSaveFileName(self, "保存结果", "", "Text Files (*.txt)")
        if file_name:
            with open(file_name, 'w') as f:
                for row in range(self.resultTable.rowCount()):
                    class_id = self.resultTable.item(row, 0).text()
                    confidence = self.resultTable.item(row, 1).text()
                    bbox = self.resultTable.item(row, 2).text()
                    f.write(f'{class_id} {confidence} {bbox}\n')

if __name__ == '__main__':
    app = QApplication(sys.argv)
    window = CrowdDetectionApp()
    window.show()
    sys.exit(app.exec_())
5. 运行与测试
文字及代码仅供参考。
如何实现推理代码、配置超参数、批量推理以及性能评估。以下是这些方面的详细说明和代码示例。
推理代码
首先,确保你已经训练好了一个YOLOv8模型,并将其保存为best.pt。接下来,我们将编写用于加载模型并进行推理的代码。
from ultralytics import YOLO
import cv2

# 加载预训练模型
model = YOLO('best.pt')

# 单张图片推理
def infer_image(image_path):
    results = model(image_path)
    annotated_frame = results[0].plot()
    return annotated_frame

# 视频或摄像头推理
def infer_video(video_path=0):  # 如果是摄像头,video_path设为0
    cap = cv2.VideoCapture(video_path)
    while cap.isOpened():
        ret, frame = cap.read()
        if not ret:
            break
        results = model(frame)
        annotated_frame = results[0].plot()
        cv2.imshow('YOLOv8 Inference', annotated_frame)
        if cv2.waitKey(1) & 0xFF == ord('q'):
            break
    cap.release()
    cv2.destroyAllWindows()
配置超参数
在训练过程中,可以通过修改配置文件来设置超参数。以下是一些常见的超参数及其说明:
epochs: 训练周期数,默认值通常为100。batch: 批处理大小,默认值取决于你的硬件能力。imgsz: 输入图像尺寸,默认640像素。可以根据需要调整以提高性能或精度。lr0: 初始学习率,默认值通常为0.01。
例如,在命令行中使用如下命令进行训练:
yolo train model=yolov8s.yaml data=crowd.yaml epochs=100 imgsz=640 batch=16 lr0=0.01
模型推理
我们已经在前面提供了基本的推理函数。对于批量推理,可以遍历目录中的所有图片文件,并对每个文件调用infer_image函数。
import os

def batch_infer_images(directory):
    for filename in os.listdir(directory):
        if filename.endswith(".jpg") or filename.endswith(".png"):
            image_path = os.path.join(directory, filename)
            annotated_frame = infer_image(image_path)
            cv2.imwrite(f"output_{filename}", annotated_frame)
性能评估代码
性能评估主要包括准确率(Precision)、召回率(Recall)、F1分数等指标。YOLOv8可以直接提供一些评估指标,如mAP(mean Average Precision)。
mAP计算
YOLOv8自带评估功能,可以在验证集上计算mAP。
yolo val model=best.pt data=crowd.yaml imgsz=640
自定义评估脚本
如果你想要更详细的评估指标,比如针对特定类别的准确率和召回率,可以编写自定义脚本。
from sklearn.metrics import precision_recall_fscore_support

def evaluate_model(model, dataset):
    all_preds = []
    all_labels = []

    for images, labels in dataset:
        preds = model(images)
        pred_classes = [int(pred.cls[0]) for pred in preds]
        true_classes = labels.numpy().flatten()

        all_preds.extend(pred_classes)
        all_labels.extend(true_classes)

    precision, recall, f1, _ = precision_recall_fscore_support(all_labels, all_preds, average='weighted')
    print(f'Precision: {precision:.2f}, Recall: {recall:.2f}, F1 Score: {f1:.2f}')
根据实际需求调整上述代码段,可以帮助你更好地完成项目目标。仅供参考


 被折叠的 条评论
为什么被折叠?
被折叠的 条评论
为什么被折叠?
 到【灌水乐园】发言


