


深度学习目标检测框架——如何使用yolov5训练使用道路车道线检测数据集 1700张 车道线 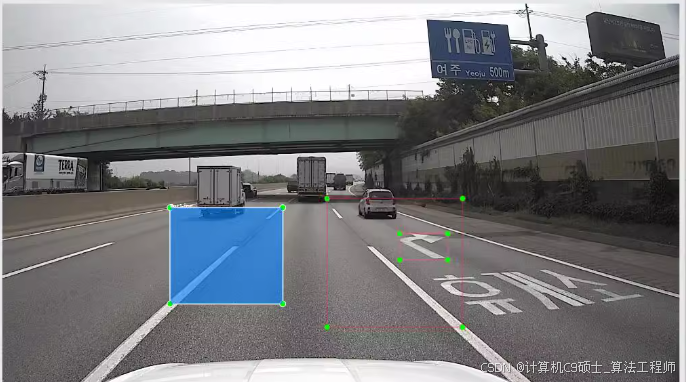
深度学习目标检测框架 使用yolov5训练使用道路车道线检测数据集 1700张 车道线 带标注 voc yolo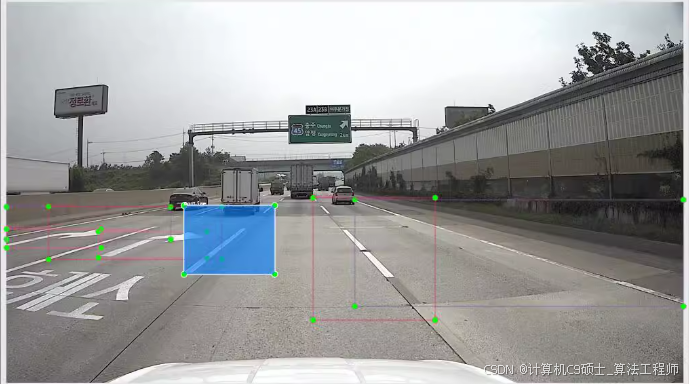
文章代码仅供参考!
都有对应标注,格式VOC(XML), 选配Y0L0(TXT)
label| pic_ num| box, _num
DotL ine:
(939,1287) .
StraightLine: (616, 964)
RightDirection: (409, 437)
LeftMergeLine: (252. 258)
Peop leSafetyZone:
(245,259)
StraightDirect ion:
(602,900)
RightMergeLine: (146, 146)
Speedlimit40: (15, 24)
LeftDirection: (256, 283)
Leftmergearrow: (180, 196) .
CenterLine: (367, 380)
Speedlimit80: (19, 40)
Strai ghtandRi ght:
(139, 141) .
Colorcone: (28, 83)
OppositeTriangle: (92 97)
Construct ionZone:
(5,6)
BusLine: (17, 19)
Speedlimit50: (25, 39)
Rightmergearrow;
(56,59)
Speedlimit30: (51, 77)
Nouturn: (19, 20)
Roaddiamond: (92, 162)
NoStraight: .
(135,152)
NoRightTurn: (36, 36)
NoLeftTurn: (53, 53)
speedlimit70: (9. 17)
speedI imi t60:
(11,21)
StraightandLeft: (116, 120) .
OppositeSideLoft: (26, 27)
Speedlimit90: (5, 9)
SuddenlyDotL ine:
(17。 18)
LeftandUturn: (36, 36)
TurnDotLine: (46, 46)
StopLine: (185, 188)
Uturn: (42, 44)
CrossWalk: (172, 190)
Oppos iteSideUturn: (13, 13)Speedlimit90: (5, 9)
SuddenlyDotLine: (17, 18)
LeftandUturn: (36, 36)
TurnDotL ine: (46, 46)
StopLine: (185, 188)
Uturn: (42, 44)
CrossWalk: (172, 190)
Oppos iteSideUturn: (13, 13) .
Busstopzone:
: (6, 7)
bikeroad: (7, 7)
Construct ionleftmergearrow: (1, 1)
Strai ghtLeftRight: (1, 1)
TurnDirection: (8, 11)
LeftandRight: (3, 3)
SpeedLimit50: (1, 1)
total: (1792, 6878)
所有内容都有相应标注,格式为VOC(XML),可选配YOLO(TXT)。
| 标签 | 图片数量 | 框数量 |
|---|---|---|
| 虚线:(939, 1287) | ||
| 直线:(616, 964) | ||
| 右方向:(409, 437) | ||
| 左合流线:(252, 258) | ||
| 人员安全区:(245, 259) | ||
| 直方向:(602, 900) | ||
| 右合流线:(146, 146) | ||
| 限速40:(15, 24) | ||
| 左方向:(256, 283) | ||
| 左合流箭头:(180, 196) | ||
| 中心线:(367, 380) | ||
| 限速80:(19, 40) | ||
| 直行和右转:(139, 141) | ||
| 彩色锥桶:(28, 83) | ||
| 反向三角形:(92, 97) | ||
| 施工区:(5, 6) | ||
| 公交专用道:(17, 19) | ||
| 限速50:(25, 39) | ||
| 右合流箭头:(56, 59) | ||
| 限速30:(51, 77) | ||
| 禁止掉头:(19, 20) | ||
| 道路菱形标识:(92, 162) | ||
| 禁止直行:(135, 152) | ||
| 禁止右转:(36, 36) | ||
| 禁止左转:(53, 53) | ||
| 限速70:(9, 17) | ||
| 限速60:(11, 21) | ||
| 直行和左转:(116, 120) | ||
| 对向左转:(26, 27) | ||
| 限速90:(5, 9) | ||
| 突发虚线:(17, 18) | ||
| 左转和掉头:(36, 36) | ||
| 转向虚线:(46, 46) | ||
| 停止线:(185, 188) | ||
| 掉头:(42, 44) | ||
| 人行横道:(172, 190) | ||
| 对向掉头:(13, 13) | ||
| 公交停靠区:(6, 7) | ||
| 自行车道:(7, 7) | ||
| 施工左合流箭头:(1, 1) | ||
| 直左转弯右转:(1, 1) | ||
| 转向方向:(8, 11) | 限速90:(5, 9) | |
| 突发虚线:(17, 18) | ||
| 左转兼掉头:(36, 36) | ||
| 转弯虚线:(46, 46) | ||
| 停止线:(185, 188) | ||
| 掉头:(42, 44) | ||
| 人行横道:(172, 190) | ||
| 对向车道掉头:(13, 13) | ||
| 公交停靠区:(6, 7) | ||
| 自行车道:(7, 7) | ||
| 施工左合流箭头:(1, 1) | ||
| 直左转弯及右转:(1, 1) | ||
| 转弯方向:(8, 11) | ||
| 左右转:(3, 3) | ||
| 限速50:(1, 1) | ||
| 总计:(1792, 6878) |
注:原文中“biker oad: (7.刀)”疑似有误,推测应为“bicycle road: (7, 7)”,
好的,我们将基于道路车道线检测数据集进行目标检测任务。数据集包含1700张图片,并且已经标注为VOC (XML) 格式。我们还将提供将XML标注转换为YOLO (TXT) 格式的脚本。
环境准备
确保您已经安装了以下软件和库:
- Python 3.8 或更高版本
- PyTorch 1.9 或更高版本
- torchvision 0.10 或更高版本
- OpenCV
- numpy
- pandas
- matplotlib
- lxml(用于解析XML文件)
- albumentations(用于数据增强)
您可以使用以下命令安装所需的Python库:
pip install torch torchvision opencv-python numpy pandas matplotlib lxml albumentations
数据集准备
假设您的数据集已经按照VOC格式组织好,并且包含训练集、验证集和测试集。以下是数据集的预期结构:
datasets/
└── road_lane_lines/
    ├── images/
    │   ├── train/
    │   ├── val/
    │   └── test/
    ├── annotations/
    │   ├── train/
    │   ├── val/
    │   └── test/
    └── labels/
        ├── train/
        ├── val/
        └── test/
同时,有一个 classes.txt 文件包含类别名称,每行一个类别名称。
类别文件 (classes.txt)
DotLine
StraightLine
RightDirection
LeftMergeLine
PeopleSafetyZone
StraightDirection
RightMergeLine
Speedlimit40
LeftDirection
Leftmergearrow
CenterLine
Speedlimit80
StraightandRight
Colorcone
OppositeTriangle
ConstructionZone
BusLine
Speedlimit50
Rightmergearrow
Speedlimit30
Nouturn
Roaddiamond
NoStraight
NoRightTurn
NoLeftTurn
speedlimit70
speedlimit60
StraightandLeft
OppositeSideLoft
Speedlimit90
SuddenlyDotLine
LeftandUturn
TurnDotLine
StopLine
Uturn
CrossWalk
OppositeSideUturn
划分数据集的脚本
假设您已经有了一个脚本来划分数据集,我们将其命名为 split_dataset.py。以下是一个示例脚本:
[<title="Data Splitting Script">]
import os
import shutil
import random
from sklearn.model_selection import train_test_split

def create_directory_structure(root_dir):
    for split in ['train', 'val', 'test']:
        os.makedirs(os.path.join(root_dir, 'images', split), exist_ok=True)
        os.makedirs(os.path.join(root_dir, 'annotations', split), exist_ok=True)
        os.makedirs(os.path.join(root_dir, 'labels', split), exist_ok=True)

def move_files(source_img_dir, source_ann_dir, dest_img_dir, dest_ann_dir, files):
    for file in files:
        img_file = f"{file}.jpg"
        ann_file = f"{file}.xml"
        shutil.move(os.path.join(source_img_dir, img_file), os.path.join(dest_img_dir, img_file))
        shutil.move(os.path.join(source_ann_dir, ann_file), os.path.join(dest_ann_dir, ann_file))

def split_dataset(data_root, train_ratio=0.7, val_ratio=0.15, test_ratio=0.15):
    image_files = [os.path.splitext(f)[0] for f in os.listdir(os.path.join(data_root, 'images')) if f.endswith('.jpg')]

    # Shuffle the files
    random.shuffle(image_files)

    # Split the files
    train_files, temp_files = train_test_split(image_files, test_size=(1 - train_ratio))
    val_files, test_files = train_test_split(temp_files, test_size=test_ratio / (val_ratio + test_ratio))

    # Move files to respective directories
    move_files(os.path.join(data_root, 'images'), os.path.join(data_root, 'annotations'),
               os.path.join(data_root, 'images/train'), os.path.join(data_root, 'annotations/train'), train_files)
    move_files(os.path.join(data_root, 'images'), os.path.join(data_root, 'annotations'),
               os.path.join(data_root, 'images/val'), os.path.join(data_root, 'annotations/val'), val_files)
    move_files(os.path.join(data_root, 'images'), os.path.join(data_root, 'annotations'),
               os.path.join(data_root, 'images/test'), os.path.join(data_root, 'annotations/test'), test_files)

if __name__ == '__main__':
    data_root = '../datasets/road_lane_lines/'
    create_directory_structure(data_root)
    split_dataset(data_root)
转换XML到YOLO格式
如果您的数据集是XML格式,需要将其转换为YOLO格式。以下是一个示例脚本 convert_xml_to_yolo.py:
[<title="Convert XML to YOLO Format">]
import os
import xml.etree.ElementTree as ET
import cv2
import numpy as np

def convert(size, box):
    dw = 1./size[0]
    dh = 1./size[1]
    x = (box[0] + box[1])/2.0 - 1
    y = (box[2] + box[3])/2.0 - 1
    w = box[1] - box[0]
    h = box[3] - box[2]
    x = x*dw
    w = w*dw
    y = y*dh
    h = h*dh
    return (x,y,w,h)

def convert_annotation(xml_file, output_path, class_mapping):
    tree = ET.parse(xml_file)
    root = tree.getroot()
    size = root.find('size')
    w = int(size.find('width').text)
    h = int(size.find('height').text)

    with open(output_path, 'w') as out_file:
        for obj in root.iter('object'):
            difficult = obj.find('difficult').text
            cls = obj.find('name').text
            if cls not in class_mapping or int(difficult) == 1:
                continue
            cls_id = class_mapping[cls]
            xmlbox = obj.find('bndbox')
            b = (float(xmlbox.find('xmin').text), float(xmlbox.find('xmax').text), float(xmlbox.find('ymin').text), float(xmlbox.find('ymax').text))
            bb = convert((w,h), b)
            out_file.write(str(cls_id) + " " + " ".join([str(a) for a in bb]) + '\n')

def main(input_dir, output_dir, class_mapping):
    for filename in os.listdir(input_dir):
        if filename.endswith('.xml'):
            xml_path = os.path.join(input_dir, filename)
            txt_filename = filename.replace('.xml', '.txt')
            txt_path = os.path.join(output_dir, txt_filename)
            convert_annotation(xml_path, txt_path, class_mapping)

if __name__ == "__main__":
    class_mapping = {
        'DotLine': 0,
        'StraightLine': 1,
        'RightDirection': 2,
        'LeftMergeLine': 3,
        'PeopleSafetyZone': 4,
        'StraightDirection': 5,
        'RightMergeLine': 6,
        'Speedlimit40': 7,
        'LeftDirection': 8,
        'Leftmergearrow': 9,
        'CenterLine': 10,
        'Speedlimit80': 11,
        'StraightandRight': 12,
        'Colorcone': 13,
        'OppositeTriangle': 14,
        'ConstructionZone': 15,
        'BusLine': 16,
        'Speedlimit50': 17,
        'Rightmergearrow': 18,
        'Speedlimit30': 19,
        'Nouturn': 20,
        'Roaddiamond': 21,
        'NoStraight': 22,
        'NoRightTurn': 23,
        'NoLeftTurn': 24,
        'speedlimit70': 25,
        'speedlimit60': 26,
        'StraightandLeft': 27,
        'OppositeSideLoft': 28,
        'Speedlimit90': 29,
        'SuddenlyDotLine': 30,
        'LeftandUturn': 31,
        'TurnDotLine': 32,
        'StopLine': 33,
        'Uturn': 34,
        'CrossWalk': 35,
        'OppositeSideUturn': 36
    }

    input_train_dir = '../datasets/road_lane_lines/annotations/train/'
    output_train_dir = '../datasets/road_lane_lines/labels/train/'
    main(input_train_dir, output_train_dir, class_mapping)

    input_val_dir = '../datasets/road_lane_lines/annotations/val/'
    output_val_dir = '../datasets/road_lane_lines/labels/val/'
    main(input_val_dir, output_val_dir, class_mapping)

    input_test_dir = '../datasets/road_lane_lines/annotations/test/'
    output_test_dir = '../datasets/road_lane_lines/labels/test/'
    main(input_test_dir, output_test_dir, class_mapping)
模型训练
我们将使用YOLOv5进行训练。首先,克隆YOLOv5仓库并设置环境。
git clone https://github.com/ultralytics/yolov5.git
cd yolov5
pip install -r requirements.txt
准备配置文件
创建一个 hyp.scratch.yaml 文件来定义超参数:
# Hyperparameters for YOLOv5 training from scratch
lr0: 0.01  # initial learning rate (SGD=1E-2, Adam=1E-3)
lrf: 0.1  # final OneCycleLR learning rate (lr0 * lrf)
momentum: 0.937  # SGD momentum/Adam beta1
weight_decay: 0.0005  # optimizer weight decay 5e-4
warmup_epochs: 3.0  # warmup epochs (fractions ok)
warmup_momentum: 0.8  # warmup initial momentum
warmup_bias_lr: 0.1  # warmup initial bias lr
box: 0.05  # box loss gain
cls: 0.5  # cls loss gain
cls_pw: 1.0  # cls BCELoss positive_weight
obj: 1.0  # obj loss gain (scale with pixels)
obj_pw: 1.0  # obj BCELoss positive_weight
iou_t: 0.20  # IoU training threshold
anchor_t: 4.0  # anchor-multiple threshold
fl_gamma: 0.0  # focal loss gamma (efficientDet default gamma=1.5)
hsv_h: 0.015  # image HSV-Hue augmentation (fraction)
hsv_s: 0.7  # image HSV-Saturation augmentation (fraction)
hsv_v: 0.4  # image HSV-Value augmentation (fraction)
degrees: 0.0  # image rotation (+/- deg)
translate: 0.1  # image translation (+/- fraction)
scale: 0.5  # image scale (+/- gain)
shear: 0.0  # image shear (+/- deg)
perspective: 0.0  # image perspective (+/- fraction), range 0-0.001
flipud: 0.0  # image flip up-down (probability)
fliplr: 0.5  # image flip left-right (probability)
mosaic: 1.0  # image mosaic (probability)
mixup: 0.0  # image mixup (probability)
copy_paste: 0.0  # segment copy-paste (probability)
paste_in: 0.0  # segment paste-in (probability)
rect: 0  # rectangular training
resume: false  # resume training from last checkpoint
nosave: false  # only save final checkpoint
noval: false  # only validate final epoch
noautoanchor: true  # disable AutoAnchor
evolve: false  # evolve hyperparameters
bucket: ''  # gsutil bucket
cache_images: false  # cache images for faster training
image_weights: false  # use weighted image selection for training
single_cls: false  # train multi-class data as single-class
optimizer: SGD  # optimizer: SGD or AdamW
sync_bn: false  # use SyncBatchNorm, only available in DDP mode
workers: 8  # dataloader workers (max is number of CPU cores)
freeze: 0  # freeze first n layers
v5_metric: true  # assume maximum recall as 1.0 in AP calculation
multi_scale: true  # vary input size between 320 and 640 pixels
rect_training: false  # rectangular training
cos_lr: false  # cosine LR scheduler
close_mosaic: 1000  # close mosaic border
scales: [0.5, 1.5]  # image size scales
augment: true  # augment data
verbose: false  # verbose print
seed: 0  # random seed for reproducibility
local_rank: -1  # ddp device id (-1 for single gpu train)
entity: null  # W&B entity
upload_dataset: False  # upload dataset as W&B artifact table
bbox_interval: -1  # W&B bounding box logging interval
artifact_alias: latest  # version of dataset artifact to use
project: runs/train  # save results to project/name
exist_ok: false  # existing project/name ok, do not increment
quad: false  # quadrilateral anchors
linear_assignment: false  # use linear assignment for NMS
创建一个 data.yaml 文件来定义数据集路径和类别:
train: ../datasets/road_lane_lines/images/train/
val: ../datasets/road_lane_lines/images/val/

nc: 37  # number of classes
names: [
    'DotLine',
    'StraightLine',
    'RightDirection',
    'LeftMergeLine',
    'PeopleSafetyZone',
    'StraightDirection',
    'RightMergeLine',
    'Speedlimit40',
    'LeftDirection',
    'Leftmergearrow',
    'CenterLine',
    'Speedlimit80',
    'StraightandRight',
    'Colorcone',
    'OppositeTriangle',
    'ConstructionZone',
    'BusLine',
    'Speedlimit50',
    'Rightmergearrow',
    'Speedlimit30',
    'Nouturn',
    'Roaddiamond',
    'NoStraight',
    'NoRightTurn',
    'NoLeftTurn',
    'speedlimit70',
    'speedlimit60',
    'StraightandLeft',
    'OppositeSideLoft',
    'Speedlimit90',
    'SuddenlyDotLine',
    'LeftandUturn',
    'TurnDotLine',
    'StopLine',
    'Uturn',
    'CrossWalk',
    'OppositeSideUturn'
]  # list of class names
训练模型
使用以下命令开始训练:
python train.py --img 640 --batch 16 --epochs 50 --data data.yaml --cfg yolov5s.yaml --weights yolov5s.pt --hyp hyp.scratch.yaml
结果评估
训练完成后,可以使用以下命令评估模型性能:
python val.py --data data.yaml --weights runs/train/exp/weights/best.pt --task test
使用说明
-
配置路径:
- 确保
datasets/road_lane_lines/目录结构正确。 - 确保
data.yaml中的路径和类别名称正确。
- 确保
-
运行脚本:
- 在终端中依次运行数据分割脚本、XML转YOLO脚本、训练脚本和评估脚本。
-
注意事项:
- 根据需要调整超参数和训练设置。
- 可以通过修改
data.yaml中的cfg参数来选择不同的YOLOv5模型架构(如yolov5m.yaml,yolov5l.yaml,yolov5x.yaml)。
示例
假设您的数据集文件夹结构如下:
datasets/
└── road_lane_lines/
    ├── images/
    │   ├── all/
    │   ├── train/
    │   ├── val/
    │   └── test/
    ├── annotations/
    │   ├── all/
    │   ├── train/
    │   ├── val/
    │   └── test/
    └── labels/
        ├── train/
        ├── val/
        └── test/
并且 all/ 目录包含所有的图片和对应的XML标注文件。运行上述脚本后,您可以查看训练日志和最终的模型权重文件。


 被折叠的 条评论
为什么被折叠?
被折叠的 条评论
为什么被折叠?
 到【灌水乐园】发言


