 C++中map和set的使用详解


map和set的使用
- 1. 序列式容器和关联式容器
- 2. set系列的使用
- 2.1 set和multiset参考文档
- 2.2 set类的介绍
- 2.3 set的构造和迭代器
- 2.4 set的增删查
- 2.5 insert和迭代器遍历使用样例
- 2.6 find和erase使用样例
- 2.7 lower_bound和upper_bound使用样例
- 2.8 multiset和set的差异
- 2.9 [349.两个数组的交集 - LeetCode](https://leetcode.cn/problems/intersection-of-two-arrays/description/)
- 2.10 [142.环形链表Ⅱ - LeetCode](https://leetcode.cn/problems/linked-list-cycle-ii/description/)
- 3. map系列的使用
- 3.1 map和multimap参考文档
- 3.2 map类的介绍
- 3.3 pair类型介绍
- 3.4 map的构造
- 3.5 map的增删查
- 3.6 构造遍历及增删查使用样例
- 3.7 map的迭代器和[]功能样例
- 3.8 multimap和map的差异
- 3.9 [138.随机链表的复制 - LeetCode](https://leetcode.cn/problems/copy-list-with-random-pointer/description/)
- 3.10 [692.前K个高频单词 - LeetCode](https://leetcode.cn/problems/top-k-frequent-words/description/)
1. 序列式容器和关联式容器
前⾯我们已经接触过STL中的部分容器如:string、vector、list、deque、array、forward_list等,这些容器统称为序列式容器,因为逻辑结构为线性序列的数据结构,两个位置存储的值之间⼀般没有紧密的关联关系,⽐如交换⼀下,他依旧是序列式容器。顺序容器中的元素是按他们在容器中的存储位置来顺序保存和访问的。
关联式容器也是⽤来存储数据的,与序列式容器不同的是,关联式容器逻辑结构通常是⾮线性结构,两个位置有紧密的关联关系,交换⼀下,他的存储结构就被破坏了。关联式容器有map/set系列和unordered_map/unordered_set系列。
本章节讲解的map和set底层是红黑树,红黑树是⼀颗平衡二叉搜索树。set是key搜索场景的结构,map是key/value搜索场景的结构。
2. set系列的使用
2.1 set和multiset参考文档
2.2 set类的介绍
- set的声明如下,T就是set底层关键字的类型。
- set默认要求T支持小于比较,如果不⽀持或者想按⾃⼰的需求走可以⾃⾏实现仿函数传给第⼆个模版参数。
- set底层存储数据的内存是从空间配置器申请的,如果需要可以⾃⼰实现内存池,传给第三个参数。
- ⼀般情况下,我们都不需要传后两个模版参数。
- set底层是⽤红⿊树实现,增删查效率是O(logN),迭代器遍历是⾛的搜索树的中序,所以是有序的。
- 前⾯部分我们已经学习了vector/list等容器的使⽤,STL容器接⼝设计,⾼度相似,所以这⾥我们就不再⼀个接⼝⼀个接⼝的介绍,而是挑⽐较重要的接⼝进⾏介绍。
template < class T,                     // set::key_type/value_type
		   class Compare = less<T>,     // set::key_compare/value_compare
		   class Alloc = allocator<T>   // set::allocator_type
		   > class set;
2.3 set的构造和迭代器
set的构造我们关注以下⼏个接⼝即可。
set⽀持正向和反向迭代遍历,遍历默认按升序顺序,因为底层是⼆叉搜索树,迭代器遍历⾛的中序;⽀持迭代器就意味着⽀持范围for,set的iterator和const_iterator都不⽀持迭代器修改数据,因为修改关键字数据会破坏底层搜索树的结构。
// empty (1) ⽆参默认构造
explicit set (const key_compare& comp = key_compare(),
			  const allocator_type& alloc = allocator_type());

// range (2) 迭代器区间构造
template <class InputIterator>
  set (InputIterator first, InputIterator last,
	   const key_compare& comp = key_compare(),
	   const allocator_type& = allocator_type());

// copy (3) 拷⻉构造
set (const set& x);

// initializer list (5) initializer 列表构造
set (initializer_list<value_type> il,
     const key_compare& comp = key_compare(),
     const allocator_type& alloc = allocator_type());

// 迭代器是⼀个双向迭代器
iterator -> a bidirectional iterator to const value_type

// 正向迭代器
iterator begin();
iterator end();

// 反向迭代器
reverse_iterator rbegin();
reverse_iterator rend();
2.4 set的增删查
set的增删查关注以下⼏个接⼝即可:
Member types
key_type   -> The first template parameter (T)
value_type -> The first template parameter (T)

// 单个数据插⼊,如果已经存在则插⼊失败
pair<iterator,bool> insert (const value_type& val);

// 列表插⼊,已经在容器中存在的值不会插⼊
void insert (initializer_list<value_type> il);

// 迭代器区间插⼊,已经在容器中存在的值不会插⼊
template <class InputIterator>
void insert (InputIterator first, InputIterator last);

// 查找val,返回val所在的迭代器,没有找到返回end()
iterator find (const value_type& val);

// 查找val,返回val的个数
size_type count (const value_type& val) const;

// 删除⼀个迭代器位置的值
iterator  erase (const_iterator position);

// 删除val,val不存在返回0,存在返回1
size_type erase (const value_type& val);

// 删除⼀段迭代器区间的值
iterator erase (const_iterator first, const_iterator last);

// 返回⼤于等val位置的迭代器
iterator lower_bound (const value_type& val) const;

// 返回⼤于val位置的迭代器
iterator upper_bound (const value_type& val) const;
2.5 insert和迭代器遍历使用样例
#include <iostream>
#include <set>
#include <string>

using namespace std;

int main()
{
	// 去重 + 排升序
	set<int> s;
	// 去重 + 排降序(给一个大于的仿函数)
	//set<int, greater<int>> s;
	s.insert(5);
	s.insert(7);
	s.insert(2);
	s.insert(5);

	set<int>::iterator it = s.begin();
	while (it != s.end())
	{
		//*it = 4; // 不支持修改
		cout << *it << " ";
		++it;
	}
	cout << endl;

	// 插入一段initializer_list列表值,已经存在的值插入失败
	s.insert({ 2, 8, 3, 9 });

	for (auto e : s)
	{
		cout << e << " ";
	}
	cout << endl;

	set<string> strset = { "sort", "insert", "add" };
	for (auto e : strset)
	{
		cout << e << " ";
	}
	cout << endl;

	return 0;
}

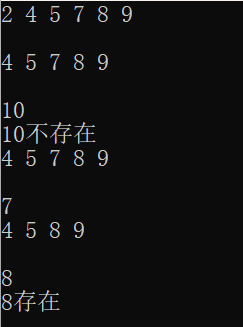
2.6 find和erase使用样例
#include <iostream>
#include <set>

using namespace std;

int main()
{
	set<int> s = { 4, 2, 7, 2, 8, 5, 9 };
	for (auto e : s)
	{
		cout << e << " ";
	}
	cout << endl << endl;

	// 删除最小值
	s.erase(s.begin());
	for (auto e : s)
	{
		cout << e << " ";
	}
	cout << endl << endl;

	// 直接删除 x
	int x;
	cin >> x;
	int num = s.erase(x);
	if (num == 0)
	{
		cout << x << "不存在" << endl;
	}
	for (auto e : s)
	{
		cout << e << " ";
	}
	cout << endl << endl;

	// 直接查找再利用迭代器删除 x
	cin >> x;
	auto pos = s.find(x);
	if (pos != s.end())
	{
		s.erase(pos);
	}
	else
	{
		cout << x << "不存在" << endl;
	}
	for (auto e : s)
	{
		cout << e << " ";
	}
	cout << endl << endl;

	// 算法库的查找是暴力查找 O(N)
	auto pos1 = find(s.begin(), s.end(), x);
	// set自身实现的查找利用搜索树的特性 O(logN)
	auto pos2 = s.find(x);

	// 利用count间接实现快速查找
	cin >> x;
	if (s.count(x))
	{
		cout << x << "存在" << endl;
	}
	else
	{
		cout << x << "不存在" << endl;
	}

	return 0;
}
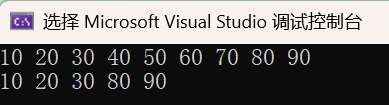
2.7 lower_bound和upper_bound使用样例
#include <iostream>
#include <set>

using namespace std;

int main()
{
	set<int> myset;
	for (int i = 1; i < 10; ++i)
	{
		myset.insert(i * 10); // 10 20 30 40 50 60 70 80 90
	}

	for (auto e : myset)
	{
		cout << e << " ";
	}
	cout << endl;

	// 实现查找并删除[35, 75]区间的值
	auto itlow = myset.lower_bound(35); // 返回>=35
	auto itup = myset.upper_bound(75); // 返回>75

	myset.erase(itlow, itup);

	for (auto e : myset)
	{
		cout << e << " ";
	}
	cout << endl;

	return 0;
}
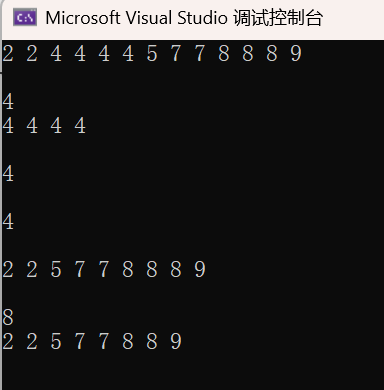
2.8 multiset和set的差异
#include <iostream>
#include <set>

using namespace std;

int main()
{
	// multiset和set的头文件都是#include <set>
	// 相比set不同的是,multiset只排序,但不去重
	multiset<int> s = { 4, 2, 7, 2, 4, 8, 4, 5, 4, 9, 8, 7, 8 };
	auto it = s.begin();
	while (it != s.end())
	{
		cout << *it << " ";
		++it;
	}
	cout << endl << endl;

	// find 返回中序的第一个
	int x;
	cin >> x;
	auto pos = s.find(x);
	while (*pos == x)
	{
		// 依次输出所有的 x
		cout << *pos << " ";
		++pos;
	}
	cout << endl << endl;

	// 返回 x 的个数
	cout << s.count(x) << endl << endl;

	// 删除所有的 x,并返回删除的个数
	cout << s.erase(x) << endl << endl;

	it = s.begin();
	while (it != s.end())
	{
		cout << *it << " ";
		++it;
	}
	cout << endl << endl;

	// 删除中序第一个x
	cin >> x;
	pos = s.find(x);
	if (pos != s.end())
	{
		s.erase(pos);
	}

	it = s.begin();
	while (it != s.end())
	{
		cout << *it << " ";
		++it;
	}
	cout << endl << endl;

	return 0;
}
2.9 349.两个数组的交集 - LeetCode
class Solution {
public:
    vector<int> intersection(vector<int>& nums1, vector<int>& nums2) {
        set<int> s1(nums1.begin(), nums1.end());
        set<int> s2(nums2.begin(), nums2.end());

        vector<int> v;
        // 遍历s1
        for(auto e : s1)
        {
        	// 如果s2中存在 e ,就尾插
           	if(s2.count(e))
            {
                v.push_back(e);
            }
        }

        return v;
    }
};
class Solution {
public:
    vector<int> intersection(vector<int>& nums1, vector<int>& nums2) {
        // 比对算法
        set<int> s1(nums1.begin(), nums1.end());
        set<int> s2(nums2.begin(), nums2.end());

        vector<int> v;
        auto it1 = s1.begin();
        auto it2 = s2.begin();
        // 其中一个结束,就结束
        while(it1 != s1.end() && it2 != s2.end())
        {
        	// 遍历到不相等的值就谁小谁++
            if(*it1 < *it2)
            {
                ++it1;
            }
            else if(*it2 < *it1)
            {
                ++it2;
            }
            else // 遍历到相等的值就尾插,都++
            {
                v.push_back(*it1);
                ++it1;
                ++it2;
            }
        }
        return v;
    }
};
2.10 142.环形链表Ⅱ - LeetCode
/**
 * Definition for singly-linked list.
 * struct ListNode {
 *     int val;
 *     ListNode *next;
 *     ListNode(int x) : val(x), next(NULL) {}
 * };
 */
class Solution {
public:
    ListNode *detectCycle(ListNode *head)
    {
        set<ListNode*> s;
        ListNode* cur = head;
        while(cur)
        {
        	// 如果 cur 不在 s 中,说明第一次遇到,插入
            if(!s.count(cur)) // if(s.find(cur) == s.end())
            {
                s.insert(cur);
            }
            // 如果 cur 在 s 中,说明是环形链表,且 cur 指向的节点就是入口点
            else
            {
                return cur;
            }
            cur = cur->next;
        }

		// 说明该链表不带环
        return nullptr;
    }
};
3. map系列的使用
3.1 map和multimap参考文档
3.2 map类的介绍
map的声明如下,Key就是map底层关键字的类型,T是map底层value的类型,mapt默认要求Key⽀持⼩于⽐较,如果不⽀持或者需要的话可以⾃⾏实现仿函数传给第⼆个模版参数,map底层存储数据的内存是从空间配置器申请的。⼀般情况下,我们都不需要传后两个模版参数。map底层是⽤红⿊树实现,增删查改效率是O(logN),迭代器遍历是⾛的中序,所以是按key有序顺序遍历的。
template < class Key,                                    // map::key_type
		   class T,                                      // map::mapped_type
		   class Compare = less<Key>,                    // map::key_compare
		   class Alloc = allocator<pair<const Key,T> >   //map::allocator_type
		   > class map;
3.3 pair类型介绍
map底层的红⿊树节点中的数据,使⽤pair<Key,T>存储键值对数据。
typedef pair<const Key, T> value_type;

template <class T1, class T2>
struct pair
{
	typedef T1 first_type;
	typedef T2 second_type;

	T1 first;
	T2 second;

	pair(): first(T1()), second(T2())
	{}

	pair(const T1& a, const T2& b): first(a), second(b)
	{}

	template<class U, class V>
	pair (const pair<U,V>& pr): first(pr.first), second(pr.second)
	{}
};

template <class T1,class T2>
inline pair<T1,T2> make_pair (T1 x, T2 y)
{
	return ( pair<T1,T2>(x,y) );
}
3.4 map的构造
map的构造我们关注以下⼏个接⼝即可。
map的⽀持正向和反向迭代遍历,遍历默认按key的升序顺序,因为底层是⼆叉搜索树,迭代器遍历⾛的中序;⽀持迭代器就意味着⽀持范围for,map⽀持修改value数据,不⽀持修改key数据,因为修改关键字数据会破坏底层搜索树的结构。
// empty (1) ⽆参默认构造
explicit map (const key_compare& comp = key_compare(),
			  const allocator_type& alloc = allocator_type());

// range (2) 迭代器区间构造
template <class InputIterator>
	map (InputIterator first, InputIterator last,
		 const key_compare& comp = key_compare(),
		 const allocator_type& = allocator_type());

// copy (3) 拷⻉构造
map (const map& x);

// initializer list (5) initializer 列表构造
map (initializer_list<value_type> il,
	 const key_compare& comp = key_compare(),
	 const allocator_type& alloc = allocator_type());

// 迭代器是⼀个双向迭代器
iterator   -> a bidirectional iterator to const value_type

// 正向迭代器
iterator begin();
iterator end();

// 反向迭代器
reverse_iterator rbegin();
reverse_iterator rend();
3.5 map的增删查
map的增删查关注以下⼏个接⼝即可:
map增接⼝,插⼊的pair键值对数据,跟set所有不同,但是查和删的接⼝只⽤关键字key跟set是类似的,不过find返回iterator,不仅仅可以确认key在不在,还找到key映射的value,同时通过迭代还可以修改value。
Member types
key_type     -> The first template parameter (Key)
mapped_type  -> The second template parameter (T)
value_type   -> pair<const key_type,mapped_type>

// 单个数据插⼊,只要key已经存在就会插⼊失败
pair<iterator,bool> insert (const value_type& val);

// 列表插⼊,已经在容器中存在的值不会插⼊
void insert (initializer_list<value_type> il);

// 迭代器区间插⼊,已经在容器中存在的值不会插⼊
template <class InputIterator>
void insert (InputIterator first, InputIterator last);

// 查找k,返回k所在的迭代器,没有找到返回end()
iterator find (const key_type& k);

// 查找k,返回k的个数
size_type count (const key_type& k) const;

// 删除⼀个迭代器位置的值
iterator  erase (const_iterator position);

// 删除k,k不存在返回0,存在返回1
size_type erase (const key_type& k);

// 删除⼀段迭代器区间的值
iterator  erase (const_iterator first, const_iterator last);

// 返回⼤于等k位置的迭代器
iterator lower_bound (const key_type& k);

// 返回⼤于k位置的迭代器
const_iterator lower_bound (const key_type& k) const;
3.6 构造遍历及增删查使用样例
#include <iostream>
#include <string>
#include <map>

using namespace std;

int main()
{
	// initializer_list构造
	map<string, string> dict = { {"sort", "排序"}, {"left", "左边"}, {"right", "右边"} };

	map<string, string>::iterator it = dict.begin();
	while (it != dict.end())
	{
		//cout << (*it).first << ":" << (*it).second << endl;
		// 这里省略了一个->
		// 第一个->是迭代器运算符重载,返回pair*
		// 第二个->是结构体指针解引用取pair数据
		//cout << it->first << ":" << it->second << endl;
		cout << it.operator->()->first << ":" << it.operator->()->second << endl;
		++it;
	}
	cout << endl << endl;

	pair<string, string> kv1("first", "第一个");
	dict.insert(kv1); // 有名对象
	dict.insert(pair<string, string>("second", "第二个")); // 匿名对象
	// make_pair比起有名对象和匿名对象就是不需要声明模板参数
	dict.insert(make_pair("third", "第三个")); // 自动推导参数类型,并返回匿名对象
	dict.insert({ "auto", "自动的" }); // 隐式类型转换

	// "sort"已经存在,插入失败
	dict.insert({ "sort", "排序" });

	for (auto& e : dict)
	{
		cout << e.first << ":" << e.second << endl;
	}
	cout << endl << endl;

	string str;
	while (cin >> str)
	{
		auto ret = dict.find(str);
		if (ret != dict.end())
		{
			cout << ret->second << endl;
		}
		else
		{
			cout << "无此单词,请重新输入" << endl;
		}
	}

	return 0;
}

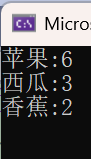
3.7 map的迭代器和[]功能样例
#include <iostream>
#include <string>
#include <map>

using namespace std;

int main()
{
	string arr[] = { "苹果", "西瓜", "苹果", "西瓜", "苹果", "苹果", "西瓜", "苹果", "香蕉", "苹果", "香蕉" };
	map<string, int> countMap;

	for (auto& str : arr)
	{
		//auto ret = countMap.find(str);
		//if (ret == countMap.end())
		//{
		//	countMap.insert({ str, 1 });
		//}
		//else
		//{
		//	ret->second++;
		//}

		// 1、不在,说明水果第一次出现,则插入{水果, 0},同时返回次数的引用,++就变成1次了
		// 2、在,则返回水果对应的次数的引用并++
		countMap[str]++; // 该代码与上面的代码效果等价
	}

	for (auto& e : countMap)
	{
		cout << e.first << ":" << e.second << endl;
	}
	cout << endl;

	return 0;
}
3.7.1 map的operator[]是怎么实现的?
pair<iterator,bool> insert (const value_type& val);
// insert既具有插入的功能也具有查找的功能
// pair<iterator, bool>
// 该pair的first成员是一个迭代器,指向要么是新插入的元素,要么是map中已存在的具有等效键的元素
// 该pair的second成员是一个布尔值:如果新元素被成功插入,则为true;如果等效键已存在,则为false

// operator的内部实现
mapped_type& operator[] (const key_type& k)
{
	// 1、如果k不在map中,insert会插⼊k和mapped_type默认值,同时[]返回结点中存储mapped_type值的引⽤,
	// 那么我们可以通过引⽤修改返映射值。所以[]具备了插⼊+修改功能

	// 2、如果k在map中,insert会插⼊失败,但是insert返回pair对象的first是指向key结点的迭代器,
	// 返回值同时[]返回结点中存储mapped_type值的引⽤,所以[]具备查找+修改的功能
   pair<iterator, bool> ret = insert({ k, mapped_type() });
   iterator it = ret.first;
   return it->second;
}

// 通俗易懂的写法
V& operator[](const K& key)
{
	pair<iterator, bool> ret = insert({key, V()});
	return (ret.first)->second;
}
#include <iostream>
#include <string>
#include <map>
using namespace std;
int main()
{
map<string, string> dict;
dict.insert({ "sort", "排序" });
// 插入 + 修改
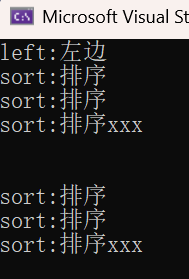
dict["insert"] = "插入";
// 插入
dict["auto"];
// 修改
dict["auto"] = "自动的";
// key已存在,插入失败
dict.insert({ "sort", "排序xxx" });
// key存在是查找,不存在是插入
cout << dict["sort"] << endl;
return 0;
}

3.8 multimap和map的差异
multimap和map的使⽤基本完全类似,主要区别点在于multimap⽀持关键值key冗余,那么insert/find/count/erase都围绕着⽀持关键值key冗余有所差异,这⾥跟set和multiset完全⼀样,⽐如find时,有多个key,返回中序第⼀个。其次就是multimap不⽀持[],因为⽀持key冗余,[]就只能⽀持插⼊了,不能⽀持修改。
int main()
{
	// 与multiset和set的区别类似,multimap可以插入多个相同的key值
	// 也就是说multimap只要插入就会成功
	multimap<string, string> dict;
	dict.insert({ "sort", "排序" });
	dict.insert({ "sort", "排序" });
	dict.insert({ "sort", "排序xxx" });
	dict.insert({ "left", "左边" });

	for (auto& e : dict)
	{
		cout << e.first << ":" << e.second << endl;
	}
	cout << endl << endl;

	// 但是multimap就没有operator[]了,因为多个相同的key,
	// value如果不同的话,就不知道要返回哪个value了。

	//// 会删除所有的"sort"
	//dict.erase("sort");

	//for (auto& e : dict)
	//{
	//	cout << e.first << ":" << e.second << endl;
	//}

	//equal_range 返回key值相等的迭代器区间[ )
	auto itpair = dict.equal_range("sort");
	auto it = itpair.first;
	while (it != itpair.second)
	{
		cout << it->first << ":" << it->second << endl;
		++it;
	}

	return 0;
}
3.9 138.随机链表的复制 - LeetCode
这个是数据结构阶段用链表实现的版本,还是比较麻烦的。
/*
// Definition for a Node.
class Node {
public:
    int val;
    Node* next;
    Node* random;

    Node(int _val) {
        val = _val;
        next = NULL;
        random = NULL;
    }
};
*/

// 在原链表每个节点后插入复制节点
void AddNode(Node* head)
{
    Node* pcur = head;
    while (pcur)
    {
        Node* newnode = new Node(pcur->val);
        Node* next = pcur->next;
        newnode->next = next;
        pcur->next = newnode;
        pcur = next;
    }
}

// 设置复制节点的random指针
void SetRandom(Node* head)
{
    Node* pcur = head;
    while (pcur)
    {
        Node* copy = pcur->next;
        if (pcur->random)
            copy->random = pcur->random->next;
        pcur = copy->next;
    }
}


class Solution {
public:
    // 复制带随机指针的链表
    Node* copyRandomList(Node* head) {
        if (head == nullptr)
            return head;

        // 在原链表的基础上拷贝新节点并插入在原链表中
        AddNode(head);

        // 设置random指针
        SetRandom(head);

        // 断开新旧链表,将旧链表还原并将新链表依次连接
        Node* pcur = head;
        Node* copyHead = head->next;
        Node* copyTail = copyHead;

        while (copyTail->next)
        {
            pcur->next = copyTail->next;
            pcur = pcur->next;
            copyTail->next = pcur->next;
            copyTail = copyTail->next;

        }
        // 恢复原链表的最后一个节点的next为nullptr
        pcur->next = nullptr;

        return copyHead;
    }

};
该版本利用map将<原链表,新链表>关联起来,使得链接random时更加简便。
/*
// Definition for a Node.
class Node {
public:
    int val;
    Node* next;
    Node* random;

    Node(int _val) {
        val = _val;
        next = NULL;
        random = NULL;
    }
};
*/

class Solution {
public:
    Node* copyRandomList(Node* head) {
        //  原链表  新链表
        map<Node*, Node*> nodeMap;
        Node* pcur = head;
        Node* copyHead = nullptr, *copyTail = nullptr;

		// 深拷贝原链表,并将原链表和新链表关联起来
        while(pcur)
        {
            // 尾插
            Node* newnode = new Node(pcur->val);
            if(copyTail == nullptr)
            {
                copyHead = copyTail = newnode;
            }
            else
            {
                copyTail->next = newnode;
                copyTail = copyTail->next;
            }
            nodeMap[pcur] = copyTail;
            pcur = pcur->next;
        }

		// 链接random
        pcur = head;
        Node* copy = copyHead;
        while(pcur)
        {
            if(pcur->random)
            {
                copy->random = nodeMap[pcur->random];
            }
            pcur = pcur->next;
            copy = copy->next;
        }

        return copyHead;
    }
};
3.10 692.前K个高频单词 - LeetCode
解法一:⽤排序找前k个单词,因为map中已经对key单词排序过,也就意味着遍历map时,次数相同的单词,字典序⼩的在前⾯,字典序⼤的在后⾯。那么我们将数据放到vector中⽤⼀个稳定的排序就可以实现上⾯特殊要求,但是sort底层是快排,是不稳定的,所以我们要⽤stable_sort,他是稳定的。当然也可以用不稳定的快排,但是需要在比较函数中做些修改。
稳定的排序有:冒泡、直接插入、归并。
bool cmp(const pair<string, int>& kv1, const pair<string, int>& kv2)
{
    return kv1.second > kv2.second || (kv1.second == kv2.second && kv1.first < kv2.first);
}

class Solution {
public:

    // 仿函数
    struct Compare
    {
        bool operator()(const pair<string, int>& kv1, const pair<string, int>& kv2)
        {
            // 按单词出现次数降序排序
            return kv1.second > kv2.second;
        }
    };

    // // 仿函数
    // struct Compare
    // {
    //     bool operator()(const pair<string, int>& kv1, const pair<string, int>& kv2)
    //     {
    //         return kv1.second > kv2.second || (kv1.second == kv2.second && kv1.first < kv2.first);
    //     }
    // };

    vector<string> topKFrequent(vector<string>& words, int k) {
        map<string, int> cntMap;
        for(auto& e : words)
        {
            ++cntMap[e];
        }

        // 将cntMap赋值过来之前,单词已经按字典序拍过了
        vector<pair<string, int>> v(cntMap.begin(), cntMap.end());

		// 可以用普通的函数传函数指针,也可以用仿函数传匿名对象

        // 只需要一个稳定的排序算法,把单词的出现此处再排成降序即可
        //stable_sort(v.begin(), v.end(), Compare());

        sort(v.begin(), v.end(), cmp);

        vector<string> ret;
        for(int i = 0; i < k; ++i)
        {
            ret.push_back(v[i].first);
        }

        return ret;
    }
};
解法二:用TopK的解法,利用大根堆求解
typedef pair<string, int> PSI;

class Solution {
public:

    struct Compare
    {
        bool operator()(const PSI& kv1, const PSI& kv2)
        {
            // 要注意优先级队列底层是反的,大根堆要实现小于比较,所以要反着来
            return kv1.second < kv2.second || (kv1.second == kv2.second && kv1.first > kv2.first);
        }
    };

    vector<string> topKFrequent(vector<string>& words, int k) {
        map<string, int> cntMap;
        for(auto& e : words)
        {
            ++cntMap[e];
        }

        priority_queue<PSI, vector<PSI>, Compare> q(cntMap.begin(), cntMap.end());

        vector<string> ret;
        for(int i = 0; i < k; ++i)
        {
            string t = q.top().first;
            ret.push_back(t);
            q.pop();
        }

        return ret;
    }
};


 1389
1389

 被折叠的 条评论
为什么被折叠?
被折叠的 条评论
为什么被折叠?
 到【灌水乐园】发言


