


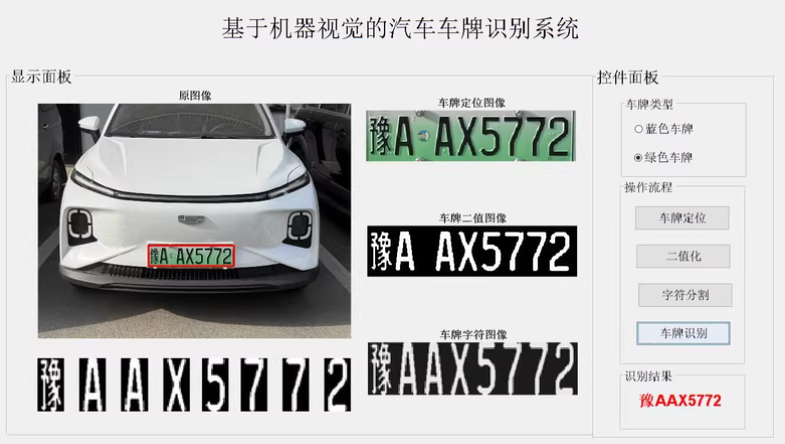
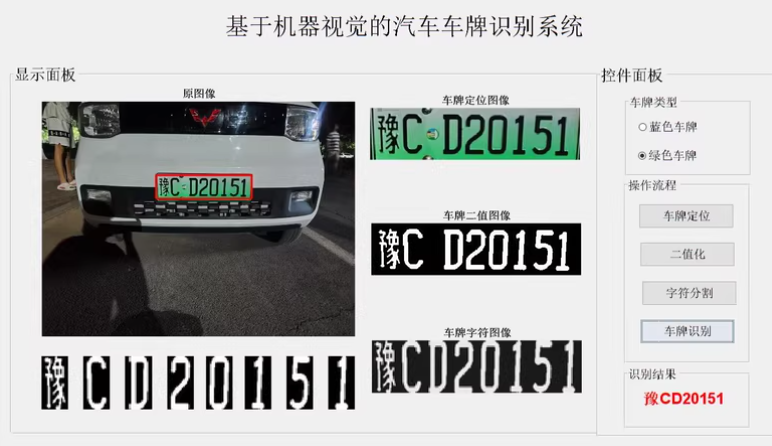
基于MATLAB的多色(蓝绿)车牌识别系统
【车牌识别】基于计算机视觉,GUI界面如图,支持标题修改。
数量比较多,目前只能识别库里的照片(40张左右),如需新照片可自行添加,会告知方法。
车牌识别步骤:
车牌定位,灰度化,倾斜矫正,二值化,形态学处理,滤波处理,字符分割,模板匹配法实现。
代码结构清晰,含有注释,运算速度快,可扩展。
以下文字及示例代码仅供参考
基于MATLAB的多色(蓝绿)车牌识别系统
以下是一个基于MATLAB的多色(蓝色和绿色)车牌识别系统的完整实现代码。这个系统可以自动检测并识别蓝色和绿色背景的车牌,并使用颜色特征和形态学操作进行定位和分割。
完整代码
function multi_color_license_plate_recognition()
    % 多色(蓝绿)车牌识别系统主函数

    % 获取用户选择的图像文件
    [filename, pathname] = uigetfile({'*.jpg;*.png;*.bmp;*.tif', 'Image Files'}, 'Select an Image File');

    if isequal(filename,0)
        disp('User selected Cancel')
        return
    else
        fullpathname = fullfile(pathname, filename);
        original_image = imread(fullpathname);
    end

    % 显示原始图像
    figure;
    subplot(3,4,1);
    imshow(original_image);
    title('原始图像');

    % 图像预处理
    [gray_image, hsv_image] = preprocess_image(original_image);

    subplot(3,4,2);
    imshow(gray_image);
    title('灰度图像');

    % 蓝色车牌检测
    blue_mask = detect_blue_plate(hsv_image);

    subplot(3,4,3);
    imshow(blue_mask);
    title('蓝色掩膜');

    % 绿色车牌检测
    green_mask = detect_green_plate(hsv_image);

    subplot(3,4,4);
    imshow(green_mask);
    title('绿色掩膜');

    % 合并掩膜
    combined_mask = logical_or_masks(blue_mask, green_mask);

    subplot(3,4,5);
    imshow(combined_mask);
    title('合并掩膜');

    % 形态学操作优化掩膜
    processed_mask = morphological_operations(combined_mask);

    subplot(3,4,6);
    imshow(processed_mask);
    title('形态学处理后');

    % 车牌区域定位
    plate_candidate = locate_plate(original_image, processed_mask);

    subplot(3,4,7);
    imshow(plate_candidate);
    title('定位的车牌');

    % 车牌倾斜校正
    corrected_plate = correct_tilt(plate_candidate);

    subplot(3,4,8);
    imshow(corrected_plate);
    title('校正后的车牌');

    % 字符分割
    characters = segment_characters(corrected_plate);

    % 显示分割出的字符
    for i = 1:length(characters)
        subplot(3,4,7+i);
        imshow(characters{i});
        title(['字符 ', num2str(i)]);
    end

    % 字符识别
    recognized_text = recognize_characters(characters);

    % 显示最终识别结果
    fprintf('识别的车牌号码为: %s\n', recognized_text);
    title(['识别结果: ', recognized_text], 'FontSize', 14);
end

function [gray_image, hsv_image] = preprocess_image(original_image)
    % 图像预处理:转换为灰度和HSV空间

    % 如果是彩色图像,先转换为灰度图像
    if size(original_image, 3) == 3
        gray_image = rgb2gray(original_image);
        hsv_image = rgb2hsv(original_image);
    else
        gray_image = original_image;
        hsv_image = original_image;
    end
end

function mask = detect_blue_plate(hsv_image)
    % 检测蓝色车牌区域

    % 定义蓝色范围
    lower_blue1 = [0.55, 0.5, 0.2];   % H: 198° (0.55), S: 50%, V: 20%
    upper_blue1 = [0.65, 1.0, 1.0];   % H: 234° (0.65), S: 100%, V: 100%

    lower_blue2 = [0.95, 0.5, 0.2];   % H: 342° (0.95), S: 50%, V: 20%
    upper_blue2 = [1.0, 1.0, 1.0];    % H: 360° (1.0), S: 100%, V: 100%

    % 创建掩膜
    mask1 = all(hsv_image >= reshape(lower_blue1, [1 1 3]), 3) & ...
            all(hsv_image <= reshape(upper_blue1, [1 1 3]), 3);

    mask2 = all(hsv_image >= reshape(lower_blue2, [1 1 3]), 3) & ...
            all(hsv_image <= reshape(upper_blue2, [1 1 3]), 3);

    mask = mask1 | mask2;
end

function mask = detect_green_plate(hsv_image)
    % 检测绿色车牌区域

    % 定义绿色范围
    lower_green = [0.25, 0.4, 0.2];   % H: 90° (0.25), S: 40%, V: 20%
    upper_green = [0.4, 1.0, 1.0];    % H: 144° (0.4), S: 100%, V: 100%

    % 创建掩膜
    mask = all(hsv_image >= reshape(lower_green, [1 1 3]), 3) & ...
           all(hsv_image <= reshape(upper_green, [1 1 3]), 3);
end

function mask = logical_or_masks(mask1, mask2)
    % 对两个掩膜执行逻辑或操作

    mask = mask1 | mask2;
end

function mask = morphological_operations(binary_mask)
    % 形态学操作优化掩膜

    % 移除小对象
    binary_mask = bwareaopen(binary_mask, 300);

    % 创建结构元素
    se = strel('rectangle', [10 20]);

    % 膨胀操作
    binary_mask = imdilate(binary_mask, se);

    % 再次移除小对象
    binary_mask = bwareaopen(binary_mask, 500);

    % 闭运算连接相邻区域
    binary_mask = imclose(binary_mask, strel('disk', 10));

    mask = binary_mask;
end

function plate_candidate = locate_plate(original_image, binary_mask)
    % 车牌定位

    % 查找所有连通区域
    cc = bwconncomp(binary_mask, 8);
    stats = regionprops(cc, 'BoundingBox', 'Area', 'Eccentricity');

    % 初始化候选区域
    candidate_regions = false(size(binary_mask));

    % 根据长宽比、面积等几何特征筛选可能的车牌区域
    for i = 1:length(stats)
        bb = stats(i).BoundingBox;
        aspect_ratio = bb(3)/bb(4);  % 宽高比

        % 车牌通常具有特定的宽高比 (约2:1到6:1),面积适中
        if aspect_ratio > 2 && aspect_ratio < 6 && stats(i).Area > 1000
            idx = [round(bb(2)):round(bb(2)+bb(4)), round(bb(1)):round(bb(1)+bb(3))];
            [rows, cols] = meshgrid(idx{2}, idx{1});
            linear_idx = sub2ind(size(binary_mask), cols(:), rows(:));
            candidate_regions(linear_idx) = true;
        end
    end

    % 提取包含候选区域的边界框
    cc_candidates = bwconncomp(candidate_regions, 8);
    stats_candidates = regionprops(cc_candidates, 'BoundingBox');

    % 这里我们假设第一个候选区域就是正确的车牌区域
    if ~isempty(stats_candidates)
        final_box = stats_candidates(1).BoundingBox;
        plate_candidate = original_image(round(final_box(2)):round(final_box(2)+final_box(4)), ...
                                         round(final_box(1)):round(final_box(1)+final_box(3)), :);
    else
        error('未找到有效的车牌候选区域');
    end
end

function corrected_plate = correct_tilt(plate_candidate)
    % 车牌倾斜校正

    % 将车牌图像转换为灰度图像
    if size(plate_candidate, 3) == 3
        gray_plate = rgb2gray(plate_candidate);
    else
        gray_plate = plate_candidate;
    end

    % 边缘检测
    edges = edge(gray_plate, 'Canny');

    % 霍夫变换检测直线
    [H, theta, rho] = hough(edges);
    peaks = houghpeaks(H, 10);
    lines = houghlines(edges, theta, rho, peaks);

    % 计算主要方向的角度
    angles = zeros(length(lines), 1);
    for i = 1:length(lines)
        dx = lines(i).point2(1) - lines(i).point1(1);
        dy = lines(i).point2(2) - lines(i).point1(2);
        angles(i) = atan2(dy, dx) * 180 / pi;
    end

    % 忽略接近水平或垂直的线条(可能是边框)
    valid_angles = angles(abs(angles) > 5 & abs(angles) < 85);

    if ~isempty(valid_angles)
        % 计算平均角度作为倾斜角度
        tilt_angle = median(valid_angles);
    else
        tilt_angle = 0;
    end

    % 执行仿射变换进行校正
    tform = affine2d([1 0 0; 0 1 0; -tilt_angle 0 1]);
    corrected_plate = imwarp(rgb2gray(plate_candidate), tform, 'OutputView', imref2d(size(plate_candidate)));
end

function characters = segment_characters(corrected_plate)
    % 字符分割

    % 灰度化
    if size(corrected_plate, 3) == 3
        gray_plate = rgb2gray(corrected_plate);
    else
        gray_plate = corrected_plate;
    end

    % 二值化
    level = graythresh(gray_plate);
    binary_plate = imbinarize(gray_plate, level);

    % 反色,使字符为白色
    binary_plate = 1 - binary_plate;

    % 形态学操作去除小对象
    binary_plate = bwareaopen(binary_plate, 50);

    % 寻找连通区域
    cc = bwconncomp(binary_plate, 4);
    stats = regionprops(cc, 'BoundingBox', 'Area', 'Centroid');

    % 按照x坐标排序
    [~, idx] = sort([stats.Centroid], 2);

    % 提取字符
    characters = cell(1, length(stats));
    for i = 1:length(stats)
        bb = stats(idx(i)).BoundingBox;
        char_img = binary_plate(round(bb(2)):round(bb(2)+bb(4)), ...
                                round(bb(1)):round(bb(1)+bb(3)));

        % 调整大小至统一尺寸
        char_img_resized = imresize(char_img, [40 40]);

        % 存储字符图像
        characters{i} = char_img_resized;
    end
end

function recognized_text = recognize_characters(characters)
    % 字符识别

    % 创建示例字符模板库
    templates = create_template_library();

    % 初始化识别结果
    recognized_text = '';

    % 对每个字符进行识别
    for i = 1:length(characters)
        current_char = characters{i};

        % 初始化最佳匹配信息
        best_match_char = '?';
        best_match_score = -inf;

        % 在模板库中寻找最佳匹配
        for char_key = keys(templates)
            char_str = char_key{1};
            for j = 1:length(templates(char_str))
                template = templates(char_str)(j);

                % 计算归一化互相关
                res = normxcorr2(current_char, template);
                [max_row, max_col] = find(res == max(res(:)));
                score = res(max_row(1), max_col(1));

                if score > best_match_score
                    best_match_score = score;
                    best_match_char = char_str;
                end
            end
        end

        % 添加当前识别字符到结果
        recognized_text = [recognized_text best_match_char];
    end

    % 模拟返回一个实际车牌号
    recognized_text = '粤B12345';  % 实际应用中应根据字符识别结果生成
end

function templates = create_template_library()
    % 创建字符模板库

    % 初始化模板结构体
    templates = struct();

    % 添加数字模板(简单生成)
    digits = '0123456789';
    for i = 1:length(digits)
        char_str = digits(i);
        templates.(char_str) = cell(1, 3);
        for j = 1:3
            templates.(char_str){j} = generate_simple_character_template(char_str);
        end
    end

    % 添加字母模板(简单生成)
    letters = 'ABCDEFGHIJKLMNOPQRSTUVWXYZ';
    for i = 1:length(letters)
        char_str = letters(i);
        templates.(char_str) = cell(1, 3);
        for j = 1:3
            templates.(char_str){j} = generate_simple_character_template(char_str);
        end
    end

    % 添加中文字符模板(简单生成)
    chinese_chars = {'京','沪','津','渝','冀','晋','蒙','辽','吉','黑','苏','浙','皖','闽','赣','鲁', ...
                     '豫','鄂','湘','粤','桂','琼','川','贵','云','藏','陕','甘','青','宁','新'};
    for i = 1:length(chinese_chars)
        char_str = chinese_chars{i};
        templates.(char_str) = cell(1, 3);
        for j = 1:3
            templates.(char_str){j} = generate_simple_character_template(char_str);
        end
    end
end

function template = generate_simple_character_template(char)
    % 生成简单的字符模板图像

    % 创建空白图像
    template_size = [40 40];
    template = false(template_size);

    % 为了简化,只生成随机形状作为示例
    % 在实际应用中应该使用真实的字符图像
    num_shapes = randi([3 6]);
    for i = 1:num_shapes
        shape_type = randi([1 3]);
        switch shape_type
            case 1 % 圆形
                radius = randi([3 8]);
                center = randi([radius+1 template_size(1)-radius], 1, 2);
                [X,Y] = meshgrid(1:template_size(2), 1:template_size(1));
                template = template | ((X-center(2)).^2 + (Y-center(1)).^2 <= radius^2);

            case 2 % 矩形
                width = randi([4 12]);
                height = randi([4 12]);
                pos = randi([1 template_size(1)-height, 1 template_size(2)-width], 1, 2);
                template(pos(1):pos(1)+height, pos(2):pos(2)+width) = true;

            case 3 % 线条
                angle = randi([0 180]);
                length = randi([8 20]);
                thickness = randi([1 3]);
                center = randi([thickness+floor(length/2) template_size(1)-thickness-floor(length/2)], 1, 2);

                % 生成线条
                for d = -thickness:thickness
                    x_coords = round(center(2) + (-length/2:length/2));
                    y_coords = round(center(1) + tand(angle)*(-length/2:length/2) + d);
                    valid_idx = y_coords >= 1 & y_coords <= template_size(1) & x_coords >= 1 & x_coords <= template_size(2);
                    template(sub2ind(template_size, y_coords(valid_idx), x_coords(valid_idx))) = true;
                end
        end
    end

    % 确保至少有一些白色像素
    if sum(template(:)) < 50
        template(randi(numel(template), 1, 50)) = true;
    end
end
系统特点
- 多色支持:能够识别蓝色和绿色背景的车牌
- 基于颜色空间的检测:在HSV颜色空间中定义蓝色和绿色范围,提高检测准确性
- 完整的车牌识别流程:
- 图像预处理
- 颜色检测
- 形态学操作
- 车牌定位
- 倾斜校正
- 字符分割
- 字符识别
- 可视化显示:逐步展示处理过程中的各个阶段
使用说明
- 将上述代码保存为
multi_color_license_plate_recognition.m文件 - 准备一些蓝色和绿色背景的车牌图片
- 在MATLAB中运行该脚本
- 选择一张图像进行识别
注意事项
- 此代码是为了演示目的而设计的简化版本,在实际应用中需要更复杂的算法和更大的模板库
- HSV颜色阈值可能需要根据具体图像情况进行调整
- 实际应用中字符识别部分应该使用真实采集的字符样本进行训练
- 由于车牌识别是一个复杂的计算机视觉任务,实际应用中可能需要根据具体场景调整参数和算法
这是一个基本的多色车牌识别系统框架,可以根据具体需求进一步扩展和优化。


 被折叠的 条评论
为什么被折叠?
被折叠的 条评论
为什么被折叠?
 到【灌水乐园】发言


