


~~~~我的生活,我的点点滴滴!!
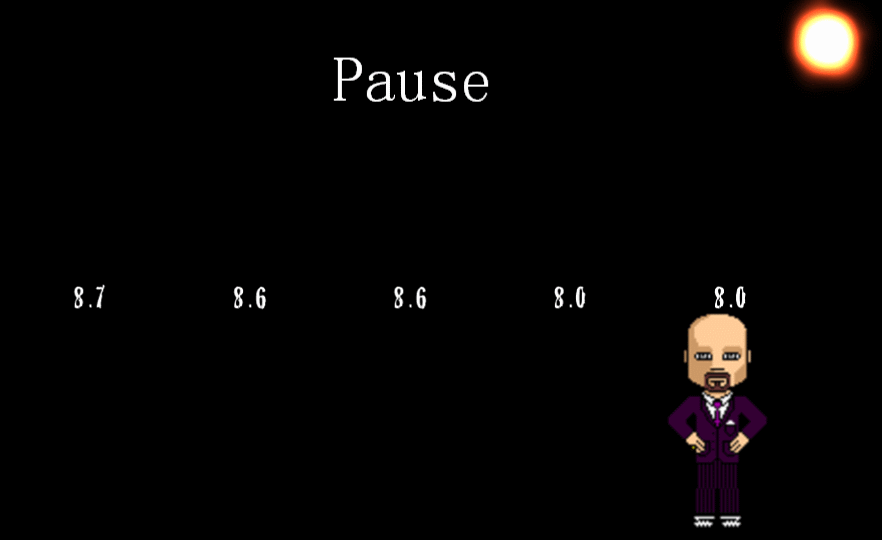
这个例子很简单,不过有值得记录在此的必要性。大体情况是一个boy在那里反复跳来跳去,上面有时间刻度,右上角还有个粒子效果。
效果图如下:
主要功能代码如下:
IntervalLayer::IntervalLayer()
{
    _time0 = _time1 = _time2 = _time3 = _time4 = 0.0f;

    auto s = Director::getInstance()->getWinSize();

	// 右上角的太阳粒子效果
    auto sun = ParticleSun::create();
	// 用了fire.png这个图片来当作纹理,当然我们也可以不使用他,效果一样明显
    sun->setTexture(Director::getInstance()->getTextureCache()->addImage("Images/fire.png"));
    sun->setPosition( Vec2(VisibleRect::rightTop().x-32,VisibleRect::rightTop().y-32) );
	// 粒子个数,如果设置的数值很小,那么粒子就很小,默认值为0,此函数为虚函数
    sun->setTotalParticles(130);
	// 粒子变化的频率,设置一个差不多的值,效果会很真实,如果这里我们设置成0.1那会变化的特别快。
	// 默认值是0 ,所以还是设置一个大点的值吧
    sun->setLife(0.6f);
    this->addChild(sun);

    // 设置字体
    _label0 = Label::createWithBMFont("fonts/bitmapFontTest4.fnt", "0");
    _label1 = Label::createWithBMFont("fonts/bitmapFontTest4.fnt", "0");
    _label2 = Label::createWithBMFont("fonts/bitmapFontTest4.fnt", "0");
    _label3 = Label::createWithBMFont("fonts/bitmapFontTest4.fnt", "0");
    _label4 = Label::createWithBMFont("fonts/bitmapFontTest4.fnt", "0");

	//设置定时器
    scheduleUpdate();
    schedule(schedule_selector(IntervalLayer::step1));
	//第二个参数为0,表示是每帧,和上面的一样的效果
    schedule(schedule_selector(IntervalLayer::step2), 0);
    schedule(schedule_selector(IntervalLayer::step3), 1.0f);
    schedule(schedule_selector(IntervalLayer::step4), 2.0f);

	//设置位置
    _label0->setPosition(Vec2(s.width*1/6, s.height/2));
    _label1->setPosition(Vec2(s.width*2/6, s.height/2));
    _label2->setPosition(Vec2(s.width*3/6, s.height/2));
    _label3->setPosition(Vec2(s.width*4/6, s.height/2));
    _label4->setPosition(Vec2(s.width*5/6, s.height/2));

	//......
    addChild(_label0);
    addChild(_label1);
    addChild(_label2);
    addChild(_label3);
    addChild(_label4);

    // boy跳动精灵
    auto sprite = Sprite::create(s_pathGrossini);
    sprite->setPosition( Vec2(VisibleRect::left().x + 40, VisibleRect::bottom().y + 50) );

    auto jump = JumpBy::create(3, Vec2(s.width-80,0), 50, 4);

    addChild(sprite);

    sprite->runAction( RepeatForever::create(Sequence::create(jump, jump->reverse(), nullptr) ));
    // 前面我们一直看到使用的是MenuItemImage那是因为当时使用的是图片,这里我们不使用图片,使用是英文字母
	// 所以当然是使用MenuItemFont,然后添加到Menu上面让其具有击功能。
	// 使用lambda表达式,当然我们可以正常使用CC_CALLBACK_1()函数功能来回调。
    auto item1 = MenuItemFont::create("Pause", [&](Ref* sender) {
		//暂停与开始全是调用的“导演类”Director里面的pause与resume
		if(Director::getInstance()->isPaused())
			Director::getInstance()->resume();
		else
			Director::getInstance()->pause();
	});
    auto menu = Menu::create(item1, nullptr);
    menu->setPosition( Vec2(s.width/2, s.height-50) );

    addChild( menu );
}我们看到这个例子里是人在跳动,上面的时间在变化,当我们点击“Pause”时,整个画面都暂停了,包括粒子效果哦,在点击后又开始了,至于时间怎么变化的,上面的代码里面我们设定了5个update,定时器,肯定是在里面累加的。
代码基本一样,相当简单,这里我只列出一个,其他的类似。
void IntervalLayer::update(float dt)
{
	//不停的累加, 不过总有一天会越界的,但那是很遥远的事情了!!!
    _time0 +=dt;
    char time[10] = {0};
    sprintf(time, "%2.1f", _time0);
    _label0->setString(time);
}
有没有觉得很简短,不过里面涉及了点粒子知识,这为我们将来系统学习粒子还是提前打了预防针。


 1392
1392

 被折叠的 条评论
为什么被折叠?
被折叠的 条评论
为什么被折叠?
 到【灌水乐园】发言


