


写在最前面:run的七步曲:
主要经历7步:1、获取并启动监听器;
2、构造容器环境
3、创建容器
4、实例化SpringBootExceptionReporter.class用于支持报告启动错误
5、准备容器
6、刷新容器
7、刷新容器后的扩展接口
一、main方法启动run函数
@SpringBootApplication
public class SpringbootoneApplication {

    public static void main(String[] args) {
        SpringApplication.run(SpringbootoneApplication.class, args);
}二、创建SpringApplication对象
public static ConfigurableApplicationContext run(Class<?>[] primarySources, String[] args) {
		return new SpringApplication(primarySources).run(args);
	}
构造方法的具体代码:

★设置应用类型方法:WebApplicationType.deduceFromClasspath();
	static WebApplicationType deduceFromClasspath() {
		if (ClassUtils.isPresent(WEBFLUX_INDICATOR_CLASS, null) && !ClassUtils.isPresent(WEBMVC_INDICATOR_CLASS, null)
				&& !ClassUtils.isPresent(JERSEY_INDICATOR_CLASS, null)) {
			return WebApplicationType.REACTIVE;//REACTIVE应用
		}
		for (String className : SERVLET_INDICATOR_CLASSES) {
			if (!ClassUtils.isPresent(className, null)) {
				return WebApplicationType.NONE;//非WEB应用
			}
		}
		return WebApplicationType.SERVLET;//WEB应用
	}
★初始化容器方法:setInitializers((Collection) getSpringFactoriesInstances(ApplicationContextInitializer.class));
ApplicationContextInitializer是spring组件spring-context组件中的一个接口,主要是spring ioc容器刷新之前的一个回调接口,用于处于自定义逻辑。这里用到了spring.factories文件,这个文件位于spring-boot-2.1.1.RELEASE.jar的META-INF目录下,spring.factories文件中配置接口的实现类名称,然后在程序中读取这些配置文件并实例化。这种自定义的SPI机制是Spring Boot Starter实现的基础。
spring.factories文件位置以及内容如下:
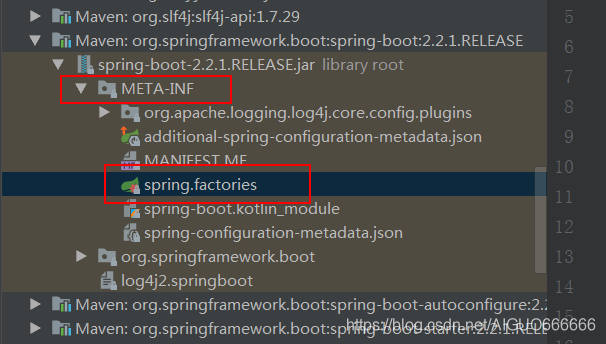
内容:主要是配置了接口的实现类
# PropertySource Loaders
org.springframework.boot.env.PropertySourceLoader=\
org.springframework.boot.env.PropertiesPropertySourceLoader,\
org.springframework.boot.env.YamlPropertySourceLoader

# Run Listeners
org.springframework.boot.SpringApplicationRunListener=\
org.springframework.boot.context.event.EventPublishingRunListener

# Error Reporters
org.springframework.boot.SpringBootExceptionReporter=\
org.springframework.boot.diagnostics.FailureAnalyzers

# Application Context Initializers
org.springframework.context.ApplicationContextInitializer=\
org.springframework.boot.context.ConfigurationWarningsApplicationContextInitializer,\
org.springframework.boot.context.ContextIdApplicationContextInitializer,\
org.springframework.boot.context.config.DelegatingApplicationContextInitializer,\
org.springframework.boot.rsocket.context.RSocketPortInfoApplicationContextInitializer,\
org.springframework.boot.web.context.ServerPortInfoApplicationContextInitializer

# Application Listeners
org.springframework.context.ApplicationListener=\
org.springframework.boot.ClearCachesApplicationListener,\
org.springframework.boot.builder.ParentContextCloserApplicationListener,\
org.springframework.boot.context.FileEncodingApplicationListener,\
org.springframework.boot.context.config.AnsiOutputApplicationListener,\
org.springframework.boot.context.config.ConfigFileApplicationListener,\
org.springframework.boot.context.config.DelegatingApplicationListener,\
org.springframework.boot.context.logging.ClasspathLoggingApplicationListener,\
org.springframework.boot.context.logging.LoggingApplicationListener,\
org.springframework.boot.liquibase.LiquibaseServiceLocatorApplicationListener

# Environment Post Processors
org.springframework.boot.env.EnvironmentPostProcessor=\
org.springframework.boot.cloud.CloudFoundryVcapEnvironmentPostProcessor,\
org.springframework.boot.env.SpringApplicationJsonEnvironmentPostProcessor,\
org.springframework.boot.env.SystemEnvironmentPropertySourceEnvironmentPostProcessor,\
org.springframework.boot.reactor.DebugAgentEnvironmentPostProcessor

# Failure Analyzers
org.springframework.boot.diagnostics.FailureAnalyzer=\
org.springframework.boot.diagnostics.analyzer.BeanCurrentlyInCreationFailureAnalyzer,\
org.springframework.boot.diagnostics.analyzer.BeanDefinitionOverrideFailureAnalyzer,\
org.springframework.boot.diagnostics.analyzer.BeanNotOfRequiredTypeFailureAnalyzer,\
org.springframework.boot.diagnostics.analyzer.BindFailureAnalyzer,\
org.springframework.boot.diagnostics.analyzer.BindValidationFailureAnalyzer,\
org.springframework.boot.diagnostics.analyzer.UnboundConfigurationPropertyFailureAnalyzer,\
org.springframework.boot.diagnostics.analyzer.ConnectorStartFailureAnalyzer,\
org.springframework.boot.diagnostics.analyzer.NoSuchMethodFailureAnalyzer,\
org.springframework.boot.diagnostics.analyzer.NoUniqueBeanDefinitionFailureAnalyzer,\
org.springframework.boot.diagnostics.analyzer.PortInUseFailureAnalyzer,\
org.springframework.boot.diagnostics.analyzer.ValidationExceptionFailureAnalyzer,\
org.springframework.boot.diagnostics.analyzer.InvalidConfigurationPropertyNameFailureAnalyzer,\
org.springframework.boot.diagnostics.analyzer.InvalidConfigurationPropertyValueFailureAnalyzer

# FailureAnalysisReporters
org.springframework.boot.diagnostics.FailureAnalysisReporter=\
org.springframework.boot.diagnostics.LoggingFailureAnalysisReporter
ApplicationContextInitializer的初始化有一下几个类负责:# Application Context Initializers
org.springframework.context.ApplicationContextInitializer=\
org.springframework.boot.context.ConfigurationWarningsApplicationContextInitializer,\
org.springframework.boot.context.ContextIdApplicationContextInitializer,\
org.springframework.boot.context.config.DelegatingApplicationContextInitializer,\
org.springframework.boot.rsocket.context.RSocketPortInfoApplicationContextInitializer,\
org.springframework.boot.web.context.ServerPortInfoApplicationContextInitializer
★监听器的初始化方法:setListeners((Collection) getSpringFactoriesInstances(ApplicationListener.class));
	private <T> Collection<T> getSpringFactoriesInstances(Class<T> type, Class<?>[] parameterTypes, Object... args) {
		ClassLoader classLoader = getClassLoader();
		// Use names and ensure unique to protect against duplicates
		Set<String> names = new LinkedHashSet<>(SpringFactoriesLoader.loadFactoryNames(type, classLoader));
		List<T> instances = createSpringFactoriesInstances(type, parameterTypes, classLoader, args, names);
		AnnotationAwareOrderComparator.sort(instances);
		return instances;
	}
监听器的初始化由一下几个类负责:
# Application Listeners
org.springframework.context.ApplicationListener=\
org.springframework.boot.ClearCachesApplicationListener,\
org.springframework.boot.builder.ParentContextCloserApplicationListener,\
org.springframework.boot.context.FileEncodingApplicationListener,\
org.springframework.boot.context.config.AnsiOutputApplicationListener,\
org.springframework.boot.context.config.ConfigFileApplicationListener,\
org.springframework.boot.context.config.DelegatingApplicationListener,\
org.springframework.boot.context.logging.ClasspathLoggingApplicationListener,\
org.springframework.boot.context.logging.LoggingApplicationListener,\
org.springframework.boot.liquibase.LiquibaseServiceLocatorApplicationListener


//以及类:org.springframework.boot.autoconfigure.BackgroundPreinitializer
★构造SpringApplication对象的方法中的this.mainApplicationClass = deduceMainApplicationClass();
	private Class<?> deduceMainApplicationClass() {
		try {
			StackTraceElement[] stackTrace = new RuntimeException().getStackTrace();
			for (StackTraceElement stackTraceElement : stackTrace) {
				if ("main".equals(stackTraceElement.getMethodName())) {
					return Class.forName(stackTraceElement.getClassName());
				}
			}
		}
		catch (ClassNotFoundException ex) {
			// Swallow and continue
		}
		return null;
	}
通过获取当前的方法栈,找到入口main方法所以在的类,通过反射创建一个对类对象并赋值给构造方法的mainApplicationClass对象。即下图所示对象

三、run方法分析

run 方法源码解析:
主要经历7步:1、获取并启动监听器;
2、构造容器环境
3、创建容器
4、实例化SpringBootExceptionReporter.class用于支持报告启动错误
5、准备容器
6、刷新容器
7、刷新容器后的扩展接口
/**
	 * Run the Spring application, creating and refreshing a new
	 * {@link ApplicationContext}.
	 * @param args the application arguments (usually passed from a Java main method)
	 * @return a running {@link ApplicationContext}
	 */
	public ConfigurableApplicationContext run(String... args) {
		StopWatch stopWatch = new StopWatch();
		stopWatch.start();
		ConfigurableApplicationContext context = null;
		Collection<SpringBootExceptionReporter> exceptionReporters = new ArrayList<>();
        //开启监控
		configureHeadlessProperty();
        //获取监听器
		SpringApplicationRunListeners listeners = getRunListeners(args);
        //启动监听器
		listeners.starting();
		try {
            //构造容器环境
			ApplicationArguments applicationArguments = new DefaultApplicationArguments(args);
			ConfigurableEnvironment environment = prepareEnvironment(listeners, applicationArguments);
            //设置要忽略的bean
			configureIgnoreBeanInfo(environment);
			Banner printedBanner = printBanner(environment);
            //创建容器
			context = createApplicationContext();
            //实例化SpringBootExceptionReporter类,用来报告启动错误
			exceptionReporters = getSpringFactoriesInstances(SpringBootExceptionReporter.class,
					new Class[] { ConfigurableApplicationContext.class }, context);
            //准备容器
			prepareContext(context, environment, listeners, applicationArguments, printedBanner);
            //刷新容器
			refreshContext(context);
            //刷新容器后的扩展接口
			afterRefresh(context, applicationArguments);
			stopWatch.stop();
			if (this.logStartupInfo) {
				new StartupInfoLogger(this.mainApplicationClass).logStarted(getApplicationLog(), stopWatch);
			}
			listeners.started(context);
			callRunners(context, applicationArguments);
		}
		catch (Throwable ex) {
			handleRunFailure(context, ex, exceptionReporters, listeners);
			throw new IllegalStateException(ex);
		}

		try {
			listeners.running(context);
		}
		catch (Throwable ex) {
			handleRunFailure(context, ex, exceptionReporters, null);
			throw new IllegalStateException(ex);
		}
		return context;
	}
获取并启动监听器:

从getRunListeners源码看来,args本身默认为空,但是在获取监听器的方法中,getSpringFactoriesInstances( SpringApplicationRunListener.class, types, this, args)将当前对象SpringApplicationRunListener作为参数,该方法用来获取spring.factories对应的监听器:
spring.factories及配置如下:
# Run Listeners
org.springframework.boot.SpringApplicationRunListener=\
org.springframework.boot.context.event.EventPublishingRunListener
在SpringBoot 框架中获取factories都是通过createSpringFactoriesInstances(Class type,Class<?>[] parameterTypes, ClassLoader classLoader, Object[] args,Set names)来获取的,并最终返回一个实例列表。
private <T> List<T> createSpringFactoriesInstances(Class<T> type, Class<?>[] parameterTypes,
			ClassLoader classLoader, Object[] args, Set<String> names) {
		List<T> instances = new ArrayList<>(names.size());
		for (String name : names) {
			try {
                           //装载SpringApplicationRunListener类到内存中
				Class<?> instanceClass = ClassUtils.forName(name, classLoader);
				Assert.isAssignable(type, instanceClass);
				Constructor<?> constructor = instanceClass.getDeclaredConstructor(parameterTypes);
                            //通过反射机制来构建SpringApplicationRunListener的事例
				T instance = (T) BeanUtils.instantiateClass(constructor, args);
				instances.add(instance);
			}
			catch (Throwable ex) {
				throw new IllegalArgumentException("Cannot instantiate " + type + " : " + name, ex);
			}
		}
		return instances;
	}
上面的通过反射构造SpringApplicationRunListener对象时,会触发EventPublishingRunListener的构造方法(
public class EventPublishingRunListener implements SpringApplicationRunListener)EventPublishingRunListener是实现类SpringApplicationRunListener是接口public class EventPublishingRunListener implements SpringApplicationRunListener, Ordered {
private final SpringApplication application;
private final String[] args;
private final SimpleApplicationEventMulticaster initialMulticaster;
public EventPublishingRunListener(SpringApplication application, String[] args) {
this.application = application;
this.args = args;
//创建一个事件多播类
this.initialMulticaster = new SimpleApplicationEventMulticaster();
//将spring.factories中的监听器传递到SimpleApplicationEventMulticaster中
for (ApplicationListener<?> listener : application.getListeners()) {
this.initialMulticaster.addApplicationListener(listener);
}
}addApplicationListener方法:
	@Override
	public void addApplicationListener(ApplicationListener<?> listener) {
		synchronized (this.retrievalMutex) {
			// Explicitly remove target for a proxy, if registered already,
			// in order to avoid double invocations of the same listener.
			Object singletonTarget = AopProxyUtils.getSingletonTarget(listener);
			if (singletonTarget instanceof ApplicationListener) {

                                                     //移除
				this.defaultRetriever.applicationListeners.remove(singletonTarget);
			}

                                                     //添加新的listener
			this.defaultRetriever.applicationListeners.add(listener);
			this.retrieverCache.clear();
		}
	}
启动监听器:
listeners.starting();


public void starting() {
        //listeners 只有一个listener,为EventPublishingRunListener,它是启动事件发布监听器,主要用来发布启动事件。
		for (SpringApplicationRunListener listener : this.listeners) {
			listener.starting();
		}
	}
EventPublishingRunListener 的实例listener调用了starting()方法,我们在来看一下starting()的实现机制(EventPublishingRunListener这个是springBoot框架中第一个执行的监听器,在该监听器执行started()方法时,会继续发布事件,也就是事件传递。这种实现主要还是基于spring的事件机制。)
//创建Application的启动事件


	@Override
	public void starting() {
		this.initialMulticaster.multicastEvent(new ApplicationStartingEvent(this.application, this.args));
	}
starting方法中的multicasEvent方法如下:
该方法是SimpleApplicationEventMulticaster类中的一个核心方法
@Override
public void multicastEvent(final ApplicationEvent event, @Nullable ResolvableType eventType) {
		ResolvableType type = (eventType != null ? eventType : resolveDefaultEventType(event));
		for (final ApplicationListener<?> listener : getApplicationListeners(event, type)) {
			//获取线程池,如果为空则同步处理。这里线程池为空,还未没初始化。
			Executor executor = getTaskExecutor();
			if (executor != null) {
			    //异步发送事件
				executor.execute(() -> invokeListener(listener, event));
			}
			else {
				//同步发送事件
				invokeListener(listener, event);
			}
		}
	}
这里会根据事件类型ApplicationStartingEvent获取对应的监听器,在容器启动之后执行响应的动作,有如下4种监听器:
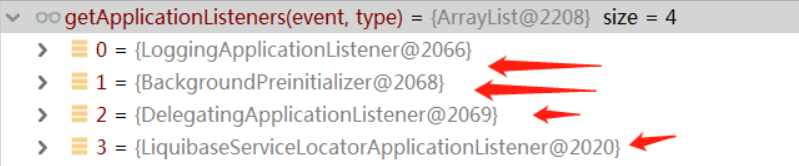
这是springBoot启动过程中,第一处根据类型,执行监听器的地方。根据发布的事件类型从上述10种监听器中选择对应的监听器进行事件发布。
1、以日志监听器为例讲解:

由于我们的事件类型为ApplicationEvent,所以会执行onApplicationStartedEvent((ApplicationStartedEvent) event);
springBoot会在运行过程中的不同阶段,发送各种事件,来执行对应监听器的对应方法
2、容器的环境构建
ConfigurableEnvironment environment = prepareEnvironment(listeners, applicationArguments);准备方法
private ConfigurableEnvironment prepareEnvironment(
			SpringApplicationRunListeners listeners,
			ApplicationArguments applicationArguments) {
		// Create and configure the environment
		//获取对应的ConfigurableEnvironment
		ConfigurableEnvironment environment = getOrCreateEnvironment();
		//配置
		configureEnvironment(environment, applicationArguments.getSourceArgs());
		//发布环境已准备事件,这是第二次发布事件
		listeners.environmentPrepared(environment);
	   //将环境绑定到spring应用
		bindToSpringApplication(environment);
		if (this.webApplicationType == WebApplicationType.NONE) {
			environment = new EnvironmentConverter(getClassLoader())
					.convertToStandardEnvironmentIfNecessary(environment);
		}
		ConfigurationPropertySources.attach(environment);
		return environment;
	}
getOrCreateEnvironment()方法:
private ConfigurableEnvironment getOrCreateEnvironment() {
		if (this.environment != null) {
			return this.environment;
		}
		switch (this.webApplicationType) {
		case SERVLET://web 应用
			return new StandardServletEnvironment();
		case REACTIVE:
			return new StandardReactiveWebEnvironment();
		default:
			return new StandardEnvironment();
		}
	}
webApplicationType 是枚举类型,environment已经被设置了servlet类型,所以这里创建的是环境对象是StandardServletEnvironment(web 应用)。
Environment接口提供了4种实现方式:
StandardEnvironment(普通应用)
StandardServletEnvironment(web应用)
MockEnvironment(测试程序的环境)
StandardReactiveWebEnvironment(响应式web环境)
我们这里是web应用,因此在这里返回return new StandardServletEnvironment();对象的时候,会完成一系列初始化动作,主要就是将运行机器的系统变量和环境变量,加入到其父类AbstractEnvironment定义的对象MutablePropertySources中,MutablePropertySources对象中定义了一个属性集合:private final List<PropertySource<?>> propertySourceList = new CopyOnWriteArrayList<PropertySource<?>>();执行到这里,系统变量和环境变量已经被载入到配置文件的集合中,接下来就行解析项目中的配置文件.
这里是第二次发布事件。系统环境初始化完成的事件。
listeners.environmentPrepared(environment);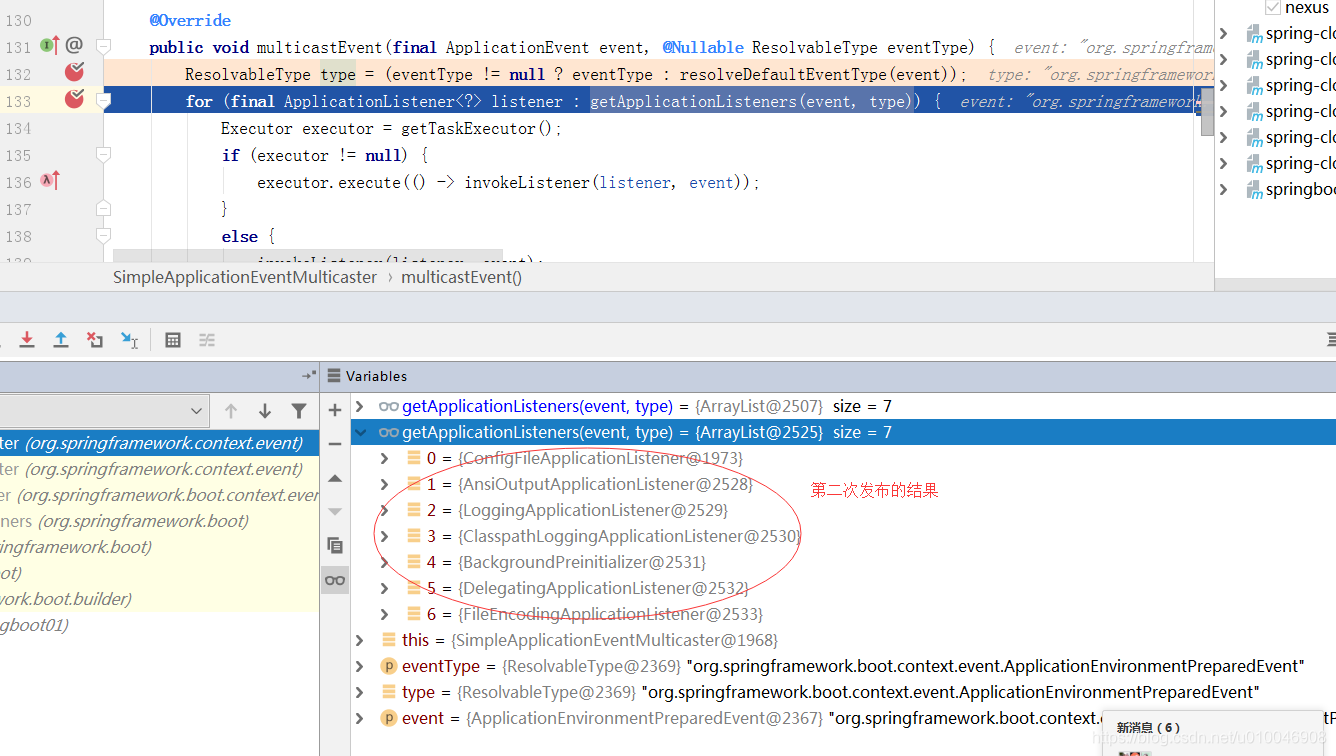
从上面的截图可以看到获取到的监听器和第一次发布启动事件获取的监听器有几个是重复的,这也验证了监听器是可以多次获取,根据事件类型来区分具体处理逻辑。
主要来看一下ConfigFileApplicationListener,该监听器非常核心,主要用来处理项目配置。
项目中的 properties 和yml文件都是其内部类所加载。具体来看一下:
首先方法执行入口:
首先还是会去读spring.factories 文件
List<EnvironmentPostProcessor> postProcessors = loadPostProcessors();
List<EnvironmentPostProcessor> loadPostProcessors() {
return SpringFactoriesLoader.loadFactories(EnvironmentPostProcessor.class,
getClass().getClassLoader());
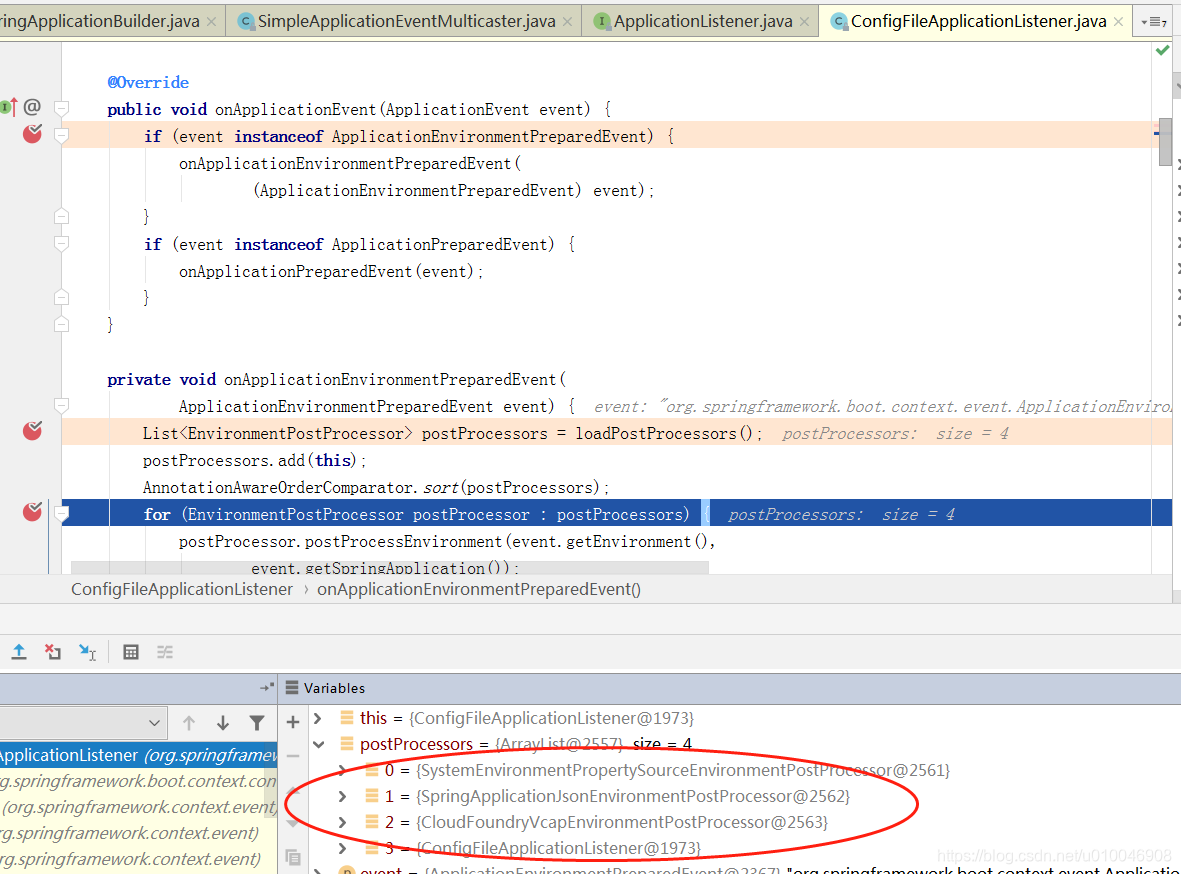
}获取的处理类型有:
# Environment Post Processors
org.springframework.boot.env.EnvironmentPostProcessor=	//一个@FunctionalInterface函数式接口
org.springframework.boot.cloud.CloudFoundryVcapEnvironmentPostProcessor,//为springCloud提供的扩展类
org.springframework.boot.env.SpringApplicationJsonEnvironmentPostProcessor,//支持json环境变量
org.springframework.boot.env.SystemEnvironmentPropertySourceEnvironmentPostProcessor //springBoo2提供的一个包装类,主要将`StandardServletEnvironment`包装成`SystemEnvironmentPropertySourceEnvironmentPostProcessor`对象
在执行完上述三个监听器流程后,ConfigFileApplicationListener会执行该类本身的逻辑。由其内部类Loader加载项目制定路径下的配置文件:private static final String DEFAULT_SEARCH_LOCATIONS = "classpath:/,classpath:/config/,file:./,file:./config/";这样就可以将项目中所有的变量的配置文件加载完
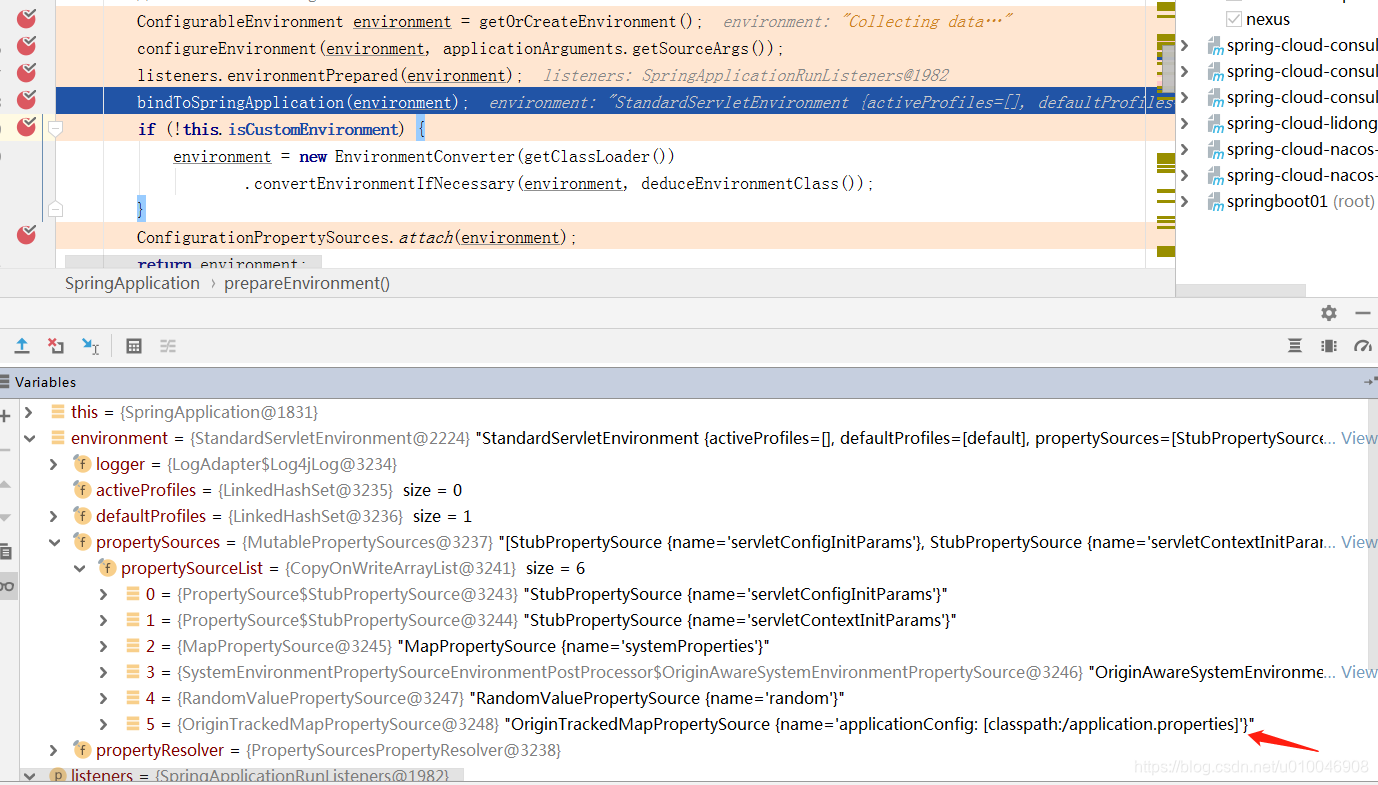
这里一共6个配置文件,前面5个都是系统默认的配置的文件。只有最后一个是我们自己的application.properties,注意 配置文件变量的命名时候,前面尽量带上前缀,防止后面的定义的变量将前面的值覆盖掉。
配置忽略bean的信息:
configureIgnoreBeanInfo(environment);


private void configureIgnoreBeanInfo(ConfigurableEnvironment environment) {
		if (System.getProperty(CachedIntrospectionResults.IGNORE_BEANINFO_PROPERTY_NAME) == null) {
			Boolean ignore = environment.getProperty("spring.beaninfo.ignore", Boolean.class, Boolean.TRUE);
			System.setProperty(CachedIntrospectionResults.IGNORE_BEANINFO_PROPERTY_NAME, ignore.toString());
		}
	}
配置控制台打印Banner
    Banner printedBanner = printBanner(environment);

	private Banner printBanner(ConfigurableEnvironment environment) {
		if (this.bannerMode == Banner.Mode.OFF) {
			return null;
		}
		ResourceLoader resourceLoader = (this.resourceLoader != null) ? this.resourceLoader
				: new DefaultResourceLoader(getClassLoader());
		SpringApplicationBannerPrinter bannerPrinter = new SpringApplicationBannerPrinter(resourceLoader, this.banner);
		if (this.bannerMode == Mode.LOG) {
			return bannerPrinter.print(environment, this.mainApplicationClass, logger);
		}
		return bannerPrinter.print(environment, this.mainApplicationClass, System.out);
	}
3、创建容器
context = createApplicationContext();

protected ConfigurableApplicationContext createApplicationContext() {
		Class<?> contextClass = this.applicationContextClass;
		if (contextClass == null) {
			try {
				switch (this.webApplicationType) {
				case SERVLET:
					contextClass = Class.forName(DEFAULT_SERVLET_WEB_CONTEXT_CLASS);
					break;
				case REACTIVE:
					contextClass = Class.forName(DEFAULT_REACTIVE_WEB_CONTEXT_CLASS);
					break;
				default:
					contextClass = Class.forName(DEFAULT_CONTEXT_CLASS);
				}
			}
			catch (ClassNotFoundException ex) {
				throw new IllegalStateException(
						"Unable create a default ApplicationContext, please specify an ApplicationContextClass", ex);
			}
		}
		return (ConfigurableApplicationContext) BeanUtils.instantiateClass(contextClass);
	}
创建容器的类型 还是根据webApplicationType进行判断的,前面已经分析过该变量如何赋值的过程。因为该类型为SERVLET类型,所以会通过反射装载对应的class文件。
public static final String DEFAULT_SERVLET_WEB_CONTEXT_CLASS = "org.springframework.boot."
			+ "web.servlet.context.AnnotationConfigServletWebServerApplicationContext";
该对象是springBoot 2创建的容器,接下来所有的操作都是该容器内部操作的。
4、报告错误信息
exceptionReporters = getSpringFactoriesInstances(SpringBootExceptionReporter.class,
					new Class[] { ConfigurableApplicationContext.class }, context);
加载spring.factorties中的SpringBootExceptionReporter的接口:
# Error Reporters
org.springframework.boot.SpringBootExceptionReporter=\
org.springframework.boot.diagnostics.FailureAnalyzers
该类主要是在项目启动失败之后,输出log文件的时候使用:
@Override
	public boolean reportException(Throwable failure) {
		FailureAnalysis analysis = analyze(failure, this.analyzers);
		return report(analysis, this.classLoader);
	}

	private FailureAnalysis analyze(Throwable failure, List<FailureAnalyzer> analyzers) {
		for (FailureAnalyzer analyzer : analyzers) {
			try {
				FailureAnalysis analysis = analyzer.analyze(failure);
				if (analysis != null) {
					return analysis;
				}
			}
			catch (Throwable ex) {
				logger.debug("FailureAnalyzer " + analyzer + " failed", ex);
			}
		}
		return null;
	}

	private boolean report(FailureAnalysis analysis, ClassLoader classLoader) {
		List<FailureAnalysisReporter> reporters = SpringFactoriesLoader
				.loadFactories(FailureAnalysisReporter.class, classLoader);
		if (analysis == null || reporters.isEmpty()) {
			return false;
		}
		for (FailureAnalysisReporter reporter : reporters) {
			reporter.report(analysis);
		}
		return true;
	}
5、准备容器
这里主要做的是在容器刷新之前的准备动作。其中包括将启动类注入容器,为后续开启自动化配置做准备。
prepareContext(context, environment, listeners, applicationArguments, printedBanner);

private void prepareContext(ConfigurableApplicationContext context,
			ConfigurableEnvironment environment, SpringApplicationRunListeners listeners,
			ApplicationArguments applicationArguments, Banner printedBanner) {
		//1.设置容器环境,包括各种变量
		context.setEnvironment(environment);
		//2.执行容器后置处理
		postProcessApplicationContext(context);
		//3.执行容器中的ApplicationContextInitializer(包括 spring.factories和自定义的实例)
		applyInitializers(context);
		//4.发送容器已经准备好的事件,通知各监听器
		listeners.contextPrepared(context);
		//5.输出log
		if (this.logStartupInfo) {
			logStartupInfo(context.getParent() == null);
			logStartupProfileInfo(context);
		}
		// Add boot specific singleton beans
		//6.注册启动参数bean,这里将容器指定的参数封装成bean,注入容器
		context.getBeanFactory().registerSingleton("springApplicationArguments",
				applicationArguments);
		//7.设置banner
		if (printedBanner != null) {
			context.getBeanFactory().registerSingleton("springBootBanner", printedBanner);
		}
		// Load the sources
		//8.获取我们的启动类指定的参数,可以是多个
		Set<Object> sources = getAllSources();
		Assert.notEmpty(sources, "Sources must not be empty");
		//9.加载我们的启动类,将启动类注入容器
		load(context, sources.toArray(new Object[0]));
		//10.发布容器已加载事件。
		listeners.contextLoaded(context);
	}
容器的后置处理:
protected void postProcessApplicationContext(ConfigurableApplicationContext context) {
		if (this.beanNameGenerator != null) {
			context.getBeanFactory().registerSingleton(AnnotationConfigUtils.CONFIGURATION_BEAN_NAME_GENERATOR,
					this.beanNameGenerator);
		}
		if (this.resourceLoader != null) {
			if (context instanceof GenericApplicationContext) {
				((GenericApplicationContext) context).setResourceLoader(this.resourceLoader);
			}
			if (context instanceof DefaultResourceLoader) {
				((DefaultResourceLoader) context).setClassLoader(this.resourceLoader.getClassLoader());
			}
		}
		if (this.addConversionService) {
			context.getBeanFactory().setConversionService(ApplicationConversionService.getSharedInstance());
		}
	}
这里默认不执行任何逻辑,因为beanNameGenerator和resourceLoader默认为空。之所以这样做,是springBoot留给我们的扩展处理方式,类似于这样的扩展,spring中也有很多。
加载启动指定类(重点)
load(context, sources.toArray(new Object[0]));


protected void load(ApplicationContext context, Object[] sources) {
		if (logger.isDebugEnabled()) {
			logger.debug("Loading source " + StringUtils.arrayToCommaDelimitedString(sources));
		}
		BeanDefinitionLoader loader = createBeanDefinitionLoader(getBeanDefinitionRegistry(context), sources);
		if (this.beanNameGenerator != null) {
			loader.setBeanNameGenerator(this.beanNameGenerator);
		}
		if (this.resourceLoader != null) {
			loader.setResourceLoader(this.resourceLoader);
		}
		if (this.environment != null) {
			loader.setEnvironment(this.environment);
		}
		loader.load();
	}
这里参数即为我们项目启动时传递的参数:SpringApplication.run(SpringBootApplication.class, args);
由于我们指定了启动类,所以上面也就是加载启动类到容器。
(需要注意的是,springBoot2会优先选择groovy加载方式,找不到再选用java方式。或许groovy动态加载class文件的性能更胜一筹。)
private int load(Class<?> source) {
		if (isGroovyPresent()
				&& GroovyBeanDefinitionSource.class.isAssignableFrom(source)) {
			// Any GroovyLoaders added in beans{} DSL can contribute beans here
			GroovyBeanDefinitionSource loader = BeanUtils.instantiateClass(source,
					GroovyBeanDefinitionSource.class);
			load(loader);
		}
		if (isComponent(source)) {
			//以注解的方式,将启动类bean信息存入beanDefinitionMap
			this.annotatedReader.register(source);
			return 1;
		}
		return 0;
	}
上面代码中启动类被加载到 beanDefinitionMap中,后续该启动类将作为开启自动化配置的入口,后面一篇文章我会详细的分析,启动类是如何加载,以及自动化配置开启的详细流程。
加载完毕之后通知监听器,容器以及准备完毕
listeners.contextLoaded(context);
6、刷新容器
执行到这里,springBoot相关的处理工作已经结束,接下的工作就交给了spring。
refreshContext(context);


private void refreshContext(ConfigurableApplicationContext context) {
		refresh(context);
		if (this.registerShutdownHook) {
			try {
				context.registerShutdownHook();
			}
			catch (AccessControlException ex) {
				// Not allowed in some environments.
			}
		}
	}


protected void refresh(ApplicationContext applicationContext) {
		Assert.isInstanceOf(AbstractApplicationContext.class, applicationContext);
		((AbstractApplicationContext) applicationContext).refresh();
	}


@Override
	public void refresh() throws BeansException, IllegalStateException {
synchronized (this.startupShutdownMonitor) {
			// Prepare this context for refreshing.
			/**
			 * 刷新上下文环境
			 * 初始化上下文环境,对系统的环境变量或者系统属性进行准备和校验
			 * 如环境变量中必须设置某个值才能运行,否则不能运行,这个时候可以在这里加这个校验,
			 * 重写initPropertySources方法就好了
			 */
			prepareRefresh();

			// Tell the subclass to refresh the internal bean factory.
			/**
			 * 初始化BeanFactory,解析XML,相当于之前的XmlBeanFactory的操作,
			 */
			ConfigurableListableBeanFactory beanFactory = obtainFreshBeanFactory();

			// Prepare the bean factory for use in this context.
			/**
			 * 为上下文准备BeanFactory,即对BeanFactory的各种功能进行填充,如常用的注解@Autowired @Qualifier等
			 * 设置SPEL表达式#{key}的解析器
			 * 设置资源编辑注册器,如PerpertyEditorSupper的支持
			 * 添加ApplicationContextAwareProcessor处理器
			 * 在依赖注入忽略实现*Aware的接口,如EnvironmentAware、ApplicationEventPublisherAware等
			 * 注册依赖,如一个bean的属性中含有ApplicationEventPublisher(beanFactory),则会将beanFactory的实例注入进去
			 */
			prepareBeanFactory(beanFactory);

			try {
				// Allows post-processing of the bean factory in context subclasses.
				/**
				 * 提供子类覆盖的额外处理,即子类处理自定义的BeanFactoryPostProcess
				 */
				postProcessBeanFactory(beanFactory);

				// Invoke factory processors registered as beans in the context.
				/**
				 * 激活各种BeanFactory处理器,包括BeanDefinitionRegistryBeanFactoryPostProcessor和普通的BeanFactoryPostProcessor
				 * 执行对应的postProcessBeanDefinitionRegistry方法 和  postProcessBeanFactory方法
				 */
				invokeBeanFactoryPostProcessors(beanFactory);

				// Register bean processors that intercept bean creation.
				/**
				 * 注册拦截Bean创建的Bean处理器,即注册BeanPostProcessor,不是BeanFactoryPostProcessor,注意两者的区别
				 * 注意,这里仅仅是注册,并不会执行对应的方法,将在bean的实例化时执行对应的方法
				 */
				registerBeanPostProcessors(beanFactory);

				// Initialize message source for this context.
				/**
				 * 初始化上下文中的资源文件,如国际化文件的处理等
				 */
				initMessageSource();

				// Initialize event multicaster for this context.
				/**
				 * 初始化上下文事件广播器,并放入applicatioEventMulticaster,如ApplicationEventPublisher
				 */
				initApplicationEventMulticaster();

				// Initialize other special beans in specific context subclasses.
				/**
				 * 给子类扩展初始化其他Bean
				 */
				onRefresh();

				// Check for listener beans and register them.
				/**
				 * 在所有bean中查找listener bean,然后注册到广播器中
				 */
				registerListeners();

				// Instantiate all remaining (non-lazy-init) singletons.
				/**
				 * 设置转换器
				 * 注册一个默认的属性值解析器
				 * 冻结所有的bean定义,说明注册的bean定义将不能被修改或进一步的处理
				 * 初始化剩余的非惰性的bean,即初始化非延迟加载的bean
				 */
				finishBeanFactoryInitialization(beanFactory);

				// Last step: publish corresponding event.
				/**
				 * 初始化生命周期处理器DefaultLifecycleProcessor,DefaultLifecycleProcessor含有start方法和stop方法,spring启动的时候调用start方法开始生命周期,
				 * spring关闭的时候调用stop方法来结束生命周期,通常用来配置后台程序,启动有一直运行,如一直轮询kafka
				 * 启动所有实现了Lifecycle接口的类
				 * 通过spring的事件发布机制发布ContextRefreshedEvent事件,以保证对应的监听器做进一步的处理,即对那种在spring启动后需要处理的一些类,这些类实现了
				 * ApplicationListener<ContextRefreshedEvent> ,这里就是要触发这些类的执行(执行onApplicationEvent方法)另外,spring的内置Event有ContextClosedEvent、ContextRefreshedEvent、ContextStartedEvent、ContextStoppedEvent、RequestHandleEvent
				 * 完成初始化,通知生命周期处理器lifeCycleProcessor刷新过程,同时发出ContextRefreshEvent通知其他人
				 */
				finishRefresh();
			}

			catch (BeansException ex) {
				if (logger.isWarnEnabled()) {
					logger.warn("Exception encountered during context initialization - " +
							"cancelling refresh attempt: " + ex);
				}

				// Destroy already created singletons to avoid dangling resources.
				destroyBeans();
				// Reset 'active' flag.
				cancelRefresh(ex);
				// Propagate exception to caller.
				throw ex;
			}

			finally {
				// Reset common introspection caches in Spring's core, since we
				// might not ever need metadata for singleton beans anymore...
				resetCommonCaches();
			}
		}
}
refresh方法在spring整个源码体系中非常的重要,是实现 ioc 和 aop的关键。
7、刷新容器后的扩展接口
afterRefresh(context, applicationArguments);


 6434
6434


 被折叠的 条评论
为什么被折叠?
被折叠的 条评论
为什么被折叠?
 到【灌水乐园】发言


