


centos6中修改网卡名称方法
概括步骤:
1.修改 /etc/udev/rules.d/70-persistent-net.rules 文件中网卡名
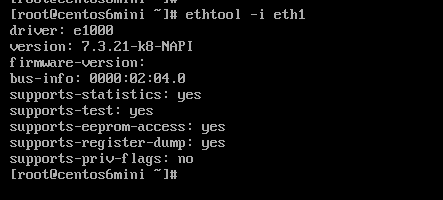
2.ethtool -i eth2 查看网卡驱动模块名
3.modprobe -r e1000 卸载网卡模块
4.modprobe e1000 重新加载网卡模块
5.修改/etc/sysconfig/network-scripts中网卡的配置文件(使其格式为ifcfg-网卡名)
6.重启网卡服务/etc/inint.d/network restart
具体步骤如下:
1、编辑 /etc/udev/rules.d/70-persistent-net.rules 将其中网卡mask地址对应的网卡名称更改为所需的名称,(我用的是vi你可以使用vim)
[root@centos6 ~]#vi /etc/udev/rules.d/70-persistent-net.rules

2.ethtool -i eth2 || dmesg | grep –i eth0 查看驱动模块信息(两个命令都可以使用)
# dmesg //显示开机加载的网卡信息 grep –i eth0 过滤信息 (没有太大用)
# #ethtool eth2 //这个命令是查看网卡更详细的信息的比如工作模式是否为双工模式

3.modprobe -r e1000 || rmmod e1000 卸载模块(两个命令都可以使用 )
4.modprobe e1000 重新加载模块

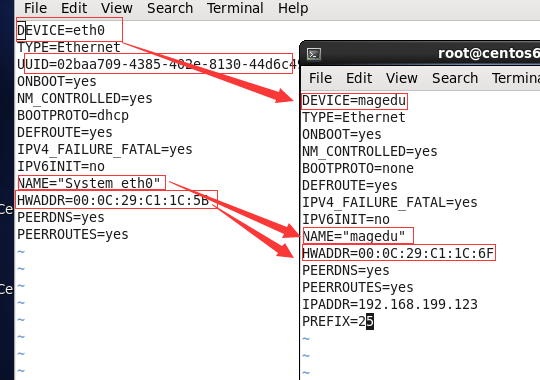
5.在/etc/sysconfig/network-scripts/中将原网卡的配置文件改文件名,使其格式为ifcfg-网卡名
(新加的网卡可能会出现没有配置文件,复制一份其他网卡配置文件进行修改)

-
修改网卡的配置文件(网卡的IP地址等信息是读取这个配置文件的)
7.ifdown 网卡名 //关闭网卡[root@centos6 ~]#ifup eth1
8.ifup 网卡名 //启动网卡
[root@centos6 ~]#ifdown eth1也可以将两步骤合并成:
service network restart   //启动网卡服务
[root@centos6mini ~]# /etc/init.d/network restart //重启网卡服务
[root@centos6 ~]#service network restart   //重启网卡服务
Shutting down interface eth0:  Device state: 3 (disconnect

Shutting down interface eth1:  Device state: 3 (disconnected)
                                                                                                            [  OK  ]
Shutting down loopback interface:                        [  OK  ]
Bringing up loopback interface:                          [  OK  ]
Bringing up interface eth0:  Active connection state: activating
Active connection path: /org/freedesktop/NetworkManager/ActiveConnection/17
state: activated
Connection activated
                                                                                                            [  OK  ]
Bringing up interface eth1:  Active connection state: activating
Active connection path: /org/freedesktop/NetworkManager/ActiveConnection/18
state: activated
Connection activated
                                                                                                            [  OK  ]
还有可以使用新服务(NetworkManager),来实现更改网卡配置文件的方式:
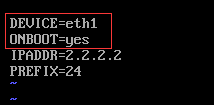
[root@centos6 ~]#vi /etc/sysconfig/network-scripts/ifcfg-eth1
重新加载网卡模块

重启网卡服务
[root@centos6 ~]# service NetworkManager restart
[root@centos6 ~]# /etc/init.d/NetworkManager restart


 5832
5832


 被折叠的 条评论
为什么被折叠?
被折叠的 条评论
为什么被折叠?
 到【灌水乐园】发言


