


1、概述
卷积神经网络相对于BP神经网络多了个感受野机制。
输入层:
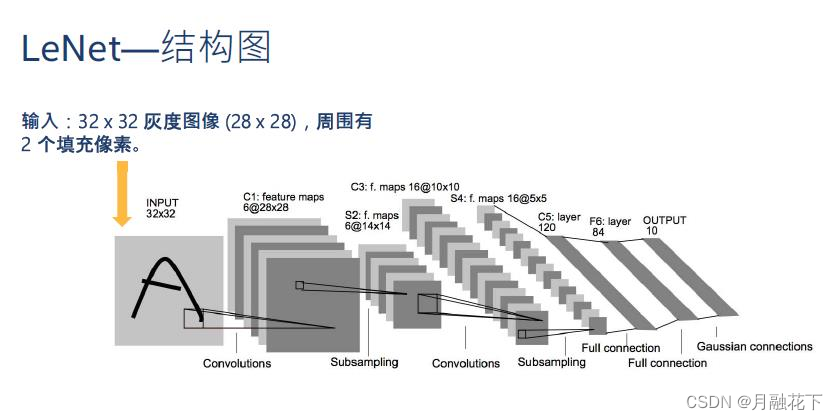
卷积层:


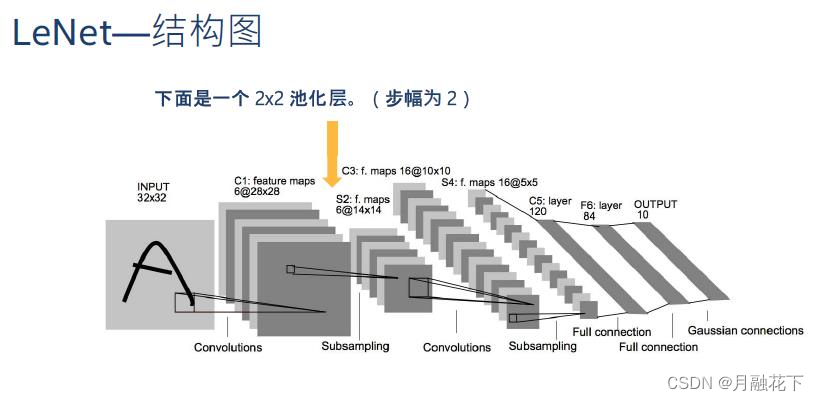
池化层:

卷积层:


池化层:


扁平化:

全连接层:

输出层:


2、实验部分
2.1 模块加载
import tensorflow.compat.v1 as tf
import numpy as np
import os
from PIL import Image
2.2 读取数据
os.listdir(path)
参数:
path -- 需要列出的目录路径
返回值:
返回指定路径下的文件和文件夹列表。
//
PIL.Image.open(fp, mode=’r’)
参数 :fp:一个文件名(字符串)、pathlib.Path对象或一个文件对象。文件对象必须实现read()、seek()和tell()方法,并且是以二进制模式打开。
mode :模式。如果给出,这个参数必须是 “r”。
返回类型:一个图像对象。
def read_data(data_dir):
    datas = []
    labels = []
    fpaths = []

    for fname in os.listdir(data_dir):
        fpath = os.path.join(data_dir,fname);
        fpaths.append(fpath)
        image = Image.open(fpath)
        data = np.array(image)/255
        label = int(fname.split("_")[0])
        datas.append(data)
        labels.append(label)

    datas = np.array(datas)
    labels = np.array(labels)

    print("shape of datas:{}\tshape of labels:{}".format(datas.shape,labels.shape))

    return fpaths,datas,labels;
#数据读取
data_dir = "../data/Image_classification";
fpaths,datas,labels = read_data(data_dir)
#计算有多少类图片
num_classes = len(set(labels))![]()
2.3 网络结构
#定义placeholder,存放输入和标签
tf.disable_eager_execution()
datas_placeholder = tf.placeholder(tf.float32,[None,32,32,3])
labels_placeholder = tf.placeholder(tf.int32,[None])
#存放DropOut参数的容器,训练时为0.5,测试时为0
dropout_placeholder = tf.placeholder(tf.float32)tf.layers.conv2d(
inputs,
filters,
kernel_size,
strides=(1, 1),
padding=‘valid’,
data_format=‘channels_last’,
dilation_rate=(1, 1),
activation=None,
use_bias=True,
kernel_initializer=None,
bias_initializer=init_ops.zeros_initializer(),
kernel_regularizer=None,
bias_regularizer=None,
activity_regularizer=None,
trainable=True,
name=None,
reuse=None
)
参数:
input:指需要做卷积的输入图像,要求是一个Tensor,具有[batch,in_height,in_width,in_channels]这样的图像,具体含义是“训练时一个batch的图片数量, 图片的高度,图片的宽度,图像通道数”,注意:这是一个四维的Tensor,要求类型为float32和float64之一
filters: 整数,输出空间的维数(即卷积中的滤波器数).
kernel_size:滤波器的大小,如果是一个整数,则宽高相等。
strides:一个整数,或者包含了两个整数的元组/队列,表示卷积的纵向和横向的步长。如果是一个整数,则横纵步长相等。另外, strides 不等于1 和 dilation_rate 不等于1 这两种情况不能同时存在。
padding:定义元素边框与元素内容之间的空间,“valid” 或者 “same”(不区分大小写)。“valid” 表示边缘不填充,"same"表示填充到过滤器可以达到图 像边缘,注:在same情况下,只有在步长为1时生成的feature map才会和输入值相等。
valid情况:输出的宽高
output_width = (in_width - filter_width + 1)/strides_width
ouput_height = (in_width - filter_width + 1)/strides_width 结果向上取整
same情况:输出的宽高和卷积核没有关系
out_height = in_height/strides_height
out_width = in_width/strides_width
补零规则:
#pad_height:补零的行数 pad_width:补零的列数
pad_height = max((out_height-1)*strides_height+filter_height-in_height,0)
pad_width = max((out_width-1)*strides_width+filter_width-in_width,0)
#代表上下左右四个方向填零的行列数
pad_top = pad_height/2
pad_bottom = pad_height - pad_top
pad_left = pad_width/2
pad_right = pad_width - pad_left
data_format:一个字符串,可以是channels_last(默认)或channels_first,表示输入维度的顺序。channels_last对应于具有形状(batch, height, width, channels)的输入,而channels_first对应于具有形状(batch, channels, height, width)的输入
(7)dilation_rate:2个整数的整数或元组/列表,指定用于扩张卷积的扩张率.可以是单个整数,以指定所有空间维度的相同值.目前,指定任何dilation_rate值!= 1与指定任何步幅值!= 1都不相容.
(8)activation:激活功能,将其设置为“None”以保持线性激活.
(9)use_bias:Boolean,该层是否使用偏差.
(10)kernel_initializer:卷积内核的初始化程序.
(11)bias_initializer:偏置向量的初始化器,如果为None,将使用默认初始值设定项.
(12)kernel_regularizer:卷积内核的可选正则化器.
(13)bias_regularizer:偏置矢量的可选正则化器.
(14)activity_regularizer:输出的可选正则化函数.
(15)kernel_constraint:由Optimizer更新后应用于内核的可选投影函数(例如,用于实现层权重的范数约束或值约束).该函数必须将未投影的变量作为输入,并且必须返回投影变量(必须具有相同的形状).在进行异步分布式培训时,使用约束是不安全的.
(16)trainable:Boolean,如果为True,还将变量添加到图集合GraphKeys.TRAINABLE_VARIABLES中(请参阅参考资料tf.Variable).
(17)name:字符串,图层的名称.————————————————————————————————————————————————
tf.layers.max_pooling2d(
inputs,
pool_size,
strides,
padding='valid',
data_format='channels_last',
name=None
)
卷积层+池化层:
#定义卷积层,20个卷积核,卷积核大小为5,用Relu函数激活
conv0= tf.layers.conv2d(datas_placeholder,20,5,activation=tf.nn.relu)
print("第一次卷积:",conv0.get_shape())
#定义最大池化层,pooling的窗口为2*2,步长为2*2
pool0=tf.layers.max_pooling2d(conv0,[2,2],[2,2])
print("第一次池化:",pool0.get_shape())
卷积层+池化层:
#定义卷积层,40个卷积核,卷积核大小为5,用Relu函数激活
conv1= tf.layers.conv2d(pool0,40,5,activation=tf.nn.relu)
print("第二次卷积:",conv1.get_shape())
#定义最大池化层,pooling的窗口为2*2,步长为2*2
pool1=tf.layers.max_pooling2d(conv1,[2,2],[2,2])
print("第二次池化:",pool1.get_shape())
扁平化:
#将3维特征转换成一维向量
flatten = tf.layers.flatten(pool1)
print("扁平化:",flatten.get_shape())![]()
全连接层:
tf.layers.dense(
inputs, #层的输入
units, #该层的输出维度
activation=None, #激活函数
use_bias=True,
kernel_initializer=None, # 卷积核的初始化器
bias_initializer=tf.zeros_initializer(), # 偏置项的初始化器
kernel_regularizer=None, # 卷积核的正则化
bias_regularizer=None, # 偏置项的正则化
activity_regularizer=None,
kernel_constraint=None,
bias_constraint=None,
trainable=True,
name=None, # 层的名字
reuse=None # 是否重复使用参数
)首先,TensorFlow中封装了全连接层函数 tf.layers.dense(),方便了开发者自己手动构造权重矩阵W WW和偏移矩阵 b bb,利用矩阵乘法实现全连接层。
tf.layers.dense( input, units=k )会在内部自动生成一个权矩阵:kernel 和偏移项:bias,
例如:
对于尺寸为[m, n]的二维张量input, tf.layers.dense()会生成:尺寸为[n, k]的权矩阵:kernel,和尺寸为[m, k] 的偏移项:bias。
内部的计算过程为y = input * kernel + bias,输出值y的维度为[m, k]。
#全连接层,转换长度为400的特征向量.
fc = tf.layers.dense(flatten,400,activation=tf.nn.relu)
print("连接层:",fc.get_shape())![]()
tf.layers.dropout(
inputs,
rate=0.5,
noise_shape=None,
seed=None,
training=False,
name=None
)
参数:
inputs:必须,即输入数据。
rate:可选,默认为 0.5,即 dropout rate,如设置为 0.1,则意味着会丢弃 10% 的神经元。
noise_shape:可选,默认为 None,int32 类型的一维 Tensor,它代表了 dropout mask 的 shape,dropout mask 会与 inputs 相乘对 inputs 做转换,例如 inputs 的 shape 为 (batch_size, timesteps, features),但我们想要 droput mask 在所有 timesteps 都是相同的,我们可以设置 noise_shape=[batch_size, 1, features]。
seed:可选,默认为 None,即产生随机熟的种子值。
training:可选,默认为 False,布尔类型,即代表了是否标志位 training 模式。
name:可选,默认为 None,dropout 层的名称。
————————————————————————————————————————————————
#加上droupout,防止过拟合
dropout_fc = tf.layers.dropout(fc,dropout_placeholder)
print("过拟合:",dropout_fc.get_shape())![]()
激活层:
#来激活输出层1
logits = tf.layers.dense(dropout_fc,num_classes)
print("输出层:",logits.get_shape())
predicted_labels = tf.arg_max(logits,1)![]()
损失函数:
tf.one_hot(
indices,#输入,这里是一维的
depth,# one hot dimension.
on_value=None,#output 默认1
off_value=None,#output 默认0
axis=None,#根据我的实验,默认为1
dtype=None,
name=None
)
例子:
import tensorflow as tf
import numpy as np
z=np.random.randint(0,10,size=[10])
y=tf.one_hot(z,10,on_value=1,off_value=None,axis=0)
with tf.Session()as sess:
print(z)
print(sess.run(y))
[5 7 7 0 5 5 2 0 0 0]
[[0 0 0 1 0 0 0 1 1 1]
[0 0 0 0 0 0 0 0 0 0]
[0 0 0 0 0 0 1 0 0 0]
[0 0 0 0 0 0 0 0 0 0]
[0 0 0 0 0 0 0 0 0 0]
[1 0 0 0 1 1 0 0 0 0]
[0 0 0 0 0 0 0 0 0 0]
[0 1 1 0 0 0 0 0 0 0]
[0 0 0 0 0 0 0 0 0 0]
[0 0 0 0 0 0 0 0 0 0]]
————————————————
#利用交叉熵定义损失
loss = tf.nn.softmax_cross_entropy_with_logits_v2(labels=tf.one_hot(labels_placeholder,num_classes),logits = logits)

#平均损失
mean_loss = tf.reduce_mean(loss)优化器:
#定义优化器
optimizer = tf.train.AdamOptimizer(learning_rate=0.05).minimize(loss)
2.4 网络训练
train = False;
saver = tf.train.Saver()
model_path='../model/Image_classification/'

#训练
with tf.Session() as sess:
    if train:
        print("训练模式")
        sess.run(tf.global_variables_initializer())
        #定义输入和label
        train_feed_dict = {
            datas_placeholder: datas,
            labels_placeholder: labels,
            dropout_placeholder:0.25
        }
        for step in range(150):
            _,mean_loss_val = sess.run([optimizer,mean_loss],feed_dict=train_feed_dict)
            if step%10==0:
                print("step={}\tmean loss={}".format(step,mean_loss_val))
        saver.save(sess,model_path)
        print("训练结束,保存模型到{}".format(model_path))
    else:
        print("测试模式")
        saver.restore(sess,model_path)
        print("从{}载入模型".format(model_path))
        #label和名称的对照关系
        label_name_dict = {
            1:'飞机',
            2:"汽车",
            3:"小熊猫"
        }
        #定义输入和label填充容器
        test_feed_dict={
            datas_placeholder: datas,
            labels_placeholder: labels,
            dropout_placeholder: 0
        }
        predicted_labels_val = sess.run(predicted_labels,feed_dict=test_feed_dict)
        print(predicted_labels_val)
        for fpath,real_label,predicted_label in zip(fpaths,labels,predicted_labels_val):
            real_label_name= label_name_dict[real_label]
            predicted_label_name = label_name_dict[predicted_label]
            print("{}\t{}=>{}".format(fpath,real_label_name,predicted_label_name))
notebook下载地址:


 1856
1856


 被折叠的 条评论
为什么被折叠?
被折叠的 条评论
为什么被折叠?
 到【灌水乐园】发言


