


目录
4.11-多线程跑 firefox 和 chrome 并行执行
第 4 章 selenium+pytest 项目案例
前面两章的学习对 pytest 框架有了初步的了解,接下来把 pytest 框架和 selenium 结合起来,运用到项目中。
之前前学过 unittest 框架的同学应该知道,unittest 框架用个痛点, 用例不用例之间的独立的,不能跨脚本运行数据共享。比如 test_01.py 的 driver,丌能共享到 test_02.py 上。返样会导致一个问题,每次运 行一个.py 的脚本用例,会重复打开浏览器,浪费比较多的时间。
pytest 框架就能很好的解决返个问题,叧需在 conftest.py 设置一 个前置的 fixture 功能,设置为 session 级别,返样所有的用例之间都 能共享 driver 了。
4.1-本地项目环境搭建
写 web 自动化用例,第一个还是从登录案例开始讲,本章的案例都以禅道项目为例。 可以在自己本机上搭建一个禅道环境,这样方便学习。
禅道搭建
这里我们选择的版本是Zentao 版本:ZenTaoPMS.9.0.1不同的禅道版本,会有差异
我的安装路径D:\xampp
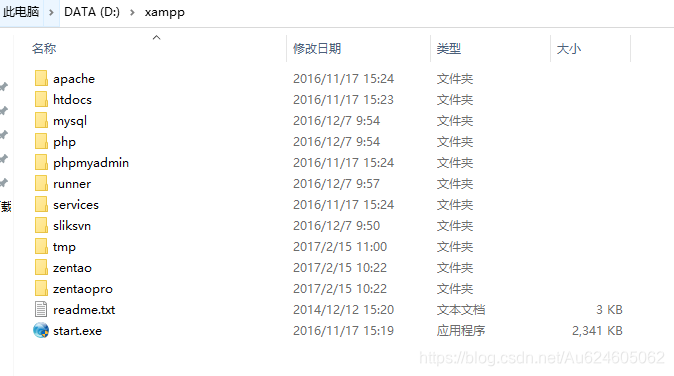
点击start.exe进行启动
再次点击启动 安装端口完成后访问禅道
出现运行界面后,点访问禅道就能打开登录页面了,默认地址是: http://127.0.0.1/index.php (默认是 80 端口启动,有时候 80 端口被占,也会在 81 端口启动:http://127.0.0.1: 81/index.php
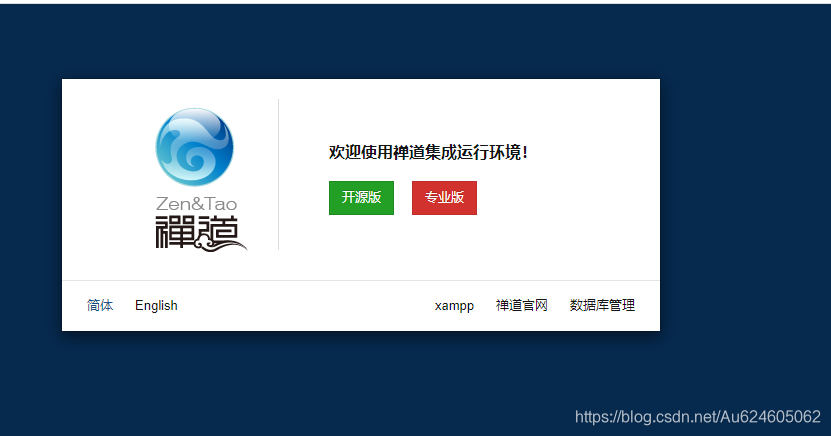 这里选择开源版进入
默认登录账号:admin 默认密码:123456
这样我们的环境就搭建好了
4.2-二次封装 selenium 基本操作
在写代码之前先对selenium的一些常规操作进行二次封装,为什么要二次封装呢?用过是同学都知道,页面上的元素由于网络加载的原因,经常会今天好好的
第二天就报错了,为了解决这种不稳定的问题,专门对元素定位做个封装处理,多次查找元素
另外还有一个原因selenium的定位方法实在是太过于麻烦,每次写个定位还得driver,find...................还不如自己封装一个简单的定位
4.2.1-项目结构
新建一个zentao_pytest的工程,把封装的代码放到common目录下,case目录主要放测试用例代码
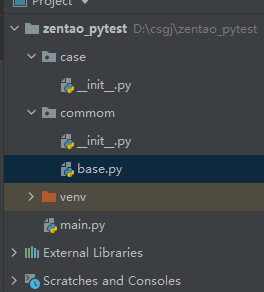
封装代码
封装 selenium 基本操作,保存为 base.py 放到 common 目录下
base.py
from selenium import webdriver
from selenium.webdriver.support.wait
import WebDriverWait
from selenium.webdriver.support
import expected_conditions as EC
from selenium.webdriver.support.select import Select
from selenium.webdriver.common.action_chains
import ActionChains
class Base():
    '''基于原生的selenium做二次封装'''
    def __init__(self,driver):#初始化self,driver
        self.driver=driver
        self.timeout=10
        self.t=0.5
    def findElement(self,locator):
        '''定位到元素,返回元素的对象,没定位到,timeout异常'''
        if not isinstance(locator,tuple):#Isinstance的用法是用来判断一个量是否是相应的类型,接受的参数一个是对象加一种类型
            print('locator参数类型错误,必须传元组类型:loc=("id","value1")')
        else:
            print('正在定位元素信息:定位方式->%s,value值—>%s'%(locator[0],locator[1]))#返回一个元组取下标0和1
            ele=WebDriverWait(self.driver,
            self.timeout,
            self.t).until(EC.presence_of_element_located(locator))#显性等待方法
            return ele
    def findElements(self,locator):
        if not isinstance(locator,tuple):
            print('locator参数类型错误,必须传元组类型:loc=("id","value1")')
        else:
            try:
                print('正在定位元素信息:定位方式->%s,value值—>%s'%(locator[0],locator[1]))
                eles=WebDriverWait(self.driver,
                self.timeout,
                self.t).until(EC.presence_of_element_located(locator))#显性等待方法
                return eles
            except:
                return []
    def sendkeys(self,locator,text=''):
        ele=self.findElement(locator)
        ele.send_keys(text)

    def click(self,locator):#点击方法
        ele=self.findElement(locator)
        ele.click()

    def clear(self,locator):#清除方法
        ele=self.findElement(locator)
        ele.clear()

    def isSelected(self,locator):
        '''判断元素是否被选中,返回bool布尔值'''
        ele=self.findElement(locator)
        r=ele.is_selected()#判断元素是否被选中并返回
        return r

    def isElementExist(self,locator):
        try:
            self.findElement(locator)
            return True
        except:
            return False

    def is_title(self,_title=''):
        '''返回bool值'''
        try:
            result=WebDriverWait(self.driver,
            self.timeout,
            self.t).until(EC.title_ls(_title))
            return result
        except:
            return False

    def is_title_contains(self,_title=''):
        '''返回bool值'''
        try:
            result = WebDriverWait(self.driver,
            self.timeout,
            self.t).until(EC.title_contains(_title))
            return result
        except:
            return False

    def is_text_in_element(self,locator,_text=''):
        '''返回bool值'''
        if not isinstance(locator,tuple):
            print('locator参数类型错误,必须传元组类型:loc=("id","value1")')
            try:
                result = WebDriverWait(self.driver,
                self.timeout,
                self.t).until(EC.text_to_be_present_in_element(locator,_text))
                return result
            except:
                return False

    def is_value_in_element(self,locator,_value=''):
        '''返回bool值,value为空字符串,返回Fasle'''
        if not isinstance(locator,tuple):
            print('locator参数类型错误,必须传元组类型:loc=("id","value1")')
            try:
                result=WebDriverWait(self.driver,
                self.timeout,
                self.t).until(EC.text_to_be_present_in_element_value(locator,_value))
                return result
            except:
                return False

    def is_alert(self,timeout=3):
        try:
            result=WebDriverWait(self.driver,timeout,
            self.t).until(EC.alert_is_present())
            return result
        except:
            return False

    def get_title(self):
        '''获取title'''
        return self.driver.title

    def get_text(self,locator):
        '''获取文本'''
        try:
            t=self.findElement(locator).text
            return t
        except:
            print('获取text失败,返回”“')
            return ""

    def get_attribute(self,locator,name):
        '''获取属性'''
        try:
            element=self.findElement(locator)
            return element.get_attribute(name)
        except:
            print('获取%属性失败,返回""'%name)
            return ""

    def js_focus_element(self,locator):
        '''聚焦元素'''
        target=self.findElement(locator)
        self.driver.execute_script("arguments[0].scrollIntoView();",target)

    def js_scroll_top(self):
        '''滚动到顶部'''
        js='window.scrollTo(0,0)'
        self.driver.execute_script(js)

    def js_scroll_end(self,x=0):
        '''滚动到底部'''
        js='window.scrollTo(%s,document.body.scrollHeight)'%x
        self.driver.execute_script(js)

    def select_by_index(self,locator,index=0):
        '''通过索引,index是索引第几个,从0开始,默认选第一个'''
        element=self.findElement(locator)#定位select这一栏
        Select(element).select_by_index(index)

    def select_by_value(self,locator,value):
        '''通过value属性'''
        element=self.findElement(locator)
        Select(element).select_by_value(value)

    def select_by_text(self,locator,text):
        '''通过文本值定位'''
        element=self.findElement(locator)
        Select(element).select_by_visible_text(text)

    def switch_iframe(self,id_index_locator):
        '''切换iframe'''
        try:
            if isinstance(id_index_locator,int):
                self.driver.switch_to.frame(id_index_locator)
            elif isinstance(id_index_locator,str):
                self.driver.switch_to.frame(id_index_locator)
            elif isinstance(id_index_locator,tuple):
                ele=self.findElement(id_index_locator)
                self.driver.switch_to.frame(ele)
        except:
            print('iframe切换异常')

    def switch_handle(self,window_name):
        self.driver.switch_to.window(window_name)

    def switch_alert(self):
        r=self.is_alert()
        if not r:
            print('alert不存在')
        else:
            return r
    def move_to_element(self,locator):
        '''鼠标悬停操作'''
        ele=self.findElement(locator)
        ActionChains(self.driver).move_to_element(ele).perform()

if __name__ == '__main__':
    driver=webdriver.Chrome
    web=Base(driver)
    driver.get('https://home.cnblogs.com/u/yoyoketang/')
    loc_1=('id','header_user_left')
    t=web.get_text(loc_1)
4.3-登陆案例
第一个案例,就从登录开始。
登录案例
以禅道项目为登录案例,测试类TestZenTaoLogin以Test开头
打开浏览器driver变量放到class全局下,用例开始的时候启动浏览器,参数driver能全局传递
setup每次用例都会执行
teardown每次用例结束后清理
teardown_class当class里面的用例执行完后,最后关闭浏览器
from selenium import webdriver
from commom.base import Base
import pytest

#-------------定位元素------------------#
loc1=('id','account')
loc2=('css selector','[name="password"]')
loc3=('xpath',"//*[@id='submit']")
login_user=('css selector','#ueseMenu>a')#登录后的用户名

class TestZenTaoLogin():
    driver=webdriver.Chrome()
    zen=Base(driver)
    url='http://127.0.0.1/zentao/user-login-L3plbnRhby8=.html'

    def setup(self):
        self.driver.get(self.url)

    def teardown(self):
        '''数据清理'''
        print('清空cookies,退出登录状态')
        self.driver.delete_all_cookies()
        self.driver.refresh()

    def teardown_class(self):
        '''用例执行完成最后退出'''
        print('teardown_class:用例执行完成,关闭浏览器')
        self.driver.quit()

    def test_login_1(self):
        '''登录成功用例:账户->admin,密码->123456'''
        self.zen.sendkeys(loc1,'admin')
        self.zen.sendkeys(loc2,'123456')
        self.zen.click(loc3)
        result=self.zen.get_text(login_user)
        print('登录结果,获取到用户名:%s'%result)
        assert  result=='admin'

    def test_login_2(self):
        '''登录失败用例:账户->admin,密码->111'''
        self.zen.sendkeys(loc1, 'admin')
        self.zen.sendkeys(loc2, '111')
        self.zen.click(loc3)
        result = self.zen.get_text(login_user)
        print('登录结果,获取到用户名:%s' % result)
        assert result == ''
if __name__ == '__main__':
    pytest.main(['-v','test_login.py'])
4.4-参数化 parametrize
参数化实际上就是数据驱动,数据驱动在web自动化中运用的场景比较少,但还是需要学习一下
登录函数
把登录独立出来,先写一个登录函数,账户和密码用参数user和psw表示
from selenium import webdriver
from commom.base import Base
import pytest

#-------------定位元素------------------#
loc1=('id','account')
loc2=('css selector','[name="password"]')
loc3=('xpath',"//*[@id='submit']")
login_user=('css selector','#ueseMenu>a')#登录后的用户名
driver=webdriver.Chrome()
zen=Base(driver)
url='http://127.0.0.1/zentao/user-login-L3plbnRhby8=.html'
driver.get(url)
def login(user='admin',psw='123456')
    '''普通登录函数'''
    zen.sendkeys(loc1,user)
    zen.sendkeys(loc2,psw)
    zen.click(loc3)
if __name__ == '__main__':
    login()
parametrize
把测试数据放到test_login_data,单独出来,实现数据与代码的分离,多组数据放到list列表,每组参数可以用元组,也可以用字典
测试用例加上修饰符@pytest.mark.paremetrize实现数据驱动
from selenium import webdriver
from commom.base import Base
import pytest
#----------------测试数据-------------#
test_login_data=[('admin','123456','admin'),('admin111','111','')]
#-------------定位元素------------------#
loc1=('id','account')
loc2=('css selector','[name="password"]')
loc3=('xpath',"//*[@id='submit']")
login_user=('css selector','#ueseMenu>a')#登录后的用户名
driver=webdriver.Chrome()
zen=Base(driver)
url='http://127.0.0.1/zentao/user-login-L3plbnRhby8=.html'
def setup_function():
    driver.get(url)

def teardown_function():
    '''数据清理'''
    print('清空cookies,退出登录状态')
    driver.delete_all_cookies()
    driver.refresh()

def teardown_module():
    '''用例执行完后退出'''
    print('teardown_module:用例执行完成关闭浏览器')
    driver.quit()

def login(user='admin',psw='123456')
    '''普通登录函数'''
    zen.sendkeys(loc1,user)
    zen.sendkeys(loc2,psw)
    zen.click(loc3)

@pytest.mark.parametrize('user,psw,expect',test_login_data)
def test_login(user,psw,expect):
    '''登录用例'''
    login(user,psw)
    result=zen.get_text(login_user)
    print('登录结果,获取到用户名:%s'%result)
    assert result==expect
if __name__ == '__main__':
    pytest.main(['-v','test_login.py'])
4.5-driver 全局调用(session)
用过unittest框架的应该就会遇到一个问题,如果把用例放到多个.py文件会启动多次浏览器,但是又不能把用例放到一个.py里面
这是unittest框架的痛点
pytest框架可以设置全局的session,在conftest里面配置一个@pytest.fixture功能 并设置scope=session就能解决上面的问题conftest会在用例前执行,这就是pytest框架的亮点
scope=session
在工程的根目录新建一个文件conftest.py写入fixture功能
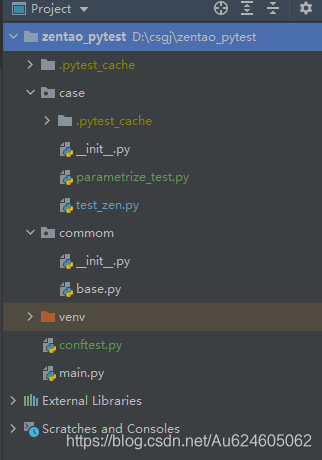
conftest.py代码如下
import pytest
from selenium import webdriver

@pytest.fixture(scope='session')
def driver(request):
    driver=webdriver.Chrome()

    def end():
        driver.quit()
    request.addfinalizer(end)#终结函数
        #这里为什么不用yield呢因为yield不能return,addfinalizer这个功能可以实现饿yield功能一样
        #而且可以return参数传给后面的用例
    return driver
写测试用例
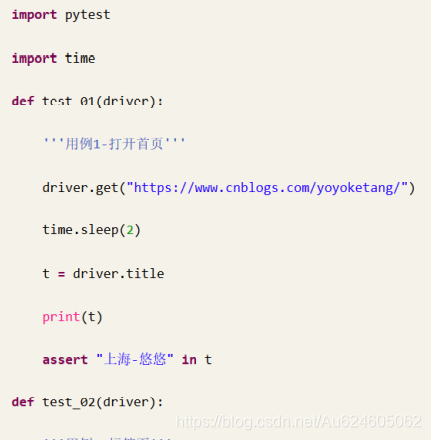
在 case 目录写多个 test_*.py 文件的用例,这里我举 2 个简单的案例 test_01.py 代码
import pytest
import time
def test_blog(driver):
driver.get('https://blog.csdn.net/Au624605062?spm=1011.2124.3001.5343')
time.sleep(3)
t=driver.title
print('测试结果:%s'%t)
assert 'Au624605062' in t,'失败原因,打开博客失败'
if __name__ == '__main__':
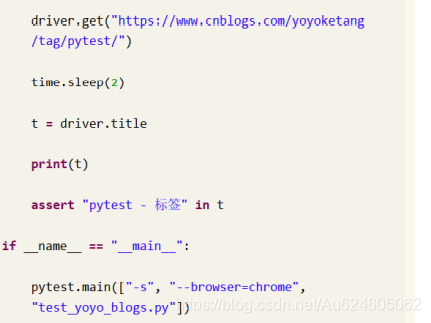
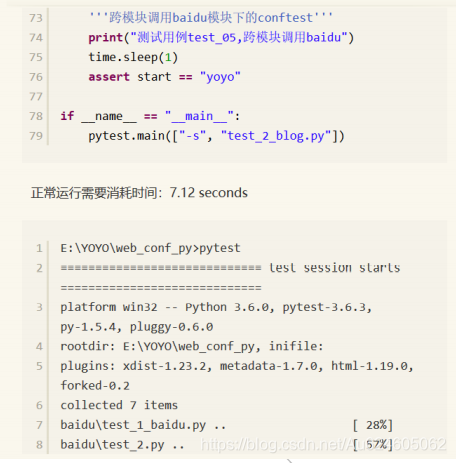
pytest.main(['-v','test_01.py'])test_02.py 代码
import pytest
import time

def test_baidu(driver):
    driver.get('https://www.baidu.com')
    time.sleep(3)
    t=driver.title
    print('测试结果:%s'%t)
    assert '百度一下' in t,'失败原因:打开百度失败'

if __name__ == '__main__':
    pytest.main(['-v','test_02.py'])
test_01.py和test_02.py这2个脚本的代码,单独运行都是能够成功的,接下来执行这2个脚本的用例,看看是不是只打开一次浏览器,然后执行了2个不同的.py文件的用例
4.6-drive 在不同 fixture 之间传递调用
如果要用到fixture函数的返回值,先return出来,用例传fixture对象就能直接调用了,那么fixture和fixture之间的参数是如何共享的呢
实际上跟用例调用一样,在fixture函数后面加上前面那个fixture参数就行了
fixture参数共享driver
实现场景:
1.用例开始前只打开一次浏览器
2.每个用例开始前,都打开首页,从首页开始运行
3.用例执行完最后关闭浏览器
实现方法:
1.先定义一个driver函数,设置scope='module',在当前模块全局生效,这样可以做到只启动一次浏览器,就能执行全部用例
2.定义一个start函数,设置scope='function'在每个用例前调用一次
3.addfinalizer终结函数可以在用例全部执行完成后,最后调用driver.quit()退出浏览器
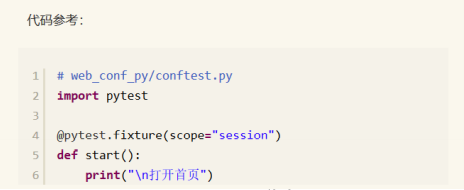
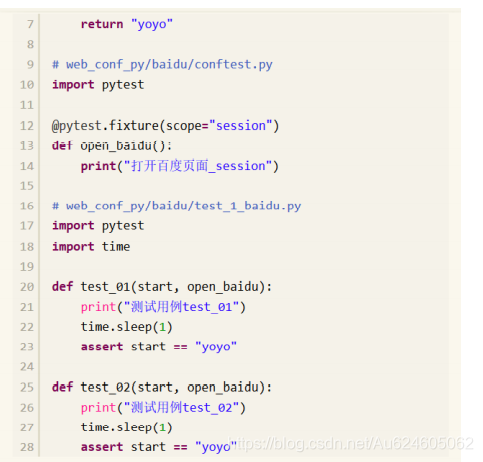
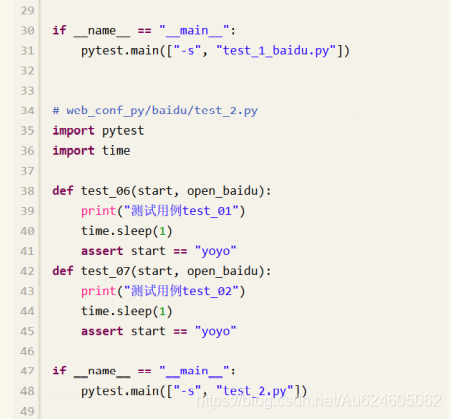
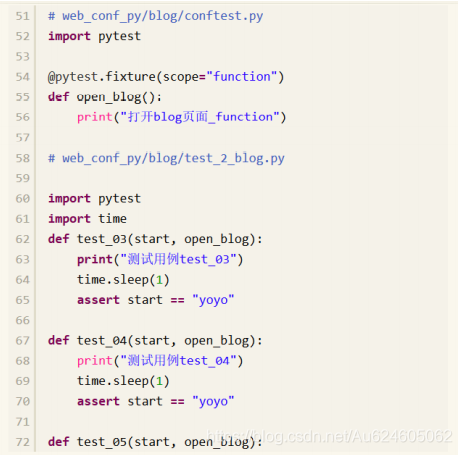
参考代码
以下是一个简单的百度案例,主要实现 driver 参数在 fixture 和用例之间共享,保存为 test_baidu.py
from selenium import webdriver
import pytest
import time
@pytest.fixture(scope='module')
def driver(request):
d=webdriver.Chrome()
print('\n module:start chrome')
def fn():
d.quit()
request.addfinalizer(fn)
return d
@pytest.fixture(scope='function')
def start(driver):
print('function:open baidu')
driver.get('https://www.baidu.com')
time.sleep(1)
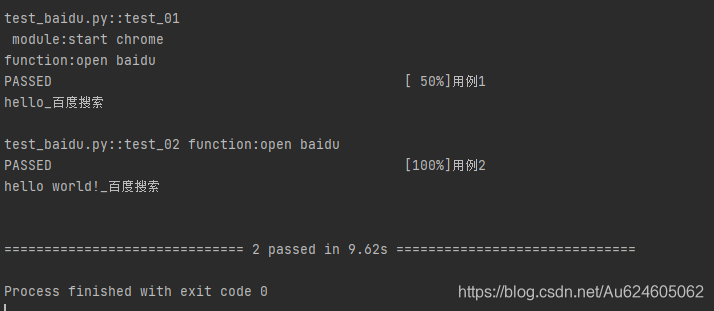
def test_01(driver,start):
print('用例1')
driver.find_element_by_id('kw').send_keys('hello')
driver.find_element_by_id('su').click()
time.sleep(1)
print(driver.title)
assert 'hello' in driver.title
def test_02(driver,start):
print('用例2')
driver.find_element_by_id('kw').send_keys('hello world!')
driver.find_element_by_id('su').click()
time.sleep(1)
print(driver.title)
assert 'hello world!' in driver.title
if __name__ == '__main__':
pytest.main(['-v','test_baidu.py'])运行结果
用例用 class 实现
from selenium import webdriver
import pytest
import time

@pytest.fixture(scope='module')
def driver(request):
    d=webdriver.Chrome()
    print('\n module:start chrome')

    def fn():
        d.quit()
    request.addfinalizer(fn)
    return d
class TestBaidu():
    @pytest.fixture(scope='function')
    def start(self,driver):
        print('function:open baidu')
        driver.get('https://www.baidu.com')
        time.sleep(1)

    def test_01(self,driver):
        print('用例1')
        driver.find_element_by_id('kw').send_keys('hello')
        driver.find_element_by_id('su').click()
        time.sleep(1)
        print(driver.title)
        assert 'hello' in driver.title

    def test_02(self,driver):
        print('用例2')
        driver.find_element_by_id('kw').send_keys('hello world!')
        driver.find_element_by_id('su').click()
        time.sleep(1)
        print(driver.title)
        assert 'hello world!' in driver.title

if __name__ == '__main__':
    pytest.main(['-v','test_baidu.py'])
4.7-登陆作为用例前准备
我们写用例大部分情况都是要先登陆的,如果用例每一次都去进行登录,太浪费时间了,前面讲到可以把driver启动浏览器放到conftest.py里面,只启动一次浏览器,同样的,可以把登录过程放到conftest.py里,这样就能做到只启动一次浏览器,只登录一次,后面的用例全部在已登录情况下测试
登录函数
selenium做自动化测试,一般采用POM设计模式,在pages目录下,新建一个loginpage.py脚本,在里面写登录页面的操作,把登录写成一个函数,以便调用
loginpage.py代码
from selenium import webdriver
from commom.base import Base

host='http//:127.0.0.1:80'
url=host+'/zentao/user-login-L3plbnRhby8=.html'
#-------定位元素信息--------#
loc1=('id','account')
loc2=('css selector','[name="password"]')
loc3=('xpath',"//*[@id='submit']")

def login(driver,user='admin',psw='123456'):
    '''普通登录函数'''
    zen=Base(driver)
    driver.get(url)
    zen.sendkeys(loc1,user)
    zen.sendkeys(loc2,psw)
    zen.click(loc3)

if __name__ == '__main__':
    driver=webdriver.Chrome()
    login(driver)
调用登录功能
conftest.py 内容可以直接调用封装好的登录函数
import pytest
from selenium import webdriver
from pages.loginpage import login

@pytest.fixture(scope='session')
def driver(request):
    driver=webdriver.Chrome()
    #先调用login函数登录
    login(driver)
    def end():
        driver.quit()
    request.addfinalizer(end)#终结函数
    return driver
后面篇幅案例。就直接使用这个 driver 函数 fixture 功能,就不需要每次登录了
4.8-mark 功能使用
当测试的项目用例非常多时,有时候不想执行全部的用例,针对某些模块去测试,这样就可以使用mark功能,对不同的用例标记不同的mark标签,运行的时候选择标签名称就能执行
案例
这里案例,用禅道-后台页面的案例,用到前面写的登录案例
from commom.base import Base
import pytest
import time

host='http://127.0.0.1:80'
url_hou=host+'/zentao/admin.html'
#进入后台页面测试
loc_h=('link text','后台')

loc_about_1=('id','proLink')
loc_about_2=('id','official')
loc_about_3=('id','changelog')
loc_about_4=('id','license')
loc_about_5=('id','extnsion')

class TestHouTai():
    @pytest.fixture(scope='function')
    def open_houtai(self,driver):
        '''每次用例回到后台一级界面首页'''
        self.hou=Base(driver)
        driver.get(url_hou)

    def test_01(self,driver,open_houtai):
        '''关于禅道——升级专业版本'''
        t1=self.hou.get_text(loc_about_1)
        print('获取到的Text文本为:%s'%t1)
        assert t1=='专业版'

    def test_02(self,open_houtai):
        '''关于禅道-官方网站'''
        t1=self.hou.get_text(loc_about_2)
        print('获取到的Text文本为:%s' % t1)
        assert t1=='官方网站'


if __name__ == '__main__':
    pytest.main(['-v','test_after_login.py'])
上面几个案例,步骤都是重复的,只是输入的参数不一样,这种情况就可以使用 pytest.mark.parametruze 装饰器实现测试用例参数化
接下来的用例使用了parameteize参数化测试,并对2个用例加了不同的标记
@pytest.mark.aboutzentao
@pytest.mark.helpwe
保存用例文件为test_houtai.py
from commom.base import Base
import pytest
import time

host='http://127.0.0.1:80'
url_hou=host+'/zentao/admin.html'
#进入后台页面测试
loc_h=('link text','后台')
#关于禅道定位
loc_about_1=('id','proLink')
loc_about_2=('id','official')
loc_about_3=('id','changelog')
loc_about_4=('id','license')
loc_about_5=('id','extnsion')
#帮助我们定位
loc_helpwe_1=('id','donate')
loc_helpwe_2=('id','reportbug')
loc_helpwe_3=('id','feedback')
loc_helpwe_4=('id','recommend')
loc_helpwe_5=('id','cowinmore')
#关于禅道测试数据
test_about_data=[
    (loc_about_1,'专业版'),
    (loc_about_2,'官方网站'),
    (loc_about_3,'版本历史'),
    (loc_about_4,'授权协议'),
    (loc_about_5,'插件平台'),
]
#帮助我们测试数据
test_helpwe_data=[
    (loc_helpwe_1,'捐助我们'),
    (loc_helpwe_2,'汇报Bug'),
    (loc_helpwe_3,'反馈需求'),
    (loc_helpwe_4,'推荐给朋友'),
    (loc_helpwe_5,'更多方式...'),
]
class TestHouTai():
    @pytest.fixture(scope='function')
    def open_houtai(self,driver):
        '''每次用例回到后台一级界面首页'''
        self.hou=Base(driver)
        driver.get(url_hou)
    @pytest.mark.aboutzentao
    @pytest.mark.parametrize('loc_about_x,text',test_about_data)
    def test_aboutzenta(self,driver,open_houtai,loc_about_x,text):
        '''关于禅道-用例'''
        t1=self.hou.get_text(loc_about_x)
        assert t1==text

    @pytest.mark.helpwe
    @pytest.mark.parametrize('loc_helpwe_x,text',test_helpwe_data)
    def test_helpwe(self,driver,open_houtai,loc_helpwe_x,text):
        '''帮助我们-用例'''
        t1=self.hou.get_text(loc_helpwe_x)
        assert t1==text


if __name__ == '__main__':
    pytest.main(['-s','test_houtai.py'])
运行标记的用例需要加一个-m 参数后面带上标记名称就可以了
if __name__ == '__main__':
pytest.main(['-s',‘-m','helpwe',test_houtai.py'])
cmd 运行指令
pytest -v -m helpwe test_houtai.py
4.9-skipif 失败时候跳过(xfail)
我们在测试过程中遇到一些比如登录不上页面打不开的情况这种后面的用例肯定会失败
自动化用例里面也可以先判断一下如果首页打开失败就返回false后面用例判断下前置条件不通过,那就全部标记xfail
标记xfail案例
依据上一篇的案例稍微改动一下
判断后台的首页是否正常打开打开失败就返回false
test_aboutzentao用例加了一个if判断,open_houtai这一步返回false那就是全部标记xfail
is_title(后台管理....)故意设置失败
-s参数显示print信息
from commom.base import Base
import pytest
import time

host='http://127.0.0.1:80'
url_hou=host+'/zentao/admin.html'
#进入后台页面测试
loc_h=('link text','后台')
#关于禅道定位
loc_about_1=('id','proversion')
loc_about_2=('id','official')
loc_about_3=('id','changelog')
loc_about_4=('id','license')
loc_about_5=('id','extension')
#帮助我们定位
loc_helpwe_1=('id','donate')
loc_helpwe_2=('id','reportbug')
loc_helpwe_3=('id','feedback')
loc_helpwe_4=('id','recommend')
loc_helpwe_5=('id','cowinmore')
#关于禅道测试数据
test_about_data=[
    (loc_about_1,'升级专业版本'),
    (loc_about_2,'官方网站'),
    (loc_about_3,'版本历史'),
    (loc_about_4,'授权协议'),
    (loc_about_5,'插件平台'),
]
#帮助我们测试数据
test_helpwe_data=[
    (loc_helpwe_1,'捐助我们'),
    (loc_helpwe_2,'汇报Bug'),
    (loc_helpwe_3,'反馈需求'),
    (loc_helpwe_4,'推荐给朋友'),
    (loc_helpwe_5,'更多方式...'),
]
class TestHouTai():
    @pytest.fixture(scope='function')
    def open_houtai(self,driver):
        '''每次用例回到后台一级界面首页'''
        self.hou=Base(driver)
        driver.get(url_hou)
        #判断后台的首页是否正常打开了,打开失败就返回false
        r=self.hou.is_title('后台管理 - 禅道xxx')
        print('后台管理页面title:%s'%r)
        return r
    @pytest.mark.aboutzentao
    @pytest.mark.parametrize('loc_about_x,text',test_about_data)
    def test_aboutzenta(self,driver,open_houtai,loc_about_x,text):
        '''关于禅道-用例'''
        if not open_houtai:
            pytest.xfail('后台打开失败,标记为xfail')
        t1=self.hou.get_text(loc_about_x)
        print(t1)
        assert t1==text

    @pytest.mark.helpwe
    @pytest.mark.parametrize('loc_helpwe_x,text',test_helpwe_data)
    def test_helpwe(self,driver,open_houtai,loc_helpwe_x,text):
        '''帮助我们-用例'''
        t1=self.hou.get_text(loc_helpwe_x)
        print(t1)
        assert t1==text


if __name__ == '__main__':
    pytest.main(['-s','test_houtai.py'])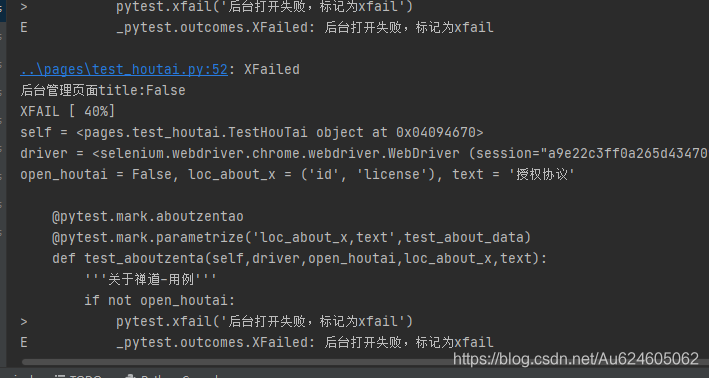
通过案例
把r=self.hou.is_title('后台管理 - 禅道xxx')改为r=self.hou.is_title('后台管理 - 禅道')就能通过了
4.10-一套代码 firefox 与 chrome 切换
当我们写完自动化代码后有时候需要切换浏览器运行,这时候我们可以把启动浏览器作文一个参数传入,这样就能做到一套代码在不同浏览器上测试
addoption命令行参数
使用addoption添加命令行参数可以满足以下功能
1.启动浏览器参数从外部传入,当执行脚本的时候,从cmd输入一个浏览器名称,就能启动对应浏览器,如‘chrome’'firefox'
2.当不输入参数的时候,应该给个默认值如chrome
这样方便调试用例,也就是参数是非必填的
3.把参数写到conftest.py,启动全局作用

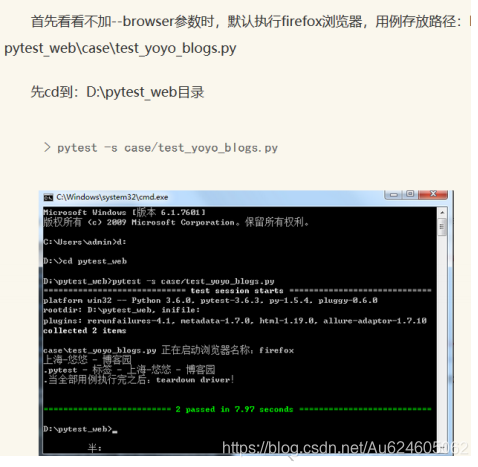
用例参考
以下两个简单的用例,调用全局driver参数,启动浏览器后操作用例
可以在pycharm里运行
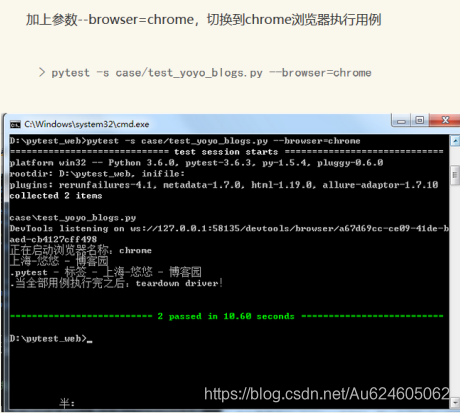
cmd加参数运行
4.11-多线程跑 firefox 和 chrome 并行执行
如果想在2个不同的浏览器中执行用例 需要用到多线程了
准备环境 pip install tomorrow
同时运行firefox和chorme
上面是通过打开cmd窗口执行用例 可以选择不同的浏览器执行,如果两个浏览器一起则很简单 打开2个CMD窗口输入不同的指令就好了

用python执行cmd
如果想要用代码执行cmd命令 可以导入os模块 使用os.system()方法去执行cmd命令
在项目文件中新建一个run.py脚本
import os
def runcase(name="firefox",case_path="")
    """执行CMD命令"""
    os.system("pytest -s --borwser=%s %s" % (name,case_path))
if __name__ == '__main__':
    runcase(name="chorme",case_path="case/test_zen.py")
使用多线程执行2个不同浏览器测试
import os
from tomorrow import threads
@threads(2)
def runcase(name="firefox",case_path=""):
    """执行CMD命令"""
    os.system("pytest -s --borwser=%s %s" % (name,case_path))
if __name__ == '__main__':
    n=['chrome','firefox']
    for i in n:
        runcase(name="chorme",case_path="case/test_zen.py")
4.12 测试环境 host 地址切换
有的时候测试地址的host会变 这样我们就不能把host写死了 可以放到配置参数里面去 写个相对路径path 拼接测试环境host就好了
添加host参数
使用parser.addoption方法,添加一个host参数 并且给个默认的测试地址http://192.168.x.xx:xx
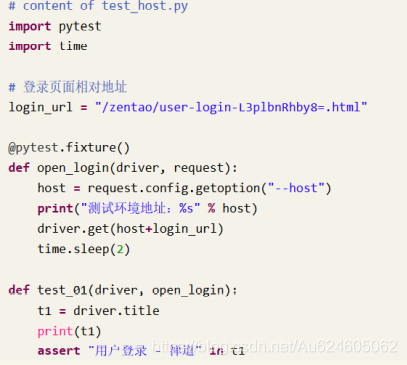
测试用例调用host地址
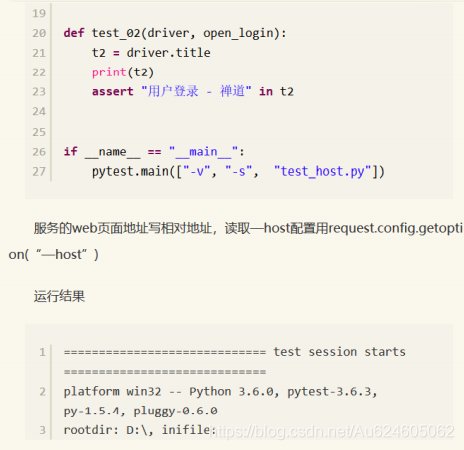
cmd执行
在cmd执行的时候 可以不加--host参数 默认用
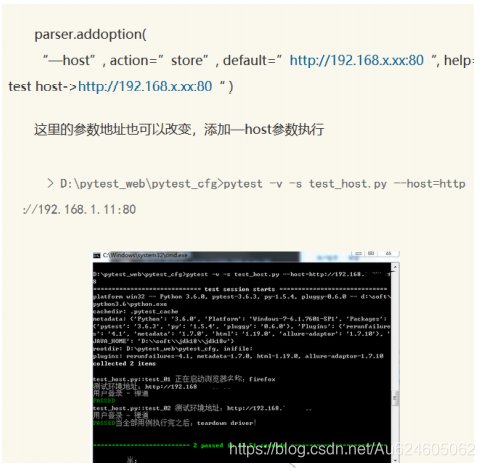
第 5 章 PageObject 设计模式
PageObject 设计模式是 selenium 自动化最成熟,也是最受欢迎的一种项目设计模式,这里 pytest 框架同样使用。 本章的案例,可以直接运行代码,在 5.5 章节可以下载到完整的代码
5.1 项目代码结构
pytest项目结构设计和之前一样之前的run_all.py换成comftest.py
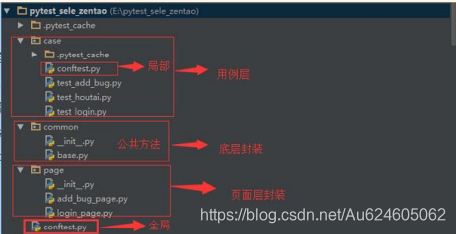
主要分三层
common:底层封装:base.py重新封装了selenium的一些基本操作方法,也就是上面说到的base.py文件内容
page:页面层封装:xx_page.py对每个页面的操作封装继承base.py的基本方法。主要是为写用例做准备 ,把每个页面用到的方法和行为事件封装起来
case:用例层封装:test_xx.py针对每个页面写测试用例
conftest.py:全局的配置文件,代码参考以下最终章节版本
case/conftest.py:局部配置文件,只在case目录下生效,可以写一些用例准备工作如登录
运行用例
cd到工程目录 执行指令

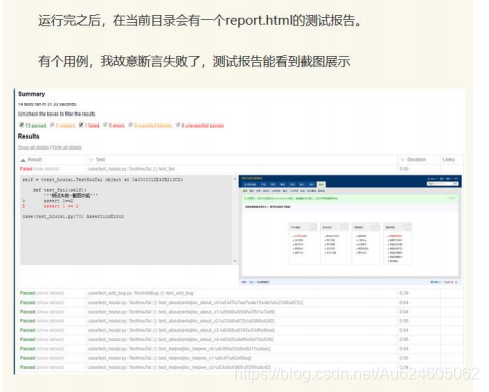
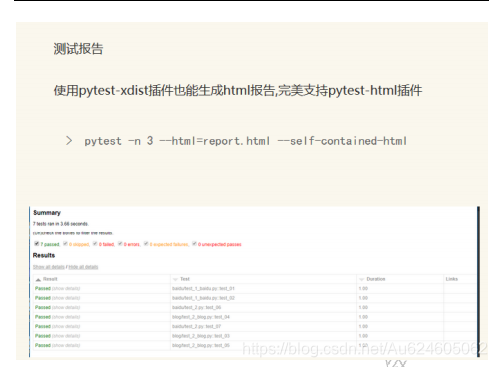
测试报告
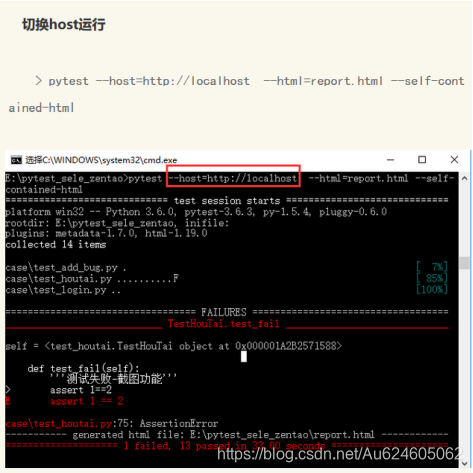
切换浏览器

切换host运行
5.2 conftest.py 最终版
conftest.py文件作为全局配置文件主要实现以下功能:
- 当测试完成后,生成html报告,插入失败截图
- 添加命令行参数broswer用于切换不同浏览器测试
- 添加命令行参数host 用于切换不同的测试环境host
- 全局参数driver调用
- 全局参数host调用
# coding:utf-8
from selenium import webdriver
from datetime import datetime
from py.xml import html
import pytest
"""
conftest.py文件
令行参数--browser、--host
"""
_driver = None
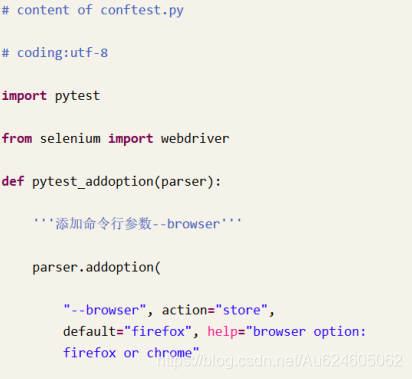
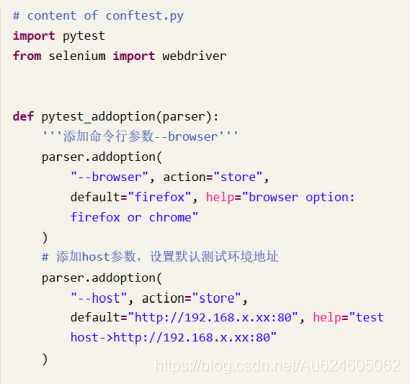
def pytest_addoption(parser):
'''添加命令行参数--browser、--host'''
parser.addoption(
"--browser", action="store", default="firefox", help="browser option: firefox or chrome"
)
# 添加host参数,设置默认测试环境地址
parser.addoption(
"--host", action="store", default="http://127.0.0.1:80", help="test host->http://127.0.0.1:80"
)
@pytest.mark.hookwrapper
def pytest_runtest_makereport(item):
"""
当测试失败的时候,自动截图,展示到html报告中
:param item:
"""
pytest_html = item.config.pluginmanager.getplugin('html')
outcome = yield
report = outcome.get_result()
extra = getattr(report, 'extra', [])
if report.when == 'call' or report.when == "setup":
xfail = hasattr(report, 'wasxfail')
if (report.skipped and xfail) or (report.failed and not xfail):
file_name = report.nodeid.replace("::", "_")+".png"
screen_img = _capture_screenshot()
if file_name:
html = '<div><img src="https://img-blog.csdnimg.cn/2022010618373718846.png" alt="screenshot" style="width:600px;height:300px;" ' \
'onclick="window.open(this.src)" align="right"/></div>' % screen_img
extra.append(pytest_html.extras.html(html))
report.extra = extra
report.description = str(item.function.__doc__)
report.nodeid = report.nodeid.encode("utf-8").decode("unicode_escape")
@pytest.mark.optionalhook
def pytest_html_results_table_header(cells):
cells.insert(1, html.th('Description'))
cells.insert(2, html.th('Test_nodeid'))
cells.pop(2)
@pytest.mark.optionalhook
def pytest_html_results_table_row(report, cells):
cells.insert(1, html.td(report.description))
cells.insert(2, html.td(report.nodeid))
cells.pop(2)
# @pytest.mark.hookwrapper
# def pytest_runtest_makereport(item, call):
# outcome = yield
# report = outcome.get_result()
# report.description = str(item.function.__doc__)
def _capture_screenshot():
'''
截图保存为base64
:return:
'''
return _driver.get_screenshot_as_base64()
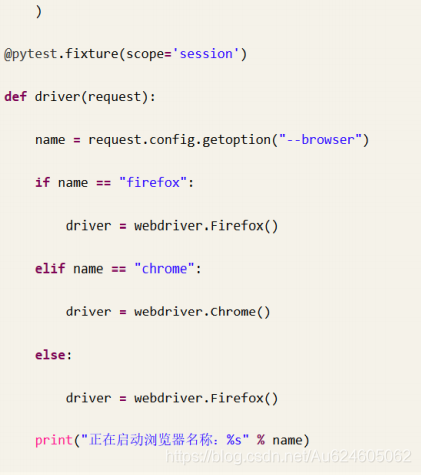
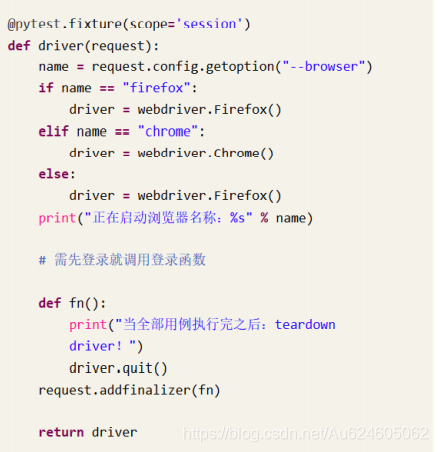
@pytest.fixture(scope='session')
def driver(request):
'''定义全局driver参数'''
global _driver
if _driver is None:
name = request.config.getoption("--browser")
if name == "firefox":
_driver = webdriver.Firefox()
elif name == "chrome":
_driver = webdriver.Chrome()
else:
_driver = webdriver.Firefox()
print("正在启动浏览器名称:%s" % name)
def fn():
print("当全部用例执行完之后:teardown quit driver!")
_driver.quit()
request.addfinalizer(fn)
return _driver
@pytest.fixture(scope='session')
def host(request):
'''全局host参数'''
return request.config.getoption("--host")
5.3 登陆用例设计
自动化测试目的不是完全代替手工测试,是为了方便回归和迭代和我们的冒烟测试,所以用例的设计可以不用完全按照手工测试那样详细,登录用例写一个成功和失败案例即可
loginpage页面
先对login页面封装,loginpage.py代码如下
# coding:utf-8
from selenium import webdriver
from common.base import Base
import time
"""
page/login_page.py文件
"""

# -------------定位元素信息------------ #
loc1 = ("id", "account")
loc2 = ("css selector", "[name='password']")
loc3 = ("xpath", "//*[@id='submit']")

result_loc = ("xpath", ".//*[@id='userMenu']/a")


def _login(driver, host, user="admin", psw="123456"):
    '''
    登录函数
    '''
    zen = Base(driver)
    driver.get(host+"/zentao/user-login-L3plbnRhby8=.html")
    zen.sendKeys(loc1, user)
    zen.sendKeys(loc2, psw)
    zen.click(loc3)
    time.sleep(2)

def _login_result(driver, _text):
    '''
    登录成功后,获取当前页面的用户名,判断用户名
    :param driver:
    :param _text: 用户名
    :return: True or False
    '''
    zen = Base(driver)
    r = zen.is_text_in_element(result_loc, _text)
    return r

def _get_alert(driver):
    '''判断alert在不在,存在返回text文本内容,不存在返回空字符'''
    zen = Base(driver)
    try:
        alert = zen.is_alert()
        text = alert.text
        alert.accept()  # 点alert确定
        return text
    except:
        return ""

if __name__ == "__main__":
    driver = webdriver.Chrome()
    _login(driver, "http://127.0.0.1")
登录用例设计 test_login.py
startPage的功能,主要是为了让用例从登录首页开始,避免前面用例失败,导致后面的用例无法执行,每次登录前先清空cookies(退出登录)
# coding:utf-8
import pytest
import time
from page.login_page import _login_result, _login, _get_alert

"""
case/test_login.py文件
"""

class TestLogin():

    @pytest.fixture(scope="function",  autouse=True)
    def startPaget(self, driver, host):
        print("---让每个用例都从登录首页开始:---start!---")
        driver.get(host+"/zentao/user-login.html")
        driver.delete_all_cookies()
        driver.refresh()

    def test_login_fail(self, driver, host):
        """禅道-登录失败案例:admin111-111111"""
        _login(driver, host, "admin111", "111111")
        result1 = _get_alert(driver)
        print("测试结果:%s" % result1)
        assert "登录失败" in result1

    def test_login_pass(self, driver, host):
        '''禅道-登录成功案例'''
        _login(driver, host, "admin", "123456")
        result2 = _login_result(driver, "admin")
        print("登录结果:%s" % result2)
        assert result2

if __name__ == "__main__":
    pytest.main(["-s", "test_login.py"])
5.4 添加 BUG 用例设计
添加BUG的流程是需要依赖登录,由于前面的一个loginpage.py已经存在了登录的方法,这里直接调用就行了,前面loginpage.py是用函数写的方法
这篇是用类和方法封装的,两个方法都可以用
局部case/conftest.py
像这种需要先登录的网站才能操作的,要是每次都去调用下登录太麻烦了,可以把这种公共操作放到conftest.py文件,作为一个配置去调用
import pytest
from page.login_page import _login

"""
case/conftest.py文件
登录功能调用
"""

@pytest.fixture(scope='session')
def login(driver, host):
    """登录功能fixture"""
    _login(driver, host)
封装add_bug_page.py
# coding:utf-8
from selenium import webdriver
from common.base import Base
import time
"""
page/add_bug_page.py文件
"""

class AddBugPage(Base):  # 继承Base

    # 添加BUG
    loc_test = ("link text", "测试")
    loc_bug = ("link text", "Bug")
    loc_addbug = ("xpath", ".//*[@id='createActionMenu']/a")
    loc_truck = ("xpath", ".//*[@id='openedBuild_chosen']/ul")
    loc_truck_add = ("xpath", ".//*[@id='openedBuild_chosen']/div/ul/li")
    loc_input_title = ("id", "title")
    # 需要先切换iframe
    loc_input_body = ("class name", "article-content")
    loc_avse = ("css selector", "#submit")

    # 新增的列表
    loc_new = ("xpath", ".//*[@id='bugList']/tbody/tr[1]/td[4]/a")

    def add_bug(self, title="测试提交BUG"):
        self.click(self.loc_test)
        self.click(self.loc_bug)
        self.click(self.loc_addbug)
        self.click(self.loc_truck)
        self.click(self.loc_truck_add)

        self.sendKeys(self.loc_input_title, title)
        # 输入body
        frame = self.findElement(("class name", "ke-edit-iframe"))
        self.driver.switch_to.frame(frame)
        # 富文本不能clear
        body = '''[测试步骤]xxx
        [结果]xxx
        [期望结果]xxx
        '''
        self.sendKeys(self.loc_input_body, body)
        self.driver.switch_to.default_content()

        self.click(self.loc_avse)

    def is_add_bug_sucess(self,_text):
        return self.is_text_in_element(self.loc_new, _text)

if __name__ == "__main__":
    from page.login_page import _login
    driver = webdriver.Chrome()
    _login(driver, "http://127.0.0.1")

    bug = AddBugPage(driver)
    timestr = time.strftime("%Y_%m_%d_%H_%M_%S")
    title = "测试提交BUG"+timestr
    bug.add_bug(title)
    result = bug.is_add_bug_sucess(title)
    print(result)
5.5 后台页面设计
如果某个测试用例需要用到login功能,在用例上加修饰就行了@pytest.mark.userfixtures("login"),如果是个class里面的用例全部都调用,那就加在class上
该方法只能调用,不能使用返回值
测试后台页面用例
# coding:utf-8
from common.base import Base
import pytest
import time

"""
case/test_houtai.py文件
"""

url_hou = "/zentao/admin.html"

# 进入‘后台’页面测试

loc_h = ("link text", "后台")

# 关于禅道定位
loc_about_1 = ("id", "proversion")
loc_about_2 = ("id", "official")
loc_about_3 = ("id", "changelog")
loc_about_4 = ("id", "license")
loc_about_5 = ("id", "extension")

# 帮助我们定位
loc_helpwe_1 = ("id", "donate")
loc_helpwe_2 = ("id", "reportbug")
loc_helpwe_3 = ("id", "feedback")
loc_helpwe_4 = ("id", "recommend")
loc_helpwe_5 = ("id", "cowinmore")


# 关于禅道测试数据
test_about_data = [
    (loc_about_1, "升级专业版本"),
    (loc_about_2, "官方网站"),
    (loc_about_3, "版本历史"),
    (loc_about_4, "授权协议"),
    (loc_about_5, "插件平台"),
]

# 帮助我们测试数据
test_helpwe_data = [
    (loc_helpwe_1, "捐助我们"),
    (loc_helpwe_2, "汇报Bug"),
    (loc_helpwe_3, "反馈需求"),
    (loc_helpwe_4, "推荐给朋友"),
    (loc_helpwe_5, "更多方式..."),
]
ids=[i[1] for i in test_helpwe_data]
@pytest.mark.usefixtures("login")
class TestHouTai():
    @pytest.fixture(scope="function", autouse=True)
    def open_houtai(self, driver, host):
        '''每次用例回到后台一级界面首页'''
        self.hou = Base(driver)
        driver.get(host+url_hou)

    @pytest.mark.aboutzentao
    @pytest.mark.parametrize("loc_about_x, text", test_about_data, ids=[i[1] for i in test_helpwe_data])
    def test_aboutzenta(self, loc_about_x, text):
        '''关于禅道-用例'''
        t1 = self.hou.get_text(loc_about_x)
        assert t1 == text

    @pytest.mark.helpwe
    @pytest.mark.parametrize("loc_helpwe_x, text", test_helpwe_data, ids=[i[1] for i in test_helpwe_data])
    def test_helpwe(self, loc_helpwe_x, text):
        '''帮我我们-用例'''
        t1 = self.hou.get_text(loc_helpwe_x,)
        assert t1 == text

    def test_fail(self):
        '''测试失败-截图功能'''
        assert 1==2


if __name__ == "__main__":
    pytest.main(["-v", "test_houtai.py"])
第 6 章 更多高级功能
Pytest 框架是开源的,支持各种插件功能,网上也能找到很多高级的功能插件,这样让 pytest 更强大。
6.1 运行首次失败用例(--lf 和--ff)
对于BUG多的模块当测试失败后开发进行修复,修复完成后我们只需要测试上次修复的BUG
那么自动化也是一样的当用例多的时候,第一次失败修复后,可以只测试上次失败的用例
pytest-h
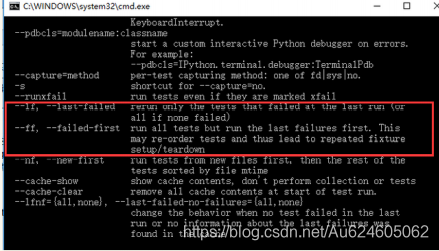
命令行输入pytest-h 找到里面两个参数行命令--if 和--ff
--if --last-failed只运行上次失败的用例,如果没有失败的话会全部跑
--ff --failed-first 运行所有测试,但是首先运行上次失败的用例
--if 和--ff
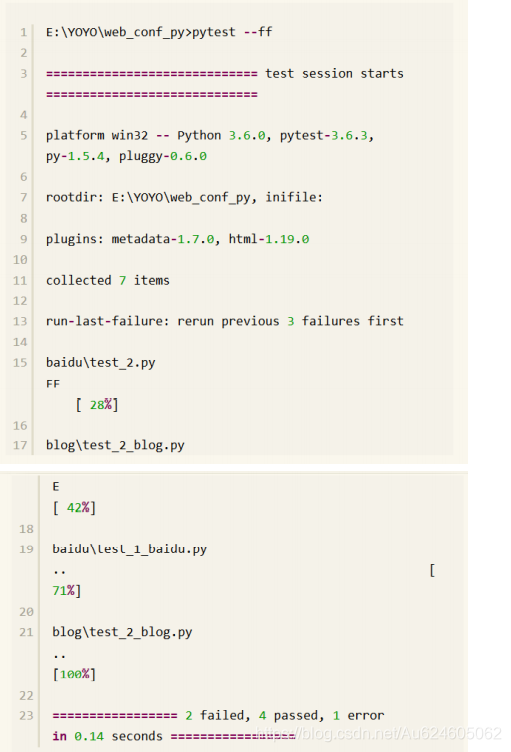
if是last-failed的缩写,运行失败的用例可以有以下
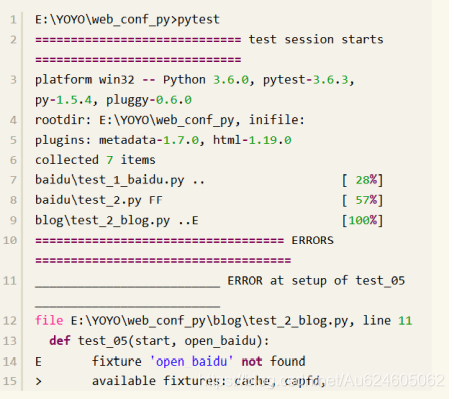

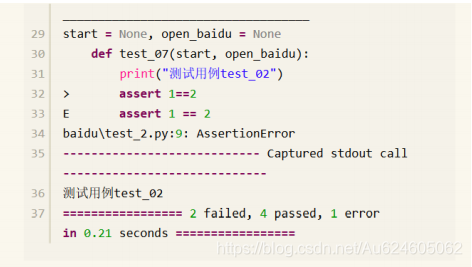
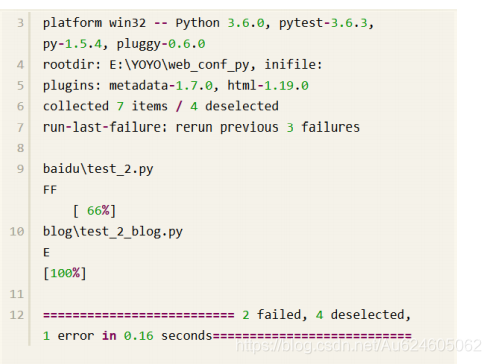
如果只想运行其中2个failed的和1个error用例,那么可以直接在cmd输入指令
pytest --if
如果想先运行上次失败的,后运行其他通过的用例
pytest --ff
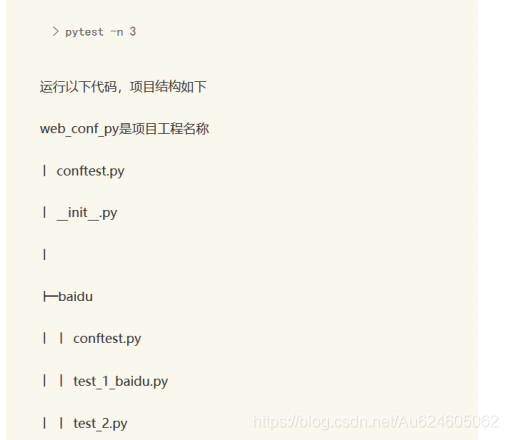
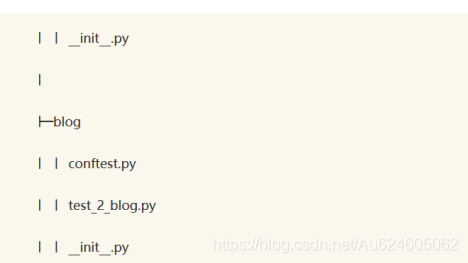
6.2 pytest 分布式执行
平时我们手工测试用例非常多的时候,比如有几千条,加入每个用例执行需要一分钟那么一个测试人员要用很长时间,为了节约时间我们可以使用并行测试例如100个测试去测也就是缩短了时间,
这就是一种分布式场景
同样的道理我们自动化测试一条条执行也很慢这时候就要用到pytest分布式执行插件pytest=xdist
如果想分布式执行,用例需要遵守以下原则
- 用例直接都是独立的 ,用例a不要去依赖用例b
- 用例执行没有先后顺序,随机都能执行
- 每个用例都能独立运行成功
- 每个用例都能重复运行,不影响其他用例
使用cmd安装pytest-xdist
pip.exe install pytest-xdist


6.3 重复执行用例
平时我们在做测试的时候,经常遇到某个模块不稳定的情况,对于这种问题我们会针对用例反复执行
自动化运行的时候也会出现这个问题,可以针对单个用例,或者某一个模块进行多次重复测试
pytest-repeat
这是pytest的一个插件,用于重复执行单个用例,或者多个测试用例,并且指点重复次数
安装:pip.exe install pytest-repeat
重复执行:--count
运行上一章节的代码
进入目录
不带--count只会执行一次

加上--count=5会重复执行5次
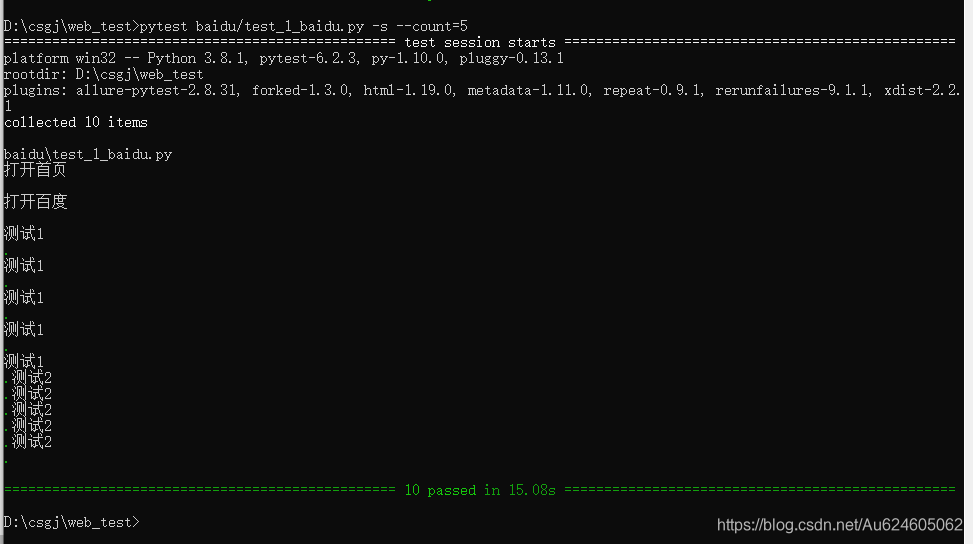
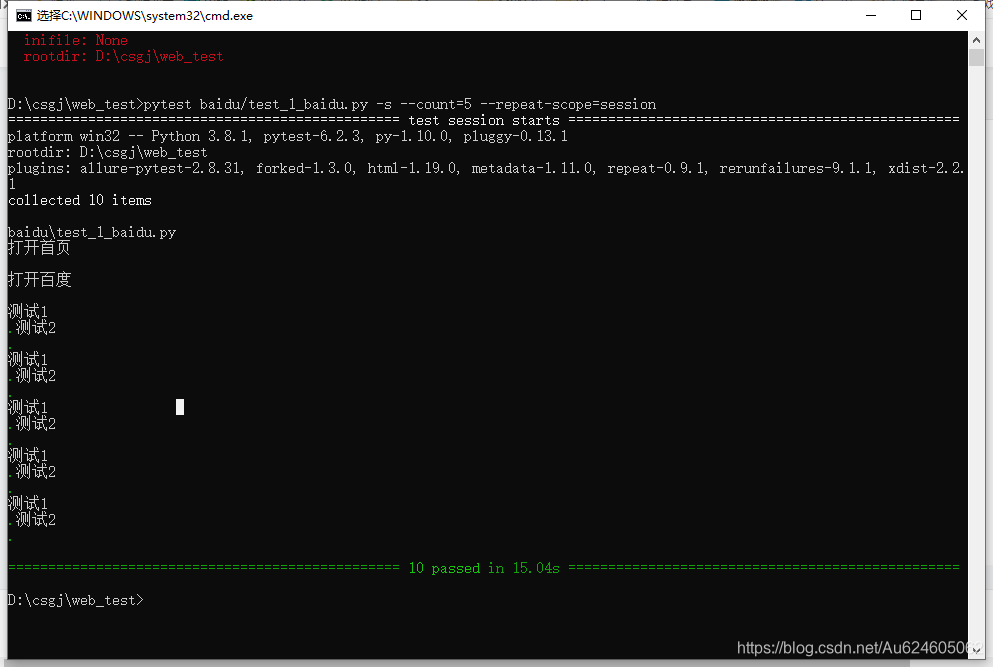
从运行结果来看是先运行test 1 5次在运行test 2 5次有时候我们希望执行的顺序是test 1,test2 按这样重复5次 接下来用到一个参数 repeat-scope
--repeat-scope
类似于pytest fixture 的scope参数 --repeat-scope也可以设置参数 或者默认值
使用重复执行整个会话用例
标记重复用例
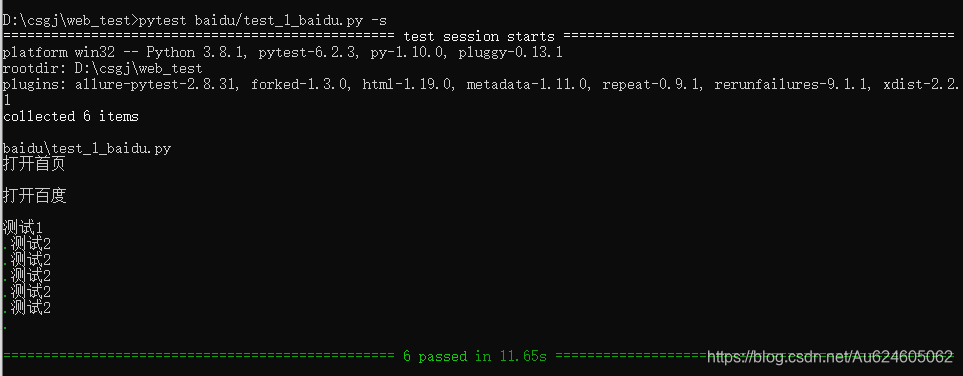
如果代码中要标记重复多次的测试,可以使用@pytest.mark.repeat(count)装饰器
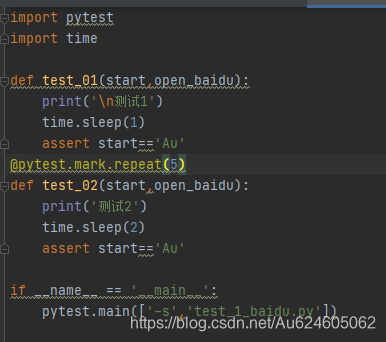
这样执行的时候就不用带上 --count=5 参数,这样的话只针对test_02模块重复执行5次
重复测试直到失败
如果你正在诊断间接性故障,那么一遍又一遍的运行相同的测试直到失败是有用的 你可以将pytest的-x选项与pytest-repeat结合使用 以强制测试运行器在第一次失败时停止例如
py.test --count=1000 -x test_file.py
这将尝试运行test_file.py 1000次 但是一旦发生故障就会停止
这次项目的笔记就做到这里了希望大家点点关注谢谢啦!!!!!!!!!!!!!!


 1366
1366

 被折叠的 条评论
为什么被折叠?
被折叠的 条评论
为什么被折叠?
 到【灌水乐园】发言


