


学习来源
- 《Andrid开发艺术探索》
- Android View体系(一)视图坐标系
- Android View体系(二)实现View滑动的六种方法
新知识
View的相关坐标
- View获取自身宽高
- getHeight():获取View自身高度
- getWidth():获取View自身宽度
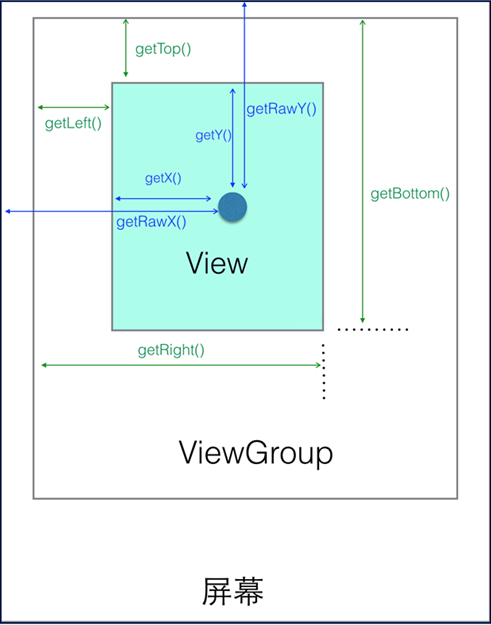
- View自身坐标
- 通过如下方法可以获得View到其父控件(ViewGroup)的距离:
- getTop():获取View自身顶边到其父布局顶边的距离
- getLeft():获取View自身左边到其父布局左边的距离
- getRight():获取View自身右边到其父布局左边的距离
- getBottom():获取View自身底边到其父布局顶边的距离
- 通过如下方法可以获得View到其父控件(ViewGroup)的距离:
- 屏幕左上角为Android坐标系的原点以
左为x轴的正方向以下为y轴的正方向
- x和y是View左上角的坐标
- translationX和translationY是View左上角相对于父容器的偏移量
- translationX和translationY的默认值是0
- x = left + translationX
- y = top + translationY
MotionEvent===>无论是View还是ViewGroup,最终的点击事件都会由onTouchEvent(MotionEvent event)方法来处理
- MotionEvent
MotionEvent.ACTION_MOVE手指刚接触屏幕MotionEvent.ACTION_DOWN手指在屏幕上移动MotionEvent.ACTION_UP手指从屏幕上松开的一瞬间
- 正常情况下 一次手指触摸屏幕的行为会触发一系列点击事件
- 点击屏幕离开松开===》事件序列为DOWN->UP
- 点击屏幕滑动一会再松开===》事件序列为DOWN->MOVE->…->MOVE->UP
- 上图那个深蓝色的点,假设就是我们触摸的点,MotionEvent也提供了各种获取焦点坐标的方法:
- getX():相当于当前View左上角的x坐标,即视图坐标
- getY():相当于当前View左上角的y坐标,即视图坐标
- getRawX():相当于手机屏幕左上角的x坐标,即绝对坐标
- getRawY():相当于手机屏幕左上角的y坐标,即绝对坐标
在activity_main中多添加了Button控件
 <Button
     android:id="@+id/btn"
     android:layout_width="match_parent"
     android:layout_height="wrap_content" />

 <com.example.axtonsun.axtonroid_view.CustomView
     android:layout_width="80dp"
     android:layout_height="80dp"
     android:id="@+id/customview"
     android:layout_margin="50dp"
android:background="@android:color/holo_red_light"/>CustomView的onTouchEvent的方法中case MotionEvent.ACTION_MOVE:
    //计算移动的距离
                int offsetX = x - lastX;
                int offsetY = y - lastY;

                //调用layout方法来重新放置它的位置
                //Button不滑动    自定义的滑动
  /*            layout(getLeft()+offsetX, getTop()+offsetY,getRight()+offsetX , getBottom()+offsetY);*/

                //Button不滑动    自定义的滑动
                //对left和right进行偏移
  /*            offsetLeftAndRight(offsetX);
                //对top和bottom进行偏移
                offsetTopAndBottom(offsetY);*/

                //使用MarginLayoutParams
                //Button不滑动 自定义的滑动
                LinearLayout.LayoutParams layoutParams= (LinearLayout.LayoutParams) getLayoutParams();
                layoutParams.leftMargin = getLeft() + offsetX;
                layoutParams.topMargin = getTop() + offsetY;
                setLayoutParams(layoutParams);

  /*            //使用scrollBy
                //Button和自定义一起滑动 相对位置不变化
((View)getParent()).scrollBy(-offsetX,-offsetY);*/在res下新建文件夹然后在创建xml文件
- 新建文件夹的
Resource type选择transtion - xml内的代码
<?xml version="1.0" encoding="utf-8"?>
<set xmlns:android="http://schemas.android.com/apk/res/android">
    <!--android:fillAfter="true">保证View动画在结束动画时是否回到原来的位置-->

    <translate
        android:fromXDelta="0"
        android:toXDelta="300"
        android:duration="1000"/>
</set>在MainActivity下
private CustomView customView;
@Override
protected void onCreate(Bundle savedInstanceState) {
super.onCreate(savedInstanceState);
setContentView(R.layout.activity_main);
customView = (CustomView) findViewById(R.id.customview);
//View动画
//如果不设置android:fillAfter="true" 会发生滑动后的复原
//customView.setAnimation(AnimationUtils.loadAnimation(this,R.anim.translate));
//属性动画
//解决了上述View动画的问题 可以解决==》新位置的单击事件的问题
//ObjectAnimator.ofFloat(customView,"translationX",0,300).setDuration(1000).start();
//customView.smoothScrollTo(-400,0);
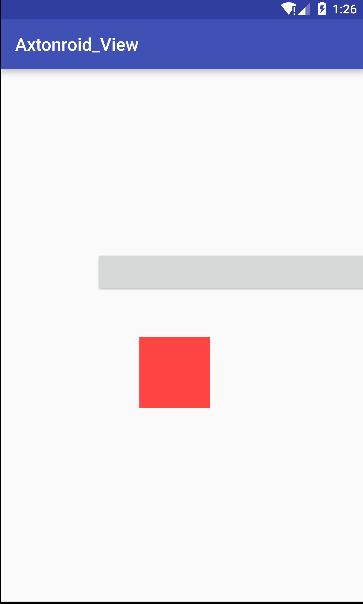
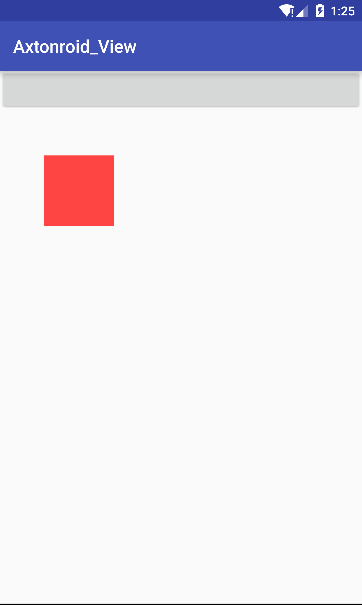
}截图===>Button与自定义控件相对变化的对比


 1090
1090

 被折叠的 条评论
为什么被折叠?
被折叠的 条评论
为什么被折叠?
 到【灌水乐园】发言


