


场景
在SpringBoot项目中需要对接三方系统,对接协议是TCP,需实现一个TCP客户端接收
服务端发送的数据并按照16进制进行解析数据,然后对数据进行过滤,将指定类型的数据
通过mybatis存储进mysql数据库中。并且当tcp服务端断连时,tcp客户端能定时检测并发起重连。
全流程效果
注:
博客:
霸道流氓气质的博客_CSDN博客-C#,架构之路,SpringBoot领域博主
实现
1、SpringBoot+Netty实现TCP客户端
本篇参考如下博客,在如下博客基础上进行修改
Springboot+Netty搭建基于TCP协议的客户端(二):
https://www.cnblogs.com/haolb123/p/16553005.html
上面博客提供的示例代码
https://download.csdn.net/download/myyhtw/12369531
引入Netty的依赖
        <!--  netty依赖 springboot2.x自动导入版本-->
        <dependency>
            <groupId>io.netty</groupId>
            <artifactId>netty-all</artifactId>
        </dependency>
2、新建Netty的client类
package com.badao.demo.netty;


import com.badao.demo.global.Global;
import io.netty.bootstrap.Bootstrap;
import io.netty.channel.Channel;
import io.netty.channel.ChannelFuture;
import io.netty.channel.ChannelOption;
import io.netty.channel.EventLoopGroup;
import io.netty.channel.nio.NioEventLoopGroup;
import io.netty.channel.socket.SocketChannel;
import io.netty.channel.socket.nio.NioSocketChannel;

/**
 *
 * netty 客户端
 *
 */
public class BootNettyClient {

 public void connect(int port, String host) throws Exception{

  /**
   * 客户端的NIO线程组
   *
   */
        EventLoopGroup group = new NioEventLoopGroup();

        try {
         /**
          * Bootstrap 是一个启动NIO服务的辅助启动类 客户端的
          */
         Bootstrap bootstrap = new Bootstrap();
         bootstrap = bootstrap.group(group);
         bootstrap = bootstrap.channel(NioSocketChannel.class).option(ChannelOption.TCP_NODELAY, true);
         /**
          * 设置 I/O处理类,主要用于网络I/O事件,记录日志,编码、解码消息
          */
         bootstrap = bootstrap.handler(new BootNettyChannelInitializer<SocketChannel>());
         /**
          * 连接服务端
          */
   ChannelFuture future = bootstrap.connect(host, port).sync();
   if(future.isSuccess()) {
    //是否连接tcp成功
    Global.getInstance().canTcpConnected = true;
    Channel channel = future.channel();
    String id = future.channel().id().toString();
    BootNettyClientChannel bootNettyClientChannel = new BootNettyClientChannel();
    bootNettyClientChannel.setChannel(channel);
    bootNettyClientChannel.setCode("clientId:"+id);
    BootNettyClientChannelCache.save("clientId:"+id, bootNettyClientChannel);
    System.out.println("netty client start success="+id);
    /**
     * 等待连接端口关闭
     */
    future.channel().closeFuture().sync();
   }else{

   }
  } finally {
   /**
    * 退出,释放资源
    */
   group.shutdownGracefully().sync();
  }
 }
}
注意这里的在连接成功之后的修改
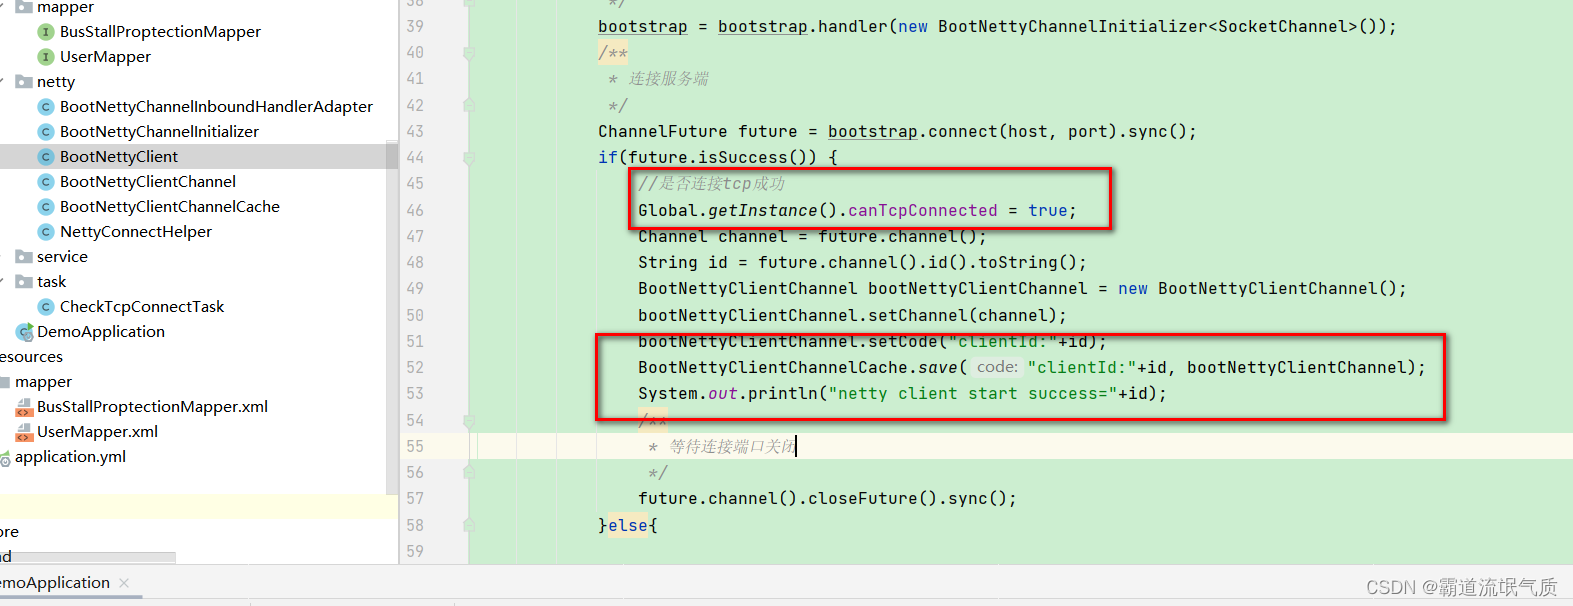
新增了一个全局的单例变量类Global,用来作为断线重连的判断,后面后具体代码实现。
接着将clientId保存的实现,可以根据自己需要决定是否保留,不需要可删除,并且下面
第4条BootNettyClientChannel以及第5条BootNettyClientChannelCache也可做相应的删除或修改。
3、新建通道初始化
package com.badao.demo.netty;

import io.netty.channel.Channel;
import io.netty.channel.ChannelHandler;
import io.netty.channel.ChannelInitializer;
/**
 * 通道初始化
 *
 */
@ChannelHandler.Sharable
public class BootNettyChannelInitializer<SocketChannel> extends ChannelInitializer<Channel> {

 @Override
 protected void initChannel(Channel ch) {
        /**
         * 自定义ChannelInboundHandlerAdapter
         */
        ch.pipeline().addLast(new BootNettyChannelInboundHandlerAdapter());
 }

}
注意与原有不一样的是这里删掉了自定义解码器的实现

这里根据自己实际情况决定是否保留以及格式,否则会提示
String cannot be cast to io.netty.buffer.ByteBuf
4、新建通道对象
package com.badao.demo.netty;

import io.netty.channel.Channel;

public class BootNettyClientChannel {

 // 连接客户端唯一的code
 private String code;

 // 客户端最新发送的消息内容
 private String last_data;

 private transient volatile Channel channel;

 public String getCode() {
  return code;
 }

 public void setCode(String code) {
  this.code = code;
 }

 public Channel getChannel() {
  return channel;
 }

 public void setChannel(Channel channel) {
  this.channel = channel;
 }

 public String getLast_data() {
  return last_data;
 }

 public void setLast_data(String last_data) {
  this.last_data = last_data;
 }
}
5、新建保存ClientChannel的Cache类
package com.badao.demo.netty;

import java.util.Map;
import java.util.concurrent.ConcurrentHashMap;


public class BootNettyClientChannelCache {

    public static volatile Map<String, BootNettyClientChannel> channelMapCache = new ConcurrentHashMap<String, BootNettyClientChannel>();

    public static void add(String code, BootNettyClientChannel channel){
     channelMapCache.put(code,channel);
    }

    public static BootNettyClientChannel get(String code){
        return channelMapCache.get(code);
    }

    public static void remove(String code){
     channelMapCache.remove(code);
    }

    public static void save(String code, BootNettyClientChannel channel) {
        if(channelMapCache.get(code) == null) {
            add(code,channel);
        }
    }
}
6、最重要的是新建客户端I/O数据读写处理类
package com.badao.demo.netty;
import com.badao.demo.entity.BusStallProptection;
import com.badao.demo.entity.StallVo;
import com.badao.demo.global.Global;
import com.badao.demo.mapper.BusStallProptectionMapper;
import io.netty.buffer.ByteBuf;
import io.netty.channel.ChannelHandler;
import io.netty.channel.ChannelHandlerContext;
import io.netty.channel.ChannelInboundHandlerAdapter;
import org.springframework.beans.factory.annotation.Autowired;
import org.springframework.stereotype.Component;
import javax.annotation.PostConstruct;
import java.io.IOException;
import java.net.InetSocketAddress;
import java.util.Date;
/**
*
* I/O数据读写处理类
*
*/
@ChannelHandler.Sharable
@Component
public class BootNettyChannelInboundHandlerAdapter extends ChannelInboundHandlerAdapter{
public static BootNettyChannelInboundHandlerAdapter bootNettyChannelInboundHandlerAdapter;
//1.正常注入[记得主类也需要使用@Component注解]
@Autowired
BusStallProptectionMapper busStallProptectionMapper;
//2.初始化构造方法一定要有
public BootNettyChannelInboundHandlerAdapter(){
}
//3.容器初始化的时候进行执行-这里是重点
@PostConstruct
public void init() {
bootNettyChannelInboundHandlerAdapter = this;
bootNettyChannelInboundHandlerAdapter.busStallProptectionMapper = this.busStallProptectionMapper;
}
/**
* 从服务端收到新的数据时,这个方法会在收到消息时被调用
*/
@Override
public void channelRead(ChannelHandlerContext ctx, Object msg) throws Exception {
if(msg == null){
return;
}
ByteBuf buf = (ByteBuf) msg;
byte[] bytes = new byte[buf.readableBytes()];
// 复制内容到字节数组bytes
buf.readBytes(bytes);
// 将接收到的数据转为字符串,此字符串就是客户端发送的字符串
String receiveStr = NettyConnectHelper.receiveHexToString(bytes);
StallVo stallVo = NettyConnectHelper.receiveHexToObj(bytes);
BootNettyClientChannel bootNettyClientChannel = BootNettyClientChannelCache.get("clientId:"+ctx.channel().id().toString());
if(bootNettyClientChannel != null){
//判断指定状态的数据进行处理
if(Global.getInstance().abnormalCarStatusList.contains(stallVo.getCarStatus())){
BusStallProptection busStallProptection = BusStallProptection.builder()
.carNumber(stallVo.getCarNumber())
.carState(stallVo.getCarStatus())
.stallScope(stallVo.getAreaNumber())
.rawData(receiveStr)
.uploadTime(new Date())
.build();
//插入数据库
bootNettyChannelInboundHandlerAdapter.busStallProptectionMapper.insert(busStallProptection);
}
bootNettyClientChannel.setLast_data(msg.toString());
}
}
/**
* 从服务端收到新的数据、读取完成时调用
*/
@Override
public void channelReadComplete(ChannelHandlerContext ctx) throws IOException {
ctx.flush();
}
/**
* 当出现 Throwable 对象才会被调用,即当 Netty 由于 IO 错误或者处理器在处理事件时抛出的异常时
*/
@Override
public void exceptionCaught(ChannelHandlerContext ctx, Throwable cause) throws IOException {
System.out.println("exceptionCaught");
cause.printStackTrace();
ctx.close();//抛出异常,断开与客户端的连接
}
/**
* 客户端与服务端第一次建立连接时 执行
*/
@Override
public void channelActive(ChannelHandlerContext ctx) throws Exception, IOException {
super.channelActive(ctx);
InetSocketAddress inSocket = (InetSocketAddress) ctx.channel().remoteAddress();
String clientIp = inSocket.getAddress().getHostAddress();
System.out.println(clientIp);
}
/**
* 客户端与服务端 断连时 执行
*/
@Override
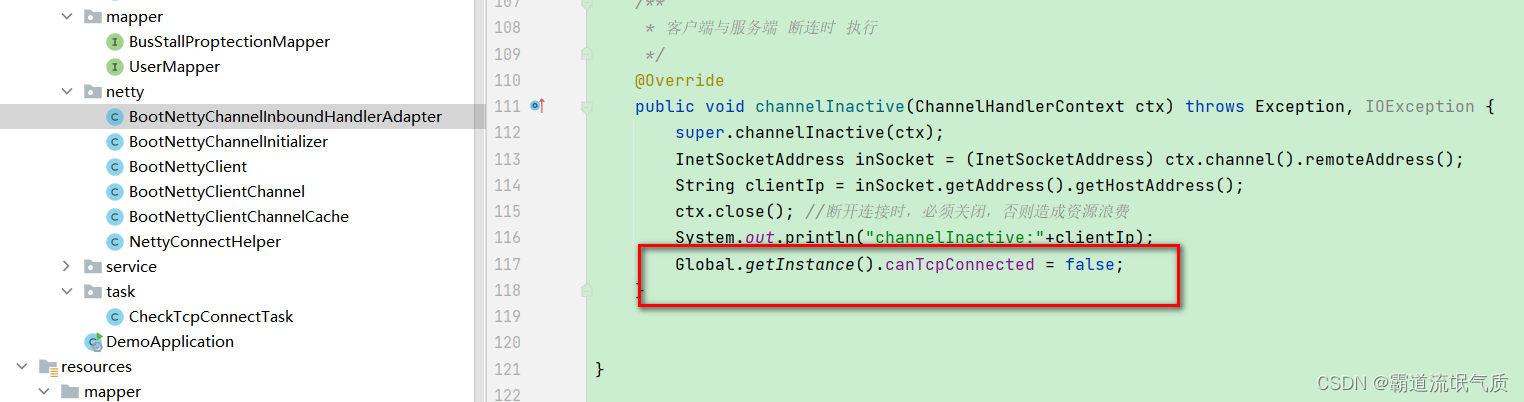
public void channelInactive(ChannelHandlerContext ctx) throws Exception, IOException {
super.channelInactive(ctx);
InetSocketAddress inSocket = (InetSocketAddress) ctx.channel().remoteAddress();
String clientIp = inSocket.getAddress().getHostAddress();
ctx.close(); //断开连接时,必须关闭,否则造成资源浪费
System.out.println("channelInactive:"+clientIp);
Global.getInstance().canTcpConnected = false;
}
}这里做的修改较多主要是修改channelRead从服务端收到新的数据时的回调方法
会将数据进行按照16进制读取和解析为字符串,并作为对接的原始数据进行存储。
还会将数据按照16进制解析并获取对应位的字符并赋值到对象保存到数据库。
其中用到的相关工具类方法,又封装了一个NettyConnectHelper
其中包含用来发起连接以及16进制解析和转换对象的相关方法
package com.badao.demo.netty;


import com.badao.demo.entity.StallVo;

public  class NettyConnectHelper {

    /**
     * 发起连接
     */
    public static void doConnect(){
        try {
            /**
             * 使用异步注解方式启动netty客户端服务
             */
            new BootNettyClient().connect(8600, "127.0.0.1");
        }catch (Exception exception){
            System.out.println("tcp连接异常");
        }
    }

    /**
     * 接收字节数据并转换为16进制字符串
     * @param by
     * @return
     */
    public  static String receiveHexToString(byte[] by) {
        try {
            String str = bytes2Str(by);
            str = str.toUpperCase();
            return str;
        } catch (Exception ex) {
            ex.printStackTrace();
            System.out.println("接收字节数据并转为16进制字符串异常");
        }
        return null;
    }

    /**
     * 字节数组转换为16进制字符串
     * @param src
     * @return
     */
    public static String bytes2Str(byte[] src){
        StringBuilder stringBuilder = new StringBuilder("");
        if (src == null || src.length <= 0) {
            return null;
        }
        for (int i = 0; i < src.length; i++) {
            if(i>0){
                stringBuilder.append(" ");
            }
            int v = src[i] & 0xFF;
            String hv = Integer.toHexString(v);
            if (hv.length() < 2) {
                stringBuilder.append(0);
            }
            stringBuilder.append(hv);
        }
        return stringBuilder.toString();
    }

    /**
     *  字节转换为16进制字符
     * @param src
     * @return
     */
    public static String byte2Str(byte src){
        StringBuilder stringBuilder = new StringBuilder("");
        int v = src & 0xFF;
        String hv = Integer.toHexString(v);
        if (hv.length() < 2) {
            stringBuilder.append(0);
        }
        stringBuilder.append(hv.toUpperCase());
        return stringBuilder.toString();
    }

    /**
     * 接收字节数据并转换为对象
     * @param by
     * @return
     */
    public static StallVo receiveHexToObj(byte[] by) {
        try {
            StallVo stallVo = bytes2Obj(by);
            return stallVo;
        } catch (Exception ex) {
            ex.printStackTrace();
            System.out.println("接收字节数据并转为对象异常");
        }
        return null;
    }

    /**
     * 对象属性赋值
     * @param src
     * @return
     */
    public static StallVo bytes2Obj(byte[] src){
        if (src == null || src.length <= 0) {
            return null;
        }
        //依据约定,第一位为区域编号;第四位为车辆状态;第五位为车辆编号
        StallVo stallVo = StallVo.builder()
                .areaNumber(byte2Str(src[0]))
                .carStatus(byte2Str(src[3]))
                .carNumber(byte2Str(src[4]))
                .build();
        return stallVo;
    }

}
这里跟业务相关挺多,对象属性映射的都是依据对接时的约定。
这里的对象StallVo
package com.badao.demo.entity;

import lombok.Builder;
import lombok.Data;

/**
 * 失速保护VO
 */
@Data
@Builder
public class StallVo {
    //区域编号
    private String areaNumber;
    //车辆状态
    private String carStatus;
    //车辆编号
    private String carNumber;
}
继续上面的读的处理类
if(Global.getInstance().abnormalCarStatusList.contains(stallVo.getCarStatus()))这里是业务需要,根据传输的数据进行判断,指定位的数据是否为需要的类型数据,只对需要的数据进行存储。
下面附全局单例类Global
package com.badao.demo.global;

import com.badao.demo.enums.CarStatus;

import java.util.ArrayList;
import java.util.List;

public class Global {

    //标识当前是否已经连接TCP
    public  boolean canTcpConnected = false;
    //过滤tcp数据,需要的数据类型的枚举变量的list
    public List<String> abnormalCarStatusList = new ArrayList<String>()
    {
        {
            add(CarStatus.OverSpeed.getCode());
            add(CarStatus.EmergStop.getCode());
            add(CarStatus.StallProtected.getCode());
        }
    };

    private static final Global _global = new Global();

    private Global(){};

    public static Global getInstance(){
        return _global;
    }
}
关于单例模式的实现可参考
设计模式-单例模式-饿汉式单例模式、懒汉式单例模式、静态内部类在Java中的使用示例:
设计模式-单例模式-饿汉式单例模式、懒汉式单例模式、静态内部类在Java中的使用示例_霸道流氓气质的博客-CSDN博客
其中Global中保存的list是枚举类的相关字段属性
package com.badao.demo.enums;

/**
 * 车辆状态
 *
 */
public enum CarStatus
{
    NormalCar("00", "没有车辆通过或车辆速度正常"), OverSpeed("01", "车辆超速行驶"),EmergStop("02", "车辆急停"), StallProtected("03", "车辆失速保护");

    private final String code;
    private final String info;

    CarStatus(String code, String info)
    {
        this.code = code;
        this.info = info;
    }

    public String getCode()
    {
        return code;
    }

    public String getInfo()
    {
        return info;
    }
}
继续上面在解析数据并判断是需要的类型之后,就是封装到存储数据库的相关实体并插入到mysql。
附BusStallProptection
package com.badao.demo.entity;

import lombok.Builder;
import lombok.Data;

import java.io.Serializable;
import java.util.Date;

@Data
@Builder
public class BusStallProptection implements Serializable {

    private Integer id;

    private String carNumber;

    private String carState;

    private String stallScope;

    private String rawData;

    private Date uploadTime;

}
封装完之后实现调用mapper的方法插入到数据库。
7、Netty的I/O数据读写处理类BootNettyChannelInboundHandlerAdapter中注入Mapper的方式
I/O数据读写处理类BootNettyChannelInboundHandlerAdapter添加注解@Component
@ChannelHandler.Sharable
@Component
public class BootNettyChannelInboundHandlerAdapter extends ChannelInboundHandlerAdapter{
然后正常注入mapper或service
    //1.正常注入[记得主类也需要使用@Component注解]
    @Autowired
    BusStallProptectionMapper busStallProptectionMapper;
然后新增初始化构造方法
    //2.初始化构造方法一定要有
    public BootNettyChannelInboundHandlerAdapter(){

    }
然后容器初始化时执行如下
    //3.容器初始化的时候进行执行-这里是重点
    @PostConstruct
    public void init() {
        bootNettyChannelInboundHandlerAdapter = this;
        bootNettyChannelInboundHandlerAdapter.busStallProptectionMapper = this.busStallProptectionMapper;
    }
前面要声明static变量
public static BootNettyChannelInboundHandlerAdapter bootNettyChannelInboundHandlerAdapter;然后在使用时就可以
bootNettyChannelInboundHandlerAdapter.busStallProptectionMapper.insert(busStallProptection);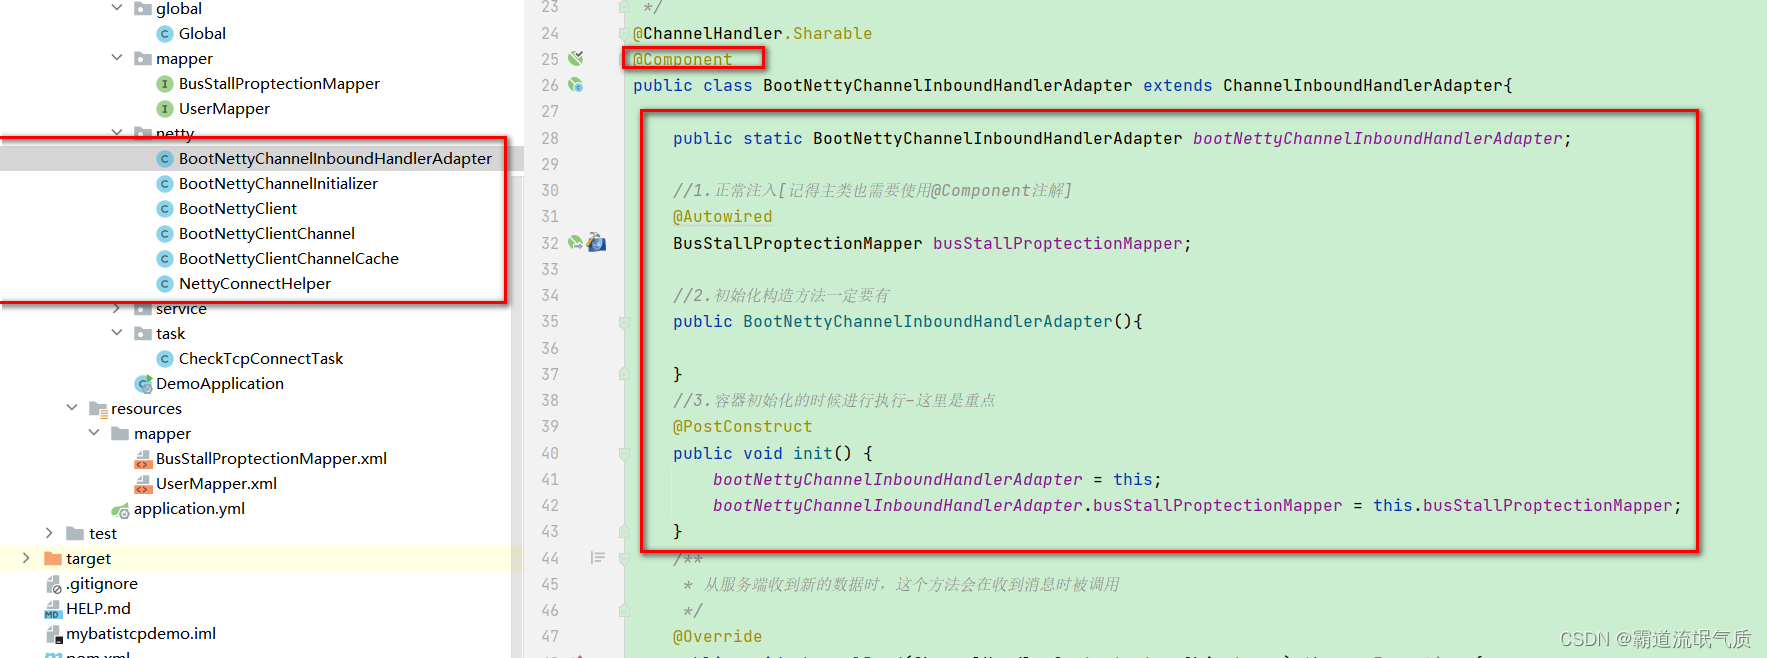
8、修改SpringBoot的启动类,使Netty项目启动后进行TCP连接
package com.badao.demo;

import com.badao.demo.netty.NettyConnectHelper;
import org.mybatis.spring.annotation.MapperScan;
import org.springframework.boot.CommandLineRunner;
import org.springframework.boot.SpringApplication;
import org.springframework.boot.autoconfigure.SpringBootApplication;


@MapperScan("com.badao.demo.mapper")
@SpringBootApplication
public class DemoApplication implements CommandLineRunner {

    public static void main(String[] args) {
        SpringApplication application = new SpringApplication(DemoApplication.class);
        application.run(args);
    }

    @Override
    public void run(String... args) {
        //如果需要项目一启动就连接则执行,否则通过定时任务执行
        NettyConnectHelper.doConnect();
    }
}
这里将发起连接的操作封装到工具类方法中,并在方法中添加try-catch,避免连接不上tcp导致无法启动。
9、SpringBoot中进行TCP客户端断线检测与自动重连。
这里需要TCP的客户端在断线之后能自动发起重连,且不需重启SpringBoot,所以这里需要借助定时任务的
实现。
新建Task类并进行定时任务实现
package com.badao.demo.task;

import com.badao.demo.global.Global;
import com.badao.demo.netty.NettyConnectHelper;
import org.springframework.scheduling.annotation.EnableScheduling;
import org.springframework.scheduling.annotation.Scheduled;
import org.springframework.stereotype.Component;


@Component
@EnableScheduling
public class CheckTcpConnectTask {

    @Scheduled(cron = "0/10 * * * * ? ")
    public void  checkReconnectTcpServer(){
        System.out.println("发起重连检测");
        if(!Global.getInstance().canTcpConnected){
            //进行连接
            System.out.println("执行连接");
            NettyConnectHelper.doConnect();
        }
    }
}
这里是10秒检测一次前面定义的全局变量,如果未连接则调用发起连接的方法。
该变量默认为false,在建立连接的回调方法BootNettyClient中连接服务端之后将其赋值
为true。
   ChannelFuture future = bootstrap.connect(host, port).sync();
   if(future.isSuccess()) {
    //是否连接tcp成功
    Global.getInstance().canTcpConnected = true;
并在断连的回调BootNettyChannelInboundHandlerAdapter的channelInactive赋值为false
    @Override
    public void channelInactive(ChannelHandlerContext ctx) throws Exception, IOException {
        super.channelInactive(ctx);
        InetSocketAddress inSocket = (InetSocketAddress) ctx.channel().remoteAddress();
        String clientIp = inSocket.getAddress().getHostAddress();
        ctx.close(); //断开连接时,必须关闭,否则造成资源浪费
        System.out.println("channelInactive:"+clientIp);
        Global.getInstance().canTcpConnected = false;
    }
10、断连检测效果
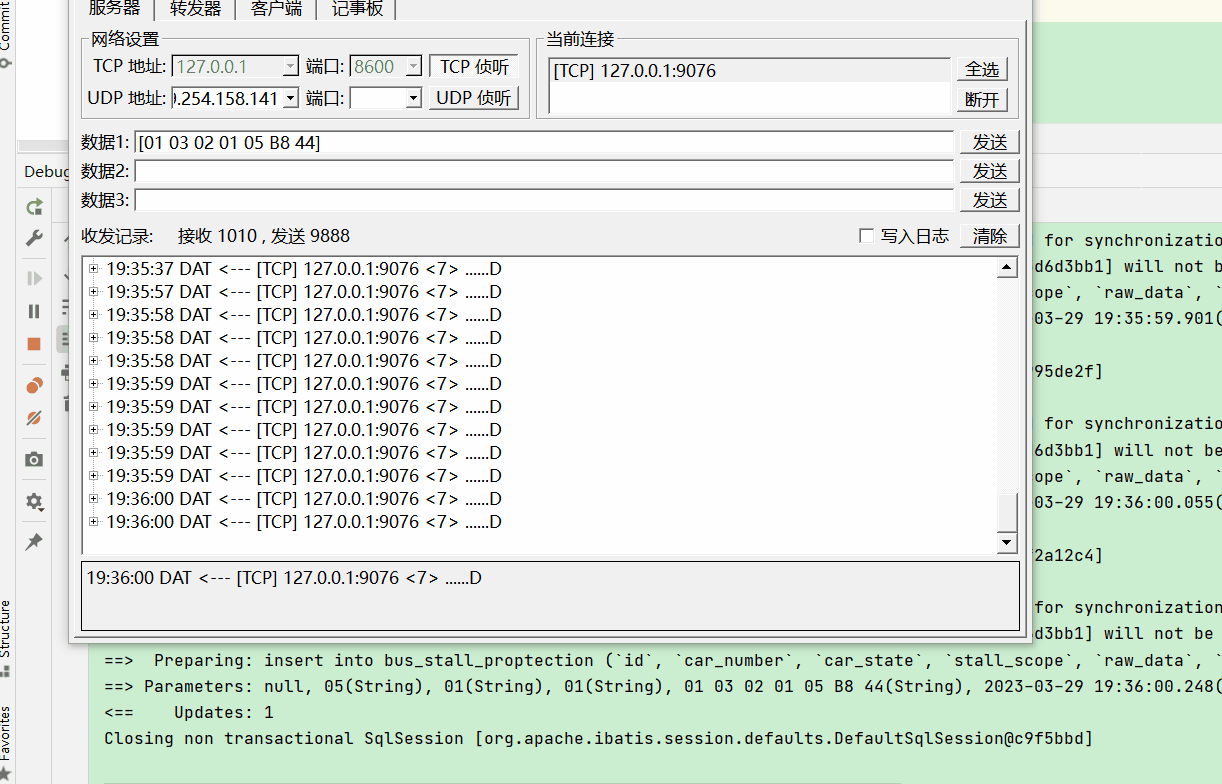
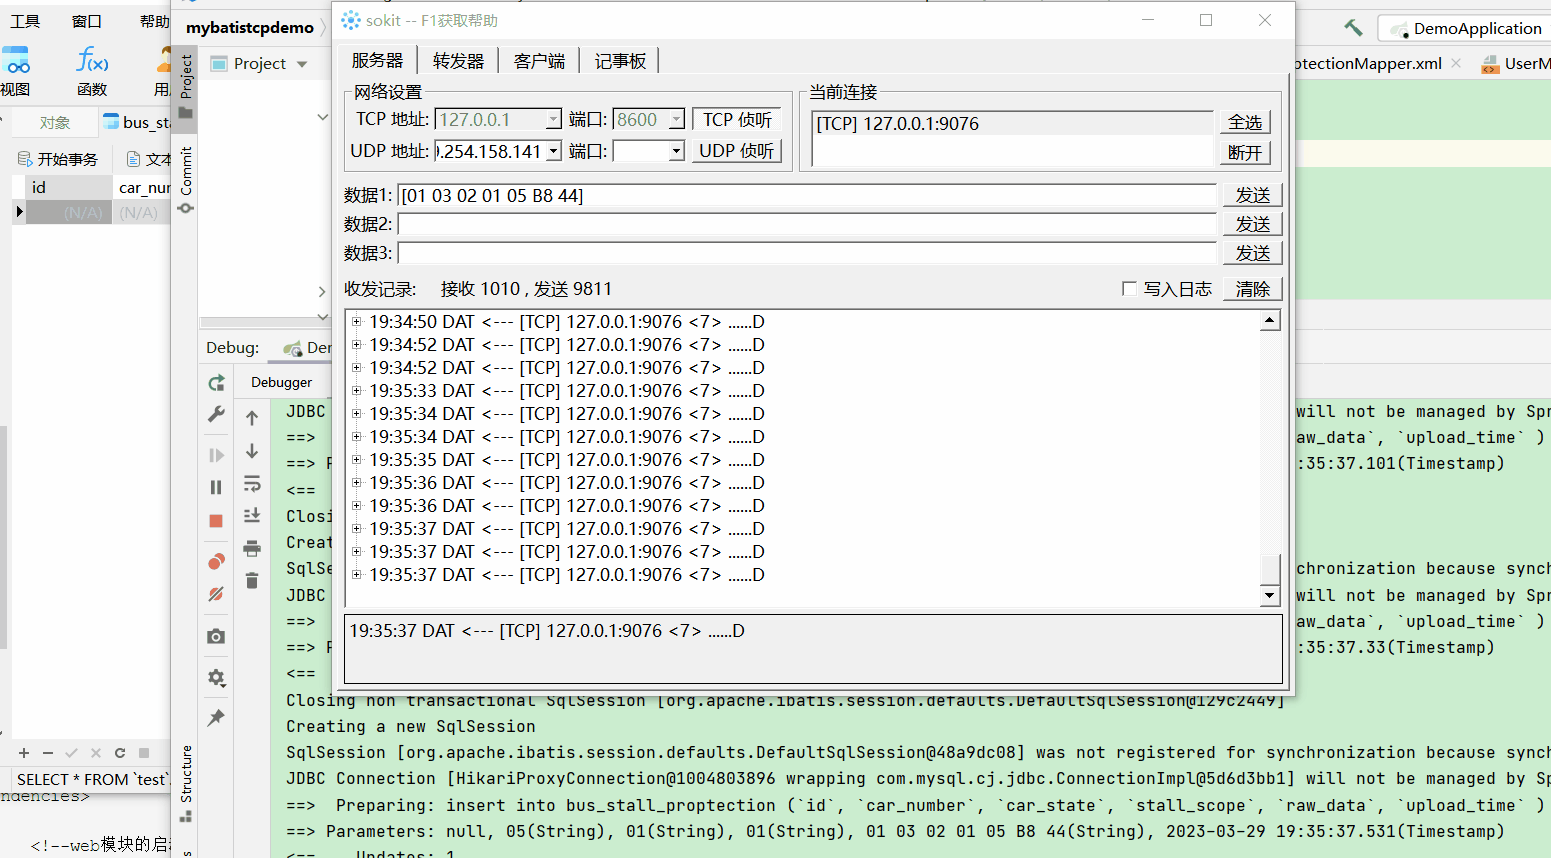
11、TCP服务端、客户端模拟测试工具
第一个是sokit
http://sqdownd.onlinedown.net/down/sokit-1.3-win32-chs.zip
下载之后解压即用

可模拟TCP服务器、客户端、转发器等,F1打开帮助,如果需要发送16进制数据,需要用方括号
包围。
除此之外还要诸多其他模拟和测试工具,比如客户端工具serial,可自行搜索友善串口调试助手。


 1万+
1万+


 被折叠的 条评论
为什么被折叠?
被折叠的 条评论
为什么被折叠?
 到【灌水乐园】发言


