


第一步、建立一个Java项目,名为Hibernate_one
第二步、加载jar包,在src下创建了lib文件夹,用来存放jar包(jar包必须一个都不能少)。如图

我连接的数据库是Oracle,所以得加载Oracle的驱动包ojdbc6,如果用mysql数据库,可从网上下载mysql的驱动包。并将包buildpath
第三步、配置hibernate(作用是连接数据库,必不可少!!!)
在src目录下建立xml文件,命名为:hibernate.cfg.xml
配置内容如下
<!--
  ~ Hibernate, Relational Persistence for Idiomatic Java
  ~
  ~ License: GNU Lesser General Public License (LGPL), version 2.1 or later.
  ~ See the lgpl.txt file in the root directory or <http://www.gnu.org/licenses/lgpl-2.1.html>.
  -->
<!DOCTYPE hibernate-configuration PUBLIC
	"-//Hibernate/Hibernate Configuration DTD 3.0//EN"
	"http://www.hibernate.org/dtd/hibernate-configuration-3.0.dtd">

<hibernate-configuration>
	<session-factory>
		<property name="connection.driver_class">oracle.jdbc.driver.OracleDriver</property>
<!-- 数据库连接地址 --><pre name="code" class="html"><span style="white-space:pre"> </span><!-- 数据库不同,连接地址不同,可从网上百度 --><span style="white-space:pre"> </span><!-- 数据库的用户名及密码 --><span style="white-space:pre"> </span><!-- 是否显示sql语句,默认为sql --><span style="white-space:pre"> </span>validate 加载hibernate时,验证数据库的结构 默认值
update 加载hibernate时,检查数据库,如果表不存在,则创建,如果存在,则更新
create 每次加载hiberante,都会创建表
create-drop 每次加载hiberante,创建,卸载hiberante时,销毁
-->
<property name="hbm2ddl.auto">update</property>
<!--看你的.hbm文件放在哪里,如果用的JPA注解,则该项存放的是持久类的路径 -->
<mapping resource="com/aisino/hibernate/Student0923.hbm.xml"/>
</session-factory>
</hibernate-configuration>
第四步、创建持久化类,并实现set/get方法及toString。如果使用JPA注解,则在持久类中编写,而不用编写映射文件
创建一个包,名为com.aisino.hibernate,下面创建持久化类Student0923
package com.aisino.hibernate;


public class Student0923 {
	private int id;
	private String name;
	private int age;
	public Student0923(){

	}

	public int getId() {
		return id;
	}
	public void setId(int id) {
		this.id = id;
	}
	public String getName() {
		return name;
	}
	public void setName(String name) {
		this.name = name;
	}
	public int getAge() {
		return age;
	}
	public void setAge(int age) {
		this.age = age;
	}

	@Override
	public String toString() {
		return "Student0923 [age=" + age + ", id=" + id + ", name=" + name
				+ "]";
	}


}
第五步,编写映射文件。命名为:Student0923.hbm.xml。(注意,映射文件必须与持久化类放同一包下)
<?xml version="1.0" encoding="UTF-8"?>
<!DOCTYPE hibernate-mapping PUBLIC
        "-//Hibernate/Hibernate Mapping DTD 3.0//EN"
        "http://www.hibernate.org/dtd/hibernate-mapping-3.0.dtd">
<!-- 持久化映射文件 -->
<hibernate-mapping><pre name="code" class="html"><span style="white-space:pre"> </span><!-- name为持久化类的路径,table为表名,你要创建的表的名字 --><span style="white-space:pre"> </span><!-- 设置主键 --><span style="white-space:pre"> </span><!-- 其余字段 -->package com.aisino.hibernate.source;
import org.hibernate.HibernateException;
import org.hibernate.Session;
import org.hibernate.SessionFactory;
import org.hibernate.cfg.Configuration;
public class HibernateUtil {
public static final SessionFactory sessionFactory;
public static final ThreadLocal session = new ThreadLocal();
static{
try{
Configuration configuration=new Configuration().configure();
sessionFactory = configuration.buildSessionFactory();
}catch (Throwable ex){
System.err.println("Initial SessionFactory creation failed." + ex);
throw new ExceptionInInitializerError(ex);
}
}
public static Session currentSession() throws HibernateException{
Session s = (Session) session.get();
if (s == null)
{
s = sessionFactory.openSession();
session.set(s);
}
return s;
}
public static void closeSession() throws HibernateException {
Session s = (Session) session.get();
if (s != null)
s.close();
session.set(null);
}
}
第七步、写一个类CreateTable,进行单元测试,创建表
import org.hibernate.cfg.Configuration;
import org.junit.Test;


public class CreateTable {

	@Test
	public void test(){
<span style="white-space:pre"> </span><!--获取hibernate的配置 -->
Configuration configuration = new Configuration();
configuration.configure();
configuration.buildSessionFactory();
}
}
第八步、建一个类Crud,执行增删改查操作
import java.util.List;

import org.hibernate.Session;
import org.hibernate.SessionFactory;
import org.hibernate.Transaction;
import org.hibernate.cfg.Configuration;
import org.junit.Test;

import com.aisino.hibernate.Student0923;


public class Crud {

	@Test
	public void testSavePerson(){
		//加载hibernate的配置文件
		Configuration configuration = new Configuration();
		configuration.configure();
		//产生sessionFactory
		SessionFactory sessionFactory = configuration.buildSessionFactory();
		//打开session
		Session session = sessionFactory.openSession();
		//开启事务
		Transaction transaction = session.beginTransaction();
		//创建一个对象
		Student0923 stu = new Student0923();
		stu.setId(2);
		stu.setName("yang");
		stu.setAge(22);
		session.save(stu);

		//事务提交
		transaction.commit();
		//session关闭
		session.close();
	}


	@Test
	public void testSelect(){
		//加载hibernate的配置文件
		Configuration configuration = new Configuration();
		configuration.configure();
		//产生sessionFactory
		SessionFactory sessionFactory = configuration.buildSessionFactory();
		//打开session
		Session session = sessionFactory.openSession();
		List<Student0923> list = session.createQuery("from Student0923").list();
		for (Student0923 student0923 : list) {
			System.out.println(student0923.toString());
		}
		//Student0923 stu=(Student0923) session.get(Student0923.class, 1);
		//System.out.println(stu.toString());

		//session关闭
		session.close();
	}


	@Test
	public void Modify(){
		//加载Hibernate的配置文件
		Configuration cfg=new Configuration();
		cfg.configure();
		//产生sessionFactory
		SessionFactory sessionFactory=cfg.buildSessionFactory();
		//打开Session
		Session session=sessionFactory.openSession();
		//开启事物
		Transaction transaction=session.beginTransaction();
		//加载对象.需要强制转换,获得第一条数据的对象
		Student0923 student=(Student0923) session.get(Student0923.class,1);
		//修改数据,注意,get方法的第二个参数是id值,不能修改,只能修改其实的字段
		student.setAge(100);
		student.setName("tian");
		//强制刷新
		session.flush();

		//提交事物
		transaction.commit();
		//关闭session
		session.close();
	}

	@Test
	public void Delete(){
		//加载Hibernate的配置文件
		Configuration cfg=new Configuration().configure();
		//产生SessionFactory
		SessionFactory sessionFactory=cfg.buildSessionFactory();
		//获取session
		Session session=sessionFactory.openSession();
		//开启事物
		Transaction transaction=session.beginTransaction();
		//获取需要删除的对象
		Student0923 student=(Student0923)session.get(Student0923.class, 1);
		//删除
		session.delete(student);
		//强制更新
		session.flush();
		//事物提交
		transaction.commit();
		//关闭session
		session.close();
	}


}
以上增删改查操作,利用单元测试永兴,并在数据库中查看。
以下是我的Java项目结构
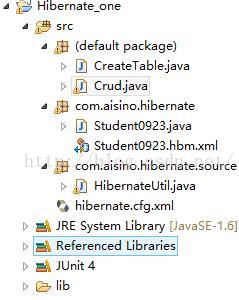
以上就是简单的hibernate使用,是非JPA注解的使用。适合初学者查看,使用JPA方便快捷,之后会在博客中介绍。可以上网了解JPA注解的种类等相关资料


 362
362

 被折叠的 条评论
为什么被折叠?
被折叠的 条评论
为什么被折叠?
 到【灌水乐园】发言


