


nginx的强大功能就是可以通过配置文件来配置代码,全面只是简单的介绍了配置文件,现在这节要讲解一下怎么在模块中使用配置文件的参数。
4.1 配置文件
我们之前写的配置文件都是比较简单的,并没有出现冲突,现在我们看的这个配置文件就是出现了很大的冲突。
http  {
	test_str main;
	server  {
		listen 80;
		test_str  server80;

		location /url1  {
			mytest;
			test_str  loc1;
		}

		location /url2  {
			mytest;
			test_str  loc2;
		}
	}

	server {
		listen 8080;
		test_str  server8080;
		location	/url3  {
			mytest;
			test_str  loc3;
		}
	}
}
看到上面的配置项也明白了,test_str出现了很多冲突,在不同的地方都有,这也是我们这一节讲述的主要内容。
4.2 使用http配置
在上一节中已经有使用了mytest配置项了,只不过当时没有值,所以这次就要好好的分析一下怎么获取配置项的值
4.2.1 配置项的保存
基本上每个模块都会提供一些配置指令,以便于用户可以通过配置来控制该模块的行为。那么这些配置信息是怎么存储的?那就需要定义模块的配置结构来进行存储。我们都知道nginx配置信息分成了几个作用域,这就是main,server,以及location。那对于这三个作用域的配置信息,每个模块就需要定义三个不同的数据结构去进行存储。
看一下定义的配置信息结构体:
typedef struct  {
    ngx_str_t  my_str;
} ngx_http_mytest_conf_t;
Nginx怎么样管理我们自定义的存储配置的结构体ngx_http_mytest_conf_t呢?很简单,通过以前讲过的ngx_http_module_t中的回调方法。下面回顾一下ngx_http_module_t的定义:
typedef struct {
    ngx_int_t   (*preconfiguration)(ngx_conf_t *cf);	//解析配置文件前调用
    ngx_int_t   (*postconfiguration)(ngx_conf_t *cf);	//完成配置文件的解析后调用

    void       *(*create_main_conf)(ngx_conf_t *cf);	//当需要创建数据结构用于储存main级别的全局变量时,可以通过这个回调方法创建存储全局配置项的结构体
    char       *(*init_main_conf)(ngx_conf_t *cf, void *conf);  //初始化main级别配置项

    void       *(*create_srv_conf)(ngx_conf_t *cf); //当需要创建数据结构用于储存srv级别的变量时,可以通过这个回调方法创建存储配置项的结构体
    char       *(*merge_srv_conf)(ngx_conf_t *cf, void *prev, void *conf);  //主要用于合并main级别和srv级别下的同名配置项

    void       *(*create_loc_conf)(ngx_conf_t *cf);		//当需要创建数据结构用于储存loc级别的变量时,可以通过这个回调方法创建存储配置项的结构体
    char       *(*merge_loc_conf)(ngx_conf_t *cf, void *prev, void *conf);	//主要是合并srv级别和loc级别下的同名配置项
} ngx_http_module_t;
其中,create_main_conf、create_srv_conf、create_loc_conf这3个回调函数方法负责把我们分配的用于保存配置项的结构体传递给HTTP框架。
为什么需要3个回调函数,其实是因为我们的配置文件也有3个级别,分别是main、srv、loc,但遇到http{}配置块的时候,就会调用create_main_conf、create_srv_conf、create_loc_conf这三个回调函数,当遇到server{}配置块的时候,就会调用create_srv_conf、create_loc_conf这两个函数,当遇到location配置块时就会调用create_loc_conf这个函数。
我们就在这里实现一个ngx_http_creat_loc_conf方法:
static void * ngx_http_mytest_creat_loc_conf(ngx_conf_t *cf) {
    ngx_http_mytest_conf_t *mycf;
    mycf = (ngx_http_mytest_conf_t *)ngx_pcalloc(cf->pool, sizeof(ngx_http_mytest_conf_t));
    if(mycf == NULL)  {
        return NULL;
    }

    ngx_str_null(&mycf->hello_string);
    //mycf->hello_string =
    return mycf;
}
上述代码只是申请了内存,并做了初始化,还没到有进行解析。
4.2.2 配置项的解析方式
下面先回顾一下ngx_command_s结构体:
struct ngx_command_s {
    ngx_str_t             name;		//配置项名称,如"gzip"
    ngx_uint_t            type;		//配置项的类型,type将指定配置项可以出现的位置
    char               *(*set)(ngx_conf_t *cf, ngx_command_t *cmd, void *conf);	//出现了name中指定的配置项后,将会调用set方法处理配置项的参数
    ngx_uint_t            conf;		//在配置文件中的偏移量
    ngx_uint_t            offset;	//需要与conf配置,下一节解析
    void                 *post;		//配置项读取后的处理方法,必须是ngx_conf_post_t结构的指针
};
(1) ngx_str_t name
其中,name是配置项的名称。
(2)ngx_uint_t type
其中,type决定了这个配置项可以在那些块。type可以同时取多个值。那些配置项我就不用了,现在变懒了。
(3) char *(*set)(ngx_conf_t *cf, ngx_command_t *cmd, void *conf);
关于set回调方法,就是name配置上了配置项的字符串,就会调用。set函数可以是我们自己实现回调方式来处理,也可以调用预设的解析配置方法(14种,我就不写了)。
(4)ngx_uint_t conf
conf用于指示配置项所处内存的相对偏移位置,仅在type中没有设置NGX_DIRECT_CONF和NGX_MAIN_CONF时才会生效。
为什么HTTP模块一定要设置conf的值呢?因为HTTP框架可以使用预设的14种方法自动地解析出的配置项写入HTTP模块代码定义的结构体中,但是HTTP模块中可能定义3个结构体,分别存储main、srv、loc级别的配置项,而HTTP框架自动解析时需要知道应把解析出的配置项值写入哪个结构体中,这将由conf成员完成。
(5)ngx_uint_t offset
offset表示当前配置项在整个存储配置项的结构体中的偏移位置(以字节为单位)。
其实我们可以用offsetof宏来定义的。
(6)void *post
post指针有许多用途,从它被设计成void*就可以看出。
我比较偷懒,14种预设方法解析配置项。我这里就只说一种,其他的都差不多的
下面还是使用ngx_http_mytest_comf_t为例进行解析:
我们在之前的配置项中是有一个配置项的名称为test_str,其后的参数只有1个,看看我们是怎么接受和保存这个变量的:
static ngx_command_t ngx_http_mytest_commands[] = {
    {
        ngx_string("test_str"),
        NGX_HTTP_MAIN_CONF | NGX_HTTP_SRV_CONF| NGX_HTTP_LOC_CONF | NGX_CONF_TAKE1,
        ngx_conf_set_str_slot,		//nginx中支持的解析str的函数
        NGX_HTTP_LOC_CONF_OFFSET,
        offsetof(ngx_http_mytest_conf_t, my_str),		//偏移量
        NULL
    },
    ngx_null_command
}
以上代码表示test_str可以出现在http{…}、server{…}或者location{…}块内,它携带了一个参数会保存到my_str中,例如:如下配置:
test_str loc1;
那么解析出来的my_str的值为{len=4;data=“loc1”}
4.2.3 自定义配置项的处理方式
除了nginx已经实现的14种通用配置项处理方法外,还可以自己编写专用的配置处理方法。事实上,之前实现的ngx_http_mytest就是自定义的处理mytest配置项的方法,只是没有去 处理配置项的参数而已,这次就在前面的例子中实现解析配置项。
static char *ngx_http_mytest_module_set(ngx_conf_t *cf, ngx_command_t *cmd, void *conf)
{
	ngx_http_core_loc_conf_t *corecf = ngx_http_conf_get_module_loc_conf(cf, ngx_http_core_module);
	corecf->handler = ngx_http_mytest_module_handler;

	//ngx_http_mytest_conf_t *local_conf = (ngx_http_mytest_conf_t *)conf;
	char *rv = ngx_conf_set_str_slot(cf, cmd, conf);

	return rv;
}
是不是看着是自己定义的函数,但其实函数内部也是调用了ngx_conf_set_str_slot来获取,其实也可以直接判断获取的,
这里就在写一个直接获取的函数:
static char *ngx_http_mytest_module_set(ngx_conf_t *cf, ngx_command_t *cmd, void *conf)
{
	ngx_http_core_loc_conf_t *corecf = ngx_http_conf_get_module_loc_conf(cf, ngx_http_core_module);
	corecf->handler = ngx_http_mytest_module_handler;

	//char *rv = ngx_conf_set_str_slot(cf, cmd, conf);


	ngx_http_mytest_conf_t *local_conf = (ngx_http_mytest_conf_t *)conf;

	//cf->args是1个ngx_array_t队列,其中的elts就是参数的存储的地址
	ngx_str_t *value = cf->args->elts;
	//netles表示参数的个数
	if (cf->args->nelts == 1) {
		//value[1]就是第一个参数
		local_conf->my_str = value[1];
	}

	return NGX_CONF_OK;
}
这就是直接获取的函数,如果看了ngx_conf_set_str_slot这个函数的源码,也会发现其实就是这样子获取的。
配置文件:
location /hello {
            mytest ajgja;
        }
运行结果:

4.2.4 合并配置项
看一下4.1的配置文件,现在我们就用4.1这个来举例,我们还在之前的mytest模块中添加:
添加一个命令:
static ngx_command_t ngx_http_mytest_commands[] = {
	{
		ngx_string("mytest"),
		NGX_HTTP_LOC_CONF | NGX_CONF_NOARGS | NGX_CONF_TAKE1,
		ngx_http_mytest_module_set,
		NGX_HTTP_LOC_CONF_OFFSET,
		offsetof(ngx_http_mytest_conf_t, my_str), NULL
	},
	{
		ngx_string("test_str"),
		NGX_HTTP_MAIN_CONF | NGX_HTTP_SRV_CONF | NGX_HTTP_LOC_CONF | NGX_CONF_NOARGS | NGX_CONF_TAKE1,
		ngx_http_mytest_test_str_module_set,
		NGX_HTTP_LOC_CONF_OFFSET,
		offsetof(ngx_http_mytest_conf_t, test_str), NULL
	},
	ngx_null_command
};
并且实现了set钩子函数:
static char *ngx_http_mytest_test_str_module_set(ngx_conf_t *cf, ngx_command_t *cmd, void *conf)
{
	ngx_http_core_loc_conf_t *corecf = ngx_http_conf_get_module_loc_conf(cf, ngx_http_core_module);
	corecf->handler = ngx_http_mytest_module_handler;

	//char *rv = ngx_conf_set_str_slot(cf, cmd, conf);


	ngx_http_mytest_conf_t *local_conf = (ngx_http_mytest_conf_t *)conf;

	//cf->args是1个ngx_array_t队列,其中的elts就是参数的存储的地址
	ngx_str_t *value = cf->args->elts;
	//netles表示参数的个数
	if (cf->args->nelts > 1) {
		//value[1]就是第一个参数
		local_conf->test_str = value[1];
		ngx_conf_log_error(NGX_LOG_EMERG, cf, 0, "--ngx_http_mytest_test_str_module_set:%s %d", local_conf->test_str.data, cf->args->nelts);
	}

	return NGX_CONF_OK;
}
回调函数是写重复了,其实可以把这个往前提
运行的结果:
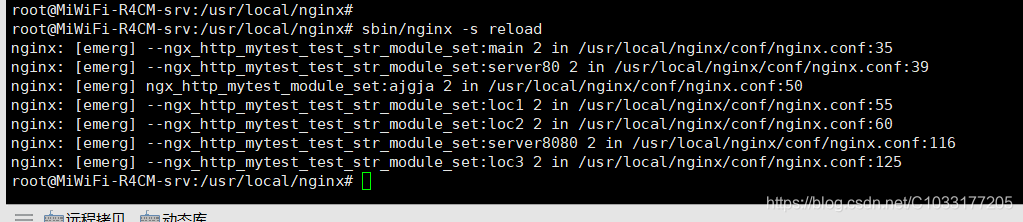
这些都是配置文件定义的,都解析出来了,那么我们需要的是哪个呢?就需要合并了,在ngx_http_module_t中也定义了一个合并的钩子函数,所以我们使用这个钩子函数就可以了。
函数原型:
char *(*merge_loc_conf)(ngx_conf_t *cf, void *prev, void *conf);
第2个参数是void *prev是指解析父配置块时生成的结构体,而第3个参数void *conf则指出的是保存子配置块的结构体。
static char* ngx_http_mytest_merge_loc_conf(ngx_conf_t *cf, void *parent, void *child)
{
	ngx_http_mytest_conf_t *prev = (ngx_http_mytest_conf_t *)parent;
	ngx_http_mytest_conf_t *conf = (ngx_http_mytest_conf_t *)child;

	//if(prev != NULL && conf != NULL)
	//	ngx_conf_log_error(NGX_LOG_EMERG, cf, 0, "1---ngx_http_mytest_merge_loc_conf:%s %s", conf->test_str.data, prev->test_str.data);

	ngx_conf_merge_str_value(conf->test_str, prev->test_str, "default");
	//if(prev != NULL && conf != NULL)
	ngx_conf_log_error(NGX_LOG_EMERG, cf, 0, "---ngx_http_mytest_merge_loc_conf:%s %s", conf->test_str.data, prev->test_str.data);

	return NGX_CONF_OK;
}
ngx_conf_merge_str_value只是简单的子字符串覆盖父字符串,nginx预设的合并方法有10个,用法都差不多的,这里我把10个宏函数都复制出来
#define ngx_conf_merge_value(conf, prev, default)                            \
    if (conf == NGX_CONF_UNSET) {                                            \
        conf = (prev == NGX_CONF_UNSET) ? default : prev;                    \
    }

#define ngx_conf_merge_ptr_value(conf, prev, default)                        \
    if (conf == NGX_CONF_UNSET_PTR) {                                        \
        conf = (prev == NGX_CONF_UNSET_PTR) ? default : prev;                \
    }

#define ngx_conf_merge_uint_value(conf, prev, default)                       \
    if (conf == NGX_CONF_UNSET_UINT) {                                       \
        conf = (prev == NGX_CONF_UNSET_UINT) ? default : prev;               \
    }

#define ngx_conf_merge_msec_value(conf, prev, default)                       \
    if (conf == NGX_CONF_UNSET_MSEC) {                                       \
        conf = (prev == NGX_CONF_UNSET_MSEC) ? default : prev;               \
    }

#define ngx_conf_merge_sec_value(conf, prev, default)                        \
    if (conf == NGX_CONF_UNSET) {                                            \
        conf = (prev == NGX_CONF_UNSET) ? default : prev;                    \
    }

#define ngx_conf_merge_size_value(conf, prev, default)                       \
    if (conf == NGX_CONF_UNSET_SIZE) {                                       \
        conf = (prev == NGX_CONF_UNSET_SIZE) ? default : prev;               \
    }

#define ngx_conf_merge_off_value(conf, prev, default)                        \
    if (conf == NGX_CONF_UNSET) {                                            \
        conf = (prev == NGX_CONF_UNSET) ? default : prev;                    \
    }

#define ngx_conf_merge_str_value(conf, prev, default)                        \
    if (conf.data == NULL) {                                                 \
        if (prev.data) {                                                     \
            conf.len = prev.len;                                             \
            conf.data = prev.data;                                           \
        } else {                                                             \
            conf.len = sizeof(default) - 1;                                  \
            conf.data = (u_char *) default;                                  \
        }                                                                    \
    }

#define ngx_conf_merge_bufs_value(conf, prev, default_num, default_size)     \
    if (conf.num == 0) {                                                     \
        if (prev.num) {                                                      \
            conf.num = prev.num;                                             \
            conf.size = prev.size;                                           \
        } else {                                                             \
            conf.num = default_num;                                          \
            conf.size = default_size;                                        \
        }                                                                    \
    }

#define ngx_conf_merge_bitmask_value(conf, prev, default)                    \
    if (conf == 0) {                                                         \
        conf = (prev == 0) ? default : prev;                                 \
    }
4.3 error日志用法
在调试模块的时候,我们使用到一些日志函数,如果不使用一些日志函数,感觉都定位不了问题,所以这次普及一下日志的用法。
由于跨平台的考虑,日志模块封装了相当多的接口,首先看一下日志模块支持可变参数提供的接口:
#define ngx_log_error(level, log, ...)                                        \
    if ((log)->log_level >= level) ngx_log_error_core(level, log, __VA_ARGS__)

void ngx_log_error_core(ngx_uint_t level, ngx_log_t *log, ngx_err_t err,
    const char *fmt, ...);

#define ngx_log_debug(level, log, ...)                                        \
    if ((log)->log_level & level)                                             \
        ngx_log_error_core(NGX_LOG_DEBUG, log, __VA_ARGS__)
(1) level
对于ngx_log_error宏来说,level表示当前这条日志的级别:
#define NGX_LOG_STDERR            0
#define NGX_LOG_EMERG             1
#define NGX_LOG_ALERT             2
#define NGX_LOG_CRIT              3
#define NGX_LOG_ERR               4
#define NGX_LOG_WARN              5
#define NGX_LOG_NOTICE            6
#define NGX_LOG_INFO              7
#define NGX_LOG_DEBUG             8
在使用ngx_log_debug宏时,level的意义完全不同,它表达的意义不再是级别(已经是debug级别),而是日志类型,因为ngx_log_debug宏记录的日志必须是NGX_LOG_DEBUG调试级别的,取值范围如下:
#define NGX_LOG_DEBUG_CORE        0x010
#define NGX_LOG_DEBUG_ALLOC       0x020
#define NGX_LOG_DEBUG_MUTEX       0x040
#define NGX_LOG_DEBUG_EVENT       0x080
#define NGX_LOG_DEBUG_HTTP        0x100
#define NGX_LOG_DEBUG_MAIL        0x200
#define NGX_LOG_DEBUG_STREAM      0x400
当HTTP模块调用ngx_log_debug宏记录日志时,传入的level参数是NGX_LOG_DEBUG_HTTP,如果是传入其他宏,就不输出日志。
(2)log参数
实际上,在开发HTTP模块中,我们并不关心log参数,因为处理请求时ngx_http_request_t结构中的connection成员中就有一个ngx_log_t类型的log成员,在读取配置阶段ngx_conf_t结构也有log成员可以用来记录日志。
下面可以简单来看一下ngx_log_t的定义:
typedef u_char *(*ngx_log_handler_pt) (ngx_log_t *log, u_char *buf, size_t len);
typedef void (*ngx_log_writer_pt) (ngx_log_t *log, ngx_uint_t level,
    u_char *buf, size_t len);


struct ngx_log_s {
    ngx_uint_t           log_level;		//日志级别和日志类型
    ngx_open_file_t     *file;			//日志文件

    ngx_atomic_uint_t    connection;	//连接数,不为0时会数输出到日志中

    time_t               disk_full_time;

    ngx_log_handler_pt   handler;	//记录日志的回调方法
    void                *data;		//handler回调使用的函数

    ngx_log_writer_pt    writer;
    void                *wdata;

    /*
     * we declare "action" as "char *" because the actions are usually
     * the static strings and in the "u_char *" case we have to override
     * their types all the time
     */

    char                *action;

    ngx_log_t           *next;
};
目前先不关心日志模块的实现,等到源码分析的时候,我们在看。
(3)err参数
err参数就是错误码,一般是执行系统调用失败后取得的error参数,当err不为0时,nginx日志模块将会在正常日志内容前输出这个错误码以及其对应的字符串形式的错误消息。
(4)fmt参数
fmt就是可变参数,就像在printf等C语言方法中输入的一样。
nginx提供了debug调试级别的日志接口:
#define ngx_log_debug0(level, log, err, fmt)                                  \
    if ((log)->log_level & level)                                             \
        ngx_log_debug_core(log, err, fmt)

#define ngx_log_debug1(level, log, err, fmt, arg1)                            \
    if ((log)->log_level & level)                                             \
        ngx_log_debug_core(log, err, fmt, arg1)

#define ngx_log_debug2(level, log, err, fmt, arg1, arg2)                      \
    if ((log)->log_level & level)                                             \
        ngx_log_debug_core(log, err, fmt, arg1, arg2)

#define ngx_log_debug3(level, log, err, fmt, arg1, arg2, arg3)                \
    if ((log)->log_level & level)                                             \
        ngx_log_debug_core(log, err, fmt, arg1, arg2, arg3)

#define ngx_log_debug4(level, log, err, fmt, arg1, arg2, arg3, arg4)          \
    if ((log)->log_level & level)                                             \
        ngx_log_debug_core(log, err, fmt, arg1, arg2, arg3, arg4)

#define ngx_log_debug5(level, log, err, fmt, arg1, arg2, arg3, arg4, arg5)    \
    if ((log)->log_level & level)                                             \
        ngx_log_debug_core(log, err, fmt, arg1, arg2, arg3, arg4, arg5)

#define ngx_log_debug6(level, log, err, fmt,                                  \
                       arg1, arg2, arg3, arg4, arg5, arg6)                    \
    if ((log)->log_level & level)                                             \
        ngx_log_debug_core(log, err, fmt, arg1, arg2, arg3, arg4, arg5, arg6)

#define ngx_log_debug7(level, log, err, fmt,                                  \
                       arg1, arg2, arg3, arg4, arg5, arg6, arg7)              \
    if ((log)->log_level & level)                                             \
        ngx_log_debug_core(log, err, fmt,                                     \
                       arg1, arg2, arg3, arg4, arg5, arg6, arg7)

#define ngx_log_debug8(level, log, err, fmt,                                  \
                       arg1, arg2, arg3, arg4, arg5, arg6, arg7, arg8)        \
    if ((log)->log_level & level)                                             \
        ngx_log_debug_core(log, err, fmt,                                     \
                       arg1, arg2, arg3, arg4, arg5, arg6, arg7, arg8)


 2201
2201


 被折叠的 条评论
为什么被折叠?
被折叠的 条评论
为什么被折叠?
 到【灌水乐园】发言


