


【nginx流程分析之读取配置文件】
继承上一篇 【nginx流程分析之初始化cycle】
说到了ngx_conf_parse的方法,这个方法主要就是说nginx解析配置文件,我们接下来看一下。
因为这里有很多的指针操作,我们单独开了一篇专门说一下中间的指针操作,详见nginx流程分析之指针操作
初始化变量和结构体
因为初始化变量,我们直接在注释中增加说明
    //初始化变量
    char             *rv;
    ngx_fd_t          fd;
    ngx_int_t         rc;
    ngx_buf_t         buf;
    ngx_conf_file_t  *prev, conf_file;

    //定义文件解析的类型
    enum {
        parse_file = 0,
        parse_block,
        parse_param
    } type;

#if (NGX_SUPPRESS_WARN)
    fd = NGX_INVALID_FILE;
    prev = NULL;
#endif
    // /usr/local/nginx/conf/nginx.conf
    if (filename) {

        /* open configuration file */

        fd = ngx_open_file(filename->data, NGX_FILE_RDONLY, NGX_FILE_OPEN, 0);

        if (fd == NGX_INVALID_FILE) {
            ngx_conf_log_error(NGX_LOG_EMERG, cf, ngx_errno,
                               ngx_open_file_n " \"%s\" failed",
                               filename->data);
            return NGX_CONF_ERROR;
        }

        //设置prev 和 conf_file
        prev = cf->conf_file;
        cf->conf_file = &conf_file;

        //读取/usr/local/nginx/conf/nginx.conf 获取文件描述符
        if (ngx_fd_info(fd, &cf->conf_file->file.info) == NGX_FILE_ERROR) {
            ngx_log_error(NGX_LOG_EMERG, cf->log, ngx_errno,
                          ngx_fd_info_n " \"%s\" failed", filename->data);
        }

        //设置conf_file的buffer
        cf->conf_file->buffer = &buf;

        //分配 NGX_CONF_BUFFER = 4096 的内存
        buf.start = ngx_alloc(NGX_CONF_BUFFER, cf->log);
        if (buf.start == NULL) {
            goto failed;
        }

        //设置buf的位置以及当前地址和最后位置
        buf.pos = buf.start;
        buf.last = buf.start;
        buf.end = buf.last + NGX_CONF_BUFFER;
        buf.temporary = 1;

        //设置conf_file的问文件信息
        cf->conf_file->file.fd = fd;
        cf->conf_file->file.name.len = filename->len;
        cf->conf_file->file.name.data = filename->data;
        cf->conf_file->file.offset = 0;
        cf->conf_file->file.log = cf->log;
        cf->conf_file->line = 1;

        //定义解析文件的类型
        type = parse_file;

        //不影响主流程 暂定 cf->conf_file->dump = NULL;
        if (ngx_dump_config
#if (NGX_DEBUG)
            || 1
#endif
           )
        {
            if (ngx_conf_add_dump(cf, filename) != NGX_OK) {
                goto failed;
            }

        } else {
            cf->conf_file->dump = NULL;
        }

    } else if (cf->conf_file->file.fd != NGX_INVALID_FILE) {

        type = parse_block;

    } else {
        type = parse_param;
    }
读取配置
接下来就是一个循环,一直从配置文件中进行读取变量。先看一下对应的代码:
  for ( ;; ) {
        rc = ngx_conf_read_token(cf);

        /*
         * ngx_conf_read_token() may return
         *
         *    NGX_ERROR             there is error
         *    NGX_OK                the token terminated by ";" was found
         *    NGX_CONF_BLOCK_START  the token terminated by "{" was found
         *    NGX_CONF_BLOCK_DONE   the "}" was found
         *    NGX_CONF_FILE_DONE    the configuration file is done
         */

        if (rc == NGX_ERROR) {
            goto done;
        }

        if (rc == NGX_CONF_BLOCK_DONE) {

            if (type != parse_block) {
                ngx_conf_log_error(NGX_LOG_EMERG, cf, 0, "unexpected \"}\"");
                goto failed;
            }

            goto done;
        }

        if (rc == NGX_CONF_FILE_DONE) {

            if (type == parse_block) {
                ngx_conf_log_error(NGX_LOG_EMERG, cf, 0,
                                   "unexpected end of file, expecting \"}\"");
                goto failed;
            }

            goto done;
        }

        if (rc == NGX_CONF_BLOCK_START) {

            if (type == parse_param) {
                ngx_conf_log_error(NGX_LOG_EMERG, cf, 0,
                                   "block directives are not supported "
                                   "in -g option");
                goto failed;
            }
        }

        /* rc == NGX_OK || rc == NGX_CONF_BLOCK_START */

         //cf->handler = null
        if (cf->handler) {

            /*
             * the custom handler, i.e., that is used in the http's
             * "types { ... }" directive
             */

            if (rc == NGX_CONF_BLOCK_START) {
                ngx_conf_log_error(NGX_LOG_EMERG, cf, 0, "unexpected \"{\"");
                goto failed;
            }

            rv = (*cf->handler)(cf, NULL, cf->handler_conf);
            if (rv == NGX_CONF_OK) {
                continue;
            }

            if (rv == NGX_CONF_ERROR) {
                goto failed;
            }

            ngx_conf_log_error(NGX_LOG_EMERG, cf, 0, rv);

            goto failed;
        }


        rc = ngx_conf_handler(cf, rc);

        if (rc == NGX_ERROR) {
            goto failed;
        }
    }
接下来我们依次进行分析,可以看到核心是ngx_conf_read_token这个方法,我们先看看这个方法。
ngx_conf_read_token
因为代码比较多,我们就在代码中增加注释进行说明,这里以worker_processes 1; 为例子
static ngx_int_t
ngx_conf_read_token(ngx_conf_t *cf)
{
    u_char      *start, ch, *src, *dst;
    off_t        file_size;
    size_t       len;
    ssize_t      n, size;
    ngx_uint_t   found, need_space, last_space, sharp_comment, variable;
    ngx_uint_t   quoted, s_quoted, d_quoted, start_line;
    ngx_str_t   *word;
    ngx_buf_t   *b, *dump;

    found = 0;
    need_space = 0;
    last_space = 1; //标志位,表示上一个字符为token分隔符
    sharp_comment = 0;
    variable = 0; //遇到字符$后,表示一个变量
    quoted = 0; //标志位,表示上一个字符为反引号
    s_quoted = 0; //标志位,表示已扫描一个双引号,期待另一个双引号
    d_quoted = 0; //标志位,表示已扫描一个单引号,期待另一个单引号

    cf->args->nelts = 0; //初始化已使用的元素个数为0
    b = cf->conf_file->buffer;
    dump = cf->conf_file->dump;
    start = b->pos;
    start_line = cf->conf_file->line;
    //获取文件大小
    file_size = ngx_file_size(&cf->conf_file->file.info);


    for ( ;; ) {

        //刚开始的时候 b->pos = b->last
        //接下来b->last 会等于 文件大小
        if (b->pos >= b->last) {

            //判断是否读完
            if (cf->conf_file->file.offset >= file_size) {

                //异常处理
                if (cf->args->nelts > 0 || !last_space) {

                    if (cf->conf_file->file.fd == NGX_INVALID_FILE) {
                        ngx_conf_log_error(NGX_LOG_EMERG, cf, 0,
                                           "unexpected end of parameter, "
                                           "expecting \";\"");
                        return NGX_ERROR;
                    }

                    ngx_conf_log_error(NGX_LOG_EMERG, cf, 0,
                                  "unexpected end of file, "
                                  "expecting \";\" or \"}\"");
                    return NGX_ERROR;
                }

                //返回成功
                return NGX_CONF_FILE_DONE;
            }

            //读取的长度 刚开始等于0
            len = b->pos - start;

            //判断长度是否超过4096
            if (len == NGX_CONF_BUFFER) {
                cf->conf_file->line = start_line;

                if (d_quoted) { //表示缺少一个双影号
                    ch = '"';

                } else if (s_quoted) { //表示缺少一个单影号
                    ch = '\'';

                } else { //too long parameter 超过了buffer的4096
                    ngx_conf_log_error(NGX_LOG_EMERG, cf, 0,
                                       "too long parameter \"%*s...\" started",
                                       10, start);
                    return NGX_ERROR;
                }

                ngx_conf_log_error(NGX_LOG_EMERG, cf, 0,
                                   "too long parameter, probably "
                                   "missing terminating \"%c\" character", ch);
                return NGX_ERROR;
            }

            if (len) {
                ngx_memmove(b->start, start, len);
            }

            //获取需要读取文件大小
            size = (ssize_t) (file_size - cf->conf_file->file.offset);

            if (size > b->end - (b->start + len)) {
                size = b->end - (b->start + len);
            }

            //进行地区文件 调用pread 同时file.offset += n
            n = ngx_read_file(&cf->conf_file->file, b->start + len, size,
                              cf->conf_file->file.offset);

            if (n == NGX_ERROR) {
                return NGX_ERROR;
            }

            //判断是否读取的正确
            if (n != size) {
                ngx_conf_log_error(NGX_LOG_EMERG, cf, 0,
                                   ngx_read_file_n " returned "
                                   "only %z bytes instead of %z",
                                   n, size);
                return NGX_ERROR;
            }

            //设置变量 len = 0
            b->pos = b->start + len;
            b->last = b->pos + n;
            start = b->start;

            if (dump) {
                dump->last = ngx_cpymem(dump->last, b->pos, size);
            }
        }

        //移动 pos 进行+1
        ch = *b->pos++;


        //判断是否有换行
        if (ch == LF) {
            //行数+1
            cf->conf_file->line++;

            if (sharp_comment) {
                sharp_comment = 0;
            }
        }


        //是否是注释 是注释跳过
        if (sharp_comment) {
            continue;
        }

        //上一个是标志位; 跳过
        if (quoted) {
            quoted = 0;
            continue;
        }

        //上一个字符为单引号或者双引号,期待一个分隔符
        if (need_space) {
            if (ch == ' ' || ch == '\t' || ch == CR || ch == LF) { //找到分隔符
                last_space = 1;
                need_space = 0;
                continue;
            }

            //简单的分割符 ;
            //比如 worker_processes  1;
            if (ch == ';') {
                return NGX_OK;
            }

            //一个模块的开始
            //比如  event{
           //worker_connections  1024;
           // }
            if (ch == '{') {
                return NGX_CONF_BLOCK_START;
            }

            //表示接下来就是 token
            if (ch == ')') {
                last_space = 1;
                need_space = 0;

            } else {
                ngx_conf_log_error(NGX_LOG_EMERG, cf, 0,
                                   "unexpected \"%c\"", ch);
                return NGX_ERROR;
            }
        }

        //表示接下的字符可能就是需要的字符
        //比如worker_processes  1;后面的1
        if (last_space) {
            //如果是这些字符说明不符合条件 因此跳过
            if (ch == ' ' || ch == '\t' || ch == CR || ch == LF) {
                continue;
            }

            start = b->pos - 1;

            //当前行数
            start_line = cf->conf_file->line;

            switch (ch) {
            case ';':
            case '{':
                if (cf->args->nelts == 0) {
                    ngx_conf_log_error(NGX_LOG_EMERG, cf, 0,
                                       "unexpected \"%c\"", ch);
                    return NGX_ERROR;
                }

                if (ch == '{') {
                    return NGX_CONF_BLOCK_START;
                }

                return NGX_OK;

            case '}':
                if (cf->args->nelts != 0) {
                    ngx_conf_log_error(NGX_LOG_EMERG, cf, 0,
                                       "unexpected \"}\"");
                    return NGX_ERROR;
                }

                return NGX_CONF_BLOCK_DONE;

            case '#': //注释
                sharp_comment = 1;
                continue;

            case '\\': //反影号
                quoted = 1;
                last_space = 0;
                continue;

            case '"': //双影号 start进行+1
                start++;
                d_quoted = 1;
                last_space = 0;
                continue;

            case '\'': //单影号
                start++;
                s_quoted = 1;
                last_space = 0;
                continue;

            case '$': //变量
                variable = 1;
                last_space = 0;
                continue;

            default:
                //说明没有找到需要的
                last_space = 0;
            }

        } else {
            if (ch == '{' && variable) {
                continue;
            }

            variable = 0;

            if (ch == '\\') {
                quoted = 1;
                continue;
            }

            if (ch == '$') {
                variable = 1;
                continue;
            }

            if (d_quoted) {
                if (ch == '"') {
                    d_quoted = 0;
                    need_space = 1;
                    found = 1;
                }

            } else if (s_quoted) {
                if (ch == '\'') {
                    s_quoted = 0;
                    need_space = 1;
                    found = 1;
                }

            //说明可能找到了
            //因为可能worker_processes  1;  因为可能worker_processes 和 1之间有多个空格
            //所以对于因为可能读取到 worker_processes 后面的第一个空格会走到这里  当然分号;也走到这里

            } else if (ch == ' ' || ch == '\t' || ch == CR || ch == LF
                       || ch == ';' || ch == '{')
            {
                last_space = 1;
                found = 1;
            }

            if (found) {
                //返回数组的第一位的内存地址
                word = ngx_array_push(cf->args);
                if (word == NULL) {
                    return NGX_ERROR;
                }

                //分配地址
                //对于 worker_processes 而言 此时就是 worker_processes 17个字节
                word->data = ngx_pnalloc(cf->pool, b->pos - 1 - start + 1);
                if (word->data == NULL) {
                    return NGX_ERROR;
                }

                // b->pos - 1 为了读取上一个字符
                for (dst = word->data, src = start, len = 0;
                     src < b->pos - 1;
                     len++)
                {

                    //判断是否是特殊字符
                    if (*src == '\\') {
                        switch (src[1]) {
                        case '"':
                        case '\'':
                        case '\\':
                            src++;
                            break;

                        case 't':
                            *dst++ = '\t';
                            src += 2;
                            continue;

                        case 'r':
                            *dst++ = '\r';
                            src += 2;
                            continue;

                        case 'n':
                            *dst++ = '\n';
                            src += 2;
                            continue;
                        }

                    }
                    //进行赋值 等于把worker_processes赋值给dst
                    *dst++ = *src++;
                }

                //加上结束符
                *dst = '\0';

                //设置长度
                word->len = len;

                //这里返回
                if (ch == ';') {
                    return NGX_OK;
                }

                if (ch == '{') {
                    return NGX_CONF_BLOCK_START;
                }

                //结束符不是 ; 和 { 那么会继续找
                found = 0;
            }
        }
    }
}
ngx_conf_handler
同上,读取完配置,接下来就是 ngx_conf_handler这个方法。我们先结合注释一起看看。
static ngx_int_t
ngx_conf_handler(ngx_conf_t *cf, ngx_int_t last)
{
    char           *rv;
    void           *conf, **confp;
    ngx_uint_t      i, found;
    ngx_str_t      *name;

    ngx_command_t  *cmd;

    //获取数组的第一个元素
    // 对于 worker_processes  1;来说  name = worker_processes
    name = cf->args->elts;

    found = 0;

     //worker_process 此时为
     //command type NGX_MAIN_CONF|NGX_DIRECT_CONF|NGX_CONF_TAKE1

    //循环判断模块
    for (i = 0; cf->cycle->modules[i]; i++) {

        //获取模块的command 如果没有那么跳过
        cmd = cf->cycle->modules[i]->commands;
        if (cmd == NULL) {
            continue;
        }


        for ( /* void */ ; cmd->name.len; cmd++) {

            //判断每个模块的命令的名称进行匹配
            if (name->len != cmd->name.len) {
                continue;
            }
            if (ngx_strcmp(name->data, cmd->name.data) != 0) {
                continue;
            }

            //说明匹配到了
            found = 1;

            //判断类型是否符合 回归一下初始化的设置
            //0x45524F43
            //  conf.module_type = NGX_CORE_MODULE;
            //0x01000000
            // conf.cmd_type = NGX_MAIN_CONF;
            if (cf->cycle->modules[i]->type != NGX_CONF_MODULE
                && cf->cycle->modules[i]->type != cf->module_type)
            {
                continue;
            }

            /* is the directive's location right ? */

            //cmd->type 和 cf->cmd_type 是否一致
            if (!(cmd->type & cf->cmd_type)) {
                continue;
            }

            //判断是否异常
            if (!(cmd->type & NGX_CONF_BLOCK) && last != NGX_OK) {
                ngx_conf_log_error(NGX_LOG_EMERG, cf, 0,
                                  "directive \"%s\" is not terminated by \";\"",
                                  name->data);
                return NGX_ERROR;
            }

            //判断是否异常
            if ((cmd->type & NGX_CONF_BLOCK) && last != NGX_CONF_BLOCK_START) {
                ngx_conf_log_error(NGX_LOG_EMERG, cf, 0,
                                   "directive \"%s\" has no opening \"{\"",
                                   name->data);
                return NGX_ERROR;
            }

            /* is the directive's argument count right ? */

            //判断是否异常
            if (!(cmd->type & NGX_CONF_ANY)) {

                if (cmd->type & NGX_CONF_FLAG) {

                    if (cf->args->nelts != 2) {
                        goto invalid;
                    }

                } else if (cmd->type & NGX_CONF_1MORE) {

                    if (cf->args->nelts < 2) {
                        goto invalid;
                    }

                } else if (cmd->type & NGX_CONF_2MORE) {

                    if (cf->args->nelts < 3) {
                        goto invalid;
                    }

                } else if (cf->args->nelts > NGX_CONF_MAX_ARGS) {

                    goto invalid;

                } else if (!(cmd->type & argument_number[cf->args->nelts - 1]))
                {
                    goto invalid;
                }
            }

            /* set up the directive's configuration context */

            conf = NULL;

            if (cmd->type & NGX_DIRECT_CONF) {

                //通过 ngx_core_module_create_conf 获取到的config
                //在ngx_init_cycle中进行了初始化
                //对应的结构体 ngx_core_conf_t
                conf = ((void **) cf->ctx)[cf->cycle->modules[i]->index];

            } else if (cmd->type & NGX_MAIN_CONF) {
                conf = &(((void **) cf->ctx)[cf->cycle->modules[i]->index]);


            } else if (cf->ctx) {
                confp = *(void **) ((char *) cf->ctx + cmd->conf);

                if (confp) {
                    conf = confp[cf->cycle->modules[i]->ctx_index];
                }
            }


            //对于 worker_process 调用 ngx_set_worker_processes方法
            //ngx_core_conf_t 中的 worker_processes设置成对应的值 这里为1
            rv = cmd->set(cf, cmd, conf);

            //进行返回
            if (rv == NGX_CONF_OK) {
                return NGX_OK;
            }

            if (rv == NGX_CONF_ERROR) {
                return NGX_ERROR;
            }

            ngx_conf_log_error(NGX_LOG_EMERG, cf, 0,
                               "\"%s\" directive %s", name->data, rv);

            return NGX_ERROR;
        }
    }

    if (found) {
        ngx_conf_log_error(NGX_LOG_EMERG, cf, 0,
                           "\"%s\" directive is not allowed here", name->data);

        return NGX_ERROR;
    }

    ngx_conf_log_error(NGX_LOG_EMERG, cf, 0,
                       "unknown directive \"%s\"", name->data);

    return NGX_ERROR;

invalid:

    ngx_conf_log_error(NGX_LOG_EMERG, cf, 0,
                       "invalid number of arguments in \"%s\" directive",
                       name->data);

    return NGX_ERROR;
}
然后这个里面可能有两个比较难理解的地方,一个是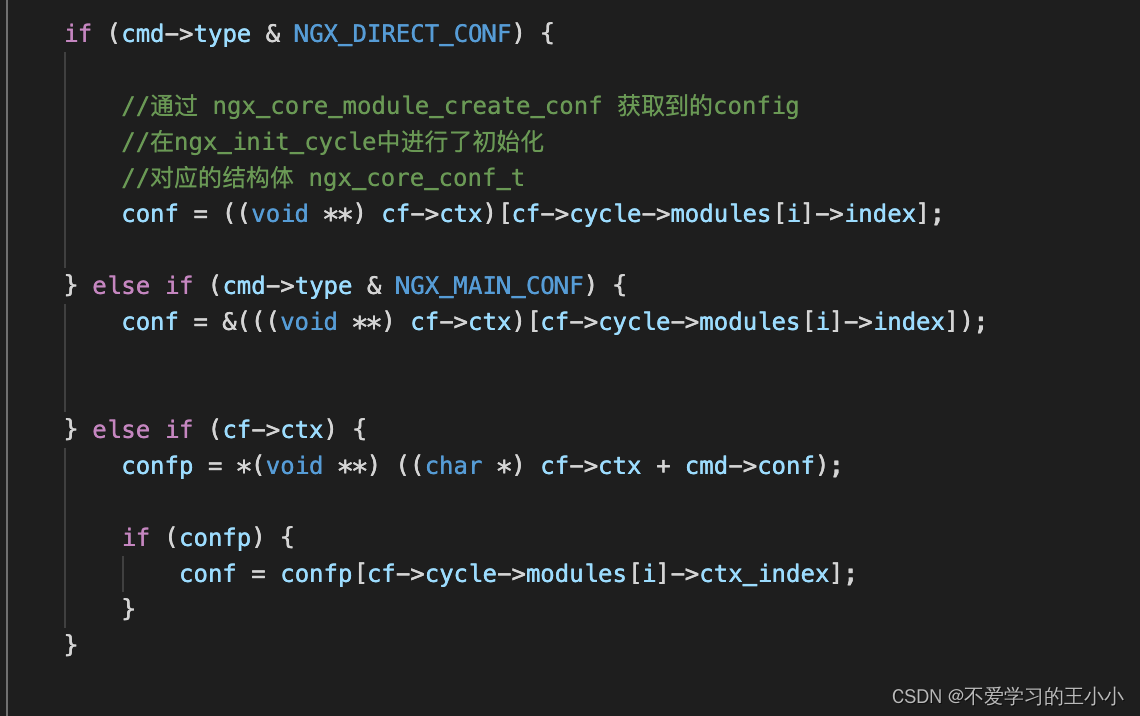
这个在【nginx流程分析之指针使用】有详细的说明。
然后就是这一块的代码
worker_processes
其实就是一个抽象类,然后用worker_process看一下.
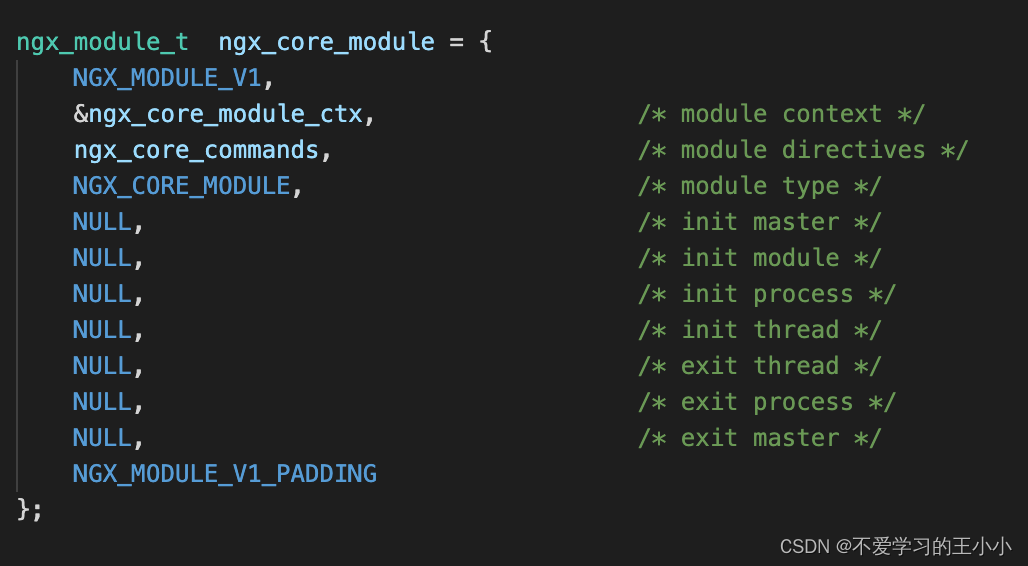
首先看所属的模块,如图所示
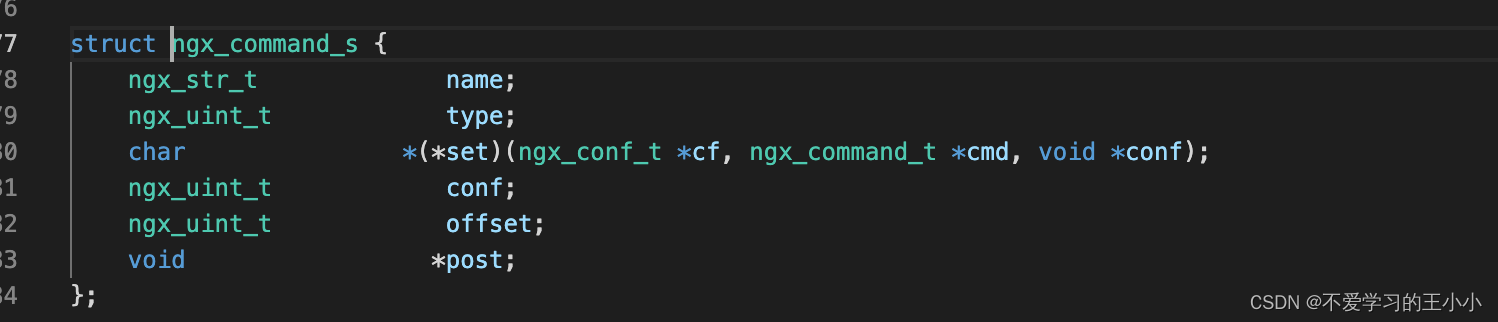
然后就是对应的command,如果所示有一个set的抽象类方法。
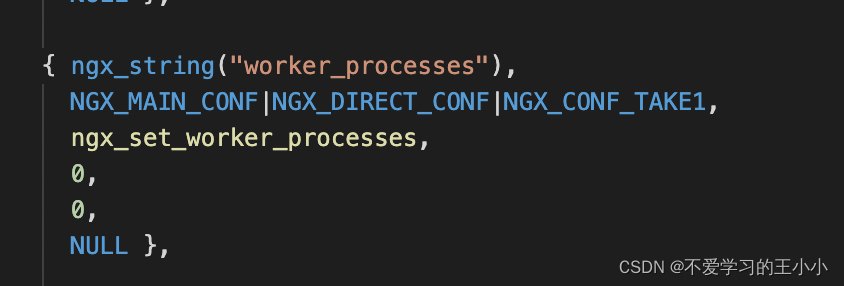
然后看一下worker_processes的实现,
然后看一下ngx_set_worker_processes的方法。

可以看出来其实worker_processes的值设置成1,并没有很复杂的逻辑。
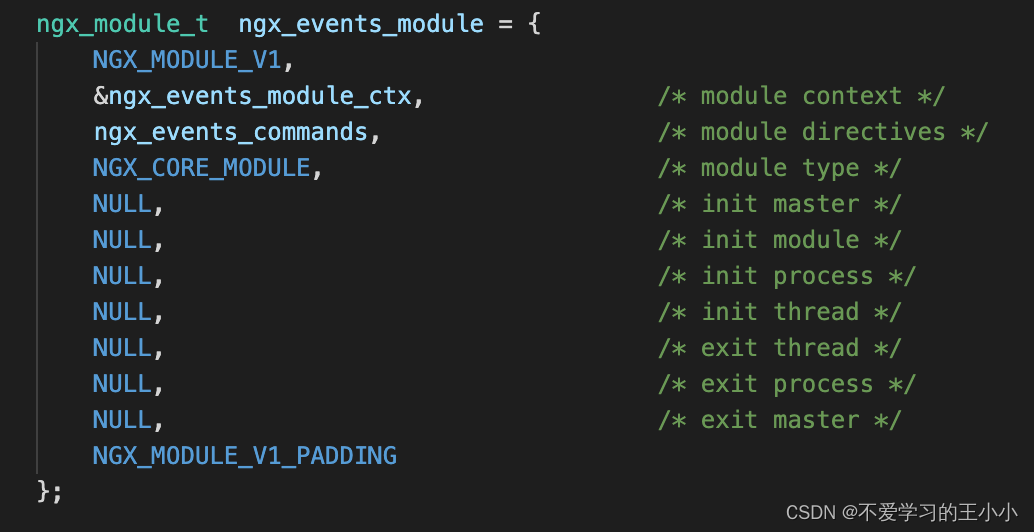
event
先看看event对应的模块,
然后就是event对应的set的实现方法
/nginx-1.14.2/src/event/ngx_event.c 中的ngx_events_block方法,详细见注释
static char *
ngx_events_block(ngx_conf_t *cf, ngx_command_t *cmd, void *conf)
{
    char                 *rv;
    void               ***ctx;
    ngx_uint_t            i;
    ngx_conf_t            pcf;
    ngx_event_module_t   *m;

    if (*(void **) conf) {
        return "is duplicate";
    }

    /* count the number of the event modules and set up their indices */


    //获取当前模块的最大index
    ngx_event_max_module = ngx_count_modules(cf->cycle, NGX_EVENT_MODULE);

    //因为没有初始化 所以进行分配内存
    ctx = ngx_pcalloc(cf->pool, sizeof(void *));
    if (ctx == NULL) {
        return NGX_CONF_ERROR;
    }

    //分配二级指针的地址
    *ctx = ngx_pcalloc(cf->pool, ngx_event_max_module * sizeof(void *));
    if (*ctx == NULL) {
        return NGX_CONF_ERROR;
    }

    //进行赋值
    *(void **) conf = ctx;

    for (i = 0; cf->cycle->modules[i]; i++) {
        if (cf->cycle->modules[i]->type != NGX_EVENT_MODULE) {
            continue;
        }

        m = cf->cycle->modules[i]->ctx;

        //event 没有实现create_conf 忽略
        if (m->create_conf) {
            (*ctx)[cf->cycle->modules[i]->ctx_index] =
                                                     m->create_conf(cf->cycle);
            if ((*ctx)[cf->cycle->modules[i]->ctx_index] == NULL) {
                return NGX_CONF_ERROR;
            }
        }
    }

    pcf = *cf;
    cf->ctx = ctx;
    cf->module_type = NGX_EVENT_MODULE;
    cf->cmd_type = NGX_EVENT_CONF;

    //再次调用解析参数 解析events {
//     worker_connections  1024;
// }
//后面的  worker_connections  1024;
    rv = ngx_conf_parse(cf, NULL);

    *cf = pcf;

    if (rv != NGX_CONF_OK) {
        return rv;
    }

    for (i = 0; cf->cycle->modules[i]; i++) {
        if (cf->cycle->modules[i]->type != NGX_EVENT_MODULE) {
            continue;
        }

        m = cf->cycle->modules[i]->ctx;

        //调用初始化config方法
        //分别调用 event_core模块 的init_conf方法 ngx_event_core_init_conf 方法
        //和epoll 模块的init_conf方法  src/event/modules/ngx_epoll_module.c 下面的 ngx_epoll_init_conf 方法
        if (m->init_conf) {
            rv = m->init_conf(cf->cycle,
                              (*ctx)[cf->cycle->modules[i]->ctx_index]);
            if (rv != NGX_CONF_OK) {
                return rv;
            }
        }
    }

    return NGX_CONF_OK;
}
init_conf
这个init_conf就是event_core模块和epoll 模块的init_conf
event_core
看一下event_core对应的实现方法
static char *
ngx_event_core_init_conf(ngx_cycle_t *cycle, void *conf)
{
    ngx_event_conf_t  *ecf = conf;

    int                  fd;
    ngx_int_t            i;
    ngx_module_t        *module;
    ngx_event_module_t  *event_module;

    module = NULL;

    //创建epoll的efd
    fd = epoll_create(100);

    //其实只是判断当前系统是否支持epoll
    if (fd != -1) {
        (void) close(fd);
        module = &ngx_epoll_module;
    } else if (ngx_errno != NGX_ENOSYS) {
        module = &ngx_epoll_module;
    }

    if (module == NULL) {
        for (i = 0; cycle->modules[i]; i++) {

            if (cycle->modules[i]->type != NGX_EVENT_MODULE) {
                continue;
            }

            event_module = cycle->modules[i]->ctx;

            if (ngx_strcmp(event_module->name->data, event_core_name.data) == 0)
            {
                continue;
            }

            module = cycle->modules[i];
            break;
        }
    }

    if (module == NULL) {
        ngx_log_error(NGX_LOG_EMERG, cycle->log, 0, "no events module found");
        return NGX_CONF_ERROR;
    }

    ngx_conf_init_uint_value(ecf->connections, DEFAULT_CONNECTIONS);
    cycle->connection_n = ecf->connections;

    ngx_conf_init_uint_value(ecf->use, module->ctx_index);

    event_module = module->ctx;
    ngx_conf_init_ptr_value(ecf->name, event_module->name->data);

    ngx_conf_init_value(ecf->multi_accept, 0);
    ngx_conf_init_value(ecf->accept_mutex, 0);
    ngx_conf_init_msec_value(ecf->accept_mutex_delay, 500);

    return NGX_CONF_OK;
}
epoll
然后这里是epoll的初始化的地方,可以看到没有什么特殊的逻辑更多的是初始化值
static char *
ngx_epoll_init_conf(ngx_cycle_t *cycle, void *conf)
{
    ngx_epoll_conf_t *epcf = conf;

    ngx_conf_init_uint_value(epcf->events, 512);
    ngx_conf_init_uint_value(epcf->aio_requests, 32);

    return NGX_CONF_OK;
}
然后接下来就是http模块的解析,然后我们打算新开一篇文章去阐述,详见【nginx读取配置文件http模块】


 2086
2086


 被折叠的 条评论
为什么被折叠?
被折叠的 条评论
为什么被折叠?
 到【灌水乐园】发言


