


目录
定时器第一种方式
timerEvent事件
启动定的器startTimer(豪秒),返回值是id号
区分定时器timerld
代码
widget.h
#ifndef WIDGET_H
#define WIDGET_H

#include <QWidget>

QT_BEGIN_NAMESPACE
namespace Ui { class Widget; }
QT_END_NAMESPACE

class Widget : public QWidget
{
    Q_OBJECT

public:
    Widget(QWidget *parent = nullptr);
    ~Widget();

private:
    Ui::Widget *ui;

    //定时器事件
    void timerEvent(QTimerEvent *);

    //定时器标识号
    int id1,id2;
};
#endif // WIDGET_H
widget.cpp
#include "widget.h"
#include "ui_widget.h"
#include <QTimerEvent>

Widget::Widget(QWidget *parent)
    : QWidget(parent)
    , ui(new Ui::Widget)
{
    ui->setupUi(this);

    //启动定时器
    id1=startTimer(1000);//每1000ms调用一次
    id2=startTimer(2000);
}

//定时器事件
void Widget::timerEvent(QTimerEvent *e){
    if(e->timerId()==id1){
        static int num=0;
        ui->label_2->setText(QString::number(num++));
    }

    if(e->timerId()==id2){
        static int num2=0;
        ui->label_3->setText(QString::number(num2++));
    }
}

Widget::~Widget()
{
    delete ui;
}
结果

定时器第二种方式
QTimer头文件
创建 QTimer *timer
启动定时器timer->start(毫秒)
发送信号timeout
暂停stop
代码
widget.cpp
#include "widget.h"
#include "ui_widget.h"
#include <QTimerEvent>
#include <QTimer>

Widget::Widget(QWidget *parent)
    : QWidget(parent)
    , ui(new Ui::Widget)
{
    ui->setupUi(this);

    //启动定时器
    id1=startTimer(1000);//每1000ms调用一次
    id2=startTimer(2000);

    //定时器第2种方式
    QTimer *timer1=new QTimer(this);
    //启动定时器对象
    timer1->start(500);//ms
    //每隔0.5秒发送信号
    connect(timer1,&QTimer::timeout,[=](){
        static int num=0;
        ui->label_4->setText(QString::number(num++));
    });

    //点击按钮,暂停定时器
    connect(ui->pushButton,&QPushButton::clicked,[=](){
        timer1->stop();
    });
}

//定时器事件
void Widget::timerEvent(QTimerEvent *e){
    if(e->timerId()==id1){
        static int num=0;
        ui->label_2->setText(QString::number(num++));
    }

    if(e->timerId()==id2){
        static int num2=0;
        ui->label_3->setText(QString::number(num2++));
    }
}

Widget::~Widget()
{
    delete ui;
}
结果

event事件

主要功能:事件的分发
bool event (QEvent *e)
返回值如果是true代表用户自己处理
false系统处理最好抛给父类去处理
static.cast<转换类型>(原对象)
e->type 具体事件
代码
mylabel.h
#ifndef MYLABEL_H
#define MYLABEL_H

#include <QLabel>

class MyLabel : public QLabel
{
    Q_OBJECT
public:
    explicit MyLabel(QWidget *parent = nullptr);

    //捕获事件
    //鼠标进入
    void enterEvent(QEvent *);

    //鼠标离开
    void leaveEvent(QEvent *);

    //鼠标按下
    void mousePressEvent(QMouseEvent *ev);

    //鼠标释放
    void mouseReleaseEvent(QMouseEvent *ev);

    //鼠标移动
    void mouseMoveEvent(QMouseEvent *ev);

    //事件分发,Event事件
    bool event(QEvent *e);

signals:

};

#endif // MYLABEL_H
mylabel.cpp
#include "mylabel.h"
#include <QDebug>
#include <QMouseEvent>
#include <QEvent>

MyLabel::MyLabel(QWidget *parent) : QLabel(parent)
{
    //设置鼠标追踪
    this->setMouseTracking(true);
}

//鼠标进入
void MyLabel::enterEvent(QEvent *){
    qDebug()<<"鼠标进入";
}

//鼠标离开
void MyLabel::leaveEvent(QEvent *){
    qDebug()<<"鼠标离开";
}

//鼠标按下
void MyLabel::mousePressEvent(QMouseEvent *ev){
    //如果鼠标按下的是左键,然后提示内容
    if(ev->button()==Qt::LeftButton){
        //找按下的位置
        QString str=QString("鼠标按下 x=%1 y=%2").arg(ev->x()).arg(ev->y());
        qDebug()<<str;
    }
}

//鼠标释放
void MyLabel::mouseReleaseEvent(QMouseEvent *ev){
    //如果鼠标按下的是左键,然后提示内容
    if(ev->button()==Qt::LeftButton){
        QString str=QString("鼠标释放 x=%1 y=%2").arg(ev->x()).arg(ev->y());
        qDebug()<<str;
    }
}

//鼠标移动
void MyLabel::mouseMoveEvent(QMouseEvent *ev){
    //如果鼠标按下的是左键,然后提示内容,持续状态需要用buttons,用与操作符进行判断
    //if(ev->buttons()&Qt::LeftButton){
        QString str=QString("鼠标移动 x=%1 y=%2").arg(ev->x()).arg(ev->y());
        qDebug()<<str;
    //}
}

//事件分发,Event事件
bool MyLabel::event(QEvent *e){
    //通常不会做拦截,event只做分发事件
    if(e->type()==QEvent::MouseButtonPress){
        QMouseEvent *ev=static_cast<QMouseEvent *>(e);
        QString str=QString("Event,鼠标按下 x=%1 y=%2").arg(ev->x()).arg(ev->y());
        qDebug()<<str;

        //只有鼠标按下,自己处理,返回true
        return true;
    }

    //其他事件,让父亲做默认处理
    return QLabel::event(e);
}
结果

事件过滤器
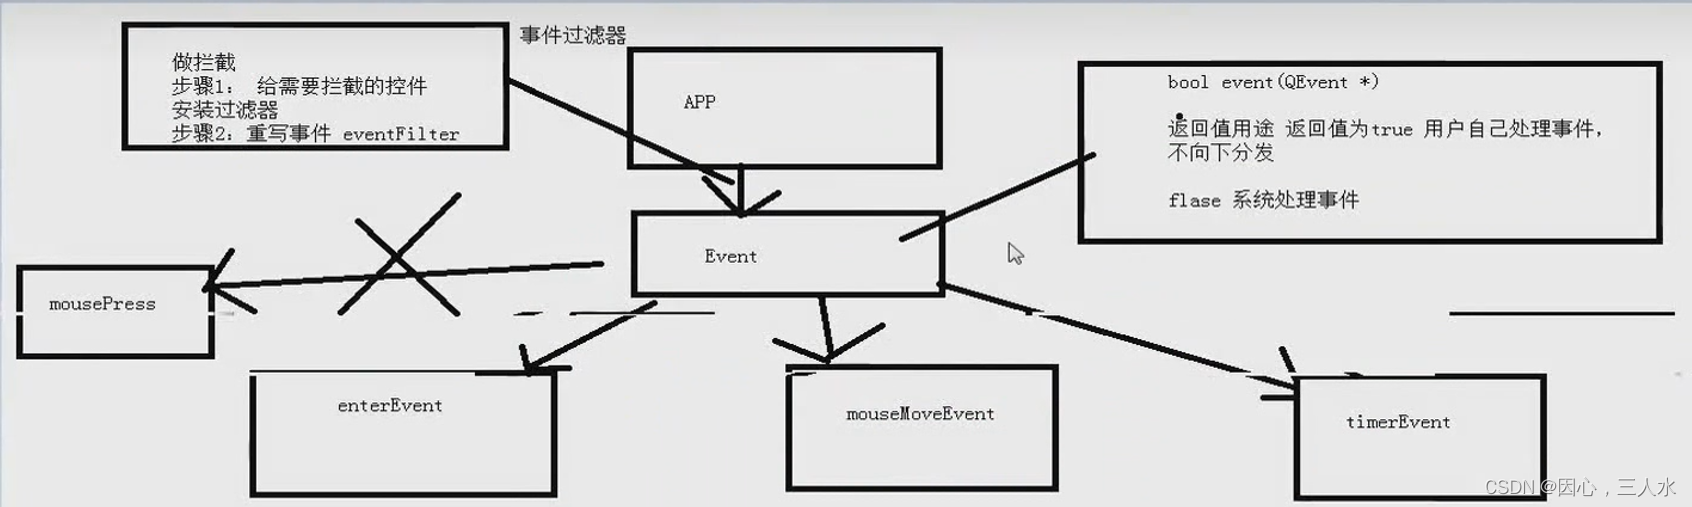
哪个控件需求过滤事件就给哪个控件安装过滤器
步骤1安装过滤器
ui->label->installEventFilter(this);
步骤2重写事件
代码
widget.h
#ifndef WIDGET_H
#define WIDGET_H

#include <QWidget>

QT_BEGIN_NAMESPACE
namespace Ui { class Widget; }
QT_END_NAMESPACE

class Widget : public QWidget
{
    Q_OBJECT

public:
    Widget(QWidget *parent = nullptr);
    ~Widget();

private:
    Ui::Widget *ui;

    //定时器事件
    void timerEvent(QTimerEvent *);

    //定时器标识号
    int id1,id2;

    //事件过滤器的事件
    bool eventFilter(QObject *,QEvent *);
};
#endif // WIDGET_H
widget.cpp
#include "widget.h"
#include "ui_widget.h"
#include <QTimerEvent>
#include <QTimer>
#include <QMouseEvent>
#include <QDebug>
Widget::Widget(QWidget *parent)
: QWidget(parent)
, ui(new Ui::Widget)
{
ui->setupUi(this);
//启动定时器
id1=startTimer(1000);//每1000ms调用一次
id2=startTimer(2000);
//定时器第2种方式
QTimer *timer1=new QTimer(this);
//启动定时器对象
timer1->start(500);//ms
//每隔0.5秒发送信号
connect(timer1,&QTimer::timeout,[=](){
static int num=0;
ui->label_4->setText(QString::number(num++));
});
//点击按钮,暂停定时器
connect(ui->pushButton,&QPushButton::clicked,[=](){
timer1->stop();
});
//给ui->label做事件过滤器拦截
//步骤1 给控件安装过滤器
//参数this,通过父窗口给lable安装过滤器
ui->label->installEventFilter(this);
//步骤2 重写eventFilter事件
}
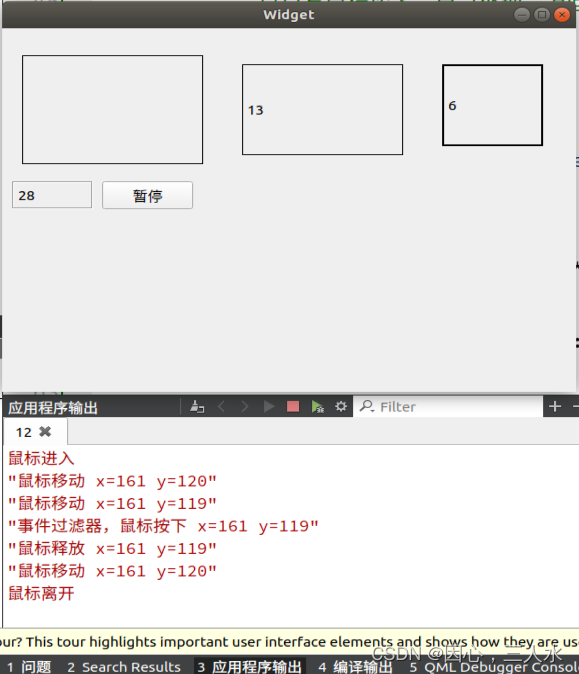
//事件过滤器的事件
bool Widget::eventFilter(QObject *obj,QEvent *e){
if(obj==ui->label){
if(e->type()==QEvent::MouseButtonPress){
QMouseEvent *ev=static_cast<QMouseEvent *>(e);
QString str=QString("事件过滤器,鼠标按下 x=%1 y=%2").arg(ev->x()).arg(ev->y());
qDebug()<<str;
//只有鼠标按下,自己处理,返回true
return true;
}
}
//其他让父类处理
return QWidget::eventFilter(obj,e);
}
//定时器事件
void Widget::timerEvent(QTimerEvent *e){
if(e->timerId()==id1){
static int num=0;
ui->label_2->setText(QString::number(num++));
}
if(e->timerId()==id2){
static int num2=0;
ui->label_3->setText(QString::number(num2++));
}
}
Widget::~Widget()
{
delete ui;
}结果


 378
378


 被折叠的 条评论
为什么被折叠?
被折叠的 条评论
为什么被折叠?
 到【灌水乐园】发言


