


思路:
项目框架:
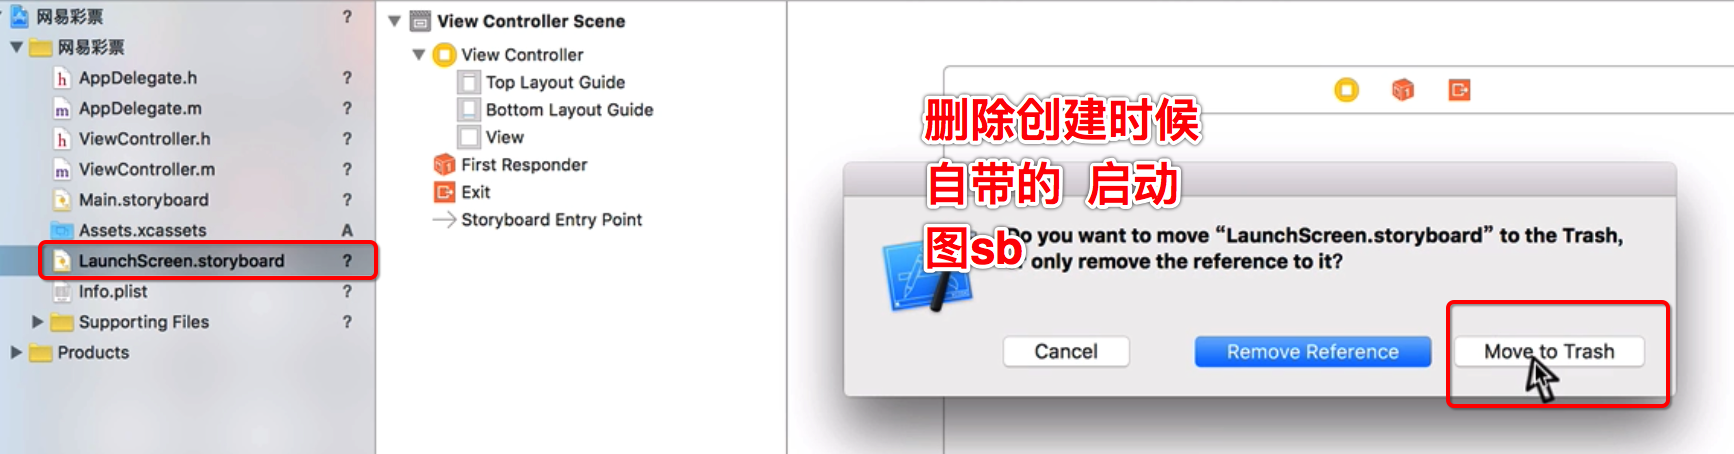
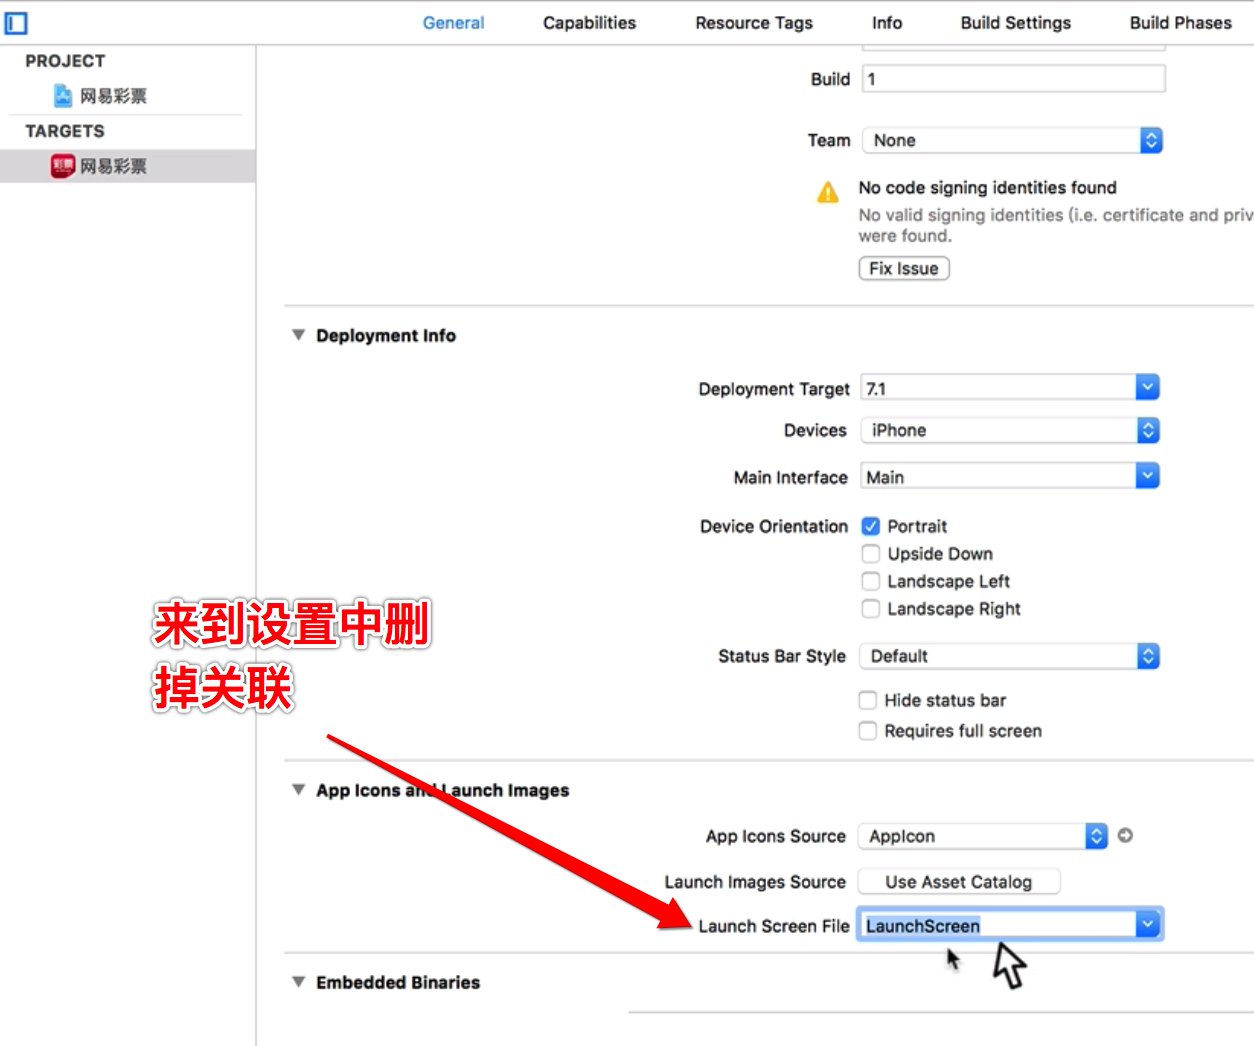
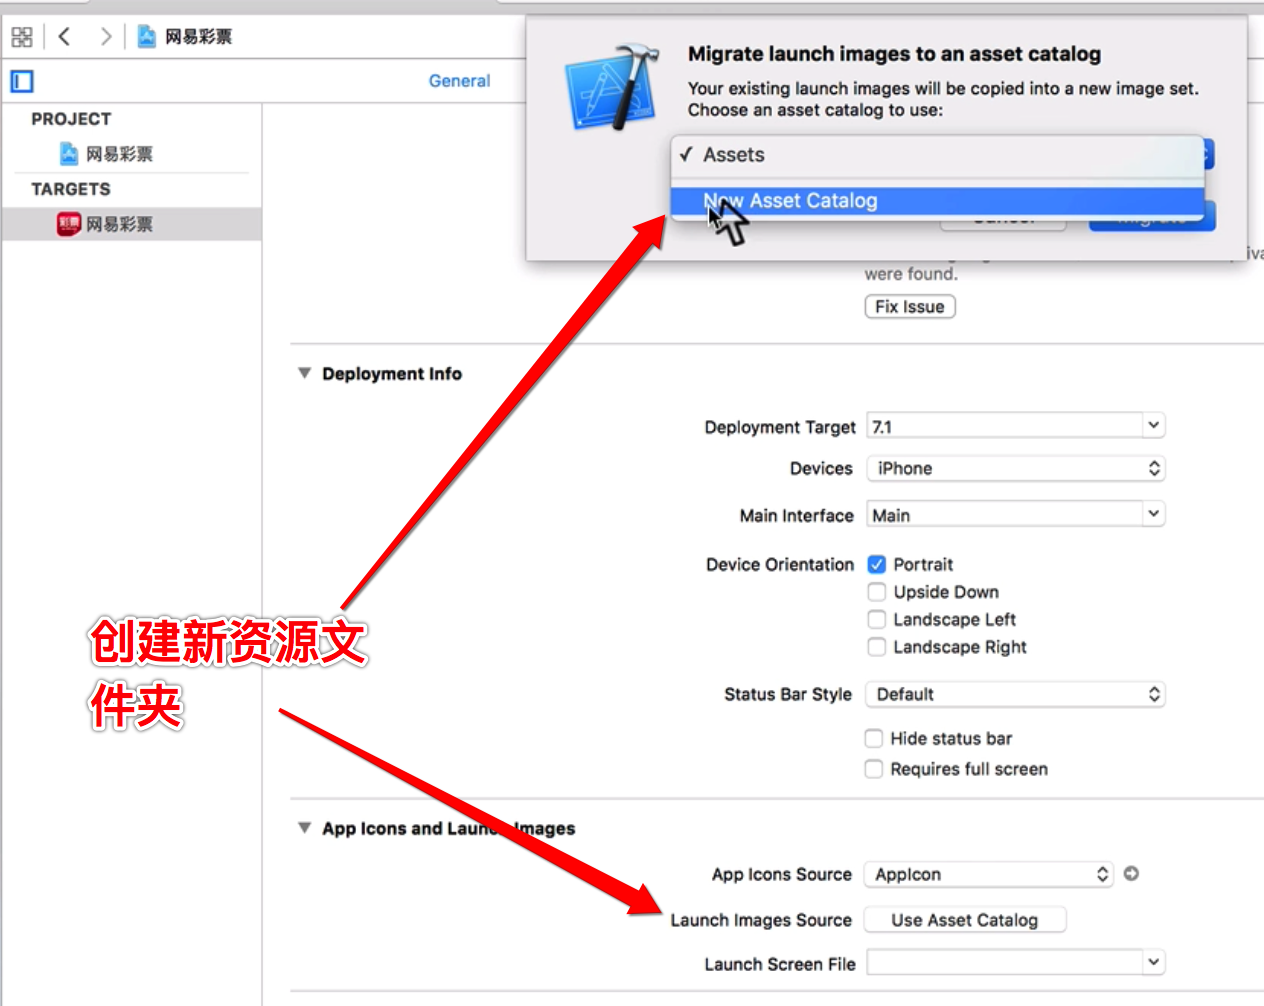
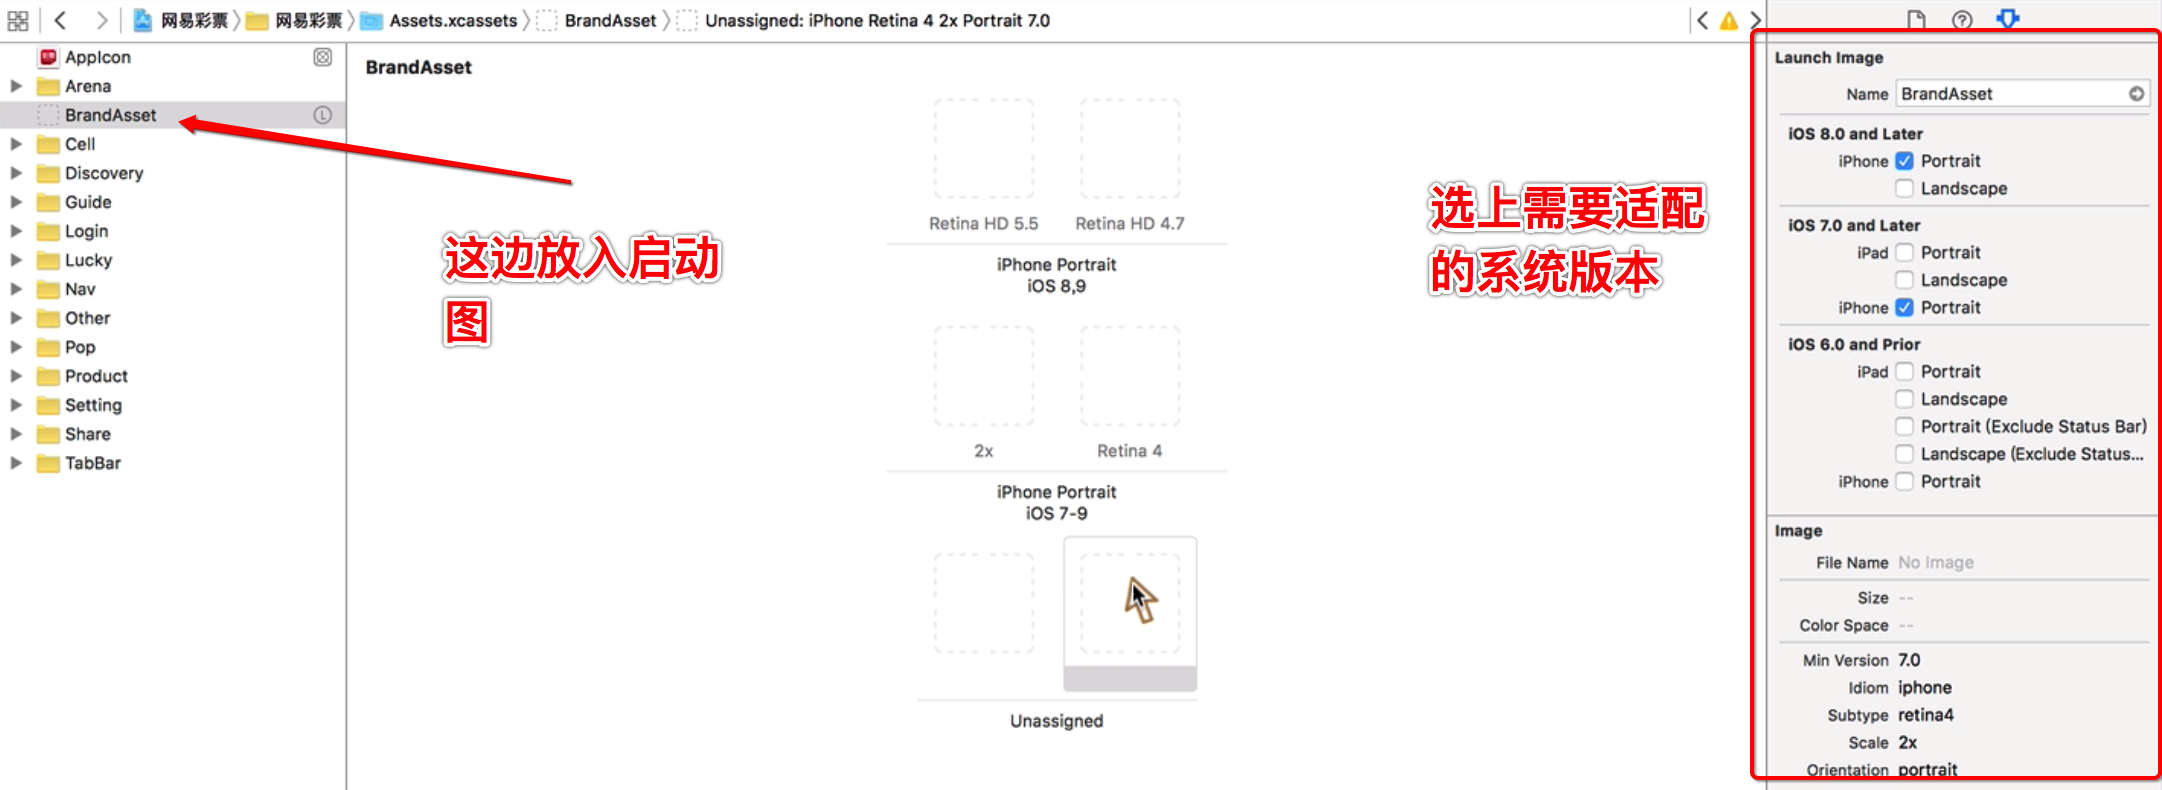
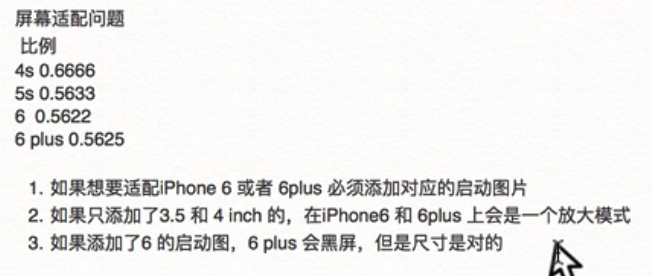
1、拖入图片资源,设置软件的图标和启动页面
特别注意启动图的添加步骤:
注意:这里有一个 延长启动画面的方法 sleep()

也有一些屏幕适配问题的描述
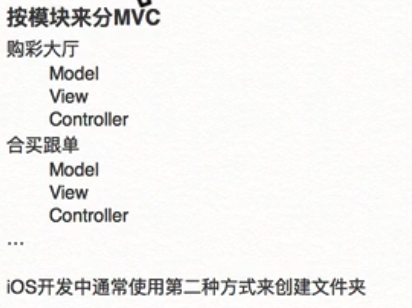
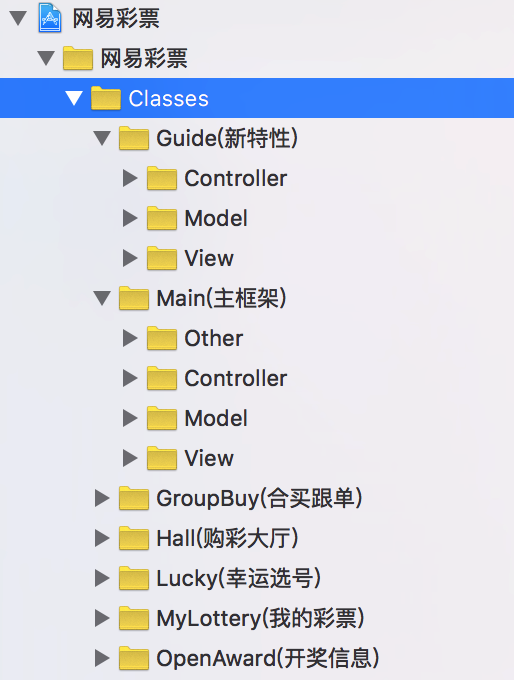
2、创建项目中的分组文件夹(采用 MVC 思想来创建文件夹)
3、手动创建一个 window,设置自定义 tabbar根控制器,然后让 window 显示出来。
4、创建tabbarcontroller 根控制器和各导航栏控制器(含 storyboard)。
5、对tabbarcontroller根控制器的 UITabBar 进行自定义,创建 UIView 文件,移除系统的 tabbar,把自定义的 UIView 添加到原来 tabbar 的位置。
6、往自定义的 UIView 上添加自定义的 UIButton(自定义的 UIButton 上重写点击高亮的方法),然后添加点击事件,还有在- (void)layoutSubviews 中布局按钮(布局中要为每个 button 添加 tag)。此处最好封装出一个方法,然后交给控制器去用 for 循环添加按钮。
7、在自定义 UIView (自定义 “tabbar”)中设置代理,通过代理来传递按钮的 tag,从而设置tabbarcontroller的当前选中页面(页面转跳,self.selectedIndex)。
- 细节:1:按钮的监听事件选UIControlEventTouchDown;2:按钮点击不高亮;3:按钮是否为选中状态需要一个全局属性来记录;4:按钮个数是动态创建的,根据tabbarcontroller中的子控制器个数来创建。
8、创建UINavigationController导航栏控制器文件进行自定义导航栏控制器,并对每一个 storyboard 的导航栏进行关联。使用+ (void)initialize 来对全部的导航栏进行全局设置,包括背景图,字体颜色和大小,还有按钮的颜色大小等。
- 细节:1:用+ (void)initialize 方法的时候需要判断是否是父类在调用这个方法,如果是子类就不执行;2:用[UINavigationBar appearance]来获取全局导航栏;3:设置背景图时候注意选择UIBarMetricsDefault(横竖屏都适用)。
购彩大厅:
9、自定义一个UITableViewController,并对storyboard 进行关联。在 storyboard 中拖出按钮,并拖线到控制器中创建一个点击事件。编写点击事件:显示蒙版(颜色,透明度),显示活动图片(位置),添加关闭按钮(设置按钮图片,位置),然后进行自动布局,最后添加关闭按钮的点击事件。关闭事件中让所有 view 都位置移动到屏幕最底部(此操作有动画),然后在全部removeFromSuperview。
- 细节:1:添加的内容都添加到 window 对象上;2:在自动布局添加约束之前必须addSubview;3:添加约束之前必须关掉一个属性(closeBtn.translatesAutoresizingMaskIntoConstraints = NO);4:添加约束有两种方法一种是NSLayoutConstraint,一种是 VFL;
合买跟单:
10、创建一个自定义UITableViewController控制器,并对storyboard 进行关联。在 storyboard 中添加顶部标题按钮,插入图片和文字。创建一个按钮文件,对 storyboard 中的标题按钮进行关联。创建一个UIView分类,封装 一套提取 fram 值的方法。在按钮文件中,用- (void)layoutSubviews方法对按钮中的图片和文字进行布局。然后回到控制器中添加该按钮的点击事件,通过拖线添加。点击事件中要对按钮的图片进行旋转,并且出现下来菜单。
- 细节:1:旋转按钮图片时候要用对方法(CGAffineTransformRotate);2、出现的下拉菜单应该添加到 self.view上,下来就直接更改高度;;3、点击后注意动画效果
幸运选号:
11、创建一个自定义UIViewController控制器,用 storyboard 进行控件布局。拖线获得彩灯 imageView,并设置数组动画。
- 细节:如果优化内存的话,可以加上 - (void)viewWillDisappear:(BOOL)animated 和 - (void)viewWillAppear:(BOOL)animated 方法,当屏幕不显示当前 view 时候回停止动画执行,再次显示当前 view 时候回再次执行彩灯动画
我的彩票:
12、创建一个自定义UIViewController控制器,用 storyboard 进行控件布局。
- 细节:对图片要进行拉伸(封装一个快速拉伸图片的工具类)
我的彩票之设置界面:
13、该界面的父类是UITableView,所以要在UITableView上做文章,但是设置界面中又包含好多个UITableView界面,所以用 storyboard 来实现太繁琐,只能通过代码来实现。首先在 storyboard 中拖出一个UITableViewController,并创建UITableViewController文件,两者进行关联。实现UITableView中的 cell 有两种方法,第一种是用 plist 文件来保存键值对,在加载cell 的时候直接读取文件;第二种方法是自定义模型,然后在控制器中导入模型添加数据的方法来设置界面。
- 第一种方法细节: plist 文件外层是数组,内层是字典,值的类型要选对,提取时候要按照键的字符去提取;
- 第二种方法细节:
- 1:创建一个UITableViewController文件(模型控制器),.h 文件增加记录 cell 数据的可变数组属性(注意readonly,然后在.m 文件中在重新写上该属性,去掉 readonly 修饰,对它进行初始化和设值,这样做外部就不能随意初始化但可以使用到这个属性);
- 2:创建组模型(.h 中增加存放所有 item 的数组属性,存放头部与尾部标题的字符串属性)和 item 模型(.h 中增加图片、标题和副标题三个字符串属性,和一个 block 属性,还有一些工厂方法);
- 3:创建 item 模型的子类模型(按钮模型和开关模型),按钮模型增加一个类名属性(Class)和工厂方法,开关模型增加一个布尔值属性和重写该属性的set 与
get 方法(此步目的是为了用户设置过的开关状态),保存原理是调用系统自带的方法,键值对的方式进行保存
- 4:创建 cell 模型,用@class 的方式导入 item 模型,增加快速创建 cell 的工厂方法。
- 导入 item 模型的头文件,对 item 进行重写 set 方法,在方法中对cell 的文字、图片、标题等进行设置
- 用- (void)layoutSubviews 来布局子View
- 5:在模型控制器中导入以上头文件,- (void)viewDidLoad中设置tableView属性,懒加载记录cell 数据的数组,然后实现设置 cell 的三个代理方法,取出 cell 数据数组中的 item赋值给 cell 的 item。还要实现头部和尾部文字的方法和点击 cell 响应方法。
- 6:做应用推荐界面:
- 创建一个描述应用的模型(继承NSObject类),增加图片、文字、URL等字符串属性和一些类方法,加载 JSON文件的数据到一个数组中,然后用字典key 提取值设置模型的属性。
- 创建自定义的UICollectionViewControllerCell 文件,.h 中@class 的方式导入应用模型属性。在 xib 中先进行控件布局,然后拖线到.m 文件中进行值的设置。通过重写模型属性的 set 方法对控件设置图片和文字内容。图标要圆角的话要在- (void)awakeFromNib中设置(先执行self.imageView.clipsToBounds = YES;在执行self.imageView.layer.cornerRadius = 10;)。
- 创建自定义UICollectionViewController文件,首先要实现- (instancetype)init 方法来创建一个UICollectionView(在方法中要创建UICollectionViewFlowLayout布局添加进去),然后在- (void)viewDidLoad 中注册 cell,实现设置 cell 的三个代理方法,还有点击响应方法。
- 7:做帮助界面:
- 创建一个描述帮助的模型(继承NSObject类),增加图片、文字、URL等字符串属性和一些类方法,加载 JSON文件的数据到一个数组中,然后用字典key 提取值设置模型的属性。
- 创建自定义的UIViewControllerCell 文件(描述转跳页面),.h 中@class 的方式导入帮助模型属性。通过重写模型属性的 set 方法对控件设置图片和文字内容。详见代码
- 创建继承模型控制器的控制器,在- (void)viewDidLoad中设置数据模型的数据。重写- (void)tableView:(UITableView )tableView didSelectRowAtIndexPath:(NSIndexPath )indexPath 方法来满足转跳需求(注意转跳时候要把控制器设置为导航栏控制器的根 View ,然后 [self presentViewController:nav animated:YES completion:nil]来跳转导航栏控制器)。
- 8:做分享界面:主要是要在 block 中实现短信分享和邮件分享功能。然后要进行结果的反馈。
- 9:做关于界面:主要是实现应用转跳到打电话的功能。
- 10:做直播推送页面:主要是实现一个时间选择功能
- 创建UIView文件来描述工具条 ,在 xib 进行基本布局,然后通过拖线获得“确定”和“取消”两个按钮的点击事件方法。在两个点击事件方法中分别设置一个代理方法进行回调。
- 创建 UIView 文件来描述时间选择器(无 xib),在这个 UIView 上添加工具条和时间选择器(- (void)layoutSubviews进行布局),然后设置代理方法在主控制器中进行回调。
- 最后特别提示:
- 当发现原有的模型中提供的属性和方法开始不满足新需求的时候,尽量不要修改原有的属性和方法,应该新增一些方法和属性去满足新需求。而在父类封装的方法中,不能满足我们的需求,重写父类的方法,自定内部的实现,达到需求的效果。
- 在使用 block 的时候注意循环引用的问题,要对对象进行 weak 一下。
首次打开软件显示的界面:
- 创建自定义的UICollectionViewCell 来描述 cell,在 xib 中进行基本布局(图片和按钮)。增加图片字符串属性,并在.m 文件中重写set 方法,并在按钮点击事件中设置代理回调方法来转跳到主界面控制器。
- 创建自定义的UICollectionViewController来描述界面,在- (instancetype)init方法中进行布局,然后实现设置 cell 的代理方法,还有转跳主界面的代理方法。
部分代码:
// 顶部状态栏是否隐藏
[application setStatusBarHidden:NO]
// 设置状态栏样式
[application setStatusBarStyle:UIStatusBarStyleLightContent];// 手动来创建window
self.window = [[UIWindow alloc]initWithFrame:[UIScreen mainScreen].bounds]; // 让window显示出来
[self.window makeKeyAndVisible];// 加载子控制器
-(void)loadViewControllers// 重写 UIButton 中的点击高亮方法,不执行 super 就不会出现高亮了
- (void)setHighlighted:(BOOL)highlighted {
// [super setHighlighted:NO];
}// 导航栏控制器中的 itemButton push 另一个控制器时候要用这个方法
- (void)pushViewController:(UIViewController *)viewController animated:(BOOL)animated {
// push 的时候隐藏底部的 tabbar
viewController.hidesBottomBarWhenPushed = YES;
[super pushViewController:viewController animated:animated];
}// 获取全局对象 appearance UIView都可以使用此方法来获取全局对象(相册,发短信)
例如:
UINavigationBar *bar = [UINavigationBar appearance];// 设置导航栏返回按钮剪头的颜色(会影响他的子view)-----导航栏控制器中用
bar.tintColor = [UIColor whiteColor];// 创建一个装载格式内容的字典
NSDictionary *att = @{
NSForegroundColorAttributeName:[UIColor whiteColor],
NSFontAttributeName : [UIFont systemFontOfSize:17.f]
};// 获取已创建的 window对象
UIWindow *window = [UIApplication sharedApplication].keyWindow;// 自动布局添加约束前要关闭此属性,否则约束无效
closeBtn.translatesAutoresizingMaskIntoConstraints = NO;// 一种普通的约束方法(代码量多)
例如:
NSLayoutConstraint *top = [NSLayoutConstraint constraintWithItem:closeBtn attribute:NSLayoutAttributeTop relatedBy:NSLayoutRelationEqual toItem:closeBtn.superview attribute:NSLayoutAttributeTop multiplier:1 constant:0];// VFL 添加约束
例子:
/*
1. 约束
2. 功能选择 一般用 0
3. 传值字典
4. 把相关view用字典传进来
*/
/*
1. 水平方向(水平间距,宽度) H:
2. 垂直方向 (垂直间距,高度) V:
3. view用 [view] 来表示
4. | 表示superView的边界
5. - 表示间距,如果跟superView之间,默认是8
6. [view1(==btn)][btn(==width)]| 可以同时设置多个view的约束,也可以使用等宽等高
*/
// VFL Visual Format
// 自动布局第三:我们不知道他底层,如果某一个约束不太好写。或者出bug
NSArray *conH = [NSLayoutConstraint constraintsWithVisualFormat:@"H:[btn(==width)]|" options:0 metrics:@{@"width":@30} views:@{@"btn":closeBtn}];
NSArray *conV = [NSLayoutConstraint constraintsWithVisualFormat:@"V:|[closeBtn(==30)]" options:0 metrics:nil views:NSDictionaryOfVariableBindings(closeBtn)];
[activityImageView addConstraints:conH];
[activityImageView addConstraints:conV];
// 转动到某个角度
btn.imageView.transform = CGAffineTransformMakeRotation(M_PI);
// 基于某个角度再转多少度
btn.imageView.transform = CGAffineTransformRotate(btn.imageView.transform, M_PI);// 把图片放到动画数组中
self.lightImageView.animationImages = @[image0, image1,image0, image1];
// 设置动画时间
self.lightImageView.animationDuration = 0.5;
// 动画运行次数
self.lightImageView.animationRepeatCount = 0;
// 开始动画
[self.lightImageView startAnimating];// 点击一个 cell 时候会执行
- (void)tableView:(UITableView *)tableView didSelectRowAtIndexPath:(NSIndexPath *)indexPath {
// 设置Cell 的数据
CZGroup *group = self.data[indexPath.section];
// 取出行对应的字典
CZItem *item = group.items[indexPath.row];
// 先判断是否有block
if (item.block) {// 如果执行了block直接返回,不需要执行后面的代码
item.block(); // 执行block
return;
}
if ([item isKindOfClass:[CZArrowItem class]]) {
CZArrowItem *arrowItem = (CZArrowItem *)item;
// 把String转成一个类名
Class className = arrowItem.target;
UIViewController *vc = [[className alloc]init];
vc.title = item.title;
// 判断如果vc 不为nil 的时候才push
if (vc) {
// push
[self.navigationController pushViewController:vc animated:YES];
}
}
}
// 以下这个是点击两次才会执行,方法不能用错!
- (void)tableView:(UITableView *)tableView didDeselectRowAtIndexPath:(NSIndexPath *)indexPath// 枚举类型的写法示例:
typedef NS_ENUM(NSInteger, XXXXXXXXXXXXXType) {
/**
* XXXX
*/
XXXXXXXX,
/**
* XXX
*/
XXXXXXXXX
};// 给一个类增加 block 属性的写法
@property (nonatomic, copy) void (^block)();/**
* 要跳转的控制器
*/
@property (nonatomic, assign) Class target;// 重写一个布尔值的 get 与 set 方法,让这个布尔值能实现数据持久化(保存值的功能)
- (BOOL)isOn {
NSUserDefaults *defaults = [NSUserDefaults standardUserDefaults];
return [defaults boolForKey:self.title];
}
- (void)setOn:(BOOL)on {
NSUserDefaults *defaults = [NSUserDefaults standardUserDefaults];
[defaults setBool:on forKey:self.title];
[defaults synchronize];
}// UITableView创建时候指定分组样式
- (instancetype)init {
// 创建的时候指定是分组样子
if (self = [super initWithStyle:UITableViewStyleGrouped]) {
}
return self;
}
// 两种方法写全以防万一
- (instancetype)initWithStyle:(UITableViewStyle)style {
if (self = [super initWithStyle:UITableViewStyleGrouped]) {
}
return self;
} // 设置tableView属性
// 设置 cell 头部或尾部的高度
self.tableView.sectionHeaderHeight = 0;
self.tableView.sectionFooterHeight = 0;
// 设置内边距(上左下右)
self.tableView.contentInset = UIEdgeInsetsMake(-15, 0, 0, 0);
// 用一张图片设置背景色
self.tableView.backgroundColor = [UIColor colorWithPatternImage:[UIImage imageNamed:@"bg"]];
// 分隔线
self.tableView.separatorStyle = UITableViewCellSeparatorStyleNone;// 设置UITableViewCell的属性
- (void)setupStyle {
// 设置title属性
self.textLabel.textColor = [UIColor grayColor];
self.textLabel.font = [UIFont systemFontOfSize:14.f];
UIView *selectedView = [[UIView alloc]init];
selectedView.backgroundColor = .......;
self.selectedBackgroundView = selectedView;
// 设置subTitle属性
self.detailTextLabel.textColor = [UIColor lightGrayColor];
}// 重写 item 模型的 set 方法
- (void)setItem:(CZItem *)item {
_item = item;
// 设置标题
self.textLabel.text = item.title;
// CUICatalog: Invalid asset name supplied: (null)
// 如果图片名字为nil 就会报此错误
if (item.icon) {
self.imageView.image = [UIImage imageNamed:item.icon];
}
self.detailTextLabel.text = item.subTitle;
// 三目运算符进行判断
self.selectionStyle = [item isKindOfClass:[CZSwitchItem class]] ? UITableViewCellSelectionStyleNone : UITableViewCellSelectionStyleDefault;
// 判断Cell的附件类型
if ([item isKindOfClass:[CZArrowItem class]]) {
self.accessoryView = self.accessoryArrow;
}else if ([item isKindOfClass:[CZSwitchItem class]]){
CZSwitchItem *switchItem = (CZSwitchItem *)item;
// 设置开关
// NSUserDefaults *defaults = [NSUserDefaults standardUserDefaults];
// self.accessorySwitch.on = [defaults boolForKey:item.title];
self.accessorySwitch.on = switchItem.isOn;
self.accessoryView = self.accessorySwitch;
}else if ([item isKindOfClass:[CZLabelItem class]]){
self.accessoryView = self.accessoryLabel;
// 设置label 的值
CZLabelItem *labelItem = (CZLabelItem *)item;
self.accessoryLabel.text = labelItem.value;
// cmd + = ==> sizeToFit 让图片显示原有尺寸
[self.accessoryLabel sizeToFit];
}
}
    // 判断是否需要显示分隔线(每组最后一个 cell 不显示分割线)
    [cell showLine:(indexPath.row != (group.items.count - 1))];
// 需要执行某段代码可以调用下面的方法
dispatch_after(dispatch_time(DISPATCH_TIME_NOW, (int64_t)(“传入时间(多少秒后执行)” * NSEC_PER_SEC)),dispatch_get_main_queue(), ^{
。。。。。。。。。。
。。。。。
});// 解决 block 中的循环引用问题
// 必须有一个是weak 才可以不循环引用
// 方法一
// __weak CZLabelItem *weakItem1 = item1;
// __weak CZLabelItem *weakItem2 = item2;
// __weak CZScoreLiveController *weakSelf = self;
/*
喜欢使用block的要注意循环引用(self)
*/
// 方法二
__weak typeof(item1) weakItem1 = item1;
__weak typeof(item2) weakItem2 = item2;
__weak typeof(self) weakSelf = self;// UICollectionViewController注册cell
[self.collectionView registerNib:[UINib nibWithNibName:@"CZProductCell" bundle:nil] forCellWithReuseIdentifier:@"CZProductCell"];/**
点击产品推荐的时候,如果手机上有安装此应用,就打开。如果没有安装,就跳去下载。
*/
- (void)collectionView:(UICollectionView *)collectionView didSelectItemAtIndexPath:(NSIndexPath *)indexPath {
CZProduct *product = self.data[indexPath.item];
// URL 一般情况下是第三方平台提供。QQ,微信。自己去获取
// 判断是否能跳转应用
// 应用
UIApplication *app = [UIApplication sharedApplication];
// 拼接 url
NSURL *url = [NSURL URLWithString:[NSString stringWithFormat:@"%@://",product.customUrl]];
if ([app canOpenURL:url]) { // 打开应用
[app openURL:url];
}else {
url = [NSURL URLWithString:product.url];
[app openURL:url];
}
}// 加载JSON文件的例子:
+ (NSArray *)products {
// 文件路径
NSString *path = [[NSBundle mainBundle]pathForResource:@"more_project.json" ofType:nil];
// 读出文件数据
NSData *data = [NSData dataWithContentsOfFile:path];
// 解析JSON
/**
NSJSONReadingMutableContainers = (1UL << 0), 返回一个可变的容器(数组或者字典)
NSJSONReadingMutableLeaves = (1UL << 1), 叶子可变(分支)
NSJSONReadingAllowFragments = (1UL << 2) 可以解释一些非正常格式的json(我从来没见过)
*/
NSArray *appList = [NSJSONSerialization JSONObjectWithData:data options:NSJSONReadingMutableContainers|NSJSONReadingMutableLeaves error:nil];
NSMutableArray *tmp = [NSMutableArray array];
for (NSDictionary *dict in appList) {
CZProduct *product = [CZProduct productWithDict:dict];
[tmp addObject:product];
}
return tmp.copy;
}
// UICollectionViewCell的 xib 中设置 imageview 控件的圆角
- (void)awakeFromNib {
    // 要设置圆角必须设置这个布尔值为 YES 才行
    self.imageView.clipsToBounds = YES;
    self.imageView.layer.cornerRadius = 10;
}
// 帮助界面的点击转跳
- (void)tableView:(UITableView *)tableView didSelectRowAtIndexPath:(NSIndexPath *)indexPath {
CZHTMLController *html = [[CZHTMLController alloc]init];
// html.view.backgroundColor =[UIColor redColor];
// NSLog(@"%@",html.view);
// 需要把点击的模型传到下一个控制器去
CZHelp *help = self.helpList[indexPath.row];
html.help = help;
html.title = help.title;
// 创建导航栏控制器
UINavigationController *nav = [[UINavigationController alloc]initWithRootViewController:html];
[self presentViewController:nav animated:YES completion:nil];
}// 帮助页面转跳的控制器
- (void)viewDidLoad {
[super viewDidLoad];
// Do any additional setup after loading the view.
// self.view.backgroundColor = [UIColor redColor];
[self setupLeftItem];
// 先要使用 UIWebView -> 用来做浏览器
// 要使用到javascript 来帮助我们完成.解析型
// javascript : web比较多的应用.电商,网易新闻,QQ(漫游输密码),dns
NSLog(@"%@",self.help);
// UIWebView
UIWebView *webView = (UIWebView *)self.view;
// NSURL
NSURL *url = [NSURL URLWithString:@"http://www.baidu.com"];
// NSURL *url = [[NSBundle mainBundle]URLForResource:self.help.html withExtension:nil];
// 创建一个请求
NSURLRequest *request = [NSURLRequest requestWithURL:url];
// 使用webView加载请求
[webView loadRequest:request];
webView.delegate = self;
}
// 设置关闭按钮
- (void)setupLeftItem {
UIBarButtonItem *item = [[UIBarButtonItem alloc]initWithTitle:@"关闭" style:UIBarButtonItemStylePlain target:self action:@selector(dismiss)];
self.navigationItem.leftBarButtonItem = item;
}
// 关闭按钮响应事件 关闭当前的控制器
- (void)dismiss {
[self dismissViewControllerAnimated:YES completion:nil];
}
// 实现跳到指定的某一个行
- (void)webViewDidFinishLoad:(UIWebView *)webView {
// 拼接方法名就可以了
NSString *code = [NSString stringWithFormat:@"document.location.href = \"#%@\";",self.help.ID];
[webView stringByEvaluatingJavaScriptFromString:code];
}//实现短信分享,邮件分型的 block
[item1 setBlock:^{
// 短信分享 方式一 :不回能到原来的应用,只能跳到短信应用
/*
NSURL *url = [NSURL URLWithString:@"sms://10010"];
UIApplication *app = [UIApplication sharedApplication];
[app openURL:url];
*/
// 方式二 可以同时发给多个人,可以设置短信内容,发送完之后回到应用
if (![MFMessageComposeViewController canSendText]) {
return ;// 模拟器,短信功能坏了
}
// 由你的手机,写好一个验证码,发过去
// 在手机端自动输入验证码
MFMessageComposeViewController *message = [[MFMessageComposeViewController alloc]init];
// 收件人
message.recipients = @[@"10010",@"13316640961"];
// 设置短信内容
message.body = @"约吗?";
message.messageComposeDelegate = self;
[self presentViewController:message animated:YES completion:nil];
}];
[item2 setBlock:^{
// 方法一 跳转到邮件应用
/**
NSURL *url = [NSURL URLWithString:@"mailto://zhiwupei@itcast.cn"];
UIApplication *app = [UIApplication sharedApplication];
[app openURL:url];
*/
if (![MFMailComposeViewController canSendMail]) {
NSLog(@"不能使用发邮件");
return ;
}
MFMailComposeViewController *mail = [[MFMailComposeViewController alloc]init];
// 设置收件人
[mail setToRecipients:@[@"zhiwupei@itcast.cn",@"xx@qq.com"]];
// 设置主题
[mail setSubject:@"是否是主题"];
// 设置邮件内容
[mail setMessageBody:@"约吗?" isHTML:YES];
mail.mailComposeDelegate = self;
[self presentViewController:mail animated:YES completion:nil];
}];// 分享后的返回原界面会调用的反馈方法(MBProgressHUD是第三方)
- (void)messageComposeViewController:(MFMessageComposeViewController *)controller didFinishWithResult:(MessageComposeResult)result {
// dismiss
[controller dismissViewControllerAnimated:YES completion:nil];
if (result == MessageComposeResultCancelled) {
NSLog(@"取消");
[MBProgressHUD showSuccess:@"取消发送"];
}else if (result == MessageComposeResultSent) {
NSLog(@"发送");
[MBProgressHUD showSuccess:@"发送成功"];
}else if (result == MessageComposeResultFailed) {
NSLog(@"失败");
[MBProgressHUD showSuccess:@"发送失败"];
}
}
- (void)mailComposeController:(MFMailComposeViewController *)controller didFinishWithResult:(MFMailComposeResult)result error:(NSError *)error {
[controller dismissViewControllerAnimated:YES completion:nil];
if (result == MFMailComposeResultCancelled) {
[MBProgressHUD showSuccess:@"取消发送"];
}else if (result == MFMailComposeResultSaved) {
[MBProgressHUD showSuccess:@"保存草稿"];
}else if (result == MFMailComposeResultSent) {
[MBProgressHUD showSuccess:@"发送成功"];
}else if (result == MFMailComposeResultFailed) {
[MBProgressHUD showSuccess:@"发送失败"];
}
}// 应用转跳打电话的 block
[item1 setBlock:^{
// 打电话 方式一 挂了电话之后会回来原来的应用,但是仅仅是在iOS 8 以上
// NSURL *url = [NSURL URLWithString:@"tel://10010"];
// UIApplication *app = [UIApplication sharedApplication];
//
// [app openURL:url];
// 方式二 打完电话也可以回来,但是私有Api,如果使用了,就不能上架。打电话的时候会弹出是否拨打
// NSURL *url = [NSURL URLWithString:@"telprompt://10010"];
// UIApplication *app = [UIApplication sharedApplication];
//
// [app openURL:url];
// 方式三 拨打电话之前会弹出是否可以拨打,而且打完电话之会回来原来的应用
NSURL *url = [NSURL URLWithString:@"tel://10010"];
NSURLRequest *request = [NSURLRequest requestWithURL:url];
[self.webView loadRequest:request];
}];//时间选择器 View 的 .h
@class CZCustonDatePicker;
@protocol CZCustonDatePickerDelegate <NSObject>
@optional
- (void)customDatePickerDidSelect:(CZCustonDatePicker *)datePicker;
- (void)customDatePickerDidCancel:(CZCustonDatePicker *)datePicker;
- (void)customDatePickerDidChange:(CZCustonDatePicker *)datePicker;
@end
@interface CZCustonDatePicker : UIView
// 哪个数据模型调用起选择时间
@property (nonatomic, strong) id model;
@property (nonatomic, strong, readonly) UIDatePicker *datePicker;
@property (nonatomic, strong) NSDate *currentDate;// 记录当前的时间
@property (nonatomic, strong) NSDate *maxDate;// 记录最大的时间
@property (nonatomic, strong) NSDate *minDate;// 记录最小的时间
@property (nonatomic, weak) id<CZCustonDatePickerDelegate> delegate;
- (void)show;
- (void)hide;
@end
// 时间选择器 View 的.m
@interface CZCustonDatePicker ()<CZToolDelegate>
@property (nonatomic, strong) CZTool *tool;
@property (nonatomic, strong) UIDatePicker *datePicker;
@property (nonatomic, weak) UIButton *closeBtn;
@end
@implementation CZCustonDatePicker
//创建 UIView 时候调用
- (instancetype)initWithFrame:(CGRect)frame {
if (self = [super initWithFrame:frame]) {
[self setupTool];
[self setupDatePicker];
}
return self;
}
//布局子空间
- (void)layoutSubviews {
[super layoutSubviews];
self.height = 256; // 工具条 40 时间选择 216
self.width = [UIApplication sharedApplication].keyWindow.width;
self.tool.width = self.width;
self.datePicker.y = self.tool.height;
self.datePicker.width = self.width;
self.datePicker.height = 216;
}
// 初始化工具条
- (void)setupTool {
CZTool *tool = [CZTool viewFromXib];
[self addSubview:tool];
tool.delegate = self;
self.tool = tool;
}
//初始化时间选择器
- (void)setupDatePicker {
UIDatePicker *datePicker = [[UIDatePicker alloc]init];
// 设置选择时间
datePicker.datePickerMode = UIDatePickerModeTime;
// 设置语言
datePicker.locale = [NSLocale localeWithLocaleIdentifier:@"zh_CN"];
[self addSubview:datePicker];
self.datePicker = datePicker;
[datePicker addTarget:self action:@selector(datePickerChange) forControlEvents:UIControlEventValueChanged];
}
//时间选择器响应方法
- (void)datePickerChange {
// NSLog(@"%@",self.datePicker.date);
if ([self.delegate respondsToSelector:@selector(customDatePickerDidChange:)]) {
[self.delegate customDatePickerDidChange:self];
}
}
//显示 view
- (void)show {
UIWindow *window = [UIApplication sharedApplication].keyWindow;
UIButton *close = [UIButton buttonWithType:UIButtonTypeCustom];
close.frame = window.bounds;
[close addTarget:self action:@selector(close:) forControlEvents:UIControlEventTouchUpInside];
[window addSubview:close];
self.closeBtn = close;
[window addSubview:self];
self.y = [UIApplication sharedApplication].keyWindow.height;
[UIView animateWithDuration:0.25 animations:^{
self.y = [UIApplication sharedApplication].keyWindow.height - 256;
}];
}
// 空白处点击事件
- (void)close:(UIButton *)btn {
[btn removeFromSuperview];
[self hide];
if ([self.delegate respondsToSelector:@selector(customDatePickerDidCancel:)]) {
[self.delegate customDatePickerDidCancel:self];
}
}
//隐藏 view
- (void)hide {
[UIView animateWithDuration:0.25 animations:^{
self.y = [UIApplication sharedApplication].keyWindow.height ;
} completion:^(BOOL finished) {
[self removeFromSuperview];
}];
}
// 实现工具条代理方法
- (void)toolDidClickCancel:(CZTool *)tool {
[self close:self.closeBtn];
if ([self.delegate respondsToSelector:@selector(customDatePickerDidCancel:)]) {
[self.delegate customDatePickerDidCancel:self];
}
}
//实现工具条的代理方法
- (void)toolDidClickSure:(CZTool *)tool {
[self close:self.closeBtn];
if ([self.delegate respondsToSelector:@selector(customDatePickerDidSelect:)]) {
[self.delegate customDatePickerDidSelect:self];
}
}
- (void)setCurrentDate:(NSDate *)currentDate {
_currentDate = currentDate;
self.datePicker.date = currentDate;
}
- (void)setMaxDate:(NSDate *)maxDate {
_maxDate = maxDate;
self.datePicker.maximumDate = maxDate;
}
- (void)setMinDate:(NSDate *)minDate {
_minDate = minDate;
// NSLog(@"最小时间%@",minDate);
self.datePicker.minimumDate = minDate;
}
@end
// 控制器中的.m
@interface CZScoreLiveController ()<CZCustonDatePickerDelegate>
@end
@implementation CZScoreLiveController
- (void)viewDidLoad {
[super viewDidLoad];
/*
此处省略一些内容
*/
__weak typeof(item1) weakItem1 = item1;
__weak typeof(item2) weakItem2 = item2;
__weak typeof(self) weakSelf = self;
[item1 setBlock:^{
CZCustonDatePicker *datePicker = [[CZCustonDatePicker alloc]init];
// item1 调用了弹出时间选择
datePicker.model = weakItem1;
// 设置代理
datePicker.delegate = weakSelf;
// 格式化时间
NSDateFormatter *formatter = [[NSDateFormatter alloc]init];
// 设置时间格式
formatter.dateFormat = @"HH:mm";
// 记录当前显示的时间
datePicker.currentDate = [formatter dateFromString: weakItem1.value];
// 还需要限制最大时间和最小时间
datePicker.maxDate = [formatter dateFromString:weakItem2.value];
[datePicker show];
}];
[item2 setBlock:^{
CZCustonDatePicker *datePicker = [[CZCustonDatePicker alloc]init];
// item1 调用了弹出时间选择
datePicker.model = weakItem2;
// 设置代理
datePicker.delegate = weakSelf;
// 格式化时间
NSDateFormatter *formatter = [[NSDateFormatter alloc]init];
// 设置时间格式
formatter.dateFormat = @"HH:mm";
// 记录最小时间(开始时间)
datePicker.minDate = [formatter dateFromString:weakItem1.value];
// 记录当前显示的时间
datePicker.currentDate = [formatter dateFromString:weakItem2.value];
[datePicker show];
}];
}
// 点击确定
- (void)customDatePickerDidSelect:(CZCustonDatePicker *)view {
// 取出模型
CZLabelItem *item = view.model;
// 修改数据
// 取出选择的时间
NSDate *date = view.datePicker.date;
// 格式化时间
NSDateFormatter *formatter = [[NSDateFormatter alloc]init];
// 设置时间格式
formatter.dateFormat = @"HH:mm";
item.value = [formatter stringFromDate:date];
// 刷新tableView
// NSLog(@"%@",item);
[self.tableView reloadData];
}
- (void)customDatePickerDidChange:(CZCustonDatePicker *)view {
// 取出模型
CZLabelItem *item = view.model;
// 修改数据
// 取出选择的时间
NSDate *date = view.datePicker.date;
// 格式化时间
NSDateFormatter *formatter = [[NSDateFormatter alloc]init];
// 设置时间格式
formatter.dateFormat = @"HH:mm";
item.value = [formatter stringFromDate:date];
// 刷新tableView
[self.tableView reloadData];
}
- (void)customDatePickerDidCancel:(CZCustonDatePicker *)view {
// 取出模型
CZLabelItem *item = view.model;
// 修改数据
// 取出选择的时间
NSDate *date = view.currentDate;
// 格式化时间
NSDateFormatter *formatter = [[NSDateFormatter alloc]init];
// 设置时间格式
formatter.dateFormat = @"HH:mm";
item.value = [formatter stringFromDate:date];
// 刷新tableView
[self.tableView reloadData];
}
// 创建 UICollectionViewController 初始化布局
- (instancetype)init {
    // 创建CollectionView 布局
    UICollectionViewFlowLayout *layout = [[UICollectionViewFlowLayout alloc]init];

    // 设置item 大小
    layout.itemSize = [UIScreen mainScreen].bounds.size;

    layout.minimumInteritemSpacing = 0;
    layout.minimumLineSpacing = 0;

    // 设置滚动方向
    layout.scrollDirection = UICollectionViewScrollDirectionHorizontal;
    if (self = [super initWithCollectionViewLayout:layout]) {

    }
    return self;
}
// UICollectionViewController
- (void)viewDidLoad {
// 注册cell的类型
    [self.collectionView registerNib:[UINib nibWithNibName:@"CZGuideCell" bundle:nil] forCellWithReuseIdentifier:@"CZGuideCell"];
    // 设置分页 & 滚动条 & 弹簧
    self.collectionView.pagingEnabled = YES;
    self.collectionView.showsHorizontalScrollIndicator = NO;
    self.collectionView.bounces = NO;
}
// 监听滑动
- (void)scrollViewDidEndDecelerating:(UIScrollView *)scrollView {
    CGFloat offsetX = scrollView.contentOffset.x;
    NSInteger index = offsetX / scrollView.width + 1;
    // 切换图片
    NSString *guide = [NSString stringWithFormat:@"guide%zd",index];
    NSString *guideLargeText = [NSString stringWithFormat:@"guideLargeText%zd",index];
    NSString *guideSmallText = [NSString stringWithFormat:@"guideSmallText%zd",index];
    self.guide.image = [UIImage imageNamed:guide];
    self.guideLargeText.image = [UIImage imageNamed:guideLargeText];
    self.guideSmallText.image = [UIImage imageNamed:guideSmallText];
    CGFloat width = scrollView.width;
    // 判断向哪个方向滚动
    if (self.guide.x > offsetX) {// 各左 坐标要减一个屏幕宽度
        NSLog(@"左");
        self.guide.x = offsetX - width;
        self.guideLargeText.x = offsetX + (self.collectionView.width - self.guideLargeText.width) * 0.5 - width;
        self.guideSmallText.x = offsetX + (self.collectionView.width - self.guideSmallText.width) * 0.5 - width;

    }else if (self.guide.x < offsetX) { // 向右 坐标要加一个屏幕宽度
        NSLog(@"右");
        self.guide.x = offsetX  + width;
        self.guideLargeText.x = offsetX + (self.collectionView.width - self.guideLargeText.width) * 0.5 + width;
        self.guideSmallText.x = offsetX + (self.collectionView.width - self.guideSmallText.width) * 0.5  + width;
    }

    [UIView animateWithDuration:0.5 animations:^{
        self.guide.x = offsetX;
        self.guideLargeText.x = offsetX + (self.collectionView.width - self.guideLargeText.width) * 0.5;
        self.guideSmallText.x = offsetX + (self.collectionView.width - self.guideSmallText.width) * 0.5;
    }];


}
// 实现了代理方法,转跳到主界面
- (void)guideCellDidClickStart:(CZGuideCell *)cell {
    UIWindow *window = [UIApplication sharedApplication].keyWindow;
    CZMainController *main = [[CZMainController alloc]init];

    window.rootViewController = main;

    // 动画
    [window addSubview:self.collectionView];

    [UIView animateWithDuration:0.5 animations:^{
        self.collectionView.x -= self.collectionView.width;
    } completion:^(BOOL finished) {
        [self.collectionView removeFromSuperview];
    }];

}


 1688
1688

 被折叠的 条评论
为什么被折叠?
被折叠的 条评论
为什么被折叠?
 到【灌水乐园】发言


