


前言
之前项目中的导出Excel文件操作都是在前端完成的,项目是由vue+vite构建的,效果还不错的,所需依赖包如下所示。
npm i xlsx@0.18.5
npm i xlsx-style-vite@0.0.2
现在了解了一下Python的openpyxl依赖库后,试一下编写脚本进行Excel导出,效果也不错的。
一、导入依赖
pip install openpyxl二、示例代码
(1)export_excel_demo.py
#! /usr/bin/env python3
# -*- coding: utf-8 -*-
from openpyxl.styles import Alignment, PatternFill, Border, Side, Font
from openpyxl.workbook import Workbook
if __name__ == '__main__':
# 定义表头键值对列表
keyMap = {
'hero': '英雄',
'level': '等级',
'gold': '金币',
'kill': '击杀',
'be_killed': '被击杀',
'assists': '助攻',
'score': '评分',
'is_mvp': '是否MVP',
}
# 定义目标数组列表
targetList = [
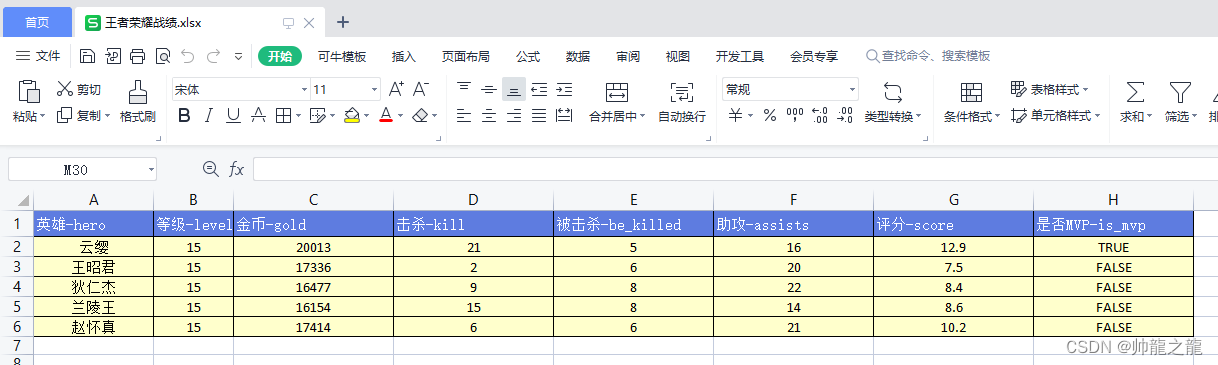
{
'hero': '云缨',
'level': 15,
'gold': 20013,
'kill': 21,
'be_killed': 5,
'assists': 16,
'score': 12.9,
'is_mvp': True,
},
{
'hero': '王昭君',
'level': 15,
'gold': 17336,
'kill': 2,
'be_killed': 6,
'assists': 20,
'score': 7.5,
'is_mvp': False,
},
{
'hero': '狄仁杰',
'level': 15,
'gold': 16477,
'kill': 9,
'be_killed': 8,
'assists': 22,
'score': 8.4,
'is_mvp': False,
},
{
'hero': '兰陵王',
'level': 15,
'gold': 16154,
'kill': 15,
'be_killed': 8,
'assists': 14,
'score': 8.6,
'is_mvp': False,
},
{
'hero': '赵怀真',
'level': 15,
'gold': 17414,
'kill': 6,
'be_killed': 6,
'assists': 21,
'score': 10.2,
'is_mvp': False,
},
]
# 将目标对象列表转为二维数组列表
processList = []
for e in targetList:
arr = []
for i in keyMap:
arr.append(e.get(i))
processList.append(arr)
# 将表头数组列表追加到二维数组列表中
lableArr = []
for i in keyMap:
lableArr.append(keyMap.get(i) + '-' + i)
processList.insert(0, lableArr)
# 打印加工后的二维数组列表
# print(processList)
# 创建一个工作簿
wb = Workbook()
# 获取当前活动的工作表
ws = wb.active
# 设置工作表的名称
ws.title = u'胜利匹配赛'
# 往工作表写入数据
r = 1
for line in processList:
for col in range(1, len(line) + 1):
ws.cell(row=r, column=col).value = line[col - 1]
r += 1
# 设置行高和列宽
ws.column_dimensions["A"].width = 15
ws.column_dimensions["B"].width = 10
ws.column_dimensions["C"].width = 20
ws.column_dimensions["D"].width = 20
ws.column_dimensions["E"].width = 20
ws.column_dimensions["F"].width = 20
ws.column_dimensions["G"].width = 20
ws.column_dimensions["H"].width = 20
ws.row_dimensions[1].height = 20
for row in ws:
# print(row)
for cell in row:
# print(cell) # 单元格对象
# print(cell.value) # 单元格的值
# print(cell.row) # 单元格所在的列
# print(cell.column) # 单元格所在的行
# print(cell.coordinate) # 单元格的坐标,如:A1
string = str(cell.coordinate) # 单元格的坐标,如:A1
# 在字符串中提取所有数字
num = ''.join([char for char in string if char.isdigit()])
# print(num)
# 匹配非首行的所有单元格
if not ('1' == str(num)):
# 设置字体
cell.font = Font(
name="Calibri", # 字体
size=11, # 字体大小
color="000000", # 字体颜色,用16进制rgb表示
bold=False, # 是否加粗,True/False
italic=False, # 是否斜体,True/False
strike=False, # 是否使用删除线,True/False
# underline='singleAccounting', # 下划线, 可选'singleAccounting', 'double', 'single', 'doubleAccounting'
)
# 设置布局
cell.alignment = Alignment(
horizontal='center', # 水平对齐,可选general、left、center、right、fill、justify、centerContinuous、distributed
vertical='center', # 垂直对齐, 可选top、center、bottom、justify、distributed
text_rotation=0, # 字体旋转,0~180整数
wrap_text=False, # 是否自动换行
shrink_to_fit=False, # 是否缩小字体填充
indent=0, # 缩进值
)
# 设置填充
cell.fill = PatternFill(
patternType="solid", # 填充类型,可选none、solid、darkGray、mediumGray、lightGray、lightDown、lightGray、lightGrid
fgColor="ffffcc", # 前景色,16进制rgb
bgColor="ff2600", # 背景色,16进制rgb
# fill_type=None, # 填充类型
# start_color=None, # 前景色,16进制rgb
# end_color=None # 背景色,16进制rgb
)
# 设置边框
side = Side(
style="thin", # 边框样式,可选dashDot、dashDotDot、dashed、dotted、double、hair、medium、mediumDashDot、mediumDashDotDot、mediumDashed、slantDashDot、thick、thin
color="000000", # 边框颜色,16进制rgb表示
)
cell.border = Border(
top=side, # 上
bottom=side, # 下
left=side, # 左
right=side, # 右
diagonal=side # 对角线
)
# 匹配首行的单元格
else:
# 设置字体
cell.font = Font(
name="宋体", # 字体
size=11, # 字体大小
color="ffffff", # 字体颜色,用16进制rgb表示
bold=False, # 是否加粗,True/False
italic=False, # 是否斜体,True/False
strike=False, # 是否使用删除线,True/False
# underline='singleAccounting', # 下划线, 可选'singleAccounting', 'double', 'single', 'doubleAccounting'
)
# 设置布局
cell.alignment = Alignment(
horizontal='left', # 水平对齐,可选general、left、center、right、fill、justify、centerContinuous、distributed
vertical='center', # 垂直对齐, 可选top、center、bottom、justify、distributed
text_rotation=0, # 字体旋转,0~180整数
wrap_text=False, # 是否自动换行
shrink_to_fit=False, # 是否缩小字体填充
indent=0, # 缩进值
)
# 设置填充
cell.fill = PatternFill(
patternType="solid", # 填充类型,可选none、solid、darkGray、mediumGray、lightGray、lightDown、lightGray、lightGrid
fgColor="5e7ce0", # 前景色,16进制rgb
bgColor="9bc2e6", # 背景色,16进制rgb
# fill_type=None, # 填充类型
# start_color=None, # 前景色,16进制rgb
# end_color=None # 背景色,16进制rgb
)
# 设置边框
side = Side(
style="thin", # 边框样式,可选dashDot、dashDotDot、dashed、dotted、double、hair、medium、mediumDashDot、mediumDashDotDot、mediumDashed、slantDashDot、thick、thin
color="000000", # 边框颜色,16进制rgb表示
)
cell.border = Border(
top=side, # 上
bottom=side, # 下
left=side, # 左
right=side, # 右
diagonal=side # 对角线
)
# 将工作簿保存到磁盘
wb.save('王者荣耀战绩.xlsx')
三、运行效果
四、参考资料
【openpyxl】设置样式(字体样式、行列宽高、对齐方式、边框、填充和渐变)_openpyxl alignment_冰冷的希望的博客-CSDN博客


 1313
1313


 被折叠的 条评论
为什么被折叠?
被折叠的 条评论
为什么被折叠?
 到【灌水乐园】发言


