


博客系统
博客系统是干什么的?
CSDN就是一个典型的博客系统。而我在这里就是通过模拟实现一个博客系统,这是一个较为简单的博客系统,但是主要功能一个不缺,不过就是 UI 有些 low,我学习前端是为了写后端更加顺手。不至于前后端完全分离,但是有个问题设计的 web 页面不是很好看。
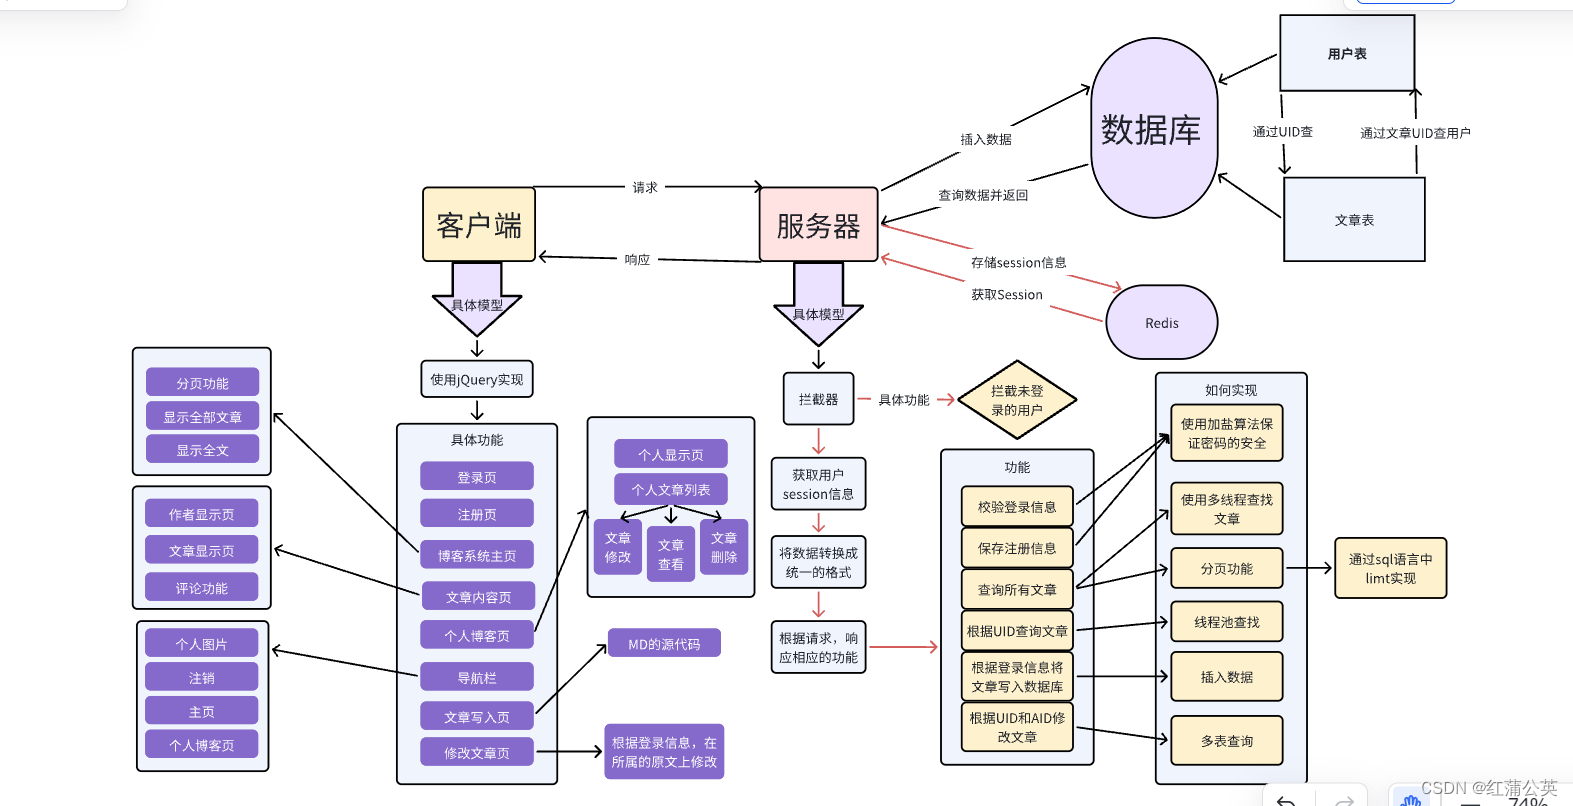
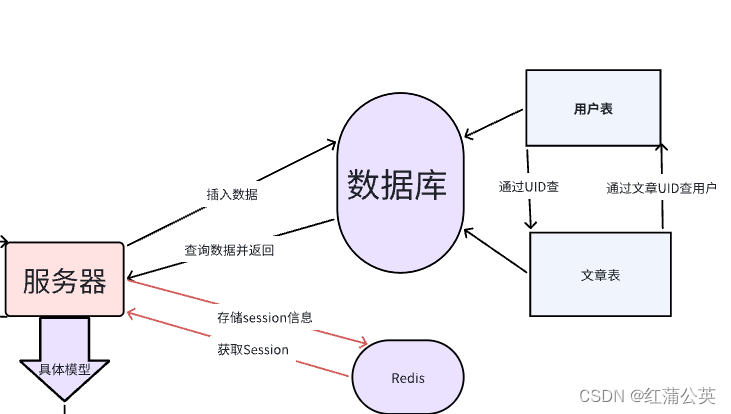
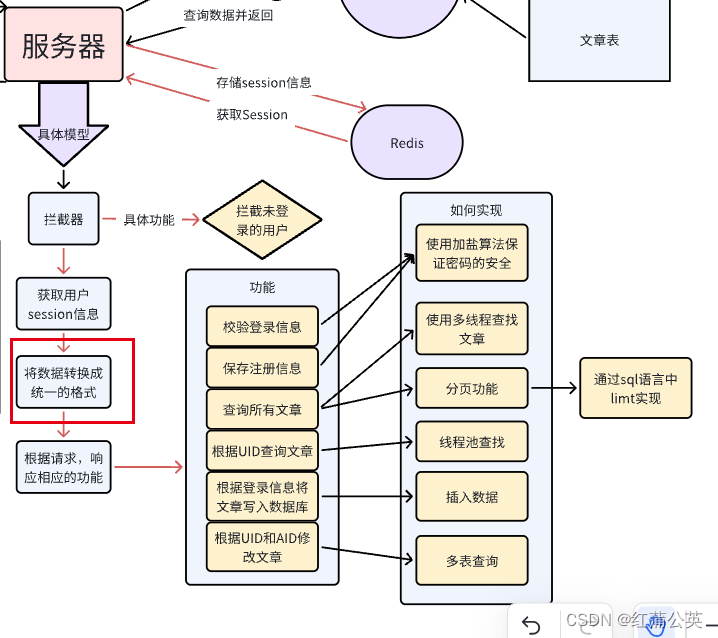
首先我将整体的业务流程展现
一、创建项目
有考试的同学不会创,可以看我的 Spring 相关的文章。里面有详细的说明
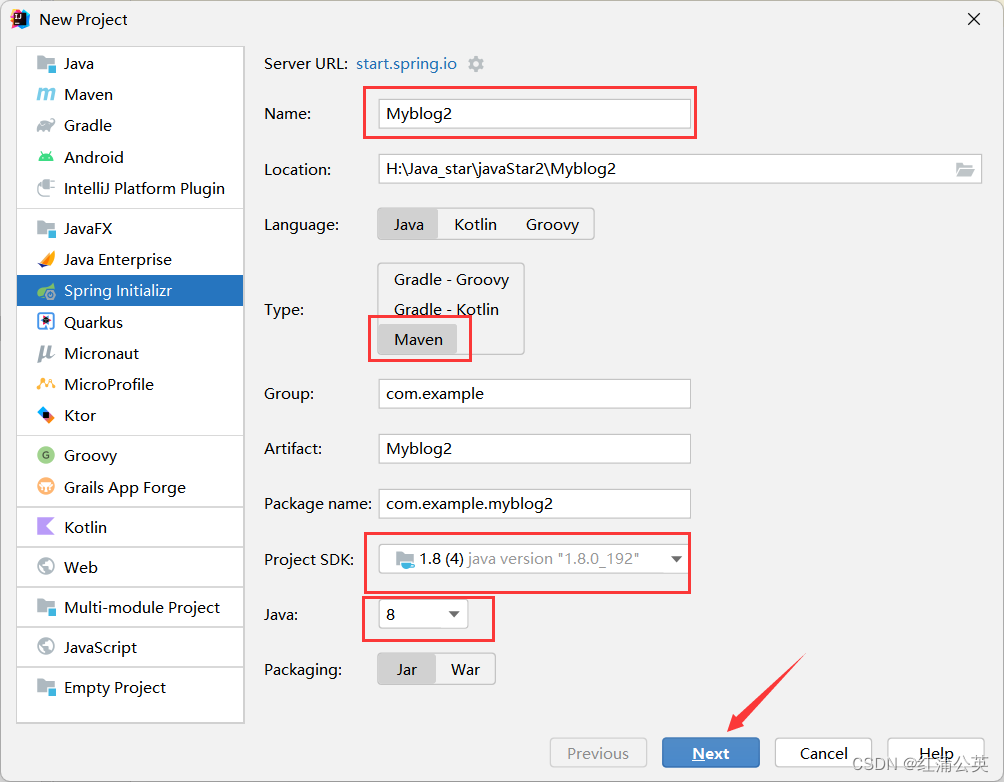
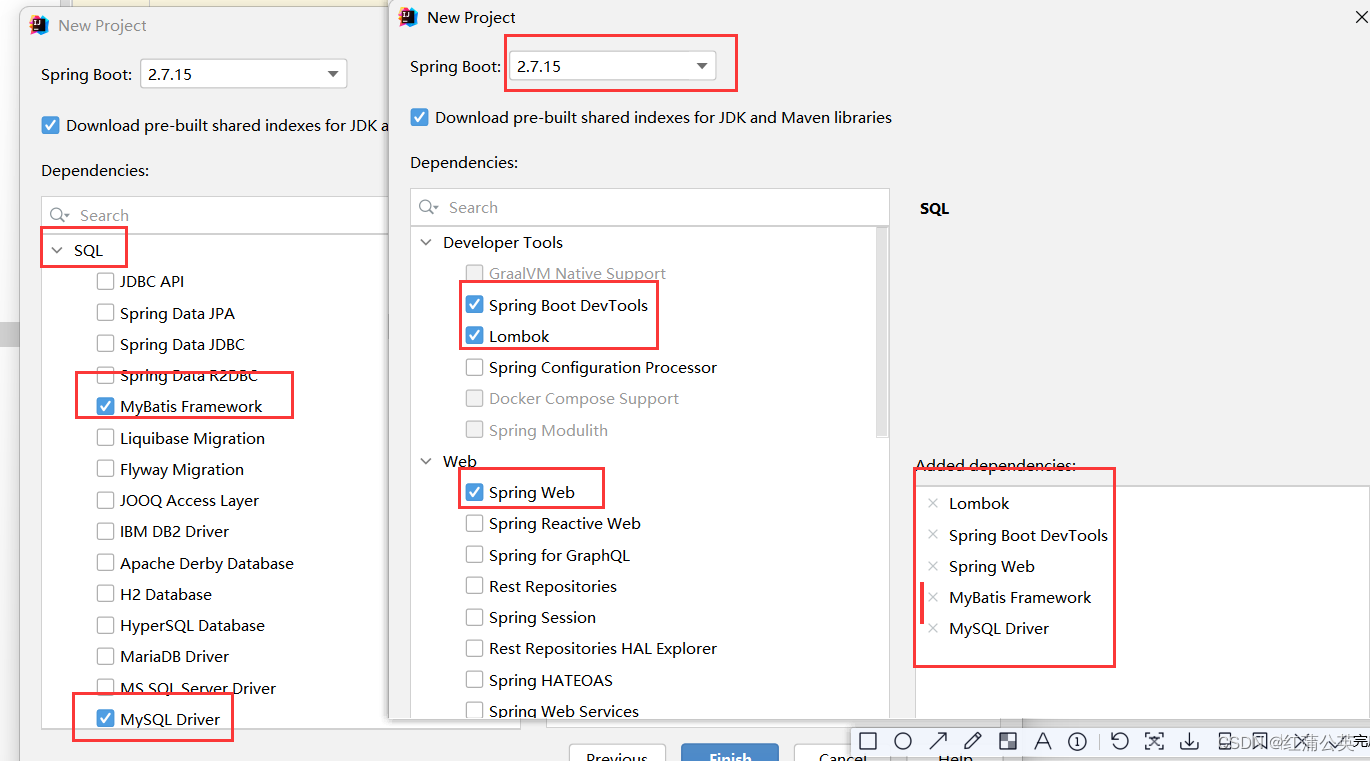
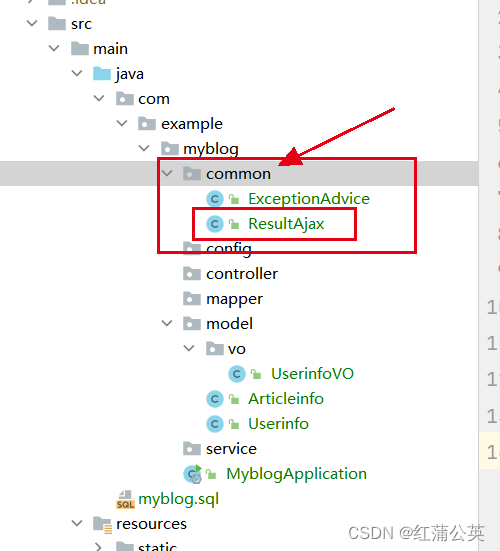
创建目录:
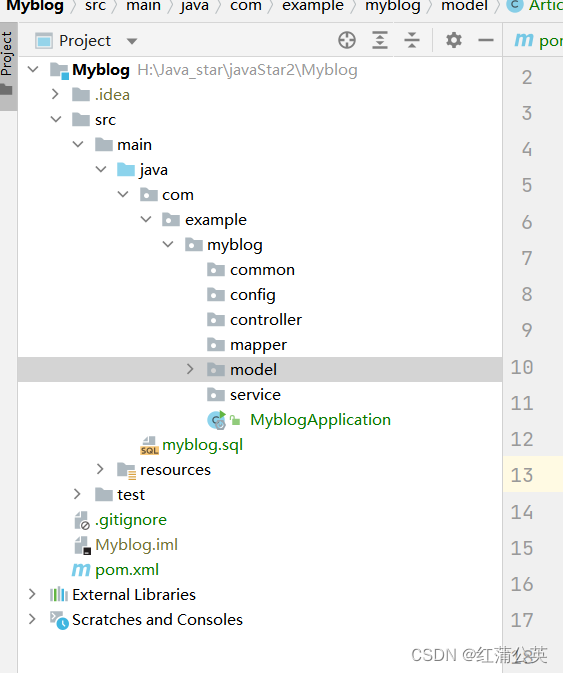
common:这里放的是公共的组件
config:这里放的配置
Controller·:控制层
model:放的实例化类
service:服务层
mapper:数据层
二、建立数据库
结构
创建一个sql文件
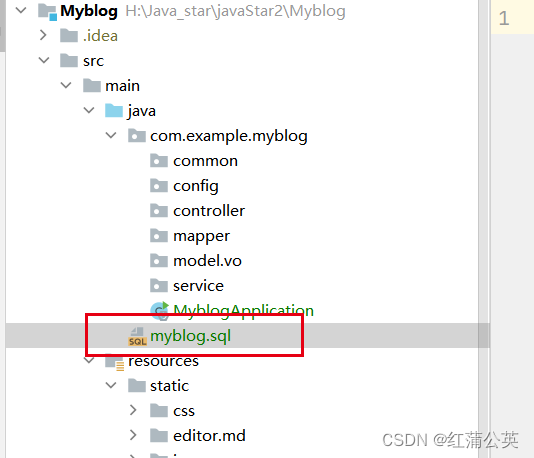
在文件中编写sql语句
创建数据库-----myblog
drop database if exists myblog;
create  database myblog default character  set utf8;
创建用户表----userinfo
drop table if exists userinfo;
create table userinfo(
    `uid` int primary key auto_increment,
    `username` varchar(100) not null,
    `password` varchar(32) not null ,
    `photo` varchar(500) default '',
    `createtime` datetime default now(),
    `updatetime` datetime default now(),
    `state` int default 1
);
创建文章表----articleinfo
drop table if exists articleinfo;
create table articleinfo(
    `aid` int primary key auto_increment,
    `title` varchar(100) not null ,
    `content` text not null ,
    `createtime` datetime default now(),
    `updatetime` datetime default now(),
    `uid` int not null ,
    `readcount` int not null default 1,
    `state` int default 1
);
插入一些测试数据
insert into userinfo(uid, username, password, photo, createtime, updatetime, `state`)
 values (1,'admin','admin','','2023-9-9 21:54','2023-9-9 21:54',1);

insert into articleinfo (aid, title, content, uid) values (1,'中庸','大学中庸',1);
链接服务器和数据库和Redis
(不使用也是可以的,看自己的需求)如何安装使用Redis,具体看我的Redis文章
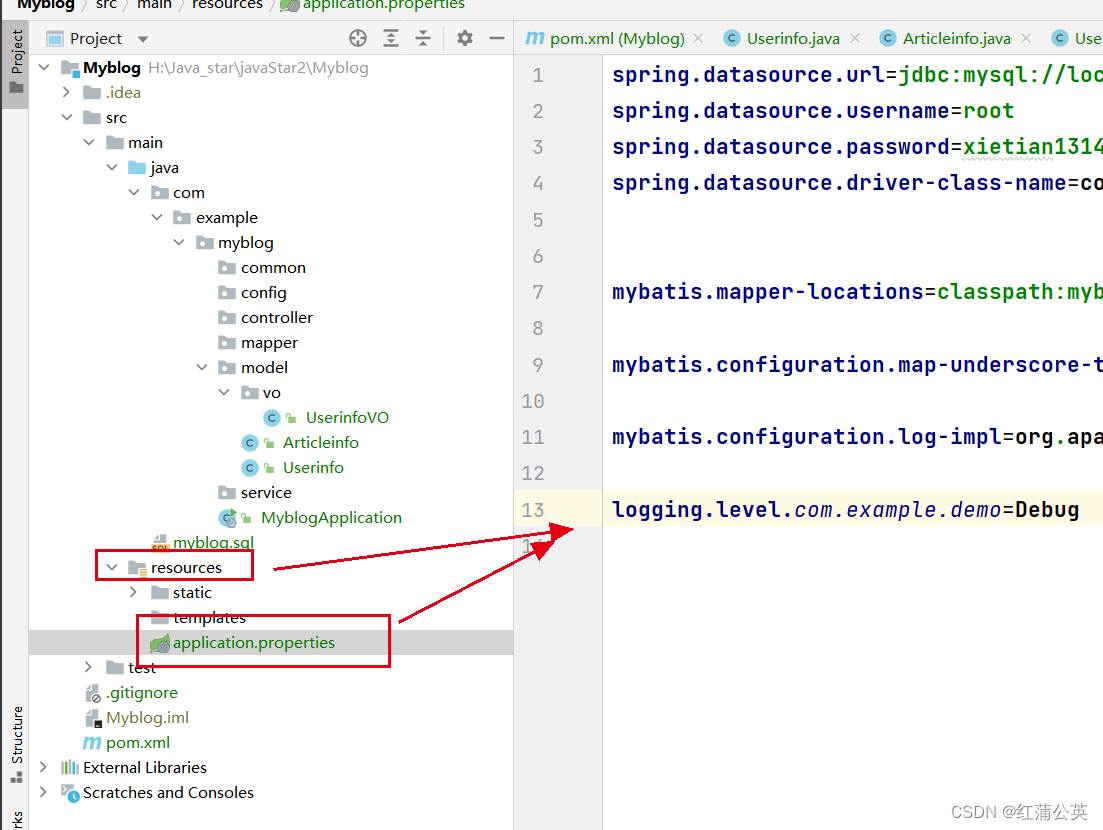
spring.datasource.url=jdbc:mysql://localhost:3306/mycnblog?characterEncoding=utf8
spring.datasource.username=root
spring.datasource.password=xietian1314
spring.datasource.driver-class-name=com.mysql.cj.jdbc.Driver

#这里可以不添加
mybatis.mapper-locations=classpath:mybatis/*Mapper.xml
mybatis.configuration.map-underscore-to-camel-case=true
mybatis.configuration.log-impl=org.apache.ibatis.logging.stdout.StdOutImpl
logging.level.com.example.demo=Debug

#redis 配置
#设置Redis连接信息
spring.redis.host=8.130.80.152
spring.redis.port=6379
spring.redis.password=
spring.redis.database=1

spring.session.store-type=redis

#过期时间
server.servlet.session.timeout=1800

spring.session.redis.flush-mode=on_save
#用户登录的session存在这个目录下
spring.session.redis.namespace=spring:session
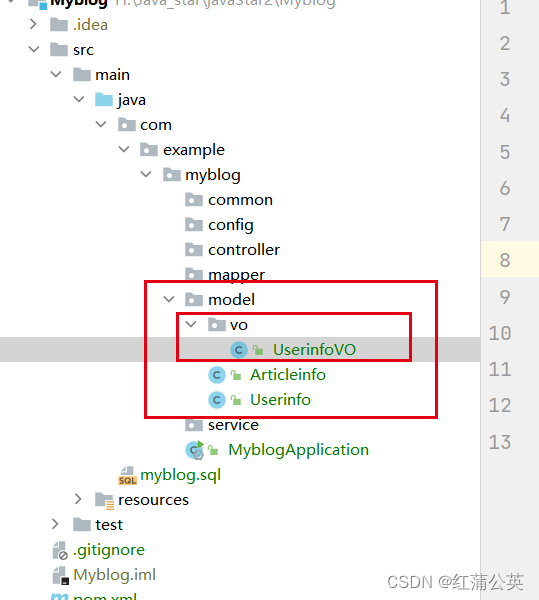
三、创建实例化对象
在model包下建立两个类,Userinfo ,Articleinfo ,并且在包下创建一个vo的包。
再vo的包中创建一个UserinfoVO,这个包继承于Userinfo ,相当于对Userinfo 进行了扩充
注意:
- Serializable 这个接口作用是序列化和反序列化 ,java 提供的接口。用来将一个对象进行二进制化。
- @Data,相当于自己构建getter,setter
创建一个用户的实例化—Userinfo
@Data
public class Userinfo implements Serializable {
    private int uid;
    private String username;
    private String password;
    private String photo;
    private LocalDateTime createtime;
    private LocalDateTime updatetime;
    private int state;
}
创建一个文章的实例化—Articleinfo
@Data
public class Articleinfo implements Serializable {
    private int aid;
    private String title;
    private String content;
    @JsonFormat(pattern = "yyyy-MM-dd HH:mm",timezone = "GMT+8")
    private String createtime;
    private String updatetime;
    private int uid;
    private int readcount;
    private int state;
}
在vo包下创建一个扩充的Userinfo
@Data
public class UserinfoVO extends Userinfo implements Serializable {
    private String chekcode;
    private int artCount;
}
四、统一数据结构
结构
我们约定数据的交互一ajax形式传输。
规定:
- 传输成功返回一个code==200,并且数据完好
- 传输失败返回一个code 非 200 的数,且返回一个错误信息
/**
 * 统一前后端的数据对象
 */
@Data
public class ResultAjax {
    private int code;
    private String msg;
    private Object data;

    public static ResultAjax success(Object data){
        ResultAjax resultAjax= new ResultAjax();
        resultAjax.setCode(200);
        resultAjax.setMsg("");
        resultAjax.setData(data);
        return resultAjax;
    }
    public static ResultAjax fail(int code,String msg){
        ResultAjax resultAjax= new ResultAjax();
        resultAjax.setCode(code);
        resultAjax.setMsg(msg);
        resultAjax.setData(null);
        return resultAjax;
    }
    public static ResultAjax fail(int code,String msg,Object data){
        ResultAjax resultAjax= new ResultAjax();
        resultAjax.setCode(code);
        resultAjax.setMsg(msg);
        resultAjax.setData(data);
        return resultAjax;
    }
}
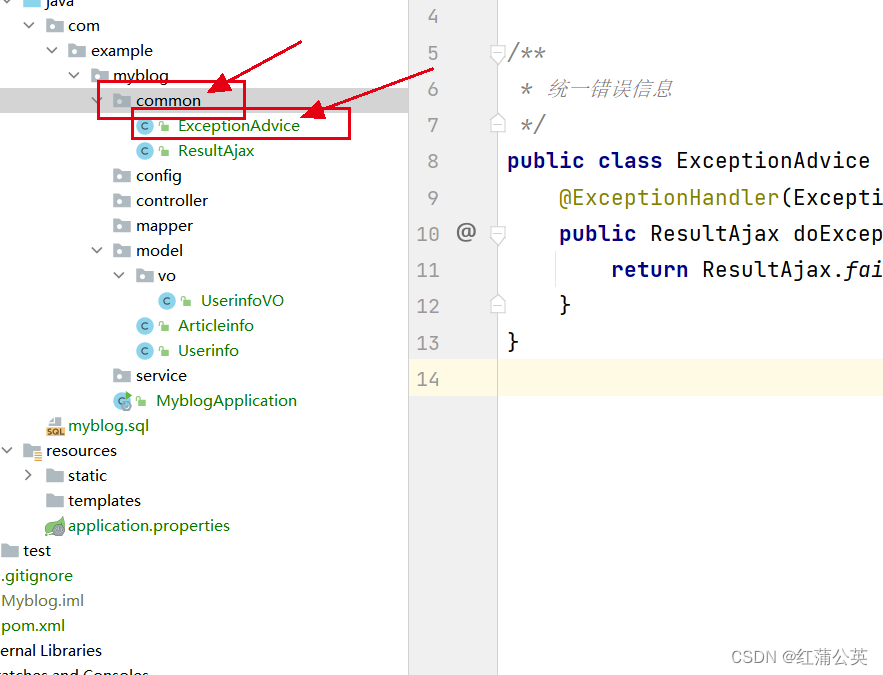
五、统一报错信息
简单而言就是整个系统出现的错误通过这个类进行捕捉
注意:
- @ExceptionHandler:这个方法就会处理类中其他方法(被@RequestMapping注解)抛出的异常。
/**
 * 统一错误信息
 */
public class ExceptionAdvice {
    @ExceptionHandler(Exception.class)
    public ResultAjax doException(Exception e){
        return ResultAjax.fail(-1,e.getMessage());
    }
}


 2398
2398

 被折叠的 条评论
为什么被折叠?
被折叠的 条评论
为什么被折叠?
 到【灌水乐园】发言


