


河南循中网络科技有限公司 - 精心创作,详细分解,按照步骤,均可成功!
学习资料
集成腾讯云COS存储
添加pom依赖
		<!-- 腾讯云cos存储 -->
        <cos_api.version>5.6.89</cos_api.version>
        <!-- alibaba JSON -->
        <fastjson.version>2.0.11</fastjson.version>
        <!-- apache公共基础类 -->
        <commons-lang3.version>3.12.0</commons-lang3.version>
		<!-- 腾讯云cos存储 -->
        <dependency>
            <groupId>com.qcloud</groupId>
            <artifactId>cos_api</artifactId>
            <version>${cos_api.version}</version>
        </dependency>
        <!-- alibaba JSON -->
        <dependency>
            <groupId>com.alibaba</groupId>
            <artifactId>fastjson</artifactId>
            <version>${fastjson.version}</version>
        </dependency>
        <!-- apache公共基础类 -->
        <dependency>
            <groupId>org.apache.commons</groupId>
            <artifactId>commons-lang3</artifactId>
            <version>${commons-lang3.version}</version>
        </dependency>
common的pom文件
<?xml version="1.0" encoding="UTF-8"?>
<project xmlns="http://maven.apache.org/POM/4.0.0" xmlns:xsi="http://www.w3.org/2001/XMLSchema-instance"
         xsi:schemaLocation="http://maven.apache.org/POM/4.0.0 https://maven.apache.org/xsd/maven-4.0.0.xsd">
    <modelVersion>4.0.0</modelVersion>
    <groupId>com.xz</groupId>
    <artifactId>common</artifactId>
    <version>0.0.1-SNAPSHOT</version>
    <name>common</name>
    <description>河南循中网络科技有限公司 - 通用工具</description>

    <!-- 子模块打包类型必须为jar -->
    <packaging>jar</packaging>

    <!-- parent指明继承关系,给出被继承的父项目的具体信息 -->
    <parent>
        <groupId>org.springframework.boot</groupId>
        <artifactId>spring-boot-starter-parent</artifactId>
        <version>2.7.1</version>
        <relativePath/> <!-- lookup parent from repository -->
    </parent>

    <!-- 版本控制 -->
    <properties>
        <java.version>1.8</java.version>
        <!-- 实体类注解 -->
        <lombok.version>1.18.24</lombok.version>
        <!-- swagger -->
        <springfox-boot-starter.version>3.0.0</springfox-boot-starter.version>
        <!-- 腾讯云cos存储 -->
        <cos_api.version>5.6.89</cos_api.version>
        <!-- alibaba JSON -->
        <fastjson.version>2.0.11</fastjson.version>
        <!-- apache公共基础类 -->
        <commons-lang3.version>3.12.0</commons-lang3.version>
    </properties>

    <!-- 引入的jar包 -->
    <dependencies>
        <dependency>
            <groupId>org.springframework.boot</groupId>
            <artifactId>spring-boot-starter-web</artifactId>
        </dependency>

        <dependency>
            <groupId>org.springframework.boot</groupId>
            <artifactId>spring-boot-starter-test</artifactId>
            <scope>test</scope>
        </dependency>

        <!-- 实体类注解 -->
        <dependency>
            <groupId>org.projectlombok</groupId>
            <artifactId>lombok</artifactId>
            <version>${lombok.version}</version>
        </dependency>

        <!-- swagger -->
        <dependency>
            <groupId>io.springfox</groupId>
            <artifactId>springfox-boot-starter</artifactId>
            <version>${springfox-boot-starter.version}</version>
        </dependency>

        <!-- spring boot内置redis -->
        <dependency>
            <groupId>org.springframework.boot</groupId>
            <artifactId>spring-boot-starter-data-redis</artifactId>
        </dependency>

        <!-- 腾讯云cos存储 -->
        <dependency>
            <groupId>com.qcloud</groupId>
            <artifactId>cos_api</artifactId>
            <version>${cos_api.version}</version>
        </dependency>

        <!-- alibaba JSON -->
        <dependency>
            <groupId>com.alibaba</groupId>
            <artifactId>fastjson</artifactId>
            <version>${fastjson.version}</version>
        </dependency>

        <!-- apache公共基础类 -->
        <dependency>
            <groupId>org.apache.commons</groupId>
            <artifactId>commons-lang3</artifactId>
            <version>${commons-lang3.version}</version>
        </dependency>
    </dependencies>

    <build>
        <plugins>
            <plugin>
                <groupId>org.springframework.boot</groupId>
                <artifactId>spring-boot-maven-plugin</artifactId>
            </plugin>
        </plugins>
    </build>

</project>
yaml配置
#腾讯云COS存储
tencentCosUtil:
  secretId: 开发者拥有的项目身份识别 ID,用于身份认证,可在 API 密钥管理 页面获取
  secretKey: 开发者拥有的项目身份密钥,可在 API 密钥管理 页面获取
  bucketName: 存储桶名称格式,用户在使用 API、SDK 时,需要按照此格式填写存储桶名称。例如 examplebucket-1250000000,含义为该存储桶 examplebucket 归属于 APPID 为1250000000的用户
  accessUrl: 存储桶配置管理中访问域名的URL
创建TencentCosUtil工具类
由于上传文件时form-data更节省流量,而base64的原始是3字节转换成4字节,也就是把24bit转换成4个6bit,然后6bit再自己补位,最后占据的是32bit,所以原来的体积是base64体积的3/4,故而放弃base64上传文件,只使用form-data方式上传。
package com.xz.cos;

import com.qcloud.cos.COSClient;
import com.qcloud.cos.ClientConfig;
import com.qcloud.cos.auth.BasicCOSCredentials;
import com.qcloud.cos.auth.COSCredentials;
import com.qcloud.cos.http.HttpProtocol;
import com.qcloud.cos.model.PutObjectRequest;
import com.qcloud.cos.region.Region;
import org.apache.commons.lang3.RandomStringUtils;
import org.springframework.beans.factory.annotation.Value;
import org.springframework.stereotype.Component;
import org.springframework.web.multipart.MultipartFile;

import javax.servlet.ServletContext;
import java.io.File;
import java.io.FileOutputStream;
import java.text.SimpleDateFormat;
import java.util.Date;

/**
 * 腾讯COS存储
 */
@Component
public class TencentCosUtil {

    private static String secretId;
    private static String secretKey;
    private static String bucketName;
    private static String accessUrl;

    @Value("${tencentCosUtil.secretId}")
    public void setSecretId(String secretId){
        this.secretId = secretId;
    }
    @Value("${tencentCosUtil.secretKey}")
    public void setSecretKey(String secretKey){
        this.secretKey = secretKey;
    }
    @Value("${tencentCosUtil.bucketName}")
    public void setBucketName(String bucketName){
        this.bucketName = bucketName;
    }
    @Value("${tencentCosUtil.accessUrl}")
    public void setAccessUrl(String accessUrl){
        this.accessUrl = accessUrl;
    }

    /**
     * 上传文件
     * @param fileMul
     * @param cosPath COS上传路径,示例:/upload/file/
     * @param context
     * @throws Exception
     * @return
     */
    public static String uploadFile(MultipartFile fileMul, String cosPath,ServletContext context) throws Exception{
        //临时文件路径
        String temporaryFile = context.getRealPath("/") +"/upload"+"/temporaryFile";
        //效验临时文件是否存在
        File localFile = new File(temporaryFile);
        if (!localFile.exists()) {
            //临时文件不存在,创造临时文件
            localFile.mkdirs();
        }
        //创造临时文件名称
        String fileName = fileMul.getOriginalFilename();
        String name = "/" + RandomStringUtils.randomNumeric(6)+System.currentTimeMillis()+System.nanoTime()+RandomStringUtils.randomNumeric(6)+fileName.substring(fileName.lastIndexOf('.'));
        //创造临时文件图片
        temporaryFile = temporaryFile+name;
        FileOutputStream fos;
        fos = new FileOutputStream(temporaryFile);
        fos.write(fileMul.getBytes());
        fos.flush();
        fos.close();
        // 使用COS
        File file = new File(temporaryFile);
        // 1 初始化用户身份信息(secretId, secretKey)。
        // SECRETID和SECRETKEY请登录访问管理控制台 https://console.cloud.tencent.com/cam/capi 进行查看和管理
        COSCredentials cred = new BasicCOSCredentials(secretId, secretKey);
        // 2 设置 bucket 的地域, COS 地域的简称请参照 https://cloud.tencent.com/document/product/436/6224
        // clientConfig 中包含了设置 region, https(默认 http), 超时, 代理等 set 方法, 使用可参见源码或者常见问题 Java SDK 部分。
        Region region = new Region("ap-shanghai");
        ClientConfig clientConfig = new ClientConfig(region);
        // 这里建议设置使用 https 协议
        // 从 5.6.54 版本开始,默认使用了 https
        clientConfig.setHttpProtocol(HttpProtocol.https);
        // 3 生成 cos 客户端。
        COSClient cosClient = new COSClient(cred, clientConfig);
        //格式化时间
        SimpleDateFormat sdf = new SimpleDateFormat("yyyyMMdd");
        PutObjectRequest putObjectRequest = new PutObjectRequest(bucketName, cosPath+sdf.format(new Date())+name, file);
        cosClient.putObject(putObjectRequest);
        String saveUrl = accessUrl+putObjectRequest.getKey();
        // 删除用户上传临时文件
        File localImgFile = new File(temporaryFile);
        localImgFile.delete();
        return saveUrl;
    }
}
创建TencentCosController类
package com.xz.controller;

import com.alibaba.fastjson.JSONObject;
import com.xz.cos.TencentCosUtil;
import io.swagger.annotations.Api;
import io.swagger.annotations.ApiOperation;
import org.slf4j.Logger;
import org.slf4j.LoggerFactory;
import org.springframework.web.bind.annotation.PostMapping;
import org.springframework.web.bind.annotation.RestController;
import org.springframework.web.multipart.MultipartFile;
import org.springframework.web.multipart.MultipartHttpServletRequest;

import javax.annotation.Resource;
import javax.servlet.http.HttpServletRequest;
import javax.servlet.http.HttpServletResponse;

@Api(tags = "腾讯云COS存储")
@RestController
public class TencentCosController {

    private Logger logger = LoggerFactory.getLogger(this.getClass());

    @Resource
    private TencentCosUtil tencentCosUtil;

    @ApiOperation(value = "上传文件,form-data方式,传值file",notes = "上传文件,form-data方式,传值file")
    @PostMapping(value = "/uploadFile")
    public JSONObject uploadFile(HttpServletRequest req, HttpServletResponse res) {
        JSONObject data = new JSONObject();
        try{
            MultipartHttpServletRequest mreq = (MultipartHttpServletRequest) req;
            MultipartFile file = mreq.getFile("file");
            if (file.getSize() > 0) {
                String path = "/upload/file/";
                String fileUrl = tencentCosUtil.uploadFile(file, path, req.getServletContext());
                data.put("code",200);
                data.put("fileUrl",fileUrl);
                return data;
            }else{
                data.put("code",400);
                data.put("msg","请上传文件");
                return data;
            }
        }catch (Exception e){
            e.printStackTrace();
            logger.error(e.getMessage());
            data.put("code",500);
            data.put("msg","网络开小差了...");
            return data;
        }
    }
}
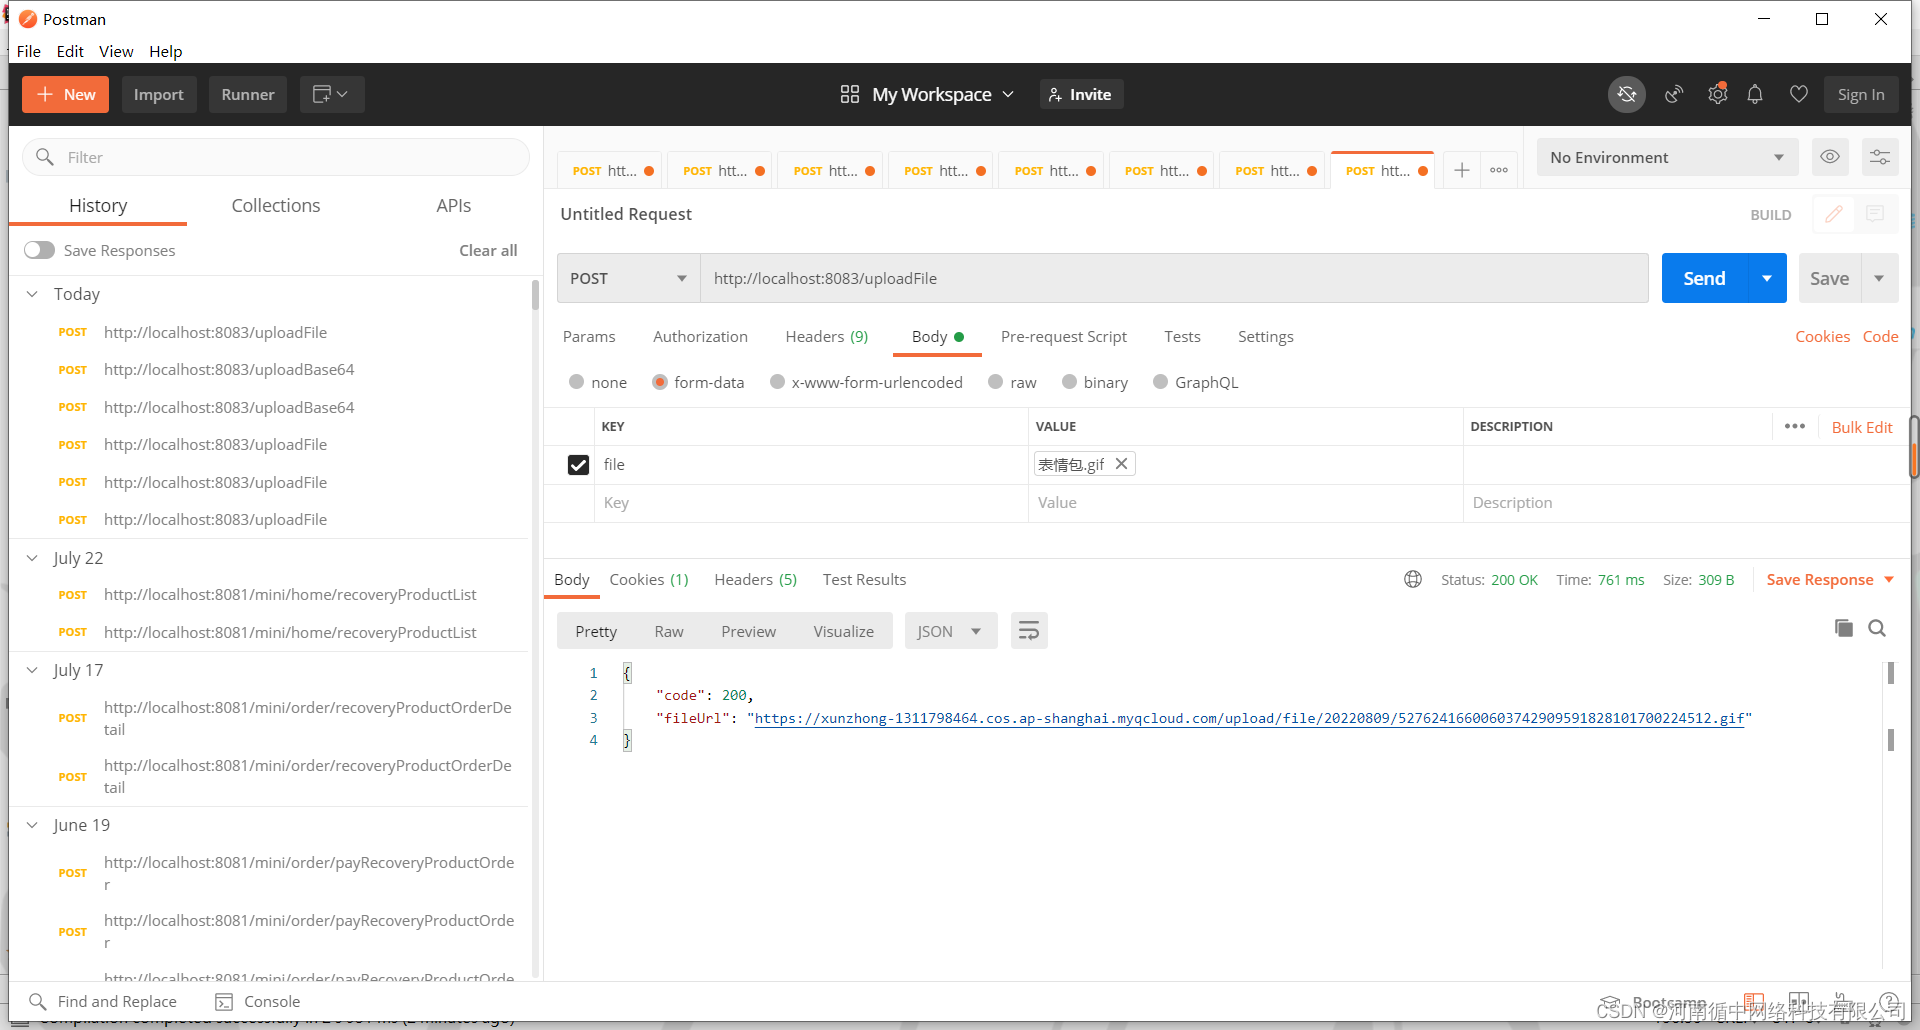
测试结果


 1461
1461


 被折叠的 条评论
为什么被折叠?
被折叠的 条评论
为什么被折叠?
 到【灌水乐园】发言


