


apisix外部插件介绍+apisix自定义JAVA插件实战
1 外部插件概述
1.1 什么是 External Plugin 和 Plugin Runner
APISIX 支持使用 Lua 语言编写插件,这种类型的插件在 APISIX 内部执行。 有时候你想使用其他语言来开发插件,因此,APISIX 支持以 Sidecar 的方式加载和运行你写的插件。 这里的 Sidecar 就是 Plugin Runner,你写的插件叫做 External Plugin。
1.2 外部插件是如何工作的

当你在 APISIX 中配置了一个 Plugin Runner,APISIX 将以子进程的方式运行该 Plugin Runner。
该子进程与 APISIX 进程从属相同用户。当重启或者重新加载 APISIX 时,该 Plugin Runner 也将被重启。
一旦你为指定路由配置了 ext-plugin-* 插件, 匹配该路由的请求将触发从 APISIX 到 Plugin Runner 的 RPC 调用。
Plugin Runner 将处理该 RPC 调用,在其侧创建一个请求,运行 External Plugin 并将结果返回给 APISIX。
External Plugin 及其执行顺序在这里 ext-plugin-* 配置。与其他插件一样,External Plugin 可以动态启用和重新配置。
1.3 外部插件是如何实现的
1.3.1 前置条件
运行 extern 插件的每个请求都将通过 Unix 套接字上的连接触发 RPC 到 Plugin Runner。RPC 的数据使用 Flatbuffers 进行序列化。
因此,Plugin Runner 需要:
- 在 Unix 套接字上处理连接
- 支持 Flatbuffers
- 在 https://github.com/api7/ext-plugin-proto/ 中使用原型和生成的代码
1.3.2 监听路径
APISIX 会将 Unix 套接字的路径作为环境变量APISIX_LISTEN_ADDRESS传递给 Plugin Runner。因此,运行程序需要在启动期间读取该值并侦听该地址。
1.3.3 注册插件
Plugin Runner 应该能够加载以特定语言编写的插件。
1.3.4 处理 RPC
RPC有两种类型:PrepareConf & HTTPReqCall
1.3.4.1 处理 PrepareConf
由于人们可以在 APISIX 这边配置 extern 插件,我们需要一种方法将插件配置同步到 Plugin Runner。
当有配置需要同步到 Plugin Runner 时,我们会通过 PrepareConf RPC 调用发送。Plugin Runner 应该能够处理调用并将配置存储在缓存中,然后返回代表配置的唯一 conf 令牌。
在前面的设计中,幂等密钥随配置一起发送。此字段已弃用,Plugin Runner 可以安全地忽略它。
运行具有特定配置的插件的请求将在 RPC 调用中带有特定的 conf 令牌,并且 Plugin Runner 应通过该令牌查找实际配置。
当配置被修改时,APISIX 会向 Plugin Runner 发送一个新的 PrepareConf。目前,无法通知 Plugin Runner 配置已删除。因此,我们引入了另一个环境变量APISIX_CONF_EXPIRE_TIME作为 conf 缓存过期时间。Plugin Runner 应该能够缓存 conf 的时间比APISIX_CONF_EXPIRE_TIME略长,如果APISIX_CONF_EXPIRE_TIME秒钟后配置仍然存在,APISIX 将发送另一个 PrepareConf 来刷新缓存。
1.3.4.2 处理 HTTPReqCall
运行 extern 插件的每个请求都将触发 HTTPReqCall。HTTPReqCall 几乎是 HTTP 请求的序列化版本,外加一个 conf 令牌。Plugin Runner 需要通过 HTTPReqCall RPC 调用的响应来告诉 APISIX 要更新什么。
有时 Plugin Runner 中的插件需要知道一些不属于 HTTPReqCall 请求的信息,比如请求开始时间和 APISIX 中的路由 ID。因此,Plugin Runner 需要回复一条ExtraInfo消息,作为发送 HTTPReqCall 请求的连接的响应。APISIX 将读取ExtraInfo消息并返回询问的信息。
目前,ExtraInfo包含以下信息 :
- variable value
- request body
HTTPReqCall 进程的流程为:
APISIX sends HTTPReqCall
Plugin Runner looks up the plugin configuration by the token in HTTPReqCall
(optional) loop:
    Plugin Runner asks for ExtraInfo
    APISIX replies the ExtraInfo
Plugin Runner replies HTTPReqCall
1.4 支持的 Plugin Runner
- Java: https://github.com/apache/apisix-java-plugin-runner
- Go: https://github.com/apache/apisix-go-plugin-runner
- Python: https://github.com/apache/apisix-python-plugin-runner
- JavaScript: https://github.com/zenozeng/apisix-javascript-plugin-runner
2 JAVA插件
2.1 如何编写java自定义插件
2.1.1 过滤器名称
请求会通过 APISIX 上动态配置的过滤器。 例如,如果在 APISIX 上完成了以下配置
curl http://127.0.0.1:9080/apisix/admin/routes/1 -H 'X-API-KEY: edd1c9f034335f136f87ad84b625c8f1' -X PUT -d '
{
    "uri":"/hello",
    "plugins":{
        "ext-plugin-pre-req":{
            "conf":[
                {
                    "name":"FooFilter",
                    "value":"bar"
                }
            ]
        }
    },
    "upstream":{
        "nodes":{
            "127.0.0.1:1980":1
        },
        "type":"roundrobin"
    }
}'
apisix-java-plugin-runner 会寻找名为FooFilter 的过滤器, 每个 filter 的实现类名称是其重写方法 public String name()的返回值。
2.1.2 需要实现的过滤器方法
- String name();
说明: 返回插件过滤器的名称
代码示例:
@Override
  public String name() {
      return "FooFilter";
  }
void filter(HttpRequest request, HttpResponse response, PluginFilterChain chain);
描述:实现自定义业务逻辑
代码示例:
@Override
  public void filter(HttpRequest request, HttpResponse response, PluginFilterChain chain) {
      // get conf of current filter
      String configStr = request.getConfig(this);
      Gson gson = new Gson();
      Map<String, Object> conf = new HashMap<>();
      // convert according to the actual configured conf type
      conf = gson.fromJson(configStr, conf.getClass());

      // get extra info
      String remoteAddr = request.getVars("remote_addr");
      String serverPort = request.getVars("server_port");
      String body = request.getBody();

      chain.filter(request, response);
  }
- List requiredVars();
描述:提前声明当前过滤器中要使用的 nginx 变量
代码示例:
@Override
  public List<String> requiredVars() {
      List<String> vars = new ArrayList<>();
      vars.add("remote_addr");
      vars.add("server_port");
      return vars;
  }
Boolean requiredBody();
描述:当前 Filter 中是否需要请求体,true 表示是。
代码示例:
@Override
  public Boolean requiredBody() {
      return true;
  }
2.1.3 重写请求
如果在 implementation 类的 filter 链中执行以下函数调用
- request.getConfig() 请求
- request.setPath()
- request.setHeader()
- request.setArg()
这意味着要重写当前请求,上游服务器将收到 此处重写了相关参数。
2.1.4 停止请求
如果在 implementation 类的 filter 链中执行以下函数调用
- response.setStatusCode()
- 响应.setHeader()
- response.setBody()
这意味着要停止当前请求,客户端将收到 此处生成的相关参数。
2.1.5 获取上游响应和流程
您可以重写函数postFilter 获取源上游响应 , 您还可以设置 PostResponse 去重写上游响应并将其返回给客户端。
PostRequest 请求
- request.getConfig() 请求
- request.getUpstreamHeaders()
- request.getUpstreamStatusCode()
- request.getBody()
PostResponse 响应
- response.setStatusCode()
- 响应.setHeader()
- response.setBody()
2.2 运行方式
apisix-java-plugin-runner 可以单独运行,也可以与 Apache APISIX 捆绑运行。 这取决于你是需要调试它还是运行它。
2.2.1 调试模式
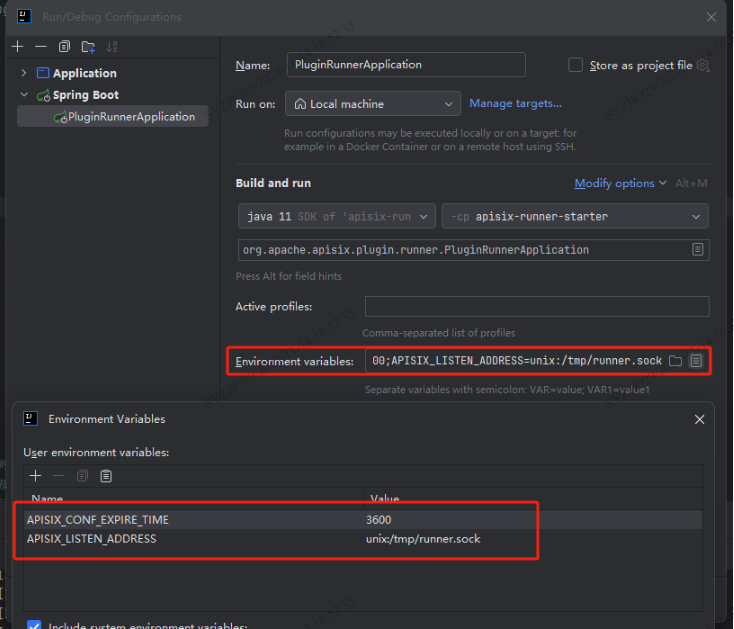
如果你正在开发一个新的插件,并且需要调试代码,那么你可以运行主类 PluginRunnerApplication。 在开始之前,您需要设置以下两个环境变量:
- APISIX_LISTEN_ADDRESS:apisix-java-plugin-runner 和 APISIX 用于进程间通信(Unix Domain Socket)套接字类型地址。 并且不需要主动创建这个文件,apisix-java-plugin-runner 会在启动时自动创建这个文件。
- APISIX_CONF_EXPIRE_TIME:APISIX 的配置缓存在 apisix-java-plugin-runner 进程中的时间。
例如,如果你以 jar 包的形式启动 apisix-java-plugin-runner,则按如下方式传递环境变量
java -jar -DAPISIX_LISTEN_ADDRESS=unix:/tmp/runner.sock -DAPISIX_CONF_EXPIRE_TIME=3600 /path/to/apisix-java-plugin-runner.jar
注意:请参考下文Run模式获取apisix-java-plugin-runner.jar 。
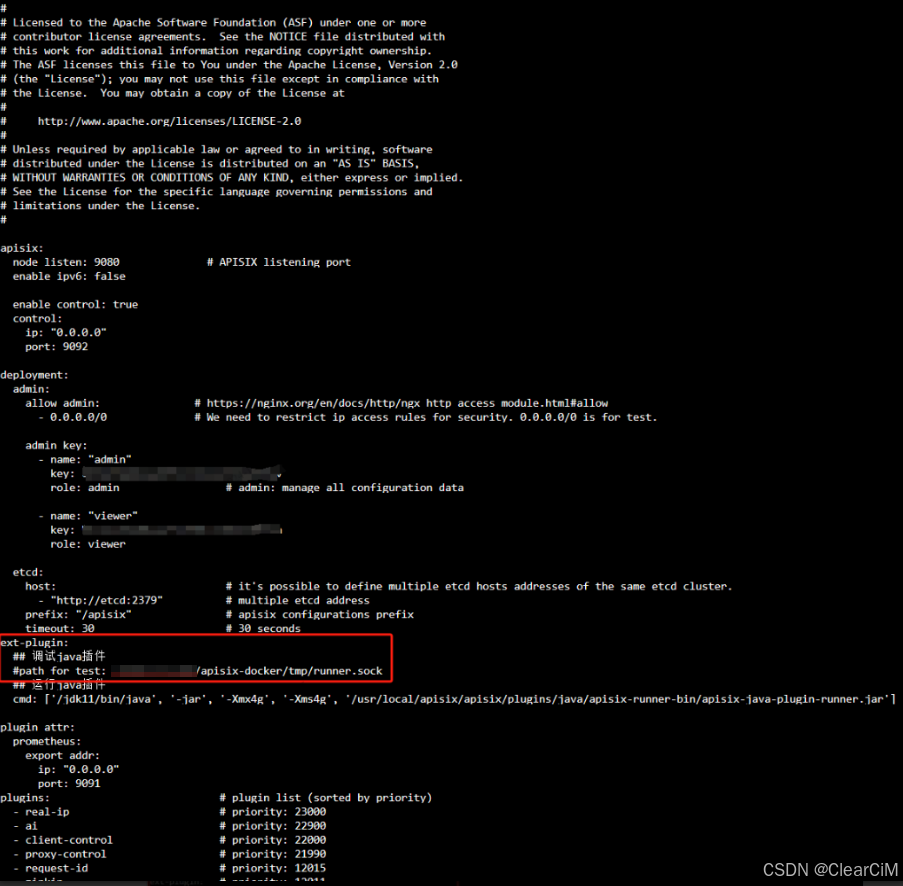
并在 APISIX 的文件config.yaml中添加以下配置
ext-plugin:
  path_for_test: /tmp/runner.sock
/tmp/runner.sock是 apisix-java-plugin-runner APISIX 在进程之间通信的UNIX套节字,必须保持一致。
注意:如果您看到一些错误日志,例如
phase_func(): failed to connect to the unix socket unix:/tmp/runner.sock: permission denied
在 APISIX 的error.log中,你可以更改此文件的权限进行调试,执行
chmod 766 /tmp/runner.sock
要获取更详细的调试信息,您可以修改日志的输出级别。 在 runner-starter/src/main/resources/application.yaml 中配置日志级别,如下所示 (对项目文件的任何更改都需要重新执行./mvnw package package)
logging:
  level:
    root: debug
2.2.2 Run模式
在 Run 模式下无需设置环境变量,执行
cd /path/to/apisix-java-plugin-runner
 ./mvnw package
要将 apisix-java-plugin-runner 构建为 jar 包,那么您将看到目录dist
cd dist
tar -zxvf apache-apisix-java-plugin-runner-0.4.0-bin.tar.gz
目录中的 files 布局如下dist
dist
├── apache-apisix-java-plugin-runner-0.4.0-bin.tar.gz
└── apisix-runner-bin
    ├── apisix-java-plugin-runner.jar
    ├── bin
    │   ├── shutdown.sh
    │   └── startup.sh
    ├── LICENSE
    ├── NOTICE
    └── README.md
然后在 APISIX 的config.yaml文件中添加如下配置
ext-plugin:
  cmd: ['java', '-jar', '-Xmx4g', '-Xms4g', '/path/to/apisix-runner-bin/apisix-java-plugin-runner.jar']
2.3 apisix java插件运行器内部
2.3.1 概述
apisix-java-plugin-runner 设计为使用 netty 构建的 TCP 服务器, 它为用户提供了一个实现的接口。PluginFilter
用户只需要关注自己的业务逻辑,而不需要关注 apisix java 插件 runner 如何与 APISIX 通信的细节。
下图描述了它们之间的进程间通信。
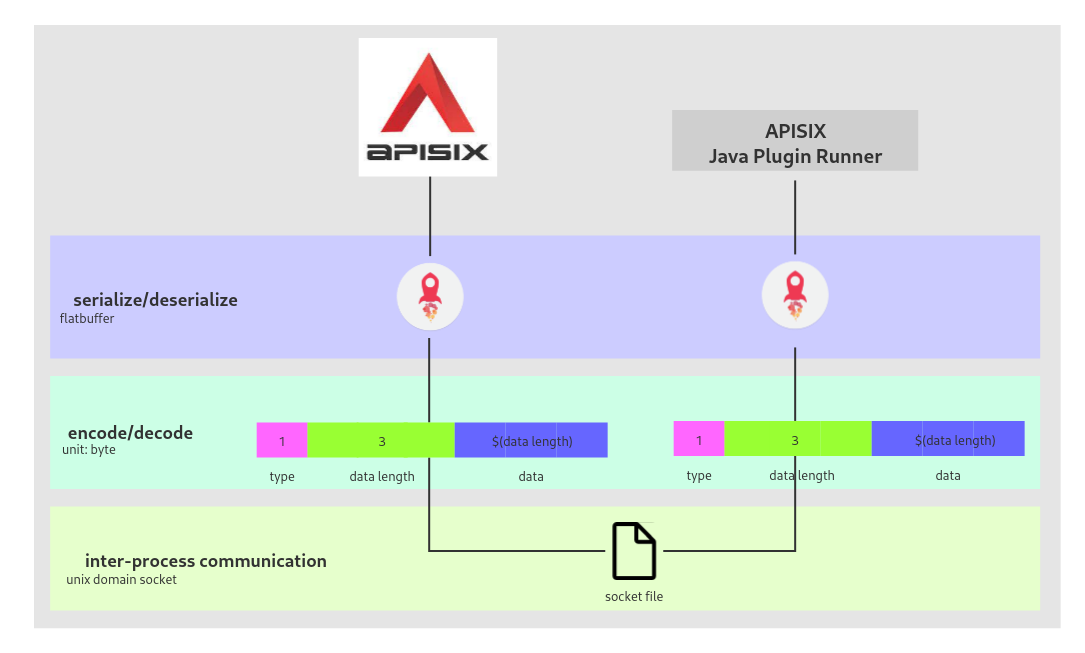
2.3.2 通信
apisix-java-plugin-runner 和 APISIX 使用 Unix Domain Socket 进行进程间通信, 因此,它们需要部署在同一个实例中。
apisix-java-plugin-runner 由 APISIX 管理。APISIX 在启动时启动 apisix-java-plugin-runner,在启动时结束 apisix-java-plugin-runner 结束。如果 apisix-java-plugin-runner 中途退出,APISIX 会自动重启。
2.3.3 序列化
请参阅 flatbuffers
FlatBuffers 是一个跨平台的序列化库,其架构旨在实现最大的内存效率。 它允许您直接访问序列化数据,而无需先解析/解包,同时仍然具有出色的向前/向后兼容性。
您可以参考 ext-plugin.fbs 架构文件,了解 Lua 和 Java 如何布局序列化对象。
2.3.4 编/解码器
apisix-java-plugin-runner 和 APISIX 使用私有二进制协议进行编码和解码。 协议格式为
1 byte of type + 3 bytes of length + data
类型可以是 0 ~ 7,长度可以是 [0, 8M]。数据的长度由长度决定。
当前类型采用以下值
- 0 表示错误
- 1 表示 prepare_conf
- 2 表示 http_req_call
flatbuffer 序列化生成的二进制数据被放置在数据段中。
2.4 安装部署
2.4.1 前置条件
- JDK 11 版本
- APISIX 主分支
- 请参阅 Debug 构建调试环境。
2.4.2 安装
- 使用 Spring Boot 创建一个简单的 Web 应用程序,并选择 Maven 作为构建工具。
- 在 POM 中添加 apisix-java-plugin-runner 依赖项,例如:
<dependency>
    <groupId>org.apache.apisix</groupId>
    <artifactId>apisix-runner-starter</artifactId>
    <version>0.4.0</version>
</dependency>
- 配置扫描包路径
@SpringBootApplication(scanBasePackages = {"your-filter's-package-name","org.apache.apisix.plugin.runner"})
- 排除默认日志记录框架
要防止多个 slf4j 绑定,请在pom.xml中排除 logback-classic 和 log4j-to-slf4j ,例如:
<dependency>
    <groupId>org.springframework.boot</groupId>
    <artifactId>spring-boot-starter</artifactId>
    <exclusions>
           <exclusion>
                <groupId>ch.qos.logback</groupId>
                <artifactId>logback-classic</artifactId>
           </exclusion>
           <exclusion>
                <groupId>org.apache.logging.log4j</groupId>
                <artifactId>log4j-to-slf4j</artifactId>
           </exclusion>
    </exclusions>
</dependency>
5.配置 Unix Domain Socket 与 APISIX 通信的地址
socket.file = /tmp/runner.sock
6.实现PluginFilter接口
编写自定义插件时,需要实现PluginFilter接口和使用 @Component 将过滤器注入 Spring Boot 的对象生命周期管理中。
代码示例:
@Component
public class RewriteRequestDemoFilter implements PluginFilter {
  ......
  implementing functions
}
2.5 实战场景化插件开发演示(JAVA)
2.5.1 token解析,根据解析结果转发路由(上游)
java插件不支持直接修改上游,可以通过转发路由的方式修改上游,新建/nginx-web1、/nginx-web2两个路由绑定其他上游,作为转发上游的demo示例
2.5.1.1 下载Plugin Runner
源码地址:https://github.com/apache/apisix-java-plugin-runner.git
2.5.1.2 编写插件代码
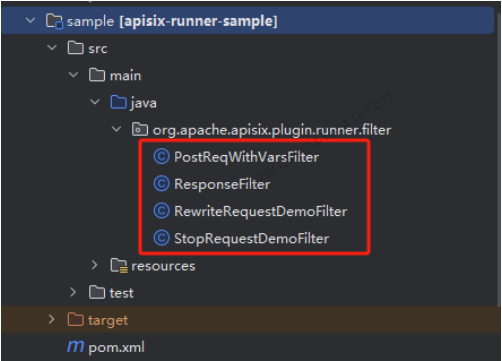
参考脚手架中sample模块的样例代码,新建 CheckTokenAndRewriteFilter 类用作远程调用接口验证token,根据解析结果转发不同路由,注意新建的Filter类需要在 runner-starter 模块的 package org.apache.apisix.plugin.runner.filter 下,如果建在别的路径下需要手动添加扫描包路径
示例代码如下:
CheckTokenAndRewriteFilter类
package org.apache.apisix.plugin.runner.filter;

import com.alibaba.fastjson.JSON;
import com.alibaba.fastjson.JSONObject;
import com.google.gson.Gson;
import org.apache.apisix.plugin.runner.HttpRequest;
import org.apache.apisix.plugin.runner.HttpResponse;
import org.apache.apisix.plugin.runner.model.JsonData;
import org.apache.apisix.plugin.runner.model.query.CheckTokenAndRewriteQuery;
import org.apache.apisix.plugin.runner.model.query.RequestConversionQuery;
import org.apache.apisix.plugin.runner.util.RestTemplateUtils;
import org.slf4j.Logger;
import org.slf4j.LoggerFactory;
import org.springframework.beans.factory.annotation.Autowired;
import org.springframework.http.HttpHeaders;
import org.springframework.http.HttpStatus;
import org.springframework.http.ResponseEntity;
import org.springframework.stereotype.Component;
import org.springframework.util.StringUtils;

import java.util.ArrayList;
import java.util.HashMap;
import java.util.List;
import java.util.Map;

/**
 * @Author :clearci
 * @Date :2024/11/8
 * @Description :远程调用接口验证token,根据解析结果转发不同路由插件
 */

@Component
public class CheckTokenAndRewriteFilter implements PluginFilter {
    private final Logger logger = LoggerFactory.getLogger(CheckTokenAndRewriteFilter.class);


    @Autowired
    public RestTemplateUtils restTemplateUtils;

    @Override
    public String name() {
        /* 建议保持过滤器的名称与类名称相同。
         配置要在 apisix 的路由上执行的 filter,格式如下(注意value中的json需要做字符串转义,此处为了参考示例的可读性并没有转义)

        {
            "uri": "/hello",
            "plugins": {
                "ext-plugin-pre-req": {
                    "conf": [{
                        "name": "RewriteRequestDemoFilter",
                        "value": "{
                            "validateHeader": "Authorization",//token取值
                            "validateUrl": "http://xxxxxxx",//校验token的api接口
                            "stopResponseCode": "500",//终止请求返回的响应码
                            "stopResponseBody": {//终止请求返回的body信息
                                "code": "500",
                                "msg": "解析token异常"
                            },
                            "stopResponseHeaderName": "route",//终止请求的头信息name
                            "stopResponseHeaderValue": "web1",//终止请求的头信息value
                            "validateSystem": "system1"//校验token的系统平台
                        }"
                    }]
                }
            },
            "upstream": {
                "nodes": {
                    "127.0.0.1:1980": 1
                },
                "type": "roundrobin"
            }
        }

        配置中 name 的值对应于此处的 return 值。
         */

        return "CheckTokenAndRewriteFilter";
    }

    @Override
    public void filter(HttpRequest request, HttpResponse response, PluginFilterChain chain) {
        /*
         * 如果您配置的 conf 是 json 类型,您可以将其转换为 Map 或 json。
         */

        logger.info("CheckTokenAndRewriteFilter---request: {}", JSON.toJSONString(request));
        String configStr = request.getConfig(this);
        logger.info("CheckTokenAndRewriteFilter---configStr: {}", configStr);
        Gson gson = new Gson();
        CheckTokenAndRewriteQuery checkTokenAndRewriteQuery = gson.fromJson(configStr, CheckTokenAndRewriteQuery.class);

        if (checkTokenAndRewriteQuery != null) {

            //校验token的系统平台
            String validateSystem = checkTokenAndRewriteQuery.getValidateSystem();
            JSONObject jsonRes = checkToken(validateSystem, request, checkTokenAndRewriteQuery.getValidateHeader(), checkTokenAndRewriteQuery.getValidateUrl());
            if (jsonRes == null) {
                //终止请求的返回响应码
                response.setStatusCode(Double.valueOf(checkTokenAndRewriteQuery.getStopResponseCode()).intValue());
                //终止请求的返回响应头信息
                response.setHeader(checkTokenAndRewriteQuery.getStopResponseHeaderName(), checkTokenAndRewriteQuery.getStopResponseHeaderValue());
                //终止请求的返回响应体
                response.setBody(JSON.toJSONString(checkTokenAndRewriteQuery.getStopResponseBody()));
                chain.filter(request, response);
                return;
            } else {//这里分别调用若依和业务系统,校验代码先写死校验用户名
                if ("ruoyi".equals(validateSystem)) {
                    if (jsonRes.get("user") != null) {
                        JSONObject userJson = JSON.parseObject(JSON.toJSONString(jsonRes.get("user")));
                        logger.info("jsonRes.get(\"user\") != null : userJson: {}", JSON.toJSONString(userJson));
                        if (userJson.get("userName") != null) {
                            String userName = userJson.get("userName").toString();
                            logger.info("userJson.get(\"userName\") != null : userName---" + userName);
                            switch (userName) {
                                case "admin":
                                    logger.info("case admin ----- /nginx-web1");
                                    request.setPath("/nginx-web1");//java插件不支持直接修改上游,可以通过转发路由的方式修改上游
                                    break;
                                case "zhangsan":
                                    logger.info("case zhangsan----- /nginx-web2");
                                    request.setPath("/nginx-web2");
                                    break;
                                default:
                                    throw new IllegalStateException("Unexpected value sslRequired: ");
                            }
                            chain.filter(request, response);
                            return;
                        }
                    }
                } else if ("system1".equals(validateSystem)) {
                    if (jsonRes.get("username") != null) {
                        String userName = jsonRes.get("username").toString();
                        logger.info("jsonRes.get(\"username\") != null : username---" + userName);
                        switch (userName) {
                            case "admin":
                                logger.info("case admin ----- /nginx-web1");
                                request.setPath("/nginx-web1");
                                break;
                            case "zhangsan":
                                logger.info("case zhangsan----- /nginx-web2");
                                request.setPath("/nginx-web2");
                                break;
                            default:
                                throw new IllegalStateException("Unexpected value sslRequired: ");
                        }
                        chain.filter(request, response);
                        return;
                    }
                }

            }
        }

        chain.filter(request, response);
    }

    /**
     * 如果你需要在当前插件中获取一些 Nginx 变量,则需要在此函数中声明它们。
     *
     * @return 此插件中需要调用的 Nginx 变量列表
     */
    @Override
    public List<String> requiredVars() {
        List<String> vars = new ArrayList<>();
        vars.add("remote_addr");
        vars.add("server_port");
        return vars;
    }

    /**
     * 如果你需要在当前插件中获取请求体,则需要在此函数中返回 true。
     */
    @Override
    public Boolean requiredBody() {
        return true;
    }

    /**
     * 校验token
     */
    public JSONObject checkToken(String validateSystem, HttpRequest request, String validateHeader, String validateUrl) {
        // token验证
        String token = request.getHeader("authorization");

        logger.info("request.getHeader------token: {}" + JSON.toJSONString(token));
        HttpHeaders headers = new HttpHeaders();

        // 请求验证
        String url = validateUrl;
        JSONObject jsonObj = null;
        if ("system1".equals(validateSystem)) {
            if (!StringUtils.isEmpty(token) && token.startsWith("Bearer ")) {
                token = token.replace("Bearer ", "");
            }
            url += "?access_token=" + token;
            try {
                ResponseEntity<Object> responseData = restTemplateUtils.get(url, headers, Object.class);
                logger.info("checkToken : responseData" + JSON.toJSONString(responseData));
                if (responseData.getStatusCode() == HttpStatus.OK) {
                    // 验证结果
                    jsonObj = JSON.parseObject(JSON.toJSONString(responseData.getBody()));
                    logger.info("checkToken : jsonObj" + JSON.toJSONString(responseData));
                }
            } catch (Exception e) {
                logger.info("request-----------error: {}" + e.getMessage());
            }
        } else {
            headers.add(validateHeader, token);
            try {
                ResponseEntity<JsonData> responseData = restTemplateUtils.get(url, headers, JsonData.class);
                logger.info("checkToken : responseData" + JSON.toJSONString(responseData));
                if (responseData.getStatusCode() == HttpStatus.OK
                        && "200".equals(responseData.getBody().getCode())) {
                    // 验证结果
                    jsonObj = JSON.parseObject(JSON.toJSONString(responseData.getBody().getData()));
                    logger.info("checkToken : jsonObj" + JSON.toJSONString(responseData));
                }
            } catch (Exception e) {
                logger.info("request-----------error: {}" + e.getMessage());
            }
        }

        return jsonObj;
    }

}
CheckTokenAndRewriteQuery
package org.apache.apisix.plugin.runner.model.query;


/**
 * @ClassName: CheckTokenAndRewriteQuery
 * @Author: clearci
 * @Date: 13:47 2024/11/8
 * @description: CheckTokenAndRewriteQuery
 **/

public class CheckTokenAndRewriteQuery {

    /** token对应header取值  */
    private String validateHeader;

    /** 校验token的api接口  */
    private String validateUrl;

    /** 终止请求返回的响应码  */
    private String stopResponseCode;

    /** 终止请求返回的body信息  */
    private Object stopResponseBody;

    /** 终止请求的返回响应头信息name  */
    private String stopResponseHeaderName;

    /** 终止请求的返回响应头信息value  */
    private String stopResponseHeaderValue;


    /** 校验token的系统平台  */
    private String validateSystem;


    public String getValidateHeader() {
        return validateHeader;
    }

    public void setValidateHeader(String validateHeader) {
        this.validateHeader = validateHeader;
    }

    public String getValidateUrl() {
        return validateUrl;
    }

    public void setValidateUrl(String validateUrl) {
        this.validateUrl = validateUrl;
    }

    public String getStopResponseCode() {
        return stopResponseCode;
    }

    public void setStopResponseCode(String stopResponseCode) {
        this.stopResponseCode = stopResponseCode;
    }

    public String getValidateSystem() {
        return validateSystem;
    }

    public void setValidateSystem(String validateSystem) {
        this.validateSystem = validateSystem;
    }

    public String getStopResponseHeaderName() {
        return stopResponseHeaderName;
    }

    public void setStopResponseHeaderName(String stopResponseHeaderName) {
        this.stopResponseHeaderName = stopResponseHeaderName;
    }

    public String getStopResponseHeaderValue() {
        return stopResponseHeaderValue;
    }

    public void setStopResponseHeaderValue(String stopResponseHeaderValue) {
        this.stopResponseHeaderValue = stopResponseHeaderValue;
    }

    public Object getStopResponseBody() {
        return stopResponseBody;
    }

    public void setStopResponseBody(Object stopResponseBody) {
        this.stopResponseBody = stopResponseBody;
    }
}
RestTemplateConfig
package org.apache.apisix.plugin.runner.config;
import org.apache.http.Header;
import org.apache.http.client.HttpClient;
import org.apache.http.client.config.RequestConfig;
import org.apache.http.config.Registry;
import org.apache.http.config.RegistryBuilder;
import org.apache.http.conn.socket.ConnectionSocketFactory;
import org.apache.http.conn.socket.PlainConnectionSocketFactory;
import org.apache.http.conn.ssl.SSLConnectionSocketFactory;
import org.apache.http.impl.client.DefaultConnectionKeepAliveStrategy;
import org.apache.http.impl.client.DefaultHttpRequestRetryHandler;
import org.apache.http.impl.client.HttpClientBuilder;
import org.apache.http.impl.conn.PoolingHttpClientConnectionManager;
import org.apache.http.message.BasicHeader;
import org.springframework.beans.factory.annotation.Value;
import org.springframework.context.annotation.Bean;
import org.springframework.context.annotation.Configuration;
import org.springframework.http.client.ClientHttpRequestFactory;
import org.springframework.http.client.HttpComponentsClientHttpRequestFactory;
import org.springframework.web.client.RestTemplate;

import java.util.ArrayList;
import java.util.List;

@Configuration
public class RestTemplateConfig {

    @Value("${http.maxTotal}")
    private Integer maxTotal;

    @Value("${http.defaultMaxPerRoute}")
    private Integer defaultMaxPerRoute;

    @Value("${http.connectTimeout}")
    private Integer connectTimeout;

    @Value("${http.connectionRequestTimeout}")
    private Integer connectionRequestTimeout;

    @Value("${http.socketTimeout}")
    private Integer socketTimeout;

    @Value("${http.staleConnectionCheckEnabled}")
    private boolean staleConnectionCheckEnabled;

    @Value("${http.validateAfterInactivity}")
    private Integer validateAfterInactivity;

    @Bean
    public RestTemplate restTemplate() {
        return new RestTemplate(httpRequestFactory());
    }

    /**
     * 使用 Apache HttpClient 作为底层客户端
     * 效率: OkHttp > Apache HttpClient > JDK HttpURLConnection
     */
    @Bean
    public ClientHttpRequestFactory httpRequestFactory() {
        return new HttpComponentsClientHttpRequestFactory(httpClient());
    }

    @Bean
    public HttpClient httpClient() {
        Registry<ConnectionSocketFactory> registry = RegistryBuilder.<ConnectionSocketFactory>create()
                .register("http", PlainConnectionSocketFactory.getSocketFactory())
                .register("https", SSLConnectionSocketFactory.getSocketFactory())
                .build();
        PoolingHttpClientConnectionManager connectionManager = new PoolingHttpClientConnectionManager(registry);
        connectionManager.setMaxTotal(maxTotal); // 最大连接数
        connectionManager.setDefaultMaxPerRoute(defaultMaxPerRoute);    // 单个路由最大连接数
        connectionManager.setValidateAfterInactivity(validateAfterInactivity); // 最大空间时间

        RequestConfig requestConfig = RequestConfig.custom()
                .setSocketTimeout(socketTimeout)        // 服务器返回数据(response)的时间,超过抛出read timeout
                .setConnectTimeout(connectTimeout)      // (握手成功)的时间,超出抛出connect timeout
                .setStaleConnectionCheckEnabled(staleConnectionCheckEnabled) // 提交前检测是否可用
                .setConnectionRequestTimeout(connectionRequestTimeout)// 从连接池中获取连接的超时时间,超时间未拿到可用连接,会抛出org.apache.http.conn.ConnectionPoolTimeoutException: Timeout waiting for connection from pool
                .build();
        // headers
        List<Header> headers = new ArrayList<>();
        headers.add(new BasicHeader("User-Agent", "Mozilla/5.0 (Windows NT 6.1) AppleWebKit/537.36 (KHTML, like Gecko) Chrome/31.0.1650.16 Safari/537.36"));
        headers.add(new BasicHeader("Accept-Encoding", "gzip,deflate"));
        headers.add(new BasicHeader("Accept-Language", "zh-CN"));
        headers.add(new BasicHeader("Connection", "Keep-Alive"));
        headers.add(new BasicHeader("Content-type", "application/json;charset=UTF-8"));
        return HttpClientBuilder.create()
                .setDefaultRequestConfig(requestConfig)
                .setConnectionManager(connectionManager)
                .setDefaultHeaders(headers)
                // 保持长连接配置,需要在头添加Keep-Alive
                .setKeepAliveStrategy(new DefaultConnectionKeepAliveStrategy())
                // 重试次数,默认是3次,没有开启
                .setRetryHandler(new DefaultHttpRequestRetryHandler(2, true))
                .build();
    }
}
RestTemplateUtils
package org.apache.apisix.plugin.runner.util;
import java.nio.charset.StandardCharsets;
import java.util.Map;
import org.springframework.beans.factory.annotation.Autowired;
import org.springframework.http.HttpEntity;
import org.springframework.http.HttpHeaders;
import org.springframework.http.HttpMethod;
import org.springframework.http.ResponseEntity;
import org.springframework.http.converter.StringHttpMessageConverter;
import org.springframework.stereotype.Component;
import org.springframework.web.client.RestTemplate;
/**
* @author: clearci
* @date: 2024/11/8 10:39
* @description:
*/
@Component
public class RestTemplateUtils {
// 固定的url访问对象 类似JdbcTemplate
@Autowired
private RestTemplate restTemplate;
// ----------------------------------GET-------------------------------------------------------
private RestTemplateUtils() {
//此方法为无参构造方法
}
/**
* GET请求调用方式
*
* @param url
* 请求URL
* @param responseType
* 返回对象类型
* @return ResponseEntity 响应对象封装类
*/
public <T> ResponseEntity<T> get(String url, Class<T> responseType) {
return restTemplate.getForEntity(url, responseType);
}
/**
* GET请求调用方式
*
* @param url
* 请求URL
* @param responseType
* 返回对象类型
* @param uriVariables
* URL中的变量,按顺序依次对应
* @return ResponseEntity 响应对象封装类
*/
public <T> ResponseEntity<T> get(String url, Class<T> responseType, Object... uriVariables) {
return restTemplate.getForEntity(url, responseType, uriVariables);
}
/**
* GET请求调用方式
*
* @param url
* 请求URL
* @param responseType
* 返回对象类型
* @param uriVariables
* URL中的变量,与Map中的key对应
* @return ResponseEntity 响应对象封装类
*/
public <T> ResponseEntity<T> get(String url, Class<T> responseType, Map<String, ?> uriVariables) {
return restTemplate.getForEntity(url, responseType, uriVariables);
}
/**
* 带请求头的GET请求调用方式
*
* @param url
* 请求URL
* @param headers
* 请求头参数
* @param responseType
* 返回对象类型
* @param uriVariables
* URL中的变量,按顺序依次对应
* @return ResponseEntity 响应对象封装类
*/
public <T> ResponseEntity<T> get(String url, Map<String, String> headers, Class<T> responseType,
Object... uriVariables) {
HttpHeaders httpHeaders = new HttpHeaders();
httpHeaders.setAll(headers);
return get(url, httpHeaders, responseType, uriVariables);
}
/**
* 带请求头的GET请求调用方式
*
* @param url
* 请求URL
* @param headers
* 请求头参数
* @param responseType
* 返回对象类型
* @param uriVariables
* URL中的变量,按顺序依次对应
* @return ResponseEntity 响应对象封装类
*/
public <T> ResponseEntity<T> get(String url, HttpHeaders headers, Class<T> responseType,
Object... uriVariables) {
HttpEntity<?> requestEntity = new HttpEntity<>(headers);
return exchange(url, HttpMethod.GET, requestEntity, responseType, uriVariables);
}
/**
* 带请求头的GET请求调用方式
*
* @param url
* 请求URL
* @param headers
* 请求头参数
* @param responseType
* 返回对象类型
* @param uriVariables
* URL中的变量,与Map中的key对应
* @return ResponseEntity 响应对象封装类
*/
public <T> ResponseEntity<T> get(String url, Map<String, String> headers, Class<T> responseType,
Map<String, ?> uriVariables) {
HttpHeaders httpHeaders = new HttpHeaders();
httpHeaders.setAll(headers);
return get(url, httpHeaders, responseType, uriVariables);
}
/**
* 带请求头的GET请求调用方式
*
* @param url
* 请求URL
* @param headers
* 请求头参数
* @param responseType
* 返回对象类型
* @param uriVariables
* URL中的变量,与Map中的key对应
* @return ResponseEntity 响应对象封装类
*/
public <T> ResponseEntity<T> get(String url, HttpHeaders headers, Class<T> responseType,
Map<String, ?> uriVariables) {
HttpEntity<?> requestEntity = new HttpEntity<>(headers);
return exchange(url, HttpMethod.GET, requestEntity, responseType, uriVariables);
}
// ----------------------------------POST-------------------------------------------------------
/**
* POST请求调用方式
*
* @param url
* 请求URL
* @param responseType
* 返回对象类型
* @return
*/
public <T> ResponseEntity<T> post(String url, Class<T> responseType) {
return restTemplate.postForEntity(url, HttpEntity.EMPTY, responseType);
}
/**
* POST请求调用方式
*
* @param url
* 请求URL
* @param requestBody
* 请求参数体
* @param responseType
* 返回对象类型
* @return ResponseEntity 响应对象封装类
*/
public <T> ResponseEntity<T> post(String url, Object requestBody, Class<T> responseType) {
return restTemplate.postForEntity(url, requestBody, responseType);
}
/**
* POST请求调用方式
*
* @param url
* 请求URL
* @param requestBody
* 请求参数体
* @param responseType
* 返回对象类型
* @param uriVariables
* URL中的变量,按顺序依次对应
* @return ResponseEntity 响应对象封装类
*/
public <T> ResponseEntity<T> post(String url, Object requestBody, Class<T> responseType,
Object... uriVariables) {
return restTemplate.postForEntity(url, requestBody, responseType, uriVariables);
}
/**
* POST请求调用方式
*
* @param url
* 请求URL
* @param requestBody
* 请求参数体
* @param responseType
* 返回对象类型
* @param uriVariables
* URL中的变量,与Map中的key对应
* @return ResponseEntity 响应对象封装类
*/
public <T> ResponseEntity<T> post(String url, Object requestBody, Class<T> responseType,
Map<String, ?> uriVariables) {
return restTemplate.postForEntity(url, requestBody, responseType, uriVariables);
}
/**
* 带请求头的POST请求调用方式
*
* @param url
* 请求URL
* @param headers
* 请求头参数
* @param requestBody
* 请求参数体
* @param responseType
* 返回对象类型
* @param uriVariables
* URL中的变量,按顺序依次对应
* @return ResponseEntity 响应对象封装类
*/
public <T> ResponseEntity<T> post(String url, Map<String, String> headers, Object requestBody,
Class<T> responseType, Object... uriVariables) {
HttpHeaders httpHeaders = new HttpHeaders();
httpHeaders.setAll(headers);
return post(url, httpHeaders, requestBody, responseType, uriVariables);
}
/**
* 带请求头的POST请求调用方式
*
* @param url
* 请求URL
* @param headers
* 请求头参数
* @param requestBody
* 请求参数体
* @param responseType
* 返回对象类型
* @param uriVariables
* URL中的变量,按顺序依次对应
* @return ResponseEntity 响应对象封装类
*/
public <T> ResponseEntity<T> post(String url, HttpHeaders headers, Object requestBody, Class<T> responseType,
Object... uriVariables) {
HttpEntity<Object> requestEntity = new HttpEntity<>(requestBody, headers);
return post(url, requestEntity, responseType, uriVariables);
}
/**
* 带请求头的POST请求调用方式
*
* @param url
* 请求URL
* @param headers
* 请求头参数
* @param requestBody
* 请求参数体
* @param responseType
* 返回对象类型
* @param uriVariables
* URL中的变量,与Map中的key对应
* @return ResponseEntity 响应对象封装类
*/
public <T> ResponseEntity<T> post(String url, Map<String, String> headers, Object requestBody,
Class<T> responseType, Map<String, ?> uriVariables) {
HttpHeaders httpHeaders = new HttpHeaders();
httpHeaders.setAll(headers);
return post(url, httpHeaders, requestBody, responseType, uriVariables);
}
/**
* 带请求头的POST请求调用方式
*
* @param url
* 请求URL
* @param headers
* 请求头参数
* @param requestBody
* 请求参数体
* @param responseType
* 返回对象类型
* @param uriVariables
* URL中的变量,与Map中的key对应
* @return ResponseEntity 响应对象封装类
*/
public <T> ResponseEntity<T> post(String url, HttpHeaders headers, Object requestBody, Class<T> responseType,
Map<String, ?> uriVariables) {
HttpEntity<Object> requestEntity = new HttpEntity<>(requestBody, headers);
return post(url, requestEntity, responseType, uriVariables);
}
/**
* 自定义请求头和请求体的POST请求调用方式
*
* @param url
* 请求URL
* @param requestEntity
* 请求头和请求体封装对象
* @param responseType
* 返回对象类型
* @param uriVariables
* URL中的变量,按顺序依次对应
* @return ResponseEntity 响应对象封装类
*/
public <T> ResponseEntity<T> post(String url, HttpEntity<?> requestEntity, Class<T> responseType,
Object... uriVariables) {
return restTemplate.exchange(url, HttpMethod.POST, requestEntity, responseType, uriVariables);
}
/**
* 自定义请求头和请求体的POST请求调用方式
*
* @param url
* 请求URL
* @param requestEntity
* 请求头和请求体封装对象
* @param responseType
* 返回对象类型
* @param uriVariables
* URL中的变量,与Map中的key对应
* @return ResponseEntity 响应对象封装类
*/
public <T> ResponseEntity<T> post(String url, HttpEntity<?> requestEntity, Class<T> responseType,
Map<String, ?> uriVariables) {
return restTemplate.exchange(url, HttpMethod.POST, requestEntity, responseType, uriVariables);
}
// ----------------------------------PUT-------------------------------------------------------
/**
* PUT请求调用方式
*
* @param url
* 请求URL
* @param responseType
* 返回对象类型
* @param uriVariables
* URL中的变量,按顺序依次对应
* @return ResponseEntity 响应对象封装类
*/
public <T> ResponseEntity<T> put(String url, Class<T> responseType, Object... uriVariables) {
return put(url, HttpEntity.EMPTY, responseType, uriVariables);
}
/**
* PUT请求调用方式
*
* @param url
* 请求URL
* @param requestBody
* 请求参数体
* @param responseType
* 返回对象类型
* @param uriVariables
* URL中的变量,按顺序依次对应
* @return ResponseEntity 响应对象封装类
*/
public <T> ResponseEntity<T> put(String url, Object requestBody, Class<T> responseType,
Object... uriVariables) {
HttpEntity<Object> requestEntity = new HttpEntity<>(requestBody);
return put(url, requestEntity, responseType, uriVariables);
}
/**
* PUT请求调用方式
*
* @param url
* 请求URL
* @param requestBody
* 请求参数体
* @param responseType
* 返回对象类型
* @param uriVariables
* URL中的变量,与Map中的key对应
* @return ResponseEntity 响应对象封装类
*/
public <T> ResponseEntity<T> put(String url, Object requestBody, Class<T> responseType,
Map<String, ?> uriVariables) {
HttpEntity<Object> requestEntity = new HttpEntity<>(requestBody);
return put(url, requestEntity, responseType, uriVariables);
}
/**
* 带请求头的PUT请求调用方式
*
* @param url
* 请求URL
* @param headers
* 请求头参数
* @param requestBody
* 请求参数体
* @param responseType
* 返回对象类型
* @param uriVariables
* URL中的变量,按顺序依次对应
* @return ResponseEntity 响应对象封装类
*/
public <T> ResponseEntity<T> put(String url, Map<String, String> headers, Object requestBody,
Class<T> responseType, Object... uriVariables) {
HttpHeaders httpHeaders = new HttpHeaders();
httpHeaders.setAll(headers);
return put(url, httpHeaders, requestBody, responseType, uriVariables);
}
/**
* 带请求头的PUT请求调用方式
*
* @param url
* 请求URL
* @param headers
* 请求头参数
* @param requestBody
* 请求参数体
* @param responseType
* 返回对象类型
* @param uriVariables
* URL中的变量,按顺序依次对应
* @return ResponseEntity 响应对象封装类
*/
public <T> ResponseEntity<T> put(String url, HttpHeaders headers, Object requestBody, Class<T> responseType,
Object... uriVariables) {
HttpEntity<Object> requestEntity = new HttpEntity<>(requestBody, headers);
return put(url, requestEntity, responseType, uriVariables);
}
/**
* 带请求头的PUT请求调用方式
*
* @param url
* 请求URL
* @param headers
* 请求头参数
* @param requestBody
* 请求参数体
* @param responseType
* 返回对象类型
* @param uriVariables
* URL中的变量,与Map中的key对应
* @return ResponseEntity 响应对象封装类
*/
public <T> ResponseEntity<T> put(String url, Map<String, String> headers, Object requestBody,
Class<T> responseType, Map<String, ?> uriVariables) {
HttpHeaders httpHeaders = new HttpHeaders();
httpHeaders.setAll(headers);
return put(url, httpHeaders, requestBody, responseType, uriVariables);
}
/**
* 带请求头的PUT请求调用方式
*
* @param url
* 请求URL
* @param headers
* 请求头参数
* @param requestBody
* 请求参数体
* @param responseType
* 返回对象类型
* @param uriVariables
* URL中的变量,与Map中的key对应
* @return ResponseEntity 响应对象封装类
*/
public <T> ResponseEntity<T> put(String url, HttpHeaders headers, Object requestBody, Class<T> responseType,
Map<String, ?> uriVariables) {
HttpEntity<Object> requestEntity = new HttpEntity<>(requestBody, headers);
return put(url, requestEntity, responseType, uriVariables);
}
/**
* 自定义请求头和请求体的PUT请求调用方式
*
* @param url
* 请求URL
* @param requestEntity
* 请求头和请求体封装对象
* @param responseType
* 返回对象类型
* @param uriVariables
* URL中的变量,按顺序依次对应
* @return ResponseEntity 响应对象封装类
*/
public <T> ResponseEntity<T> put(String url, HttpEntity<?> requestEntity, Class<T> responseType,
Object... uriVariables) {
return restTemplate.exchange(url, HttpMethod.PUT, requestEntity, responseType, uriVariables);
}
/**
* 自定义请求头和请求体的PUT请求调用方式
*
* @param url
* 请求URL
* @param requestEntity
* 请求头和请求体封装对象
* @param responseType
* 返回对象类型
* @param uriVariables
* URL中的变量,与Map中的key对应
* @return ResponseEntity 响应对象封装类
*/
public <T> ResponseEntity<T> put(String url, HttpEntity<?> requestEntity, Class<T> responseType,
Map<String, ?> uriVariables) {
return restTemplate.exchange(url, HttpMethod.PUT, requestEntity, responseType, uriVariables);
}
// ----------------------------------DELETE-------------------------------------------------------
/**
* DELETE请求调用方式
*
* @param url
* 请求URL
* @param responseType
* 返回对象类型
* @param uriVariables
* URL中的变量,按顺序依次对应
* @return ResponseEntity 响应对象封装类
*/
public <T> ResponseEntity<T> delete(String url, Class<T> responseType, Object... uriVariables) {
return delete(url, HttpEntity.EMPTY, responseType, uriVariables);
}
/**
* DELETE请求调用方式
*
* @param url
* 请求URL
* @param responseType
* 返回对象类型
* @param uriVariables
* URL中的变量,与Map中的key对应
* @return ResponseEntity 响应对象封装类
*/
public <T> ResponseEntity<T> delete(String url, Class<T> responseType, Map<String, ?> uriVariables) {
return delete(url, HttpEntity.EMPTY, responseType, uriVariables);
}
/**
* DELETE请求调用方式
*
* @param url
* 请求URL
* @param requestBody
* 请求参数体
* @param responseType
* 返回对象类型
* @param uriVariables
* URL中的变量,按顺序依次对应
* @return ResponseEntity 响应对象封装类
*/
public <T> ResponseEntity<T> delete(String url, Object requestBody, Class<T> responseType,
Object... uriVariables) {
HttpEntity<Object> requestEntity = new HttpEntity<>(requestBody);
return delete(url, requestEntity, responseType, uriVariables);
}
/**
* DELETE请求调用方式
*
* @param url
* 请求URL
* @param requestBody
* 请求参数体
* @param responseType
* 返回对象类型
* @param uriVariables
* URL中的变量,与Map中的key对应
* @return ResponseEntity 响应对象封装类
*/
public <T> ResponseEntity<T> delete(String url, Object requestBody, Class<T> responseType,
Map<String, ?> uriVariables) {
HttpEntity<Object> requestEntity = new HttpEntity<>(requestBody);
return delete(url, requestEntity, responseType, uriVariables);
}
/**
* 带请求头的DELETE请求调用方式
*
* @param url
* 请求URL
* @param headers
* 请求头参数
* @param responseType
* 返回对象类型
* @param uriVariables
* URL中的变量,按顺序依次对应
* @return ResponseEntity 响应对象封装类
*/
public <T> ResponseEntity<T> delete(String url, Map<String, String> headers, Class<T> responseType,
Object... uriVariables) {
HttpHeaders httpHeaders = new HttpHeaders();
httpHeaders.setAll(headers);
return delete(url, httpHeaders, responseType, uriVariables);
}
/**
* 带请求头的DELETE请求调用方式
*
* @param url
* 请求URL
* @param headers
* 请求头参数
* @param responseType
* 返回对象类型
* @param uriVariables
* URL中的变量,按顺序依次对应
* @return ResponseEntity 响应对象封装类
*/
public <T> ResponseEntity<T> delete(String url, HttpHeaders headers, Class<T> responseType,
Object... uriVariables) {
HttpEntity<Object> requestEntity = new HttpEntity<>(headers);
return delete(url, requestEntity, responseType, uriVariables);
}
/**
* 带请求头的DELETE请求调用方式
*
* @param url
* 请求URL
* @param headers
* 请求头参数
* @param responseType
* 返回对象类型
* @param uriVariables
* URL中的变量,与Map中的key对应
* @return ResponseEntity 响应对象封装类
*/
public <T> ResponseEntity<T> delete(String url, Map<String, String> headers, Class<T> responseType,
Map<String, ?> uriVariables) {
HttpHeaders httpHeaders = new HttpHeaders();
httpHeaders.setAll(headers);
return delete(url, httpHeaders, responseType, uriVariables);
}
/**
* 带请求头的DELETE请求调用方式
*
* @param url
* 请求URL
* @param headers
* 请求头参数
* @param responseType
* 返回对象类型
* @param uriVariables
* URL中的变量,与Map中的key对应
* @return ResponseEntity 响应对象封装类
*/
public <T> ResponseEntity<T> delete(String url, HttpHeaders headers, Class<T> responseType,
Map<String, ?> uriVariables) {
HttpEntity<Object> requestEntity = new HttpEntity<>(headers);
return delete(url, requestEntity, responseType, uriVariables);
}
/**
* 带请求头的DELETE请求调用方式
*
* @param url
* 请求URL
* @param headers
* 请求头参数
* @param requestBody
* 请求参数体
* @param responseType
* 返回对象类型
* @param uriVariables
* URL中的变量,按顺序依次对应
* @return ResponseEntity 响应对象封装类
*/
public <T> ResponseEntity<T> delete(String url, Map<String, String> headers, Object requestBody,
Class<T> responseType, Object... uriVariables) {
HttpHeaders httpHeaders = new HttpHeaders();
httpHeaders.setAll(headers);
return delete(url, httpHeaders, requestBody, responseType, uriVariables);
}
/**
* 带请求头的DELETE请求调用方式
*
* @param url
* 请求URL
* @param headers
* 请求头参数
* @param requestBody
* 请求参数体
* @param responseType
* 返回对象类型
* @param uriVariables
* URL中的变量,按顺序依次对应
* @return ResponseEntity 响应对象封装类
*/
public <T> ResponseEntity<T> delete(String url, HttpHeaders headers, Object requestBody,
Class<T> responseType, Object... uriVariables) {
HttpEntity<Object> requestEntity = new HttpEntity<>(requestBody, headers);
return delete(url, requestEntity, responseType, uriVariables);
}
/**
* 带请求头的DELETE请求调用方式
*
* @param url
* 请求URL
* @param headers
* 请求头参数
* @param requestBody
* 请求参数体
* @param responseType
* 返回对象类型
* @param uriVariables
* URL中的变量,与Map中的key对应
* @return ResponseEntity 响应对象封装类
*/
public <T> ResponseEntity<T> delete(String url, Map<String, String> headers, Object requestBody,
Class<T> responseType, Map<String, ?> uriVariables) {
HttpHeaders httpHeaders = new HttpHeaders();
httpHeaders.setAll(headers);
return delete(url, httpHeaders, requestBody, responseType, uriVariables);
}
/**
* 带请求头的DELETE请求调用方式
*
* @param url
* 请求URL
* @param headers
* 请求头参数
* @param requestBody
* 请求参数体
* @param responseType
* 返回对象类型
* @param uriVariables
* URL中的变量,与Map中的key对应
* @return ResponseEntity 响应对象封装类
*/
public <T> ResponseEntity<T> delete(String url, HttpHeaders headers, Object requestBody,
Class<T> responseType, Map<String, ?> uriVariables) {
HttpEntity<Object> requestEntity = new HttpEntity<>(requestBody, headers);
return delete(url, requestEntity, responseType, uriVariables);
}
/**
* 自定义请求头和请求体的DELETE请求调用方式
*
* @param url
* 请求URL
* @param requestEntity
* 请求头和请求体封装对象
* @param responseType
* 返回对象类型
* @param uriVariables
* URL中的变量,按顺序依次对应
* @return ResponseEntity 响应对象封装类
*/
public <T> ResponseEntity<T> delete(String url, HttpEntity<?> requestEntity, Class<T> responseType,
Object... uriVariables) {
return restTemplate.exchange(url, HttpMethod.DELETE, requestEntity, responseType, uriVariables);
}
/**
* 自定义请求头和请求体的DELETE请求调用方式
*
* @param url
* 请求URL
* @param requestEntity
* 请求头和请求体封装对象
* @param responseType
* 返回对象类型
* @param uriVariables
* URL中的变量,与Map中的key对应
* @return ResponseEntity 响应对象封装类
*/
public <T> ResponseEntity<T> delete(String url, HttpEntity<?> requestEntity, Class<T> responseType,
Map<String, ?> uriVariables) {
return restTemplate.exchange(url, HttpMethod.DELETE, requestEntity, responseType, uriVariables);
}
// ----------------------------------通用方法-------------------------------------------------------
/**
* 通用调用方式
*
* @param url
* 请求URL
* @param method
* 请求方法类型
* @param requestEntity
* 请求头和请求体封装对象
* @param responseType
* 返回对象类型
* @param uriVariables
* URL中的变量,按顺序依次对应
* @return ResponseEntity 响应对象封装类
*/
public <T> ResponseEntity<T> exchange(String url, HttpMethod method, HttpEntity<?> requestEntity,
Class<T> responseType, Object... uriVariables) {
return restTemplate.exchange(url, method, requestEntity, responseType, uriVariables);
}
/**
* 通用调用方式
*
* @param url
* 请求URL
* @param method
* 请求方法类型
* @param requestEntity
* 请求头和请求体封装对象
* @param responseType
* 返回对象类型
* @param uriVariables
* URL中的变量,与Map中的key对应
* @return ResponseEntity 响应对象封装类
*/
public <T> ResponseEntity<T> exchange(String url, HttpMethod method, HttpEntity<?> requestEntity,
Class<T> responseType, Map<String, ?> uriVariables) {
return restTemplate.exchange(url, method, requestEntity, responseType, uriVariables);
}
/**
* 获取RestTemplate实例对象,可自由调用其方法
*
* @return RestTemplate实例对象
*/
public RestTemplate getRestTemplate() {
restTemplate.getMessageConverters().set(1,new StringHttpMessageConverter(StandardCharsets.UTF_8));
return restTemplate;
}
}
JsonEnum
package org.apache.apisix.plugin.runner.model;

/**
 * 统一返回结果类枚举 using
 *
 * @author clearci
 * @date 2024/11/08
 */
public enum JsonEnum {
    /**
     * 错误
     */
    ERROR("error", "错误"),
    /**
     * 失败
     */
    FAILURE("failure", "失败"),
    /**
     * 成功
     */
    SUCCESS("success", "成功"),
    /**
     * 无权限
     */
    UNAUTH("unauth", "无权限");

    private String code;

    private String msg;

    JsonEnum(String code, String msg) {
        this.code = code;
        this.msg = msg;
    }

    public String code() {
        return code;
    }

    public String msg() {
        return msg;
    }
}
JsonData
package org.apache.apisix.plugin.runner.model;

/**
 * 统一返回结果类 using
 *
 * @author clearci
 * @date 2024/11/08
 */
public class JsonData {

    @Deprecated
    public static JsonData failure() {
        return new JsonData(JsonEnum.FAILURE, JsonEnum.FAILURE.msg());
    }

    @Deprecated
    public static JsonData failure(String msg) {
        return new JsonData(JsonEnum.FAILURE, msg);
    }

    @Deprecated
    public static JsonData success() {
        return new JsonData(JsonEnum.SUCCESS, JsonEnum.SUCCESS.msg());
    }

    @Deprecated
    public static JsonData success(Object obj) {
        return new JsonData(JsonEnum.SUCCESS, JsonEnum.SUCCESS.msg(), obj);
    }

    private Object appendOne;

    private Object appendThree;

    private Object appendTwo;

    private String buss;

    private String code;

    private Object data;

    private String msg;

    public JsonData() {}

    @Deprecated
    public JsonData(JsonEnum jsonEnum, Object data) {
        this.code = jsonEnum.code();
        this.data = data;
        this.buss = "";
    }

    @Deprecated
    public JsonData(JsonEnum jsonEnum, String msg) {
        this.code = jsonEnum.code();
        this.msg = msg;
        this.buss = "";
    }


    @Deprecated
    public JsonData(JsonEnum jsonEnum, String msg, Object data) {
        this.code = jsonEnum.code();
        this.msg = msg;
        this.data = data;
        this.buss = "";
    }

    /**
     * @return the appendOne
     */
    public Object getAppendOne() {
        return appendOne;
    }

    /**
     * @return the appendThree
     */
    public Object getAppendThree() {
        return appendThree;
    }

    /**
     * @return the appendTwo
     */
    public Object getAppendTwo() {
        return appendTwo;
    }

    public String getBuss() {
        return buss;
    }

    public String getCode() {
        return code;
    }

    public Object getData() {
        return data;
    }

    public String getMsg() {
        return msg;
    }

    /**
     * @param appendOne
     *            the appendOne to set
     */
    public void setAppendOne(Object appendOne) {
        this.appendOne = appendOne;
    }

    /**
     * @param appendThree
     *            the appendThree to set
     */
    public void setAppendThree(Object appendThree) {
        this.appendThree = appendThree;
    }

    /**
     * @param appendTwo
     *            the appendTwo to set
     */
    public void setAppendTwo(Object appendTwo) {
        this.appendTwo = appendTwo;
    }

    public void setBuss(String buss) {
        this.buss = buss;
    }

    public void setCode(String code) {
        this.code = code;
    }

    public void setData(Object data) {
        this.data = data;
    }

    public void setMsg(String msg) {
        this.msg = msg;
    }

}
application.yaml新增配置
http:
  maxTotal: 100         #最大连接数
  defaultMaxPerRoute: 20  #并发数
  connectTimeout: 1000   #创建连接的最长时间
  connectionRequestTimeout: 500  #从连接池中获取到连接的最长时间
  socketTimeout: 10000 #数据传输的最长时间
  staleConnectionCheckEnabled: true  #提交请求前测试连接是否可用
  validateAfterInactivity: 3000000   #可用空闲连接过期时间,重用空闲连接时会先检查是否空闲时间超过这个时间,如果超过,释放socket重新建立
pom.xml新增依赖
<dependency>
     <groupId>org.springframework</groupId>
     <artifactId>spring-web</artifactId>
     <version>6.1.12</version>
 </dependency>
2.5.1.3 调试与运行插件
2.5.1.3.1 前置条件
- epoll 或 kqueue 支持
注意:确保本地调试或运行的环境支持epoll 或 kqueue,apisix-java-plugin-runner不支持在windows下运行 - JDK11
- 与apisix的通信
通过UNIX套节字与apisix通信,需要保证同一环境,具体根据部署方式以及调试还是运行情况而定
2.5.1.3.2 调试插件
以下以linux下使用idea调试java插件为例
- 配置环境变量
idea中配置APISIX_CONF_EXPIRE_TIME与APISIX_LISTEN_ADDRESS
APISIX_LISTEN_ADDRESS:apisix-java-plugin-runner 和 APISIX 用于进程间通信(Unix Domain Socket)套接字类型地址。 并且不需要主动创建这个文件,apisix-java-plugin-runner 会在启动时自动创建这个文件。
APISIX_CONF_EXPIRE_TIME:APISIX 的配置缓存在 apisix-java-plugin-runner 进程中的时间。
- APISIX 的配置文件中添加以下配置
ext-plugin:
  path_for_test: /tmp/runner.sock
- 重启apisix服务,启动apisix-java-plugin-runner即可进行调试
2.5.1.3.3 运行插件
以下以linux下使用docker-compose部署apisix并java插件为例
- 构建jar
运行模式下不用设置环境变量,到工程目录下执行打包即可
cd /path/to/apisix-java-plugin-runner
 ./mvnw package
完成后可以在dist目录下看到打好的包

3. 上传并解压包到指定路径下
tar -zxvf apache-apisix-java-plugin-runner-0.4.0-bin.tar.gz
# 移动到规划的java插件目录中
mv apisix-runner-bin path/apisix-docker/plugins/java/apisix-runner-bin
- 包内file布局如下
dist
├── apache-apisix-java-plugin-runner-0.1.0-bin.tar.gz
└── apisix-runner-bin
    ├── apisix-java-plugin-runner.jar
    ├── LICENSE
    └── NOTICE
- APISIX 的配置文件中添加以下配置
注意前面需要配置jdk11路径
ext-plugin:
  cmd: ['/jdk11/bin/java', '-jar', '-Xmx4g', '-Xms4g', '/usr/local/apisix/apisix/plugins/java/apisix-runner-bin/apisix-java-plugin-runner.jar']
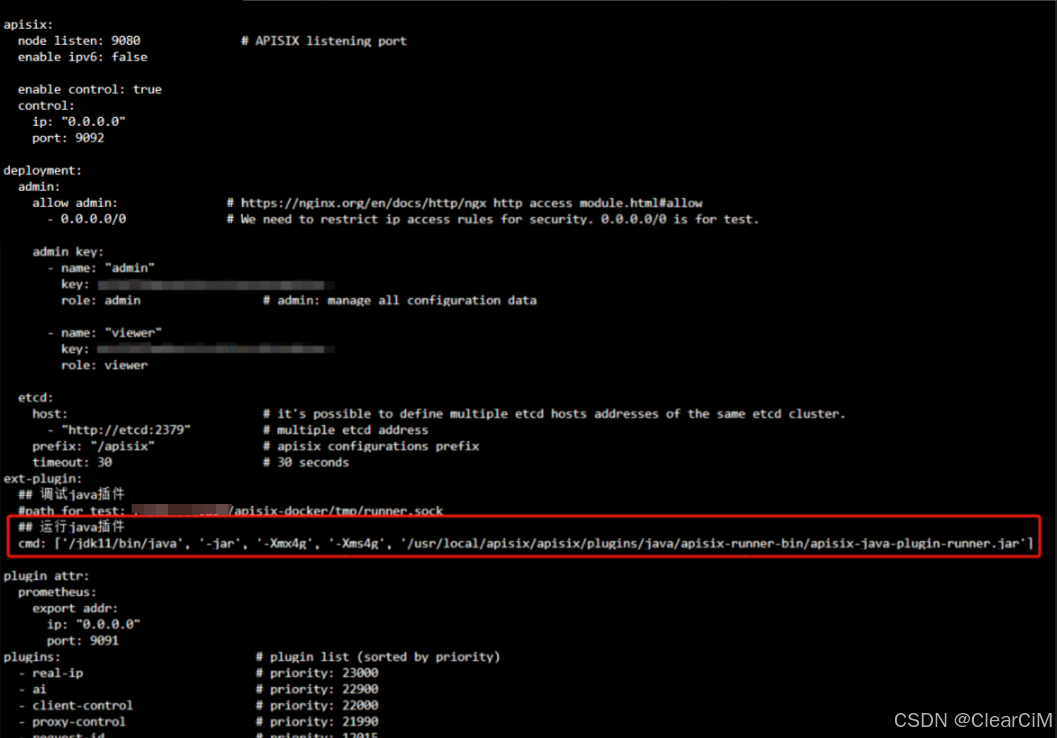
- 修改docker-compose.yml
添加jdk11目录挂载、jar目录挂载
services:
  apisix:
    image: apache/apisix:3.10.0-debian
    environment:
      - TZ=Asia/Shanghai
      - JAVA_HOME=/jdk11
    restart: always
    volumes:
      - ./apisix_conf/config.yaml:/usr/local/apisix/conf/config.yaml:ro
    ## 自定义java插件调试代码时,apisix-java-plugin-runner 和 APISIX 用于进程间通信(Unix Domain Socket)套接字挂载
      - ./tmp/runner.sock:/tmp/runner.sock
    ## java插件映射
      - ./plugins/java/:/usr/local/apisix/apisix/plugins/java/
    ## jdk11,用于运行java插件
      - ./jdk-11.0.25:/jdk11
    depends_on:
      - etcd
    ##network_mode: host
    ports:
      - "9180:9180/tcp"
      - "80:9080/tcp"
      - "9091:9091/tcp"
      - "9443:9443/tcp"
      - "9092:9092/tcp"
    networks:
      apisix:
- 此种方式运行java插件首次需要基于修改的docker-compose重新打镜像,后续修改插件覆盖jar并重启apisix即可,成功运行可以在apisix的日志中看到apisix-java-plugin-runner的打印日志

2.5.1.3.4 使用插件
以下以新开发的CheckTokenAndRewriteFilter为例介绍在apisix中如何使用
- 配置路由
这里直接通过apisix-dashboard的数据编辑器创建路由
{
  "uri": "/test-java-plugins-CheckTokenAndRewriteFilter",
  "name": "test-java-plugins-CheckTokenAndRewriteFilter",
  "methods": [
    "GET",
    "POST",
    "PUT",
    "DELETE",
    "PATCH",
    "HEAD",
    "OPTIONS",
    "CONNECT",
    "TRACE",
    "PURGE"
  ],
  "plugins": {
    "ext-plugin-post-req": {
      "conf": [
        {
          "name": "CheckTokenAndRewriteFilter",
          "value": "{\"validateHeader\":\"Authorization\",\"validateUrl\":\"http://xxxxxx\",\"stopResponseCode\":\"500\",\"stopResponseBody\":{\"code\":\"500\",\"msg\":\"解析token异常\"},\"stopResponseHeaderName\":\"test\",\"stopResponseHeaderValue\":\"test\",\"validateSystem\":\"xxxx\"}"
        }
      ]
    },
    "proxy-rewrite": {
      "uri": "/hello"
    }
  },
  "upstream_id": "540116577329087171",
  "status": 1
}
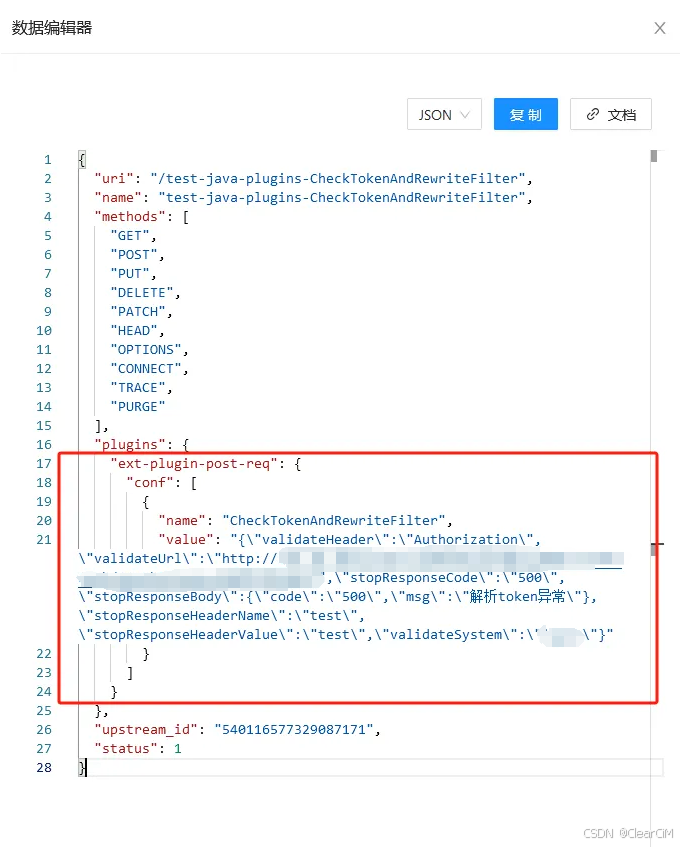
- 配置说明:
使用java插件重点是在plugins下面新增插件配置,插件分类目前主要有三种
ext-plugin-pre-req 插件用于在执行内置 Lua 插件之前在 Plugin Runner 内运行特定的 External Plugin。
ext-plugin-post-req 插件是在内置 Lua 插件执行之后且在请求到达上游之前工作。
ext-plugin-post-resp 插件将在请求获取到上游的响应之后执行。
因为当前路由没有配置其他插件,这里使用ext-plugin-post-req与ext-plugin-pre-req效果一样
conf中的name配置需要与插件中的name保持一致,否则无法调用到插件
conf中的value数据格式需要与插件中配置的保持一致,否则会解析异常,详细信息可见上述开发流程中的代码注释介绍
- 请求路由测试插件
先获取token(略)
curl携带用户1token请求路由
## 系统1用户1
curl http://apisix地址/test-java-plugins-CheckTokenAndRewriteFilter -H 'Authorization:	Bearer eyJhbGciOiJIUzI1NiIsInR5cCI6IkpXVCJ9.eyJleHAiOjE4MTc3OTAwOTAsInVzZXJfbmFtZSI6ImFkbWluIiwiYXV0aG9yaXRpZXMiOlsiUk9MRV9BRE1JTiIsIms4ZGFzaC1hZG1pbiIsIlJPTEVfT1RBX0RFViIsIlJPTEVfVVNFUiJdLCJqdGkiOiIwNWM2MDU5Ny1hOGYwLTRmMTktYjE3NS0yMWJkYWVjZTIxMzYiLCJjbGllbnRfaWQiOiJwaWciLCJzY29wZSI6WyJzZXJ2ZXIiXX0.yF1NN94n1uS4keqmKKSC7HIGZ1VQ-UvUaytZ8To_nAg'
- 响应结果1

curl携带用户2token请求路由
## 系统1用户2
curl http://apisix地址/test-java-plugins-CheckTokenAndRewriteFilter -H 'Authorization: Bearer eyJhbGciOiJIUzI1NiIsInR5cCI6IkpXVCJ9.eyJleHAiOjE4MTc4Njc1OTgsInVzZXJfbmFtZSI6InN5emJvMjkiLCJhdXRob3JpdGllcyI6WyJST0xFX0FETUlOIiwiZGV2ZWxvcGVyIiwiUk9MRV9VU0VSIl0sImp0aSI6Ijk1MmM1MGE3LTEwODItNDliMi04OGJlLWEwMDRjZWNjNjVhOSIsImNsaWVudF9pZCI6InBpZyIsInNjb3BlIjpbInNlcnZlciJdfQ.fcJ2fvx-vG1R2buFgsENrUP71jIrYkskf8UTodqN7Pg'
- 响应结果2

curl不携带token或携带错误token请求路由
##携带错误token
curl http://apisix地址/test-java-plugins-CheckTokenAndRewriteFilter -H 'Authorization: 111111'
- 响应结果3

3 LUA插件
3.1 为什么需要lua插件
3.1.1 开发便捷性
以Java插件开发为例,需要jdk11开发环境,本地需要epoll 或 kqueue 支持,windows下无法运行,极不方便,而lua首先apisix直接具备运行环境,lua语言本身也比较简单,参考官方lua插件可以很快上手自行开发定制化插件。
3.1.2 部署方式
不管是docker单独部署还是通过docker-compose部署亦或是k8s中通过yaml或者helm部署,外部插件需要与apisix运行在同一个实例中,这就要求我们需要把apisix基础镜像+外部插件运行环境打成一个新的镜像,然后再基于自定义镜像运行,以java为例,需要把JDK11与java-plugin-run编译后的jar以及apisix官方基础镜像一起打成docker镜像后基于新打的镜像运行,后续修改插件代码更新还需要重新打镜像,非常不方便。而lua只需要挂载一个目录就行了,甚至能直接使用configmap将整个.lua脚本放进配置中,同时如果只修改了插件内容,可以通过/apisix/admin/plugins/reload直接热加载。
3.1.3 性能
由前文外部插件是如何工作的可以知道,一旦你为指定路由配置了 ext-plugin-* 插件, 匹配该路由的请求将触发从 APISIX 到 Plugin Runner 的 RPC 调用,一定是影响性能的。而lua插件是运行在 Lua VM 中的,自定义开发的lua插件和apisix官方插件运行方式没有区别,apisix会默认加载 /user/local/apisix/plugins 下的插件,插件可以直接放在这里面,也可以自定义插件目录。
3.2 如何编写lua自定义插件
3.2.1 官方示例
这里贴上官方提供的example-plugin.lua
local ngx = ngx
local core = require("apisix.core")
local plugin = require("apisix.plugin")
local upstream = require("apisix.upstream")

local schema = {
    type = "object",
    properties = {
        i = {type = "number", minimum = 0},
        s = {type = "string"},
        t = {type = "array", minItems = 1},
        ip = {type = "string"},
        port = {type = "integer"},
    },
    required = {"i"},
}

local metadata_schema = {
    type = "object",
    properties = {
        ikey = {type = "number", minimum = 0},
        skey = {type = "string"},
    },
    required = {"ikey", "skey"},
}

local plugin_name = "example-plugin"

local _M = {
    version = 0.1,
    priority = 0,
    name = plugin_name,
    schema = schema,
    metadata_schema = metadata_schema,
}


function _M.check_schema(conf, schema_type)
    if schema_type == core.schema.TYPE_METADATA then
        return core.schema.check(metadata_schema, conf)
    end
    return core.schema.check(schema, conf)
end


function _M.init()
    -- call this function when plugin is loaded
    local attr = plugin.plugin_attr(plugin_name)
    if attr then
        core.log.info(plugin_name, " get plugin attr val: ", attr.val)
    end
end


function _M.destroy()
    -- call this function when plugin is unloaded
end


function _M.rewrite(conf, ctx)
    core.log.warn("plugin rewrite phase, conf: ", core.json.encode(conf))
    core.log.warn("conf_type: ", ctx.conf_type)
    core.log.warn("conf_id: ", ctx.conf_id)
    core.log.warn("conf_version: ", ctx.conf_version)
end


function _M.access(conf, ctx)
    core.log.warn("plugin access phase, conf: ", core.json.encode(conf))
    -- return 200, {message = "hit example plugin"}

    if not conf.ip then
        return
    end

    local up_conf = {
        type = "roundrobin",
        nodes = {
            {host = conf.ip, port = conf.port, weight = 1}
        }
    }

    local ok, err = upstream.check_schema(up_conf)
    if not ok then
        return 500, err
    end

    local matched_route = ctx.matched_route
    upstream.set(ctx, up_conf.type .. "#route_" .. matched_route.value.id,
                 ctx.conf_version, up_conf)
    return
end


function _M.body_filter(conf, ctx)
    core.log.warn("plugin body_filter phase, eof: ", ngx.arg[2],
                  ", conf: ", core.json.encode(conf))
end


function _M.delayed_body_filter(conf, ctx)
    core.log.warn("plugin delayed_body_filter phase, eof: ", ngx.arg[2],
                  ", conf: ", core.json.encode(conf))
end


local function hello()
    local args = ngx.req.get_uri_args()
    if args["json"] then
        return 200, {msg = "world"}
    else
        return 200, "world\n"
    end
end


function _M.control_api()
    return {
        {
            methods = {"GET"},
            uris = {"/v1/plugin/example-plugin/hello"},
            handler = hello,
        }
    }
end


return _M
3.2.2 插件放置路径
Apache APISIX 提供了两种方式来添加新的功能。
修改 Apache APISIX 的源代码并重新发布 (不推荐)。
配置 extra_lua_path 和 extra_lua_cpath 在 conf/config.yaml 以加载你自己的代码文件。你应该给自己的代码文件起一个不包含在原来库中的名字,而不是使用相同名称的代码文件,但是如果有需要,你可以使用这种方式覆盖内置的代码文件。
比如,你可以创建一个目录目录结构,像下面这样:
├── example
│ └── apisix
│ ├── plugins
│ │ └── 3rd-party.lua
│ └── stream
│ └── plugins
│ └── 3rd-party.lua
如果你需要自定义插件的目录,请在该目录下创建 /apisix/plugins 的子目录。
接着,在 conf/config.yaml 文件中添加如下的配置:
apisix:
    ...
    extra_lua_path: "/path/to/example/?.lua"
现在使用 require “apisix.plugins.3rd-party” 会加载你自己的插件,比如 require "apisix.plugins.jwt-auth"会加载 jwt-auth 插件。
可能你会想覆盖一个文件中的函数,你可以在 conf/config.yaml 文件中配置 lua_module_hook 来使你的 hook 生效。
你的配置可以像下面这样:
apisix:
    ...
    extra_lua_path: "/path/to/example/?.lua"
    lua_module_hook: "my_hook"
当 APISIX 启动的时候,example/my_hook.lua 就会被加载,这时你可以使用这个钩子在 APISIX 中来全局替换掉一个方法。 这个例子:my_hook.lua 可以在项目的 example 路径下被找到。
3.2.3 检查外部依赖
如果你的插件,涉及到一些外部的依赖和三方库,请首先检查一下依赖项的内容。如果插件需要用到共享内存,需要在 自定义 Nginx 配置,例如:
#put this in config.yaml:
nginx_config:
    http_configuration_snippet: |
        # for openid-connect plugin
        lua_shared_dict discovery             1m; # cache for discovery metadata documents
        lua_shared_dict jwks                  1m; # cache for JWKs
        lua_shared_dict introspection        10m; # cache for JWT verification results
插件本身提供了 init 方法。方便插件加载后做初始化动作。如果你需要清理初始化动作创建出来的内容,你可以在对应的 destroy 方法里完成这一操作。
注:如果部分插件的功能实现,需要在 Nginx 初始化启动,则可能需要在 apisix/init.lua 文件的初始化方法 http_init 中添加逻辑,并且可能需要在 apisix/cli/ngx_tpl.lua 文件中,对 Nginx 配置文件生成的部分,添加一些你需要的处理。但是这样容易对全局产生影响,根据现有的插件机制,我们不建议这样做,除非你已经对代码完全掌握。
3.2.4 插件命名,优先级和其他
给插件取一个很棒的名字,确定插件的加载优先级,然后在 conf/config.yaml 文件中添加上你的插件名。例如 example-plugin 这个插件, 需要在代码里指定插件名称(名称是插件的唯一标识,不可重名),在 apisix/plugins/example-plugin.lua 文件中可以看到:
local plugin_name = "example-plugin"

local _M = {
    version = 0.1,
    priority = 0,
    name = plugin_name,
    schema = schema,
    metadata_schema = metadata_schema,
}
注:新插件的优先级(priority 属性)不能与现有插件的优先级相同,您可以使用 control API 的 /v1/schema 方法查看所有插件的优先级。另外,同一个阶段里面,优先级 ( priority ) 值大的插件,会优先执行,比如 example-plugin 的优先级是 0,ip-restriction 的优先级是 3000,所以在每个阶段,会先执行 ip-restriction 插件,再去执行 example-plugin 插件。这里的“阶段”的定义,参见后续的 确定执行阶段 这一节。对于你的插件,建议采用 1 到 99 之间的优先级。
默认情况下,大多数 APISIX 插件都是启用的状态:
apisix/cli/config.lua
local _M = {
  ...
  plugins = {
    "real-ip",
    "ai",
    "client-control",
    "proxy-control",
    "request-id",
    "zipkin",
    "ext-plugin-pre-req",
    "fault-injection",
    "mocking",
    "serverless-pre-function",
    ...
  },
  ...
}
注:先后顺序与执行顺序无关。
要启用您的自定义插件,请将插件列表添加到 conf/config.yaml 并附加您的插件名称。例如:
plugins:         # 请参阅 `conf/config.yaml.example` 示例
  - ...          # 添加现有插件
  - your-plugin  # 添加您的自定义插件
特别需要注意的是,如果你的插件有新建自己的代码目录,那么就需要修改 Makefile 文件,新增创建文件夹的操作,比如:
$(INSTALL) -d $(INST_LUADIR)/apisix/plugins/skywalking
$(INSTALL) apisix/plugins/skywalking/*.lua $(INST_LUADIR)/apisix/plugins/skywalking/
_M 中还有其他字段会影响到插件的行为。
local _M = {
    ...
    type = 'auth',
    run_policy = 'prefer_route',
}
run_policy 字段可以用来控制插件执行。当这个字段设置成 prefer_route 时,且该插件同时配置在全局和路由级别,那么只有路由级别的配置生效。
如果你的插件需要跟 consumer 一起使用,需要把 type 设置成 auth。详情见下文。
3.2.5 配置描述与校验
定义插件的配置项,以及对应的 JSON Schema 描述,并完成对 JSON 的校验,这样方便对配置的数据规格进行验证,以确保数据的完整性以及程序的健壮性。同样,我们以 example-plugin 插件为例,看看他的配置数据:
{
  "example-plugin": {
    "i": 1,
    "s": "s",
    "t": [1]
  }
}
我们看下他的 Schema 描述:
local schema = {
    type = "object",
    properties = {
        i = {type = "number", minimum = 0},
        s = {type = "string"},
        t = {type = "array", minItems = 1},
        ip = {type = "string"},
        port = {type = "integer"},
    },
    required = {"i"},
}
这个 schema 定义了一个非负数 i,字符串 s,非空数组 t,和 ip 跟 port。只有 i 是必需的。
同时,需要实现 check_schema(conf) 方法,完成配置参数的合法性校验。
function _M.check_schema(conf)
    return core.schema.check(schema, conf)
end
注:项目已经提供了 core.schema.check 公共方法,直接使用即可完成配置参数校验。
另外,如果插件需要使用一些元数据,可以定义插件的 metadata_schema ,然后就可以通过 Admin API 动态的管理这些元数据了。如:
local metadata_schema = {
    type = "object",
    properties = {
        ikey = {type = "number", minimum = 0},
        skey = {type = "string"},
    },
    required = {"ikey", "skey"},
}

local plugin_name = "example-plugin"

local _M = {
    version = 0.1,
    priority = 0,        -- TODO: add a type field, may be a good idea
    name = plugin_name,
    schema = schema,
    metadata_schema = metadata_schema,
}
你可能之前见过 key-auth 这个插件在它的模块定义时设置了 type = ‘auth’。 当一个插件设置 type = ‘auth’,说明它是个认证插件。
认证插件需要在执行后选择对应的 consumer。举个例子,在 key-auth 插件中,它通过 apikey 请求头获取对应的 consumer,然后通过 consumer.attach_consumer 设置它。
为了跟 consumer 资源一起使用,认证插件需要提供一个 consumer_schema 来检验 consumer 资源的 plugins 属性里面的配置。
下面是 key-auth 插件的 consumer 配置:
{
  "username": "Joe",
  "plugins": {
    "key-auth": {
      "key": "Joe's key"
    }
  }
}
你在创建 Consumer 时会用到它。
为了检验这个配置,这个插件使用了如下的 schema:
local consumer_schema = {
    type = "object",
    properties = {
        key = {type = "string"},
    },
    required = {"key"},
}
注意 key-auth 的 check_schema(conf) 方法和 example-plugin 的同名方法的区别:
-- key-auth
function _M.check_schema(conf, schema_type)
    if schema_type == core.schema.TYPE_CONSUMER then
        return core.schema.check(consumer_schema, conf)
    else
        return core.schema.check(schema, conf)
    end
end

-- example-plugin
function _M.check_schema(conf, schema_type)
    return core.schema.check(schema, conf)
end
3.2.5.1 加密存储字段
指定参数需要被加密存储(需要 APISIX 版本不小于 3.1)
有些插件需要将参数加密存储,比如 basic-auth 插件的 password 参数。这个插件需要在 schema 中指定哪些参数需要被加密存储。
encrypt_fields = {"password"}
如果是嵌套的参数,比如 error-log-logger 插件的 clickhouse.password 参数,需要用 . 来分隔:
encrypt_fields = {"clickhouse.password"}
目前还不支持:
两层以上的嵌套
数组中的字段
通过在 schema 中指定 encrypt_fields = {“password”},可以将参数加密存储。APISIX 将提供以下功能:
通过 Admin API 来新增和更新资源时,对于 encrypt_fields 中声明的参数,APISIX 会自动加密存储在 etcd 中
通过 Admin API 来获取资源时,以及在运行插件时,对于 encrypt_fields 中声明的参数,APISIX 会自动解密
如何开启该功能?
在 config.yaml 中开启 data_encryption:
apisix:
    data_encryption:
    enable: true
    keyring:
        - edd1c9f0985e76a2
        - qeddd145sfvddff4
keyring 是一个数组,可以指定多个 key,APISIX 会按照 keyring 中 key 的顺序,依次尝试用 key 来解密数据(只对在 encrypt_fields 声明的参数)。如果解密失败,会尝试下一个 key,直到解密成功。
如果 keyring 中的 key 都无法解密数据,则使用原始数据。
3.2.6 确定执行阶段
根据业务功能,确定你的插件需要在哪个阶段执行。key-auth 是一个认证插件,所以需要在 rewrite 阶段执行。在 APISIX,只有认证逻辑可以在 rewrite 阶段里面完成,其他需要在代理到上游之前执行的逻辑都是在 access 阶段完成的。
注意:我们不能在 rewrite 和 access 阶段调用 ngx.exit、ngx.redirect 或者 core.respond.exit。如果确实需要退出,只需要 return 状态码和正文,插件引擎将使用返回的状态码和正文进行退出。例子
APISIX 的自定义阶段#
除了 OpenResty 的阶段,我们还提供额外的阶段来满足特定的目的:
delayed_body_filter
function _M.delayed_body_filter(conf, ctx)
    -- delayed_body_filter 在 body_filter 之后被调用。
    -- 它被 tracing 类型插件用来在 body_filter 之后立即结束 span。
end
3.2.7 编写执行逻辑
在对应的阶段方法里编写功能的逻辑代码,在阶段方法中具有 conf 和 ctx 两个参数
,以 limit-conn 插件配置为例。您可以这样从 config.yaml 中获取 admin_key 并存入环境变量:
admin_key=$(yq '.deployment.admin.admin_key[0].key' conf/config.yaml | sed 's/"//g')
curl http://127.0.0.1:9180/apisix/admin/routes/1 -H "X-API-KEY: $admin_key" -X PUT -d '
{
    "methods": ["GET"],
    "uri": "/index.html",
    "id": 1,
    "plugins": {
        "limit-conn": {
            "conn": 1,
            "burst": 0,
            "default_conn_delay": 0.1,
            "rejected_code": 503,
            "key": "remote_addr"
        }
    },
    "upstream": {
        "type": "roundrobin",
        "nodes": {
            "127.0.0.1:1980": 1
        }
    }
}'
3.2.7.1 conf 参数
conf 参数是插件的相关配置信息,您可以通过 core.log.warn(core.json.encode(conf)) 将其输出到 error.log 中进行查看,如下所示:
function _M.access(conf, ctx)
    core.log.warn(core.json.encode(conf))
    ......
end
conf:
{
  "rejected_code": 503,
  "burst": 0,
  "default_conn_delay": 0.1,
  "conn": 1,
  "key": "remote_addr"
}
3.2.7.2 ctx 参数
ctx 参数缓存了请求相关的数据信息,您可以通过 core.log.warn(core.json.encode(ctx, true)) 将其输出到 error.log 中进行查看,如下所示:
function _M.access(conf, ctx)
    core.log.warn(core.json.encode(ctx, true))
    ......
end
3.2.8 注册公共接口
插件可以注册暴露给公网的接口。以 batch-requests 插件为例,这个插件注册了 POST /apisix/batch-requests 接口,让客户端可以将多个 API 请求组合在一个请求/响应中:
function batch_requests()
    -- ...
end

function _M.api()
    -- ...
    return {
        {
            methods = {"POST"},
            uri = "/apisix/batch-requests",
            handler = batch_requests,
        }
    }
end
注意,注册的接口将不会默认暴露,需要使用public-api 插件来暴露它。
3.2.9 注册控制接口
如果你只想暴露 API 到 localhost 或内网,你可以通过 Control API 来暴露它。
Take a look at example-plugin plugin:
local function hello()
    local args = ngx.req.get_uri_args()
    if args["json"] then
        return 200, {msg = "world"}
    else
        return 200, "world\n"
    end
end


function _M.control_api()
    return {
        {
            methods = {"GET"},
            uris = {"/v1/plugin/example-plugin/hello"},
            handler = hello,
        }
    }
end
如果你没有改过默认的 control API 配置,这个插件暴露的 GET /v1/plugin/example-plugin/hello API 只有通过 127.0.0.1 才能访问它。通过以下命令进行测试:
curl -i -X GET "http://127.0.0.1:9090/v1/plugin/example-plugin/hello"
查看更多有关 control API 介绍
3.2.10 注册自定义变量
我们可以在 APISIX 的许多地方使用变量。例如,在 http-logger 中自定义日志格式,用它作为 limit-* 插件的键。在某些情况下,内置的变量是不够的。因此,APISIX 允许开发者在全局范围内注册他们的变量,并将它们作为普通的内置变量使用。
例如,让我们注册一个叫做 a6_labels_zone 的变量来获取路由中 zone 标签的值。
local core = require "apisix.core"

core.ctx.register_var("a6_labels_zone", function(ctx)
    local route = ctx.matched_route and ctx.matched_route.value
    if route and route.labels then
        return route.labels.zone
    end
    return nil
end)
此后,任何对 $a6_labels_zone 的获取操作都会调用注册的获取器来获取数值。
注意,自定义变量不能用于依赖 Nginx 指令的功能,如 access_log_format。
编写测试用例#
针对功能,完善各种维度的测试用例,对插件做个全方位的测试吧!插件的测试用例,都在 t/plugin 目录下,可以前去了解。 项目测试框架采用的 test-nginx 。 一个测试用例 .t 文件,通常用 DATA 分割成 序言部分 和 数据部分。这里我们简单介绍下数据部分, 也就是真正测试用例的部分,仍然以 key-auth 插件为例:
=== TEST 1: sanity
--- config
    location /t {
        content_by_lua_block {
            local plugin = require("apisix.plugins.key-auth")
            local ok, err = plugin.check_schema({key = 'test-key'}, core.schema.TYPE_CONSUMER)
            if not ok then
                ngx.say(err)
            end

            ngx.say("done")
        }
    }
--- request
GET /t
--- response_body
done
--- no_error_log
[error]
一个测试用例主要有三部分内容:
程序代码:Nginx location 的配置内容
输入:http 的 request 信息
输出检查:status,header,body,error_log 检查
这里请求 /t,经过配置文件 location,调用 content_by_lua_block 指令完成 lua 的脚本,最终返回。 用例的断言是 response_body 返回 “done”,no_error_log 表示会对 Nginx 的 error.log 检查, 必须没有 ERROR 级别的记录。
3.2.11 附上 test-nginx 执行流程
根据我们在 Makefile 里配置的 PATH,和每一个 .t 文件最前面的一些配置项,框架会组装成一个完整的 nginx.conf 文件, t/servroot 会被当成 Nginx 的工作目录,启动 Nginx 实例。根据测试用例提供的信息,发起 http 请求并检查 http 的返回项, 包括 http status,http response header,http response body 等。
3.3 实战场景化插件开发演示(LUA)
3.3.1 token解析,根据解析结果动态修改上游场景插件开发
还是以上述java插件场景为例,基于头信息中携带的token信息远程调用配置的解析token接口,根据解析结果动态修改上游信息(java插件是通过修改路由来修改上游信息的,lua可以直接修改上游)
这里是基于官方forward-auth插件修改的,新建my-forward-auth.lua,完整代码如下:
local ipairs = ipairs
local core = require("apisix.core")
local http = require("resty.http")
local type   = type

-- schema 是创建插件的时候指定参数。
local schema = {
    type = "object",
    properties = {
        uri = { type = "string" },
        allow_degradation = { type = "boolean", default = false },
        status_on_error = { type = "integer", minimum = 200, maximum = 599, default = 403 },
        ssl_verify = {
            type = "boolean",
            default = true,
        },
        request_method = {
            type = "string",
            default = "GET",
            enum = { "GET", "POST" },
            description = "the method for client to request the authorization service"
        },
        request_headers = {
            type = "array",
            default = {},
            items = { type = "string" },
            description = "client request header that will be sent to the authorization service"
        },
        upstream_headers = {
            type = "array",
            default = {},
            items = { type = "string" },
            description = "authorization response header that will be sent to the upstream"
        },
        client_headers = {
            type = "array",
            default = {},
            items = { type = "string" },
            description = "authorization response header that will be sent to"
                    .. "the client when authorizing failed"
        },
        timeout = {
            type = "integer",
            minimum = 1,
            maximum = 60000,
            default = 3000,
            description = "timeout in milliseconds",
        },
        keepalive = { type = "boolean", default = true },
        keepalive_timeout = { type = "integer", minimum = 1000, default = 60000 },
        keepalive_pool = { type = "integer", minimum = 1, default = 5 },
        body_on_error = {
            type = "object",
            minProperties = 1,
            patternProperties = {
                ["^[^:]+$"] = {
                    oneOf = {
                        { type = "string" },
                        { type = "number" },
                    }
                }
            },
            description = "请求异常返回给客户端的body"
        },
        auth_system = {
            type = "string",
            default = "xxxx-system",
            enum = { "xxxx-system", "ruoyi" },
            description = "校验token的系统"
        },
    },
    required = { "uri" }
}

-- 插件配置示例:
--"plugins": {
--    "my-forward-auth": {
--        "_meta": {
--            "disable": false
--        },
--        "auth_system": "ruoyi",
--        "body_on_error": {
--            "code": "500",
--            "msg": "解析token异常"
--        },
--        "client_headers": [
--          "Location"
--        ],
--        "name": "my-forward-auth",
--        "request_headers": [
--          "Authorization"
--        ],
--        "status_on_error": 401,
--        "upstream_headers": [
--           "X-User-ID",
--           "Authorization"
--        ],
--        "uri": "http://xxxxxxxxxxxx"
--    },
--    "proxy-rewrite": {
--        "_meta": {
--          "disable": false
--        }
--    }
--},


-- 这部分是插件的基本信息,包含了插件版本, 优先级,类型等等.
local _M = {
    version = 0.1,
    priority = 1009, -- proxy-rewrite优先级为1008,my-forward-auth需要在proxy-rewrite之前执行,当前设置为1009
    name = "my-forward-auth", -- 插件名称
    schema = schema,
}

-- 校验schema指定的参数
function _M.check_schema(conf)
    local check = { "uri" }
    core.utils.check_https(check, conf, _M.name)
    core.utils.check_tls_bool({ "ssl_verify" }, conf, _M.name)

    return core.schema.check(schema, conf)
end

-- 生命周期方法 proxy-rewrite插件在rewrite阶段运行,所以my-forward-auth想要在proxy-rewrite之前执行,除了优先级设置更大以外,还需要运行阶段也设置为rewrite
function _M.rewrite(conf, ctx)
    -- 需要在函数里面定义才会获取到ngx.ctx.api_ctx的值,如果把local api_ctx的声明放在函数外面作为整个插件的局部变量,那获取到的ngx.ctx.api_ctx的值为nil。
    local api_ctx = ngx.ctx.api_ctx
    local route = api_ctx.matched_route --获取当前的路由对象

    local auth_headers = {
        ["X-Forwarded-Proto"] = core.request.get_scheme(ctx),
        ["X-Forwarded-Method"] = core.request.get_method(),
        ["X-Forwarded-Host"] = core.request.get_host(ctx),
        ["X-Forwarded-Uri"] = ctx.var.request_uri,
        ["X-Forwarded-For"] = core.request.get_remote_client_ip(ctx),
    }

    if conf.request_method == "POST" then
        auth_headers["Content-Length"] = core.request.header(ctx, "content-length")
        auth_headers["Expect"] = core.request.header(ctx, "expect")
        auth_headers["Transfer-Encoding"] = core.request.header(ctx, "transfer-encoding")
        auth_headers["Content-Encoding"] = core.request.header(ctx, "content-encoding")
    end

    -- append headers that need to be get from the client request header
    if #conf.request_headers > 0 then
        for _, header in ipairs(conf.request_headers) do
            if not auth_headers[header] then
                auth_headers[header] = core.request.header(ctx, header)
            end
        end
    end

    local params = {
        headers = auth_headers,
        keepalive = conf.keepalive,
        ssl_verify = conf.ssl_verify,
        method = conf.request_method
    }

    core.log.warn("my-forward-auth-conf------>: ", core.json.encode(conf))

    local httpc = http.new()
    httpc:set_timeout(conf.timeout)
    if params.method == "POST" then
        local client_body_reader, err = httpc:get_client_body_reader()
        if client_body_reader then
            params.body = client_body_reader
        else
            core.log.warn("failed to get client_body_reader. err: ", core.json.encode(err),
                    " using core.request.get_body() instead")
            params.body = core.request.get_body()
        end
    end

    if conf.keepalive then
        params.keepalive_timeout = conf.keepalive_timeout
        params.keepalive_pool = conf.keepalive_pool
    end

    local res, err = httpc:request_uri(conf.uri, params)


    if not res and conf.allow_degradation then
        core.log.warn("my-forward-auth-req-res------>: res is nil")
        return
    elseif not res then
        core.log.warn("failed to process forward auth, err: ", core.json.encode(err))
        if #conf.body_on_error then
            err = conf.body_on_error
        end
        return conf.status_on_error, err
    end

    if res.status >= 300 then
        core.log.warn("my-forward-auth-req-res.status >= 300------>: ", res.status)
        local client_headers = {}

        if #conf.client_headers > 0 then
            for _, header in ipairs(conf.client_headers) do
                client_headers[header] = res.headers[header]
            end
        end

        core.response.set_header(client_headers)
        if conf.body_on_error then
            res.body = conf.body_on_error
        end
        return res.status, res.body
    end

    if res.status == 200 then
        if conf.auth_system == "ruoyi" then
            core.log.warn("---------my-forward-auth-case-ruoyi--------")

            -- parse the results of the decision
            local body, err = core.json.decode(res.body)

            if not body then
                core.log.error("invalid response body: ", res.body, " err: ", err)
                return 503
            end

            -- 若依多包一层,除了http响应码还需要判断body里面code
            if body.code >= 300 then
                core.log.warn("my-forward-auth-req-res.body.code >= 300------>: ", body.code)
                local client_headers = {}

                if #conf.client_headers > 0 then
                    for _, header in ipairs(conf.client_headers) do
                        client_headers[header] = res.headers[header]
                    end
                end

                core.response.set_header(client_headers)
                if conf.body_on_error then
                    res.body = conf.body_on_error
                end
                return res.status, res.body
            end

            if not body.data then
                core.log.error("invalid OPA decision format: ", res.body,
                        " err: `data` field does not exist")
                return 503
            end
            local data, err = body.data

            -- 具体data的解析视不同接口返回结构而定,这里是模拟若依接口特殊情景return AjaxResult.success(ajax)的情况,需要多判断一层code
            if not data then
                core.log.error("invalid response body.data: ", core.json.encode(data), " err: ", err)
                return 503
            end

            if not data.code then
                core.log.error("invalid OPA decision format: ", core.json.encode(data),
                        " err: `code` field does not exist")
                return 503
            end

            if data.code == 200 then
                local user, err = data.user
                core.log.warn("my-forward-auth-req-res.body.data.user------>: ", core.json.encode(user))
                if user then
                    local userName = nil
                    if user.userName then
                        userName = type(user.userName) == "table"
                                and core.json.encode(user.userName)
                                or user.userName
                    end
                    if userName == "admin" then
                        core.log.warn("my-forward-auth-req-res.body.data.user.userName-case admin------>")
                        route.value.plugins["proxy-rewrite"].uri = "/nginx-web1"
                        route.value.upstream_id = "apisix"
                    else
                        core.log.warn("my-forward-auth-req-res.body.data.user.userName-case not admin------>")
                        route.value.plugins["proxy-rewrite"].uri = "/nginx-web2"
                        route.value.upstream_id = "apisix"
                    end
                else
                    core.log.error("invalid response body.data.user: ", core.json.encode(data), " err: ", err)
                    if conf.body_on_error then
                        res.body = conf.body_on_error
                    end
                    return 500, res.body
                end
            else
                core.log.error("invalid OPA decision format: ", core.json.decode(data),
                        " err: `code` " + data.code)
                if conf.body_on_error then
                    res.body = conf.body_on_error
                end
                return 500, data
            end
        elseif conf.auth_system == "xxxx-system" then
            core.log.warn("---------my-forward-auth-case-xxxx-system--------")
            core.log.warn("my-forward-auth-req-res.body------>: ", res.body)

            -- parse the results of the decision
            local body, err = core.json.decode(res.body)

            core.log.warn("my-forward-auth-req-res.body.data------>: ", core.json.decode(body))
            local username = nil
            if body and body.username then
                username = type(body.username) == "table"
                        and core.json.encode(body.username)
                        or body.username
            end
            if username then
                if username == "admin" then
                    route.value.plugins["proxy-rewrite"].uri = "/nginx-web1"
                    route.value.upstream_id = "apisix"
                else
                    route.value.plugins["proxy-rewrite"].uri = "/nginx-web2"
                    route.value.upstream_id = "apisix"
                end
            else
                core.log.error("invalid response body.data.user: ", core.json.encode(body), " err: ", err)
                if #conf.body_on_error > 0 then
                    res.body = conf.body_on_error
                end
                return 500, res.body
            end
        end

    end

    core.log.warn("my-forward-auth finish------>")
    -- append headers that need to be get from the auth response header
    for _, header in ipairs(conf.upstream_headers) do
        local header_value = res.headers[header]
        if header_value then
            core.request.set_header(ctx, header, header_value)
        end
    end
end

return _M
3.3.2 注意事项
3.3.2.1 插件优先级priority
新插件的优先级(priority 属性)不能与现有插件的优先级相同,可以使用 control API 的 /v1/schema 方法查看所有插件的优先级。另外,同一个阶段里面,优先级 ( priority ) 值大的插件,会优先执行,比如 example-plugin 的优先级是 0,ip-restriction 的优先级是 3000,所以在每个阶段,会先执行 ip-restriction 插件,再去执行 example-plugin 插件。对于自定义的插件,如果不需要其他插件的参与,建议设置较低的优先级,当前案例中因为需要使用proxy-rewrite修改上游,所以需要设置当前插件的优先级在proxy-rewrite优先级之上。
3.3.2.2 插件执行阶段
根据业务功能,确定你的插件需要在哪个阶段执行。forward-auth 是一个认证插件,所以需要在 rewrite 阶段执行。在 APISIX,只有认证逻辑可以在 rewrite 阶段里面完成,其他需要在代理到上游之前执行的逻辑都是在 access 阶段完成的。常见的阶段包括:init, check_schema, rewrite, access, balancer, header filter, body filter 以及 log。
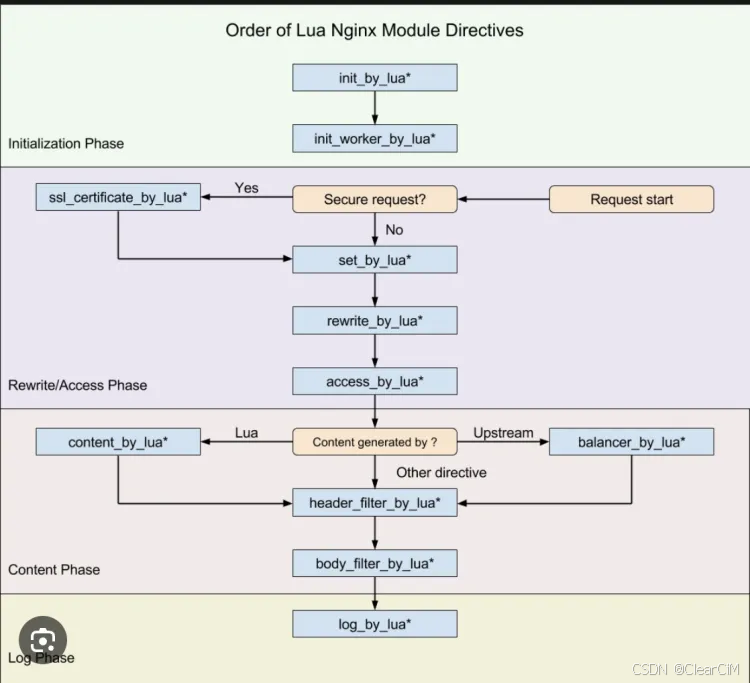
在阶段方法中具有 conf 和 ctx 两个参数,
如果插件需要修改路由的配置或者调整路由匹配的上游,则可以使用api_ctx获取路由对象,然后对路由对象进行修改即可。
如下示例:
function _M.access(conf, ctx)
  local api_ctx = ngx.ctx.api_ctx
  local route = api_ctx.matched_route --获取当前的路由对象
  local upstreamId = "newupstream"
  local originuri = "/newpath"

  core.log.warn("before set route============route info is:  "..core.json.encode(route))
   route.value.plugins["proxy-rewrite"].uri = originuri
  route.value.upstream_id = upstreamId
  core.log.warn("after set route=============route info is:  "..core.json.encode(ctx.var._ctx, true))
  core.log.warn("value of route is:============="..core.json.encode(route))
end
注意: local api_ctx = ngx.ctx.api_ctx需要在函数里面定义才会获取到ngx.ctx.api_ctx的值,如果把local api_ctx的声明放在函数外面作为整个插件的局部变量,那获取到的ngx.ctx.api_ctx的值为nil。
3.2.3 部署运行lua插件
3.2.3.1 放置lua脚本至插件文件夹下
把lua脚本改为你写的plugin_name,例如我上边写的就是my-forward-auth.lua,然后放到Admin服务的plugins文件夹底下,一般在/usr/local/apisix/apisix/plugins/,直接放底下就行,如果是容器化部署需要挂载目录或者将脚本文件打到新镜像中(不推荐),当然也可以自己写路径指定,但你的config.yaml得自己指定路径,开头官方文档有介绍。
3.2.3.2 修改config.yaml文件
在config.yaml的plugins里加插件名
yaml

plugins:
  - my-forward-auth
这里除了这个,还需要把config-default.yaml里的插件挪过来,不然之后就你这个插件能用,官方插件就用不了了,最终效果:
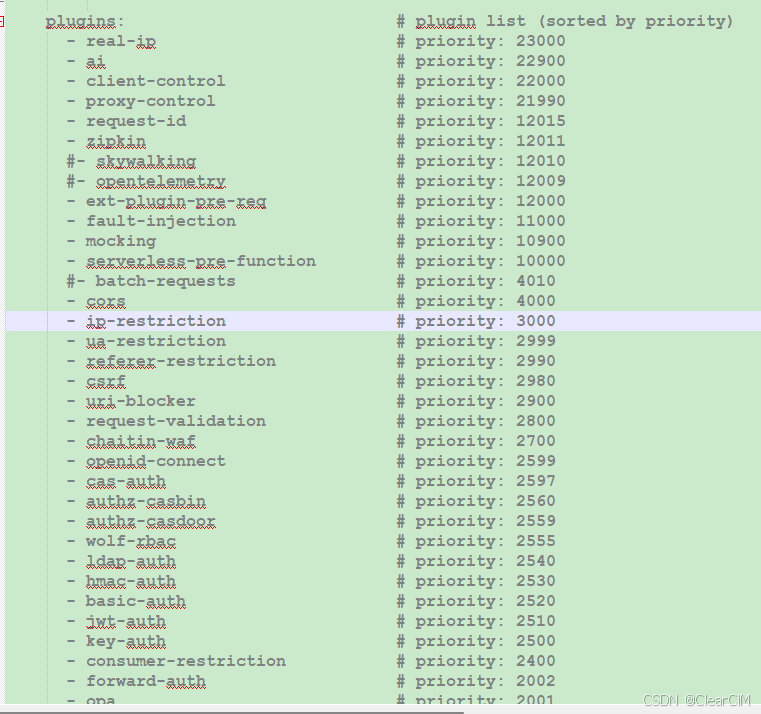
3.2.3.3 刷新插件
可以直接重启apisix刷新,同时apisix也支持通过admin api热加载插件:
curl --location --request PUT 'http://127.0.0.1:9180/apisix/admin/plugins/reload' \
--header 'X-API-KEY: xxxxxxxxxxxxxxxx'
3.2.3.4 添加测试路由
这个时候apisix的插件已经可以用了,以刚才我们的插件为例,添加一个路由,这里以dashboard添加为例:
{
  "uri": "/test-lua-plugins-my-forward-auth",
  "name": "test-lua-plugins-my-forward-auth",
  "methods": [
    "GET",
    "POST",
    "PUT",
    "DELETE",
    "PATCH",
    "HEAD",
    "OPTIONS",
    "CONNECT",
    "TRACE",
    "PURGE"
  ],
  "plugins": {
    "my-forward-auth": {
      "_meta": {
        "disable": false
      },
      "auth_system": "ruoyi",
      "body_on_error": {
        "code": "500",
        "msg": "解析token异常"
      },
      "client_headers": [
        "Location"
      ],
      "name": "my-forward-auth",
      "request_headers": [
        "Authorization"
      ],
      "status_on_error": 401,
      "upstream_headers": [
        "X-User-ID",
        "Authorization"
      ],
      "uri": "http://xxxxxxxxxxxx"
    },
    "proxy-rewrite": {
      "_meta": {
        "disable": false
      }
    }
  },
  "upstream_id": "xxxxxxxxx",
  "status": 1
}
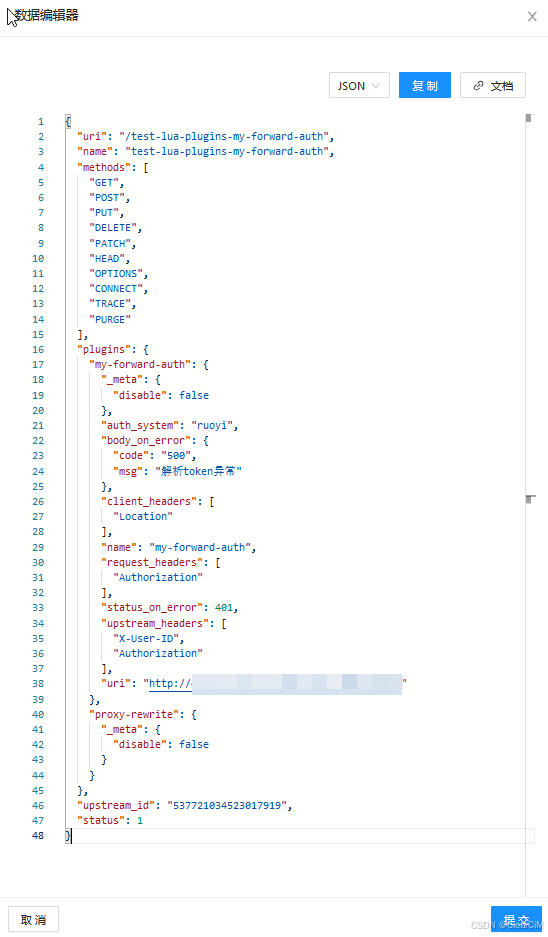
3.2.3.5 请求路由验证

3.2.3.6 生成schema.json
这个schema.json是Dashboard提供可视化需要的文件,也就是现在说api已经可以使用了,但是如果你想在Dashboard配置是配置不了的,会报插件不存在,这时候是因为之前的schema.json对新插件没有描述,这个也不用自己写,查看官方文档。
由于 Dashboard 缓存了 Apache APISIX 中插件的 jsonschema 数据,因此在 Apache APISIX 中创建自定义插件后,需要同步 Dashboard 中的数据,目前仅支持手动操作。请按照以下指南进行操作。
- 确认你的 APISIX 正在运行,并且已经开启了控制 API(默认开启,只运行本地访问) 请参阅开头:https://apisix.apache.org/docs/apisix/control-api
打印指定插件的元数据:
curl 127.0.0.1:9090/v1/plugin_metadata/{plugin_name}
- 执行以下命令,在你的 APISIX 服务器上导出 jsonchema(如果配置了非本地访问,则不需要在你的 APISIX 服务器上执行,访问 IP 和端口需要相应修改)
curl 127.0.0.1:9090/v1/schema > schema.json
- 将导出的schema.json复制到 Dashboard 工作目录conf)下(关于工作目录请参考 https://github.com/apache/apisix-dashboard/blob/master/docs/en/latest/deploy.md#working-directory
- 重新启动 Manager API
3.2.3.7 替换schema.json
将上一步导出的schema.json复制到Dashboard的config目录下替换就行,之后重启Dashboard服务就ok,容器化部署需要挂载schema.json到容器中。
这样一个apisix使用lua脚本自定义插件和部署就可以了
4 其他语言插件与场景开发:
其他语言插件开发与场景:待补充
5 参考:
apisix 官方文档外部插件说明
支流科技 - 使用 Java 编写 Apache APISIX 插件
Apisix官方文档插件开发说明


 2045
2045

 被折叠的 条评论
为什么被折叠?
被折叠的 条评论
为什么被折叠?
 到【灌水乐园】发言


