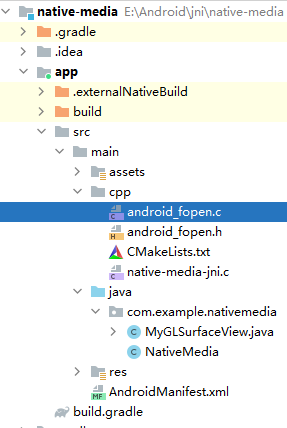
项目目录

CMakeLists.txt
cmake_minimum_required(VERSION 3.4.1)

set(CMAKE_C_FLAGS "${CMAKE_C_FLAGS} -Wall -UNDEBUG")

add_library(native-media-jni SHARED
            android_fopen.c
            native-media-jni.c)

# Include libraries needed for native-media-jni lib
target_link_libraries(native-media-jni
                      android
                      log
                      OpenMAXAL)
链接了OpenMaxAL的库。
android_fopen.c
return funopen(asset, android_read, android_write, android_seek, android_close); The calling conventions of readfn, writefn, seekfn and closefn must match
those, respectively, of read(2), write(2), lseek(2), and close(2) with
the single exception that they are passed the cookie argument specified
to funopen() in place of the traditional file descriptor argument.MySurfaceView.java
1)定义GLsurface的渲染器
class MyRenderer implements GLSurfaceView.Renderer, SurfaceTexture.OnFrameAvailableListener 2)构造方法
分配本地Direct buffer,可以减少内存的复制。
那么为什么创建DirectByteBuffer比HeapByteBuffer性能差却还使用DirectByteBuffer呢?
答:创建DirectByteBuffer的确不如HeapByteBuffer快,但是本地IO(从操作系统本地获取数据,比如FileChannel、SocketChannel网络数据)时,使用DirectByteBuffer比HeapByteBuffer少复制一次(java堆内存复制到操作系统内存,具体请继续看)
————————————————
版权声明:本文为CSDN博主「我叫周利东」的原创文章,遵循CC 4.0 BY-SA版权协议,转载请附上原文出处链接及本声明。
原文链接:https://blog.csdn.net/qq_36951116/article/details/87185240
public MyRenderer() {
    mVertices = ByteBuffer.allocateDirect(mVerticesData.length
            * FLOAT_SIZE_BYTES).order(ByteOrder.nativeOrder()).asFloatBuffer();
    mVertices.put(mVerticesData).position(0);

    Matrix.setIdentityM(mSTMatrix, 0);
    Matrix.setIdentityM(mMMatrix, 0);
    Matrix.rotateM(mMMatrix, 0, 20, 0, 1, 0);
}
3)onSurfaceCreated方法
public void onSurfaceCreated(GL10 glUnused, EGLConfig config) {/* Set up alpha blending and an Android background color */
GLES20.glEnable(GLES20.GL_BLEND);//启动混合,实现半透明的效果
/*
GL_ONE: 表示使用1.0作为因子,实际上相当于完全的使用了这种颜色参与混合运算。
GL_SRC_ALPHA:表示使用源颜色的alpha值来作为因子。
GL_DST_ALPHA:表示使用目标颜色的alpha值来作为因子。
GL_ONE_MINUS_SRC_ALPHA:表示用1.0减去源颜色的alpha值来作为因子(1-alpha)。
GL_ONE_MINUS_DST_ALPHA:表示用1.0减去目标颜色的alpha值来作为因子。
除 此以外,还有GL_SRC_COLOR(把源颜色的四个分量分别作为因子的四个分量)、GL_ONE_MINUS_SRC_COLOR、 GL_DST_COLOR、GL_ONE_MINUS_DST_COL
*/
GLES20.glBlendFunc(GLES20.GL_SRC_ALPHA, GLES20.GL_ONE_MINUS_SRC_ALPHA);
//改变背景颜色
GLES20.glClearColor(0.643f, 0.776f, 0.223f, 1.0f);//创建着色器的程序
{
//首先,加载定点着色器
{
private int loadShader(int shaderType, String source) {
    int shader = GLES20.glCreateShader(shaderType);
    if (shader != 0) {
//加载着色器程序
        GLES20.glShaderSource(shader, source);
//编译着色器
        GLES20.glCompileShader(shader);
        int[] compiled = new int[1];
        GLES20.glGetShaderiv(shader, GLES20.GL_COMPILE_STATUS, compiled, 0);
        if (compiled[0] == 0) {
            Log.e(TAG, "Could not compile shader " + shaderType + ":");
            Log.e(TAG, GLES20.glGetShaderInfoLog(shader));
            GLES20.glDeleteShader(shader);
            shader = 0;
        }
    }
    return shader;
}
}
int vertexShader = loadShader(GLES20.GL_VERTEX_SHADER, vertexSource);
if (vertexShader == 0) {
    return 0;
}
//然后,加载片元着色器
int pixelShader = loadShader(GLES20.GL_FRAGMENT_SHADER, fragmentSource);
if (pixelShader == 0) {
    return 0;
}
//创建程序
int program = GLES20.glCreateProgram();
if (program != 0) {
//程序绑定,定点着色器
    GLES20.glAttachShader(program, vertexShader);
    checkGlError("glAttachShader");
//绑定片元这着色器
    GLES20.glAttachShader(program, pixelShader);
    checkGlError("glAttachShader");
//连接
    GLES20.glLinkProgram(program);
    int[] linkStatus = new int[1];
    GLES20.glGetProgramiv(program, GLES20.GL_LINK_STATUS, linkStatus, 0);
    if (linkStatus[0] != GLES20.GL_TRUE) {
        Log.e(TAG, "Could not link program: ");
        Log.e(TAG, GLES20.glGetProgramInfoLog(program));
        GLES20.glDeleteProgram(program);
        program = 0;
    }
}
}
mProgram = createProgram(mVertexShader, mFragmentShader); if (mProgram == 0) { return; }
//获取定点位置
maPositionHandle = GLES20.glGetAttribLocation(mProgram, "aPosition");
checkGlError("glGetAttribLocation aPosition");
if (maPositionHandle == -1) {
    throw new RuntimeException("Could not get attrib location for aPosition");
}
//获取纹理坐标
maTextureHandle = GLES20.glGetAttribLocation(mProgram, "aTextureCoord");
checkGlError("glGetAttribLocation aTextureCoord");
if (maTextureHandle == -1) {
    throw new RuntimeException("Could not get attrib location for aTextureCoord");
}
分别获取相应的矩阵
muMVPMatrixHandle = GLES20.glGetUniformLocation(mProgram, "uMVPMatrix");muSTMatrixHandle = GLES20.glGetUniformLocation(mProgram, "uSTMatrix");int[] textures = new int[1];
// glGenTextures函数根据纹理参数返回n个纹理索引
GLES20.glGenTextures(1, textures, 0);
mTextureID = textures[0];
//纹理进行绑定
GLES20.glBindTexture(GL_TEXTURE_EXTERNAL_OES, mTextureID);
checkGlError("glBindTexture mTextureID");//设置纹理放大缩小和边界的方式
GLES20.glTexParameterf(GL_TEXTURE_EXTERNAL_OES, GLES20.GL_TEXTURE_MIN_FILTER,
        GLES20.GL_NEAREST);
创建了一个surface
mSurface = new SurfaceTexture(mTextureID);
mSurface.setOnFrameAvailableListener(this);
/*
void setLookAtM (float[] rm , int rmOffset ,float eyeX , float eyeY , float eyeZ , float centerX,

float centerY , float centerZ , float upX , float upY , float upZ )

在世界坐标系下,设置眼镜观察点的位置,设置视图中心的位置,设置某个坐标轴方向为屏幕竖直向上的向量(不清楚可见第3节)。
参数rm是待设定的矩阵数组,它应为4×4的矩阵,即大小为16的数组;

参数rmOffset为启用数组的偏移量,一般设为0;

参数eyeX,eyeY和eyeZ为人眼在世界坐标系的位置。

参数centerX,centerY和centerZ为模型中心在世界坐标系中的位置;

eyeX,eyeY和eyeZ所确定的点与centerX,centerY和centerZ所确定的点构成了视线;

参数upX,upY和upZ决定哪个坐标轴竖直向上,且该向量与视线是垂直的,可理解为人正常平视物体时,头顶所指方向为竖直向上向量,视线此刻与该向量垂直的
————————————————
版权声明:本文为CSDN博主「lyzirving」的原创文章,遵循CC 4.0 BY-SA版权协议,转载请附上原文出处链接及本声明。
原文链接:https://blog.csdn.net/lyzirving/article/details/79022445
*/

Matrix.setLookAtM(mVMatrix, 0, 0, 0, 4f, 0f, 0f, 0f, 0f, 1.0f, 0.0f);

synchronized(this) {
    updateSurface = false;
}
4) 定点和片元着色器
private final String mVertexShader =
    "uniform mat4 uMVPMatrix;\n" +
    "uniform mat4 uSTMatrix;\n" +
    "attribute vec4 aPosition;\n" +
    "attribute vec4 aTextureCoord;\n" +
    "varying vec2 vTextureCoord;\n" +
    "void main() {\n" +
    "  gl_Position = uMVPMatrix * aPosition;\n" +
    "  vTextureCoord = (uSTMatrix * aTextureCoord).xy;\n" +
    "}\n";

private final String mFragmentShader =
    "#extension GL_OES_EGL_image_external : require\n" +
    "precision mediump float;\n" +
    "varying vec2 vTextureCoord;\n" +
    "uniform samplerExternalOES sTexture;\n" +
    "void main() {\n" +
    "  gl_FragColor = texture2D(sTexture, vTextureCoord);\n" +
    "}\n";
5)当onFrameAvaliable时,进行onDrawFrame
public void onDrawFrame(GL10 glUnused)//更新texImagehttps://blog.csdn.net/lyzirving/article/details/79051437
synchronized(this) {
    if (updateSurface) {
        mSurface.updateTexImage();
//获取纹理坐标
        mSurface.getTransformMatrix(mSTMatrix);
        updateSurface = false;
    }
}
GLES会情况深度缓冲
GLES20.glClear( GLES20.GL_DEPTH_BUFFER_BIT | GLES20.GL_COLOR_BUFFER_BIT);
GLES20.glUseProgram(mProgram);
checkGlError("glUseProgram");
GLES20.glActiveTexture(GLES20.GL_TEXTURE0);
GLES20.glBindTexture(GL_TEXTURE_EXTERNAL_OES, mTextureID);mVertices.position(VERTICES_DATA_POS_OFFSET);
GLES20.glVertexAttribPointer(maPositionHandle, 3, GLES20.GL_FLOAT, false,
VERTICES_DATA_STRIDE_BYTES, mVertices);
checkGlError("glVertexAttribPointer maPosition");
GLES20.glEnableVertexAttribArray(maPositionHandle);
checkGlError("glEnableVertexAttribArray maPositionHandle");
mVertices.position(VERTICES_DATA_UV_OFFSET);
GLES20.glVertexAttribPointer(maTextureHandle, 3, GLES20.GL_FLOAT, false,
VERTICES_DATA_STRIDE_BYTES, mVertices);
checkGlError("glVertexAttribPointer maTextureHandle");
GLES20.glEnableVertexAttribArray(maTextureHandle);
checkGlError("glEnableVertexAttribArray maTextureHandle");
Matrix.multiplyMM(mMVPMatrix, 0, mVMatrix, 0, mMMatrix, 0);
Matrix.multiplyMM(mMVPMatrix, 0, mProjMatrix, 0, mMVPMatrix, 0);
GLES20.glUniformMatrix4fv(muMVPMatrixHandle, 1, false, mMVPMatrix, 0);
GLES20.glUniformMatrix4fv(muSTMatrixHandle, 1, false, mSTMatrix, 0);
//矩形渲染
GLES20.glDrawArrays(GLES20.GL_TRIANGLE_STRIP, 0, 4);
checkGlError("glDrawArrays");


 3760
3760


 被折叠的 条评论
为什么被折叠?


