


文章目录
前言:
在软件开发中,用户界面(UI)的设计对于提升用户体验至关重要。Qt框架作为一个跨平台的C++应用程序框架,提供了丰富的控件和信号与槽机制,使得开发者能够创建出既美观又实用的用户界面。本文将详细介绍Qt中的各种常用控件,包括单行文本输入框(LineEdit)、多行文本编辑器(TextEdit)、下拉框(Combo Box)、微调框(Spin Box)、日期和时间选择器(Date Edit & Time Edit)、旋转按钮(Dial)以及滑动条(Slider)。通过具体的代码示例,展示如何使用这些控件来实现各种交互功能,如个人信息录入、密码验证、商品点餐模拟、透明度调整等。此外,还将探讨如何利用正则表达式进行复杂的文本验证,以及如何通过自定义快捷键来增强用户界面的交互性。
1. Line Edit
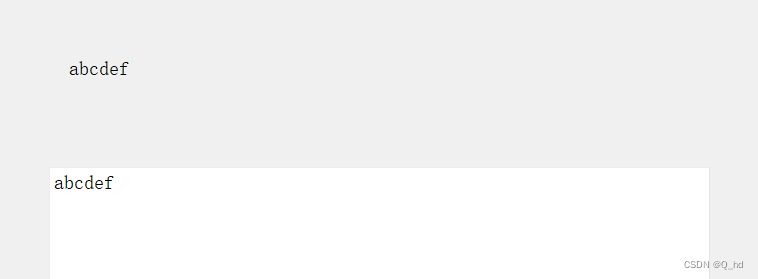
QLineEdit: 用来表示单行输入框,可以输入一段文本,当不能换行。
text: 输入文本框 这个text属性不仅仅可以通过代码来设置,用户在输入框中编辑,也会影响到text进行编辑,也会影响到
text值的变换。
1)通过代码中设置text,界面上的文本会发生变化。
2)直接操作修改界面上的文## 标题本(输入框,可以编辑的),text属性的值也会发生改变。
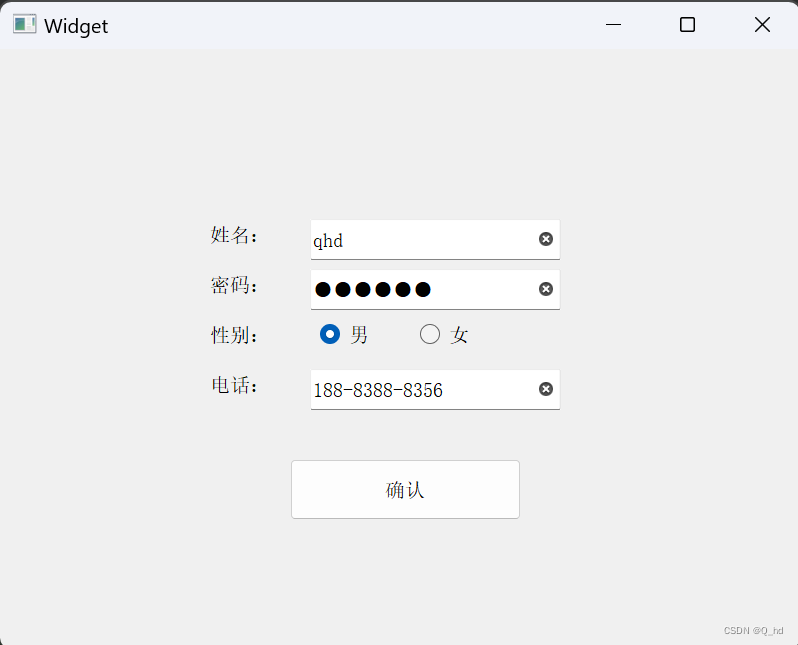
1.1. 代码示例: 录入个人信息
让用户输入个人信息:
1)姓名
2)密码
3)性别
4)电话
通过提交按钮,把上述内容给统一获取到
#include "widget.h"
#include "ui_widget.h"
#include <QDebug>

Widget::Widget(QWidget *parent)
    : QWidget(parent)
    , ui(new Ui::Widget)
{
    ui->setupUi(this);

    //  初始化第一个输入框,用来输入姓名
    ui->lineEdit_name->setPlaceholderText("请输入姓名"); // 未输入的时候显示
    ui->lineEdit_name->setClearButtonEnabled(true); // 添加清空按钮

    // 初始化第二个输入框,用来输入密码
    ui->lineEdit_password->setPlaceholderText("请输入密码");
    ui->lineEdit_password->setClearButtonEnabled(true);
    ui->lineEdit_password->setEchoMode(QLineEdit::Password); // 把显示模式设置成显示密码的模式

    // 初始化第三个输入框
    ui->lineEdit_phone->setPlaceholderText("请输入手机号码");
    ui->lineEdit_phone->setClearButtonEnabled(true);
    ui->lineEdit_phone->setInputMask("000-0000-0000"); // 手机号码是有固定的格式的,此处0代表 “数字”
    // inputMask 可以针对输入框的内容进行简单的校验
}

Widget::~Widget()
{
    delete ui;
}


void Widget::on_pushButton_submit_clicked()
{
    QString gender = ui->radioButton_male->isChecked() ? "男" : "女";
    qDebug() << "姓名:" << ui->lineEdit_name->text()
             << "密码:" << ui->lineEdit_password->text()
             << "性别:" << gender
             << "电话:" << ui->lineEdit_phone->text();
    // 此处咱们只是经行简单的打印,实际开发中可以通过把数据发送给服务器了
}

inputMask功能比较有限,只能进行简单的验证 如果需要复杂的验证,就需要使用“正则表达式”
计算机中通用概念,和具体编程语言无关 正则表达式,本质上就是一个带有特殊字符的字符串,特殊字符用来表示另一个字符串的特征。
此时就可以借助正则表达式来描述一些具有一定特点的字符串。(基于这些特点,就可以完成字符串的匹配)
此处的规则是,输入框要检查输入的内容是否是合法的手机号码。
如果是,则按钮设为可用状态,如果不是,则设为禁用状态。
"^1\\d{10}$"
这是一个简单的验证手机号码的正则表达式
^ 表示以 xxx 开头
^ 表示后面跟着的 1,意思是以 1 开头
\d 表是数字,为了在C++字符串中使用,需要写作 \\d
{10} 表示前面的内容重复出现10次。 \d 数字要重复出现10次
$ 表示结尾了
ui->lineEdit->setValidator(new QRegExpValidator(regExp));
只是注册一个验证器,具体验证器咱们使用,还需要写其他代码来完成
验证输入框的内容,是否合法。
只要输入框中的内容发生改变了,验证操作就应该被执行。

第一个参数,是要验证字符串。参数类型是 QString& 不是 const!!!
程序员可以定义一个Validator, 重写validate函数,此处写的RegExpValidator 是 Qt 内置的。
int &: 如果你的字符串不符合规则,是从哪个位置开始不符合的
#include "widget.h"
#include "ui_widget.h"
#include <QRegExpValidator>

Widget::Widget(QWidget *parent)
    : QWidget(parent)
    , ui(new Ui::Widget)
{
    ui->setupUi(this);

    // 就需要给单行输入框设置验证器,基于正则表达式来完成验证的!
    QRegExp regExp("^1\\d{10}$");
    ui->lineEdit->setValidator(new QRegExpValidator(regExp));
}

Widget::~Widget()
{
    delete ui;
}


void Widget::on_lineEdit_textEdited(const QString &text)
{
    QString content = text; // 这里是为了满足不是 const
    int pos = 0;
    if (ui->lineEdit->validator()->validate(content, pos) == QValidator::Acceptable){
        // 验证通过
        ui->pushButton->setEnabled(true);
    } else {
        // 验证不通过
        ui->pushButton->setEnabled(false);
    }
}
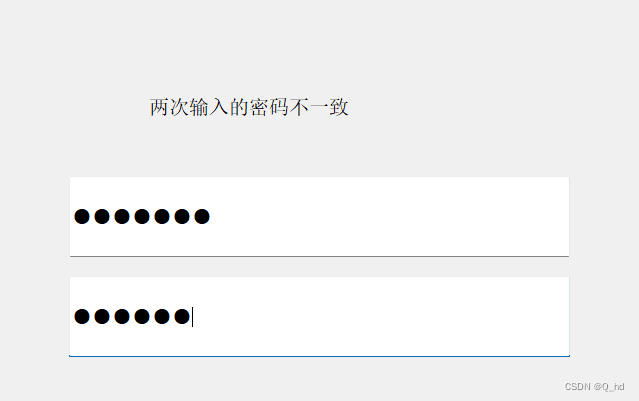
1.2. 代码示例:验证两次输入的密码一致

如果函数形参每有用到,这里会有一个警告,这个写法对于代码实际逻辑是每有任何影响的。同时可以“骗过”编译器,警告就没有了
(void) arg1;
#include "widget.h"
#include "ui_widget.h"

Widget::Widget(QWidget *parent)
    : QWidget(parent)
    , ui(new Ui::Widget)
{
    ui->setupUi(this);

    // 初始化,把这两个输入框 echoMode 设置一下
    ui->lineEdit->setEchoMode(QLineEdit::Password);
    ui->lineEdit_2->setEchoMode(QLineEdit::Password);
    ui->label->setText("密码为空");

}

Widget::~Widget()
{
    delete ui;
}

// 使用 textEdited 信号,来触发对于两个输入框内容的判定
void Widget::on_lineEdit_textEdited(const QString &arg1)
{
    (void) arg1; // 防止警告产生
    this->compare();
}

void Widget::on_lineEdit_2_textEdited(const QString &arg1)
{
    (void) arg1; // 防止警告产生
    this->compare();
}

void Widget::compare()
{
    const QString& s1 = ui->lineEdit->text();
    const QString& s2 = ui->lineEdit_2->text();
    if(s1.isEmpty() && s2.isEmpty()) {
        ui->label->setText("密码为空");
    } else if (s1 == s2) {
        ui->label->setText("两次输入密码一致");
    } else {
        ui->label->setText("两次输入的密码不一致");
    }
}
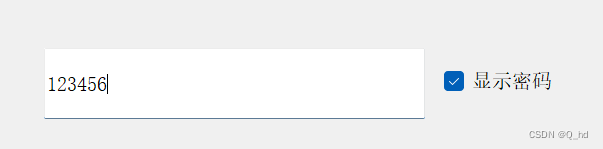
如果想让密码切换为,“显示密码”状态呢?
#include "widget.h"
#include "ui_widget.h"

Widget::Widget(QWidget *parent)
    : QWidget(parent)
    , ui(new Ui::Widget)
{
    ui->setupUi(this);

    // 初始情况下,输入框按照密码方式来显示
    ui->lineEdit->setEchoMode(QLineEdit::Password);
}

Widget::~Widget()
{
    delete ui;
}


void Widget::on_checkBox_toggled(bool checked)
{
    if (checked) {
        // true 则是 "显示密码" 状态, 输入框显示模式,设为Normal
        ui->lineEdit->setEchoMode(QLineEdit::Normal);
    } else {
        // false 则是 "隐藏密码" 状态, 就把输入框的显示模式,设为 PassWord
        ui->lineEdit->setEchoMode(QLineEdit::Password);
    }
}
2. Text Edit
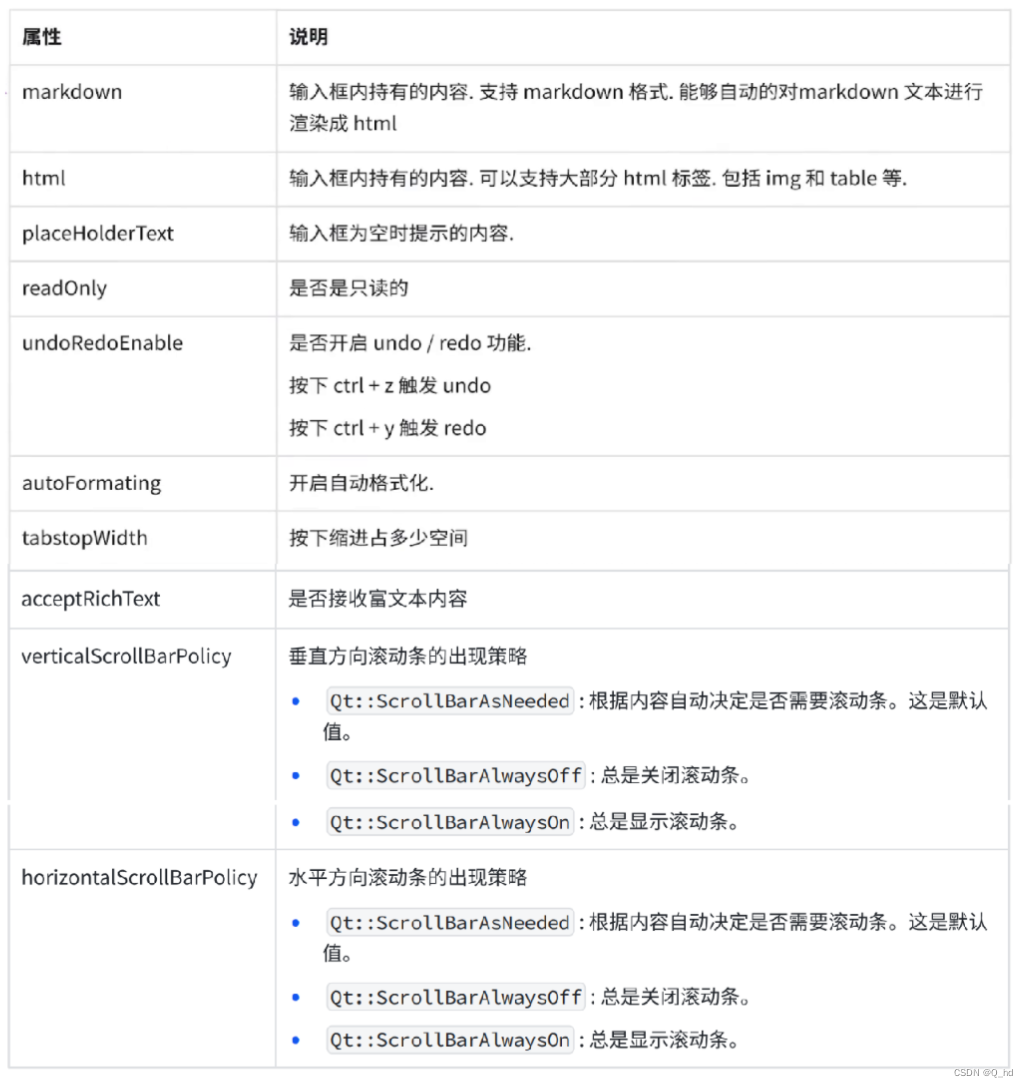
QTextEdit 表示多行输入框,也是一个富文本 &markdown 编辑器。
并且能在内容超出编辑范围时自动提供滚条。
Qt中显示多行文本有:
QTextEdit: 不仅可以表示纯文本,还可以表示 html 和 markdown
QPlainTextEdit: 只能表示纯文本(Plain Text)
2.1. 代码示例: 获取多行输入框的内容
#include "widget.h"
#include "ui_widget.h"

Widget::Widget(QWidget *parent)
    : QWidget(parent)
    , ui(new Ui::Widget)
{
    ui->setupUi(this);
}

Widget::~Widget()
{
    delete ui;
}


void Widget::on_textEdit_textChanged()
{
    // 获取到多行输入框中的内容
    const QString& text = ui->textEdit->toPlainText(); // 除了toPlainText 还有 toHtml toMarkdown
    ui->label->setText(text);
}
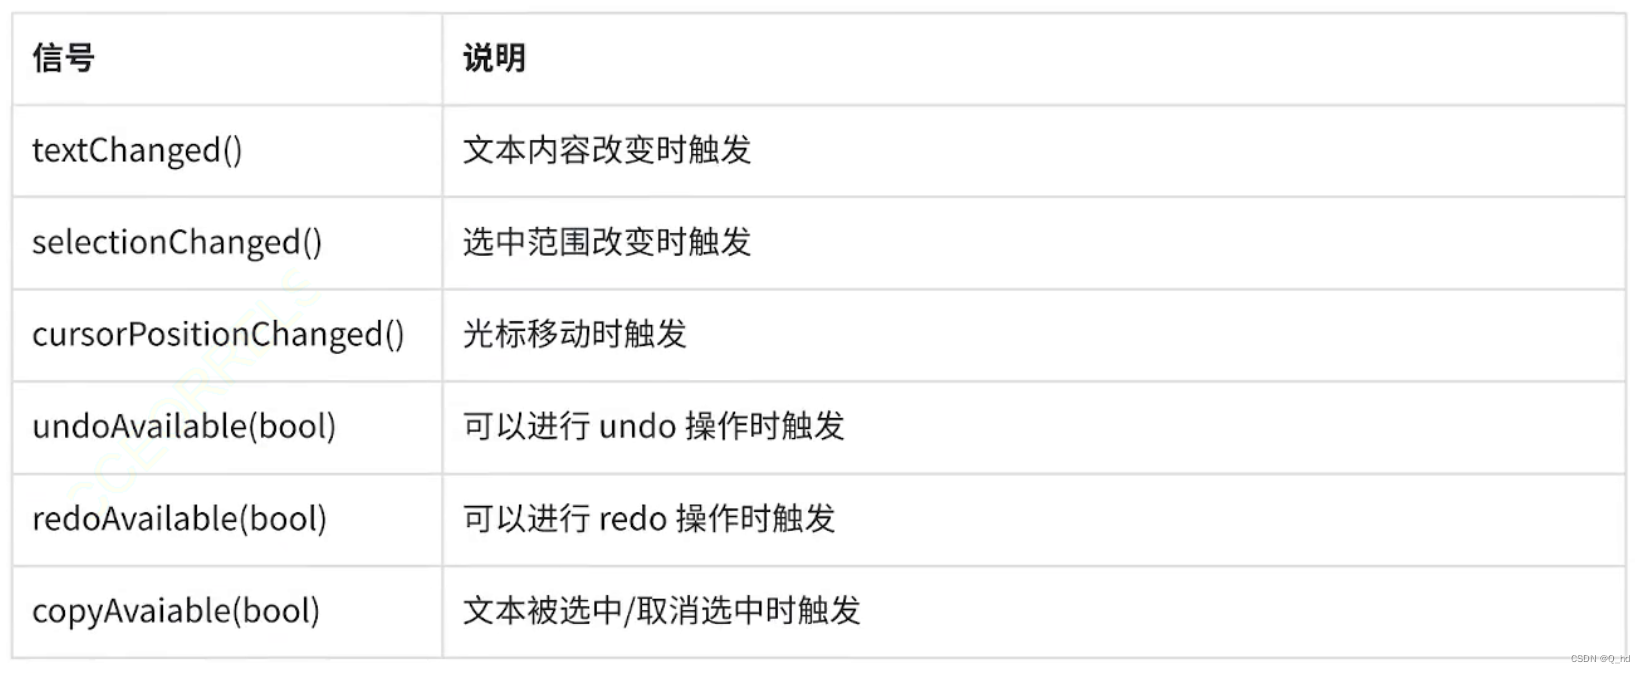
2.2. 代码示例: 验证输入框的各种信号
展示QTextEdit 的这几个信号 :
#include "widget.h"
#include "ui_widget.h"

#include <QDebug>

Widget::Widget(QWidget *parent)
    : QWidget(parent)
    , ui(new Ui::Widget)
{
    ui->setupUi(this);
}

Widget::~Widget()
{
    delete ui;
}


void Widget::on_textEdit_textChanged() // 文本框中的文本
{
    qDebug() << "textChanged:" << ui->textEdit->toPlainText();
}

void Widget::on_textEdit_selectionChanged() // 选中的文本
{
    QTextCursor cursor = ui->textEdit->textCursor();
    qDebug() << "selectionChanged:" << cursor.selectedText();
}


void Widget::on_textEdit_cursorPositionChanged() // 输入光标的位置
{
    QTextCursor cursor = ui->textEdit->textCursor();
    qDebug() << "cursorPositionChanged:" << cursor.position();
}

void Widget::on_textEdit_undoAvailable(bool b) // 可执行撤销操作
{
    qDebug() << "undoAvailable:" << b;
}

void Widget::on_textEdit_redoAvailable(bool b) // 不可执行撤销操作
{
    qDebug() << "redoAvailable:" << b;
}

void Widget::on_textEdit_copyAvailable(bool b) // 可复制
{
    qDebug() << "copyAvailable:" << b;
}
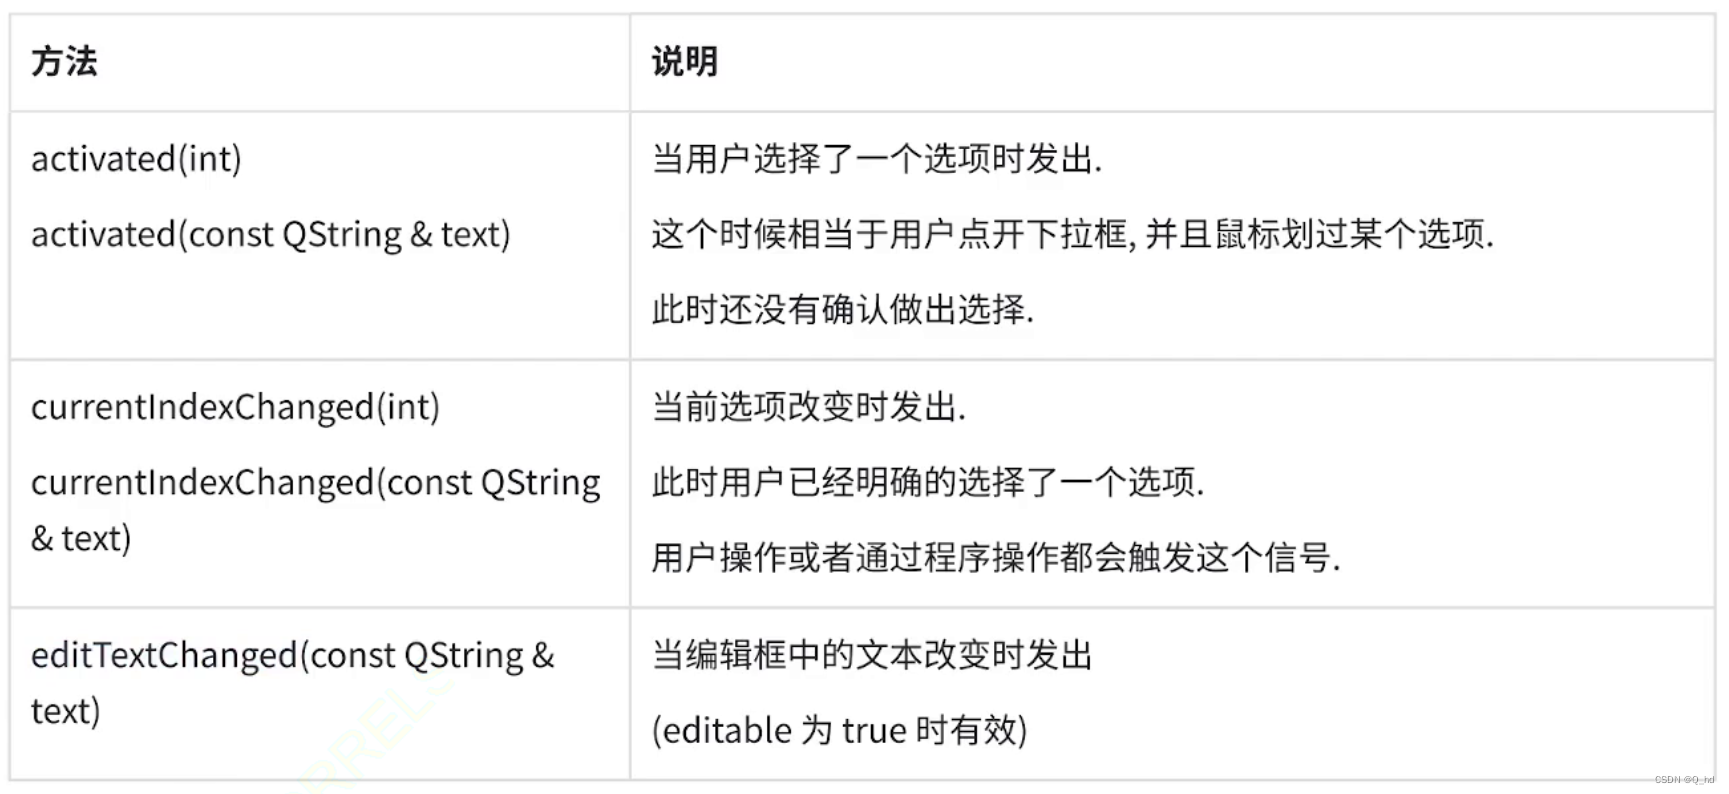
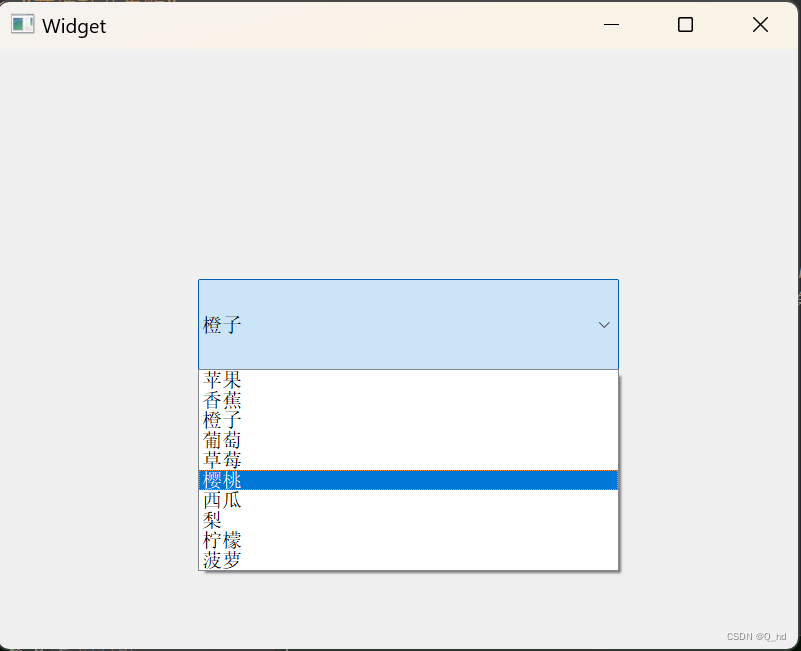
3. Combo Box
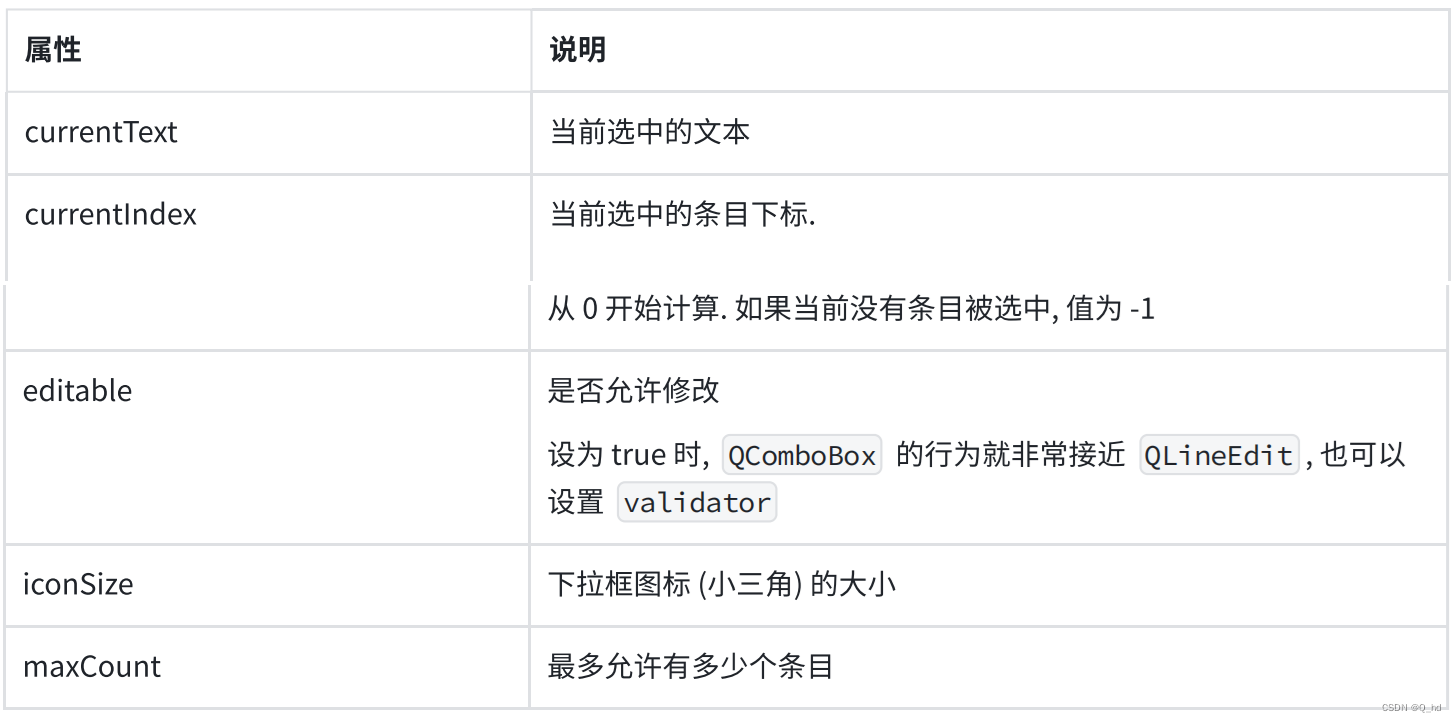
QComboBox 表示下拉框

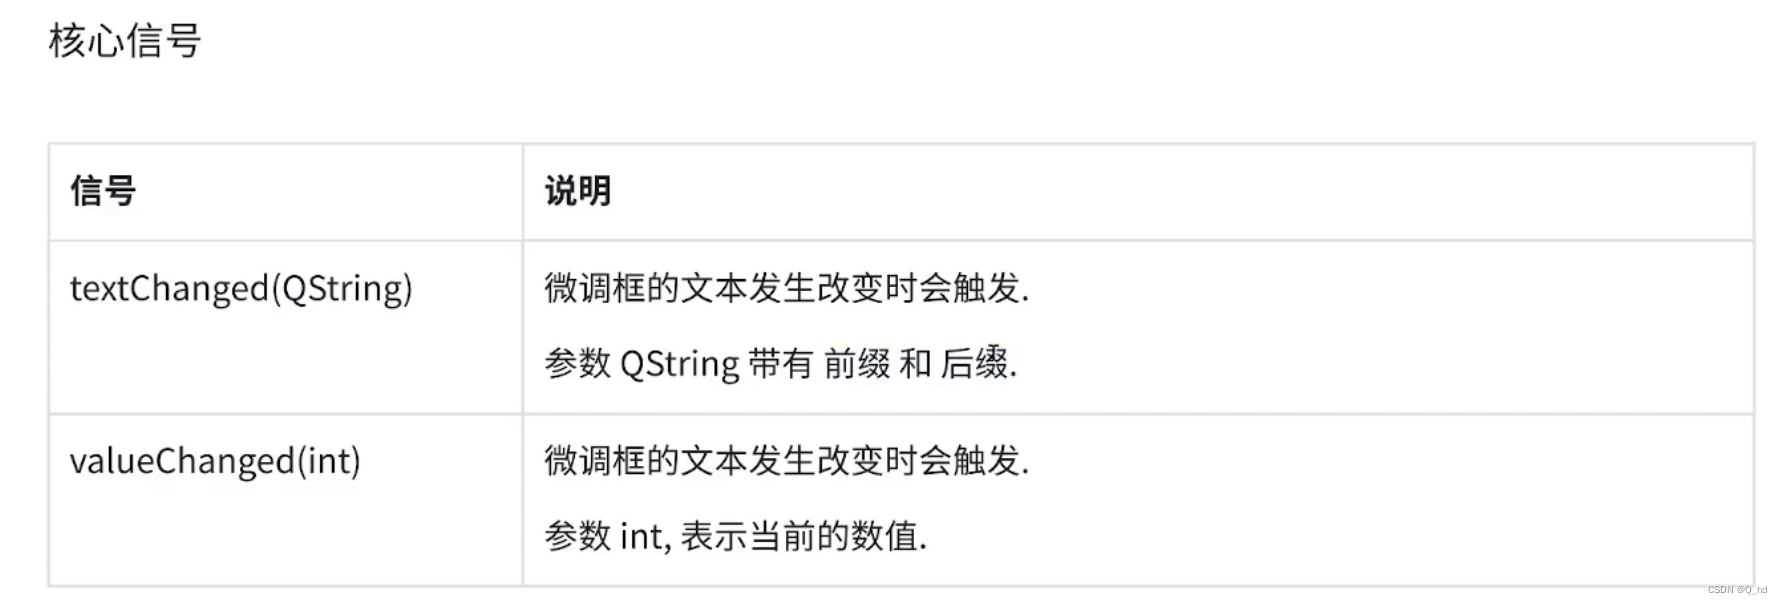
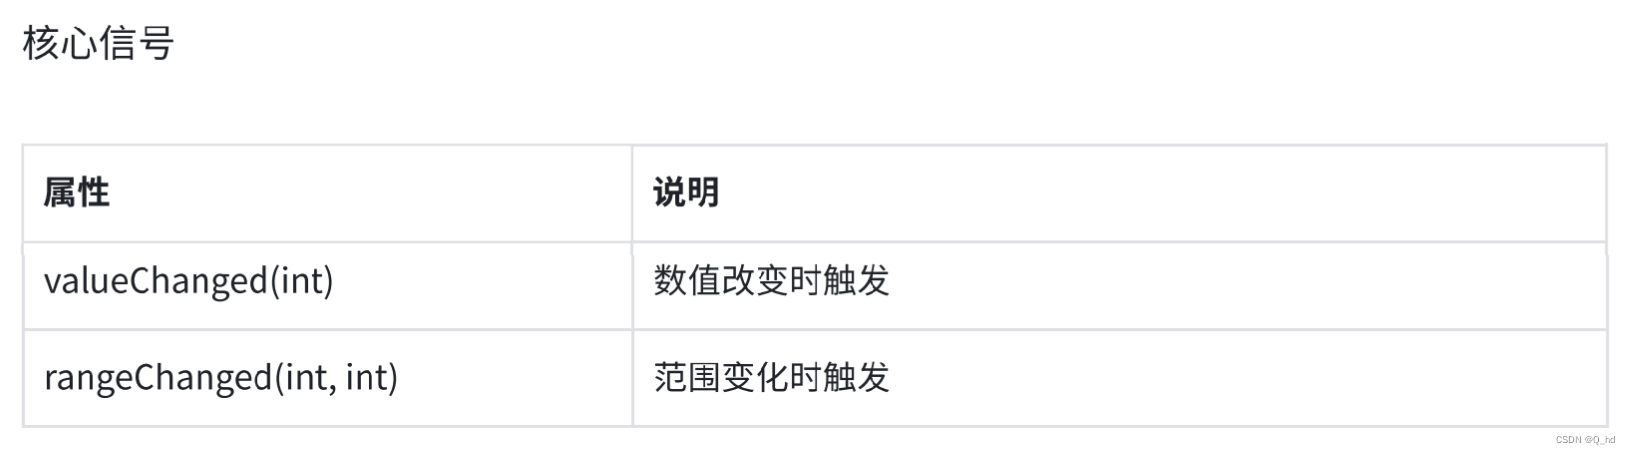
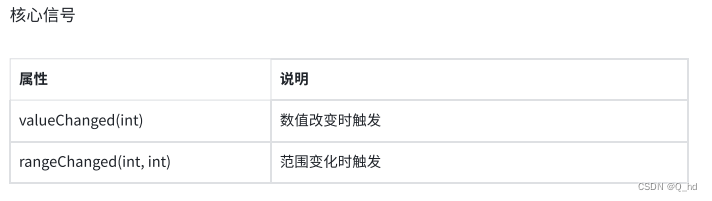
核心信号:
3.1. 代码示例: 使用下拉框模拟麦当劳点餐
用代码添加下拉框:
#include "widget.h"
#include "ui_widget.h"
#include <QDebug>

Widget::Widget(QWidget *parent)
    : QWidget(parent)
    , ui(new Ui::Widget)
{
    ui->setupUi(this);

    ui->comboBox->addItem("麦辣鸡腿堡");
    ui->comboBox->addItem("巨无霸");
    ui->comboBox->addItem("培根蔬菜牛堡");

    ui->comboBox_2->addItem("中薯条");
    ui->comboBox_2->addItem("麦乐鸡块");
    ui->comboBox_2->addItem("麦辣鸡翅");

    ui->comboBox_3->addItem("可乐");
    ui->comboBox_3->addItem("雪碧");
    ui->comboBox_3->addItem("橙汁");
}

Widget::~Widget()
{
    delete ui;
}


void Widget::on_pushButton_clicked()
{
    qDebug() << ui->comboBox->currentText() << ", "
             << ui->comboBox_2->currentText() << ","
             << ui->comboBox_3->currentText();
}
又键点击编辑项目,进行直接编辑:
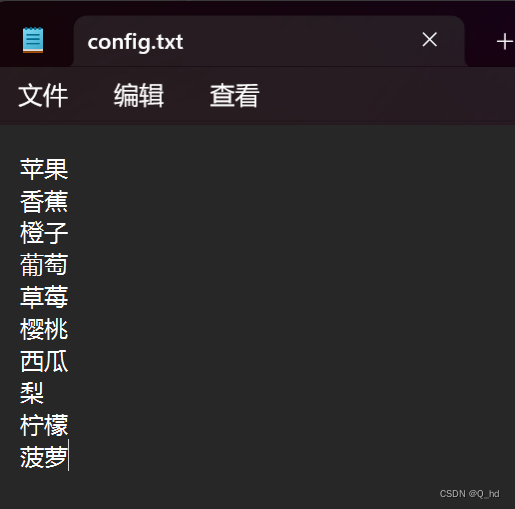
在上述模拟麦当劳点餐中,下拉框里的内容,很多时候不是代码中写死的,而是通过 文件/网络 加载数据得到的!
比如说,在一个txt文件中存放:
- 对文件的操作:
fopen(FILE*) // C
 fstream  // C++
- 理解:intput、output:
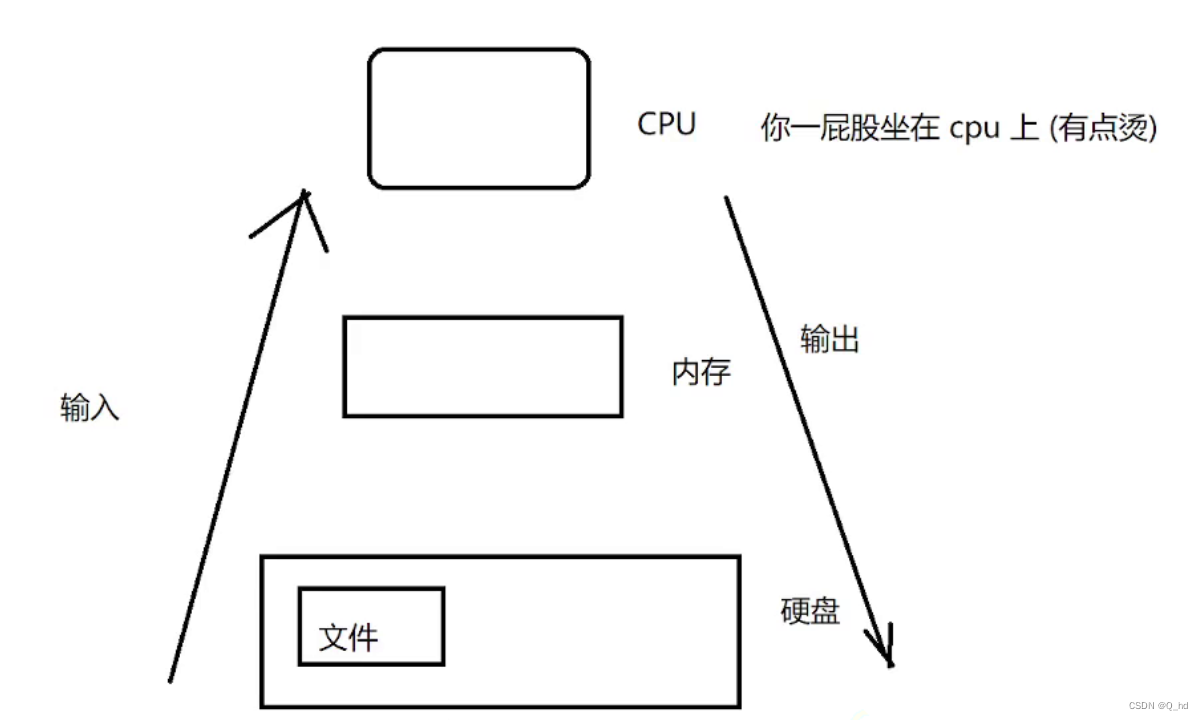
- 为什么是这样呢?
CPU是计算机的核心,一个计算机可以没有硬盘,可以没有网卡,可以没有显示器,可以没有键盘,但是不能没有CPU,一个计算机如果没有CPU,就不能是计算机了!
#include "widget.h"
#include "ui_widget.h"

#include <fstream>
#include <QDebug>
#include <QString>

Widget::Widget(QWidget *parent)
    : QWidget(parent)
    , ui(new Ui::Widget)
{
    ui->setupUi(this);

    // 需要读取文件内容,把文件中的每一行读取出来,作为一个 ComboBox 的选项
    std::ifstream file("D:/Acode/class111/test_-qt/Qt/20240517_QComboBox2/config.txt");

    if (!file.is_open()) {
        qDebug() << "文件打开失败";
        return;
    }
    // 按行来读取文本内容
    // getline 函数完成

    std::string line;
    while (std::getline(file, line)) {
        // 取到的每一行内容,设置到下拉框中
        ui->comboBox->addItem(QString::fromStdString(line)); // 此处要求的是Qstring 而不是 string
                                                            // 这里是将 sting 转换成 Qstring
        QString s;
        s.toStdString(); // 将QString转换成为string
    }
    file.close();
}

Widget::~Widget()
{
    delete ui;
}
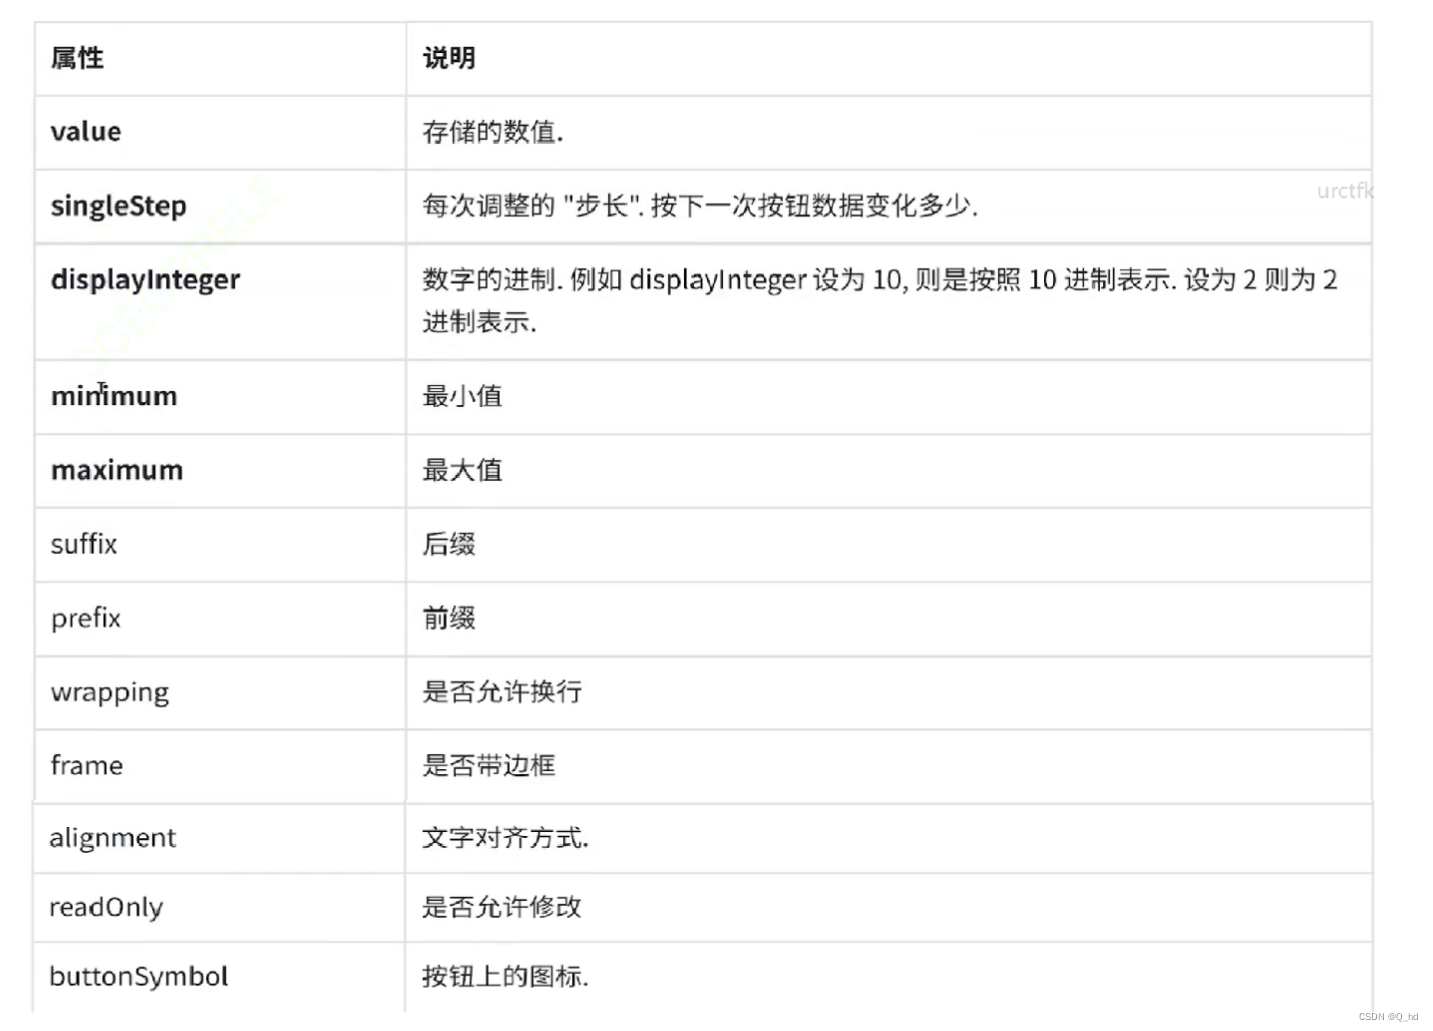
4. Spin Box
使用 QSpinBox 或者 QDoubleSpinBox 表示 “微调框”, 它是带有按钮的输入框,可以用输入整行/浮点数。通过点击按钮来修改数值大小。
由于SpinBox 和 QDubleSpinBox 用法基本相同,就只介绍了 SpinBox 的使用了。
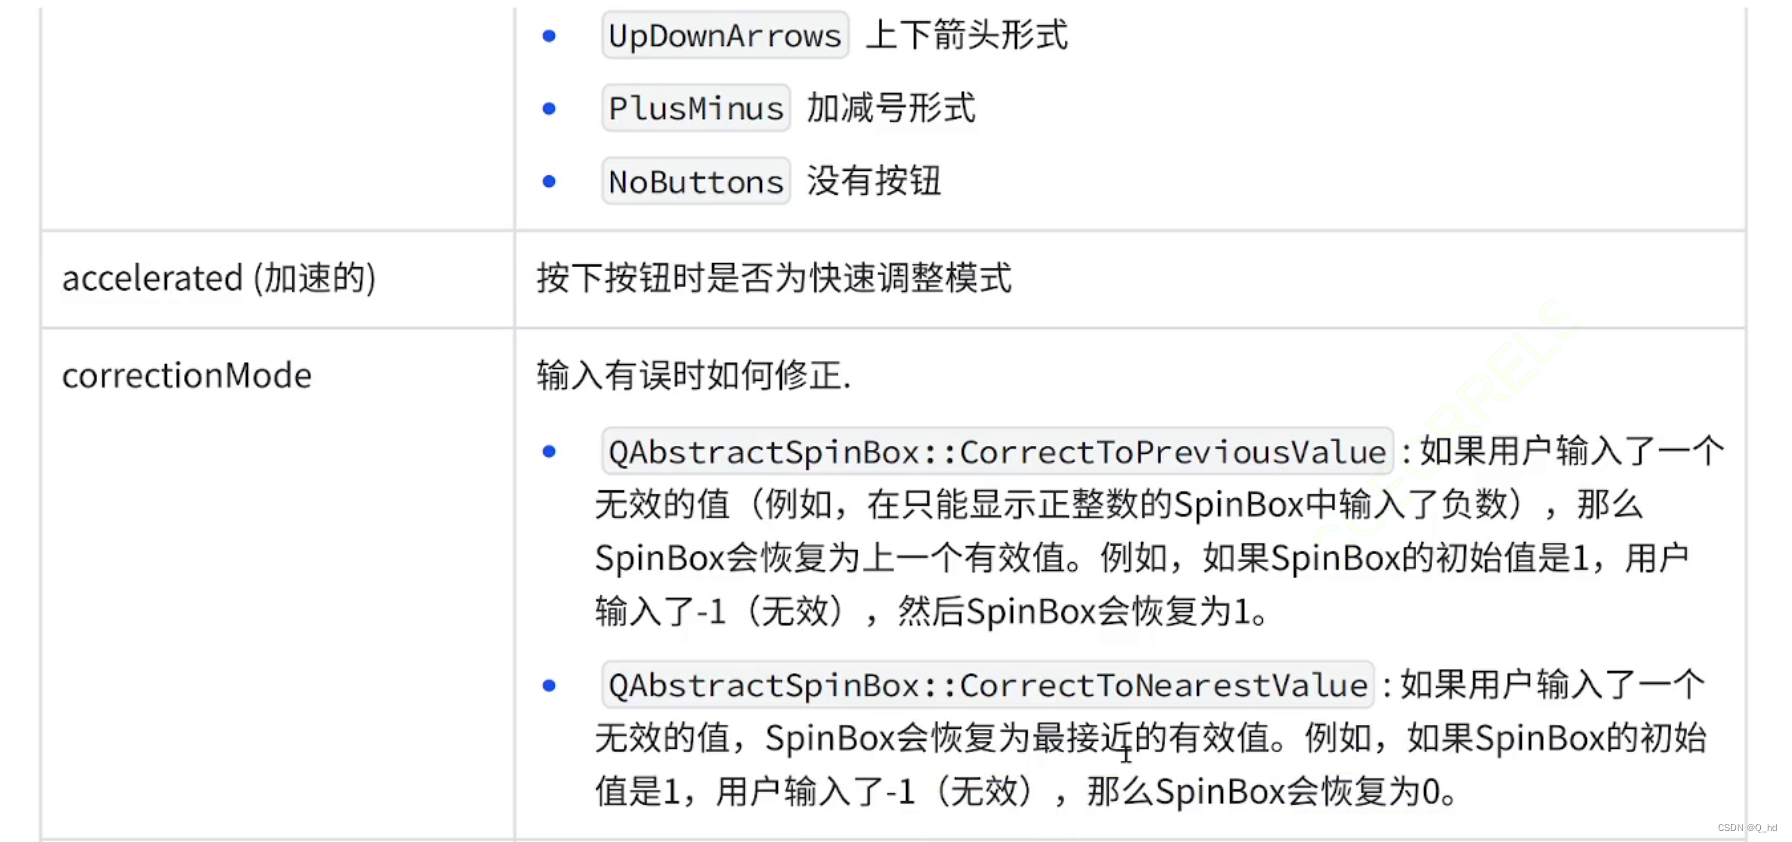
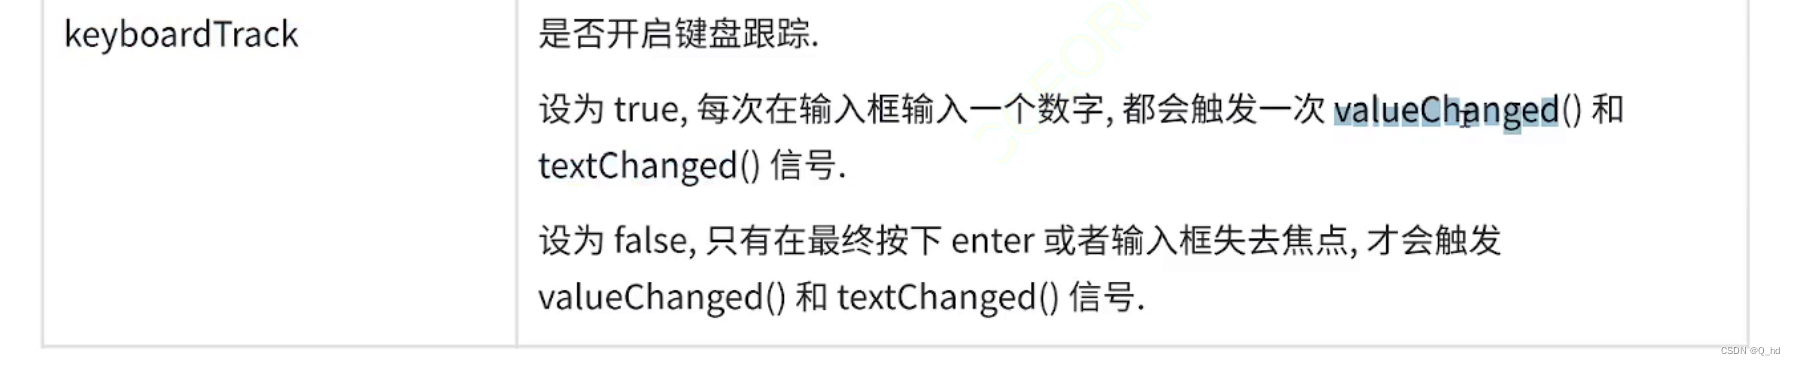
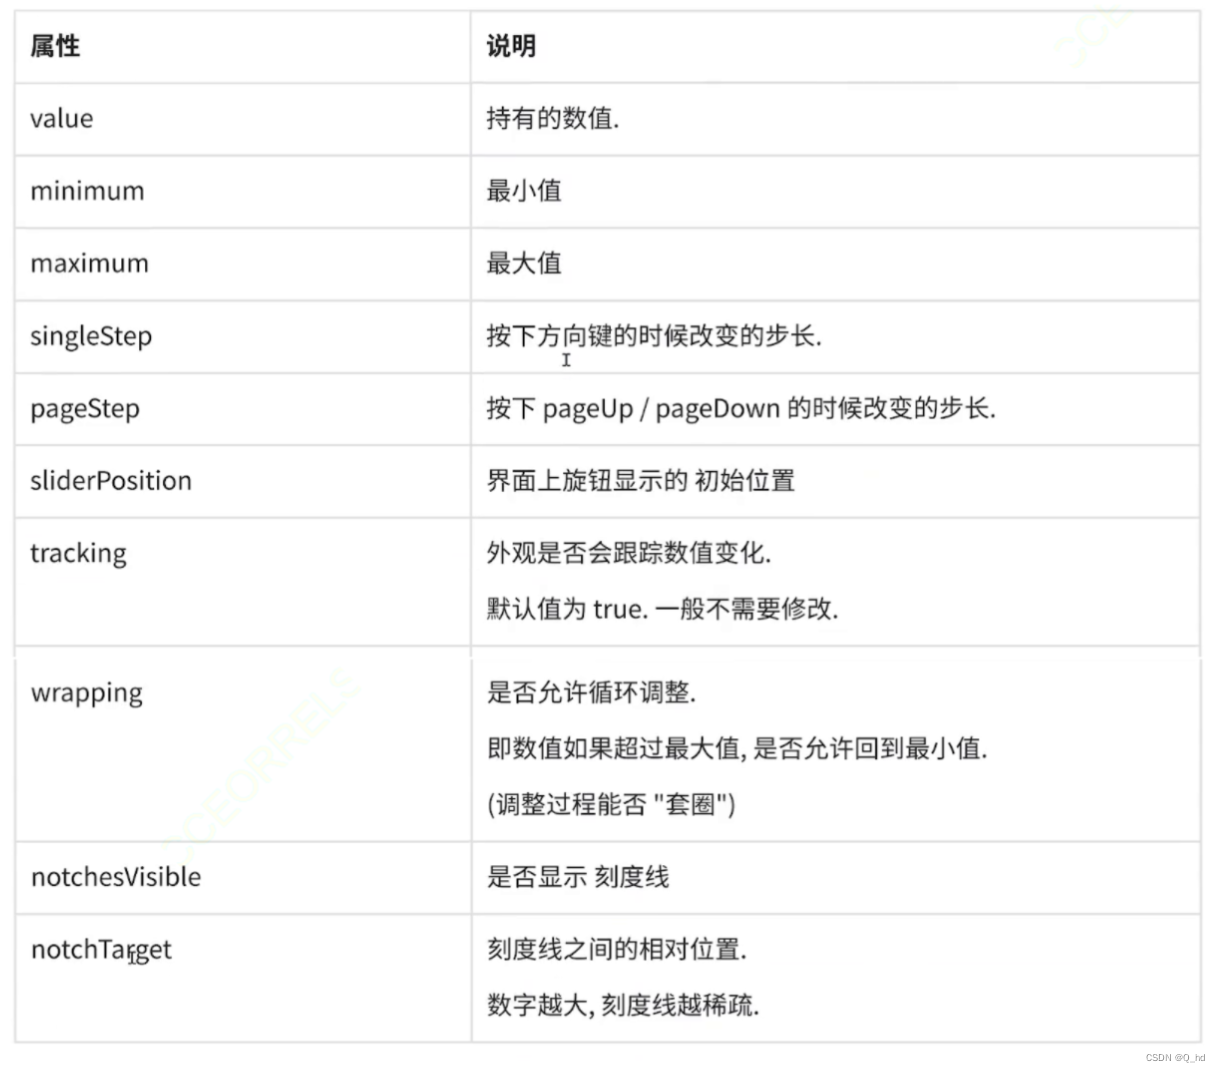
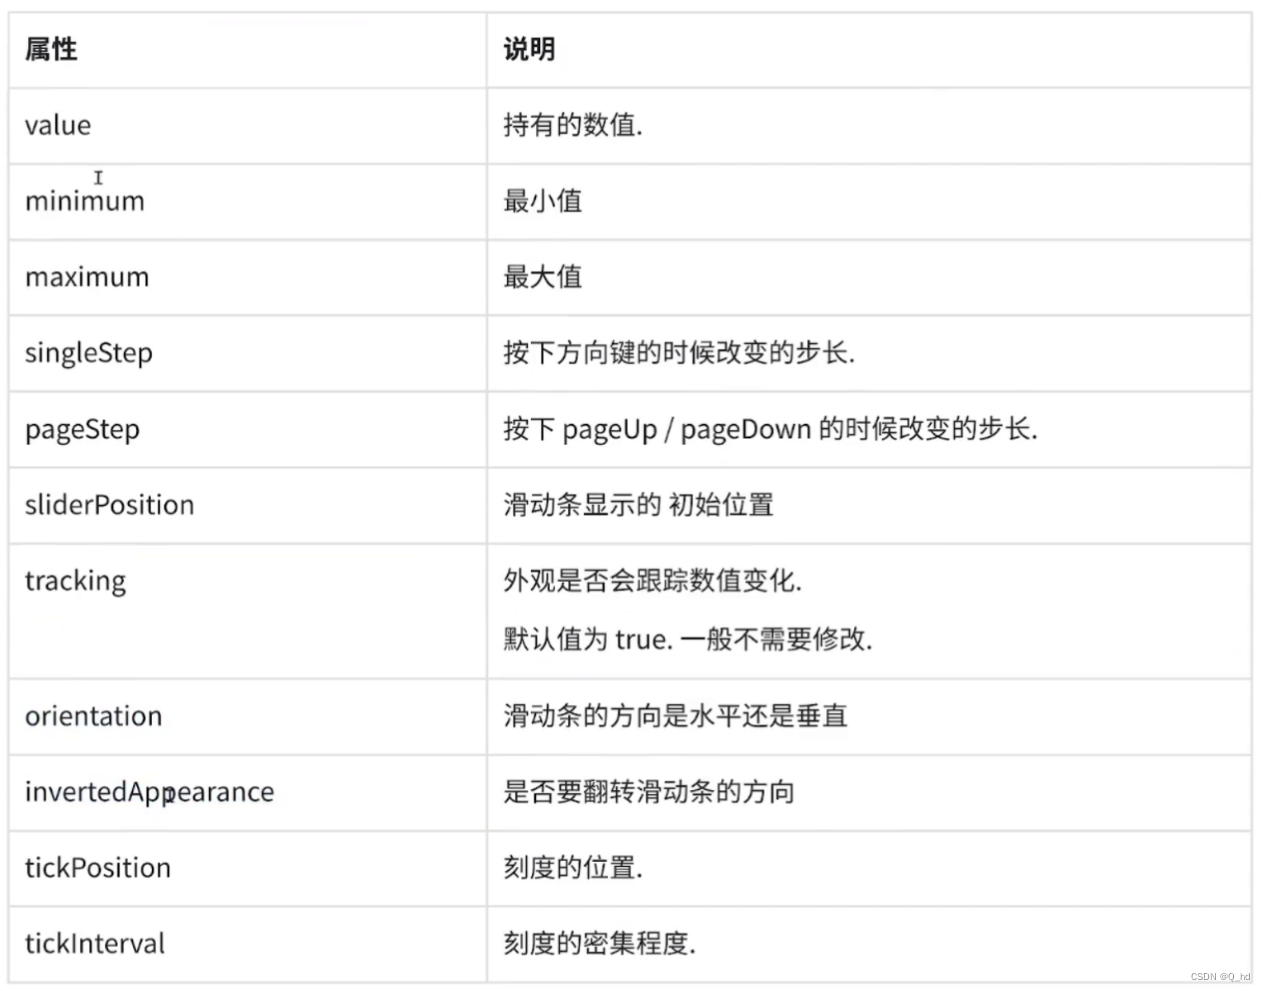
QSpinBox 关系属性
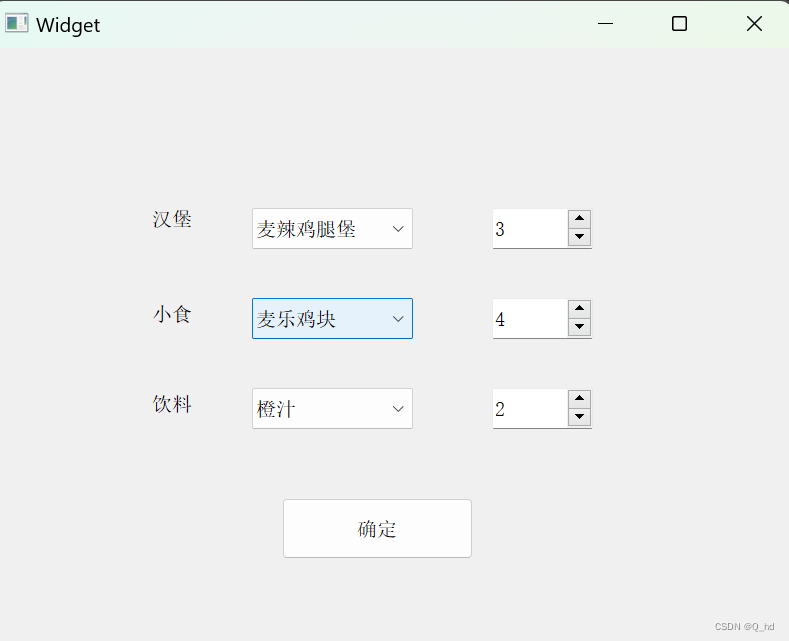
4.1. 代码示例: 调整麦当劳购物车中的份数
通过下拉框来选择每个食物的种类,再通过微调框来调整份数
#include "widget.h"
#include "ui_widget.h"
#include <QDebug>

Widget::Widget(QWidget *parent)
    : QWidget(parent)
    , ui(new Ui::Widget)
{
    ui->setupUi(this);

    // 初始化下拉菜单
    ui->comboBox->addItem("麦辣鸡腿堡");
    ui->comboBox->addItem("巨无霸");
    ui->comboBox->addItem("培根蔬菜双层牛堡");

    ui->comboBox_2->addItem("中薯条");
    ui->comboBox_2->addItem("麦乐鸡块");
    ui->comboBox_2->addItem("麦辣鸡翅");

    ui->comboBox_3->addItem("雪碧");
    ui->comboBox_3->addItem("可乐");
    ui->comboBox_3->addItem("橙汁");


    //针对 QSpinBox 的范围进行设置
    ui->spinBox->setRange(1, 5);
    ui->spinBox_2->setRange(1, 5);
    ui->spinBox_3->setRange(1, 5);

    ui->spinBox->setValue(1);
    ui->spinBox_2->setValue(1);
    ui->spinBox_3->setValue(1);
}

Widget::~Widget()
{
    delete ui;
}


void Widget::on_pushButton_clicked()
{
    qDebug() << "当前下单的内容:"
             << ui->comboBox->currentText() << ": " << ui->spinBox->value()
             << ui->comboBox_2->currentText() << ": " << ui->spinBox_2->value()
             << ui->comboBox_3->currentText() << ": " << ui->spinBox_3->value();
}

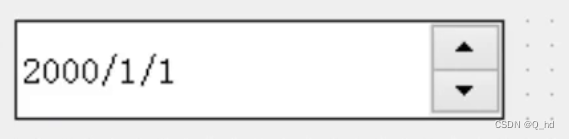
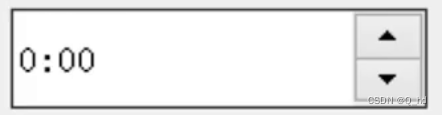
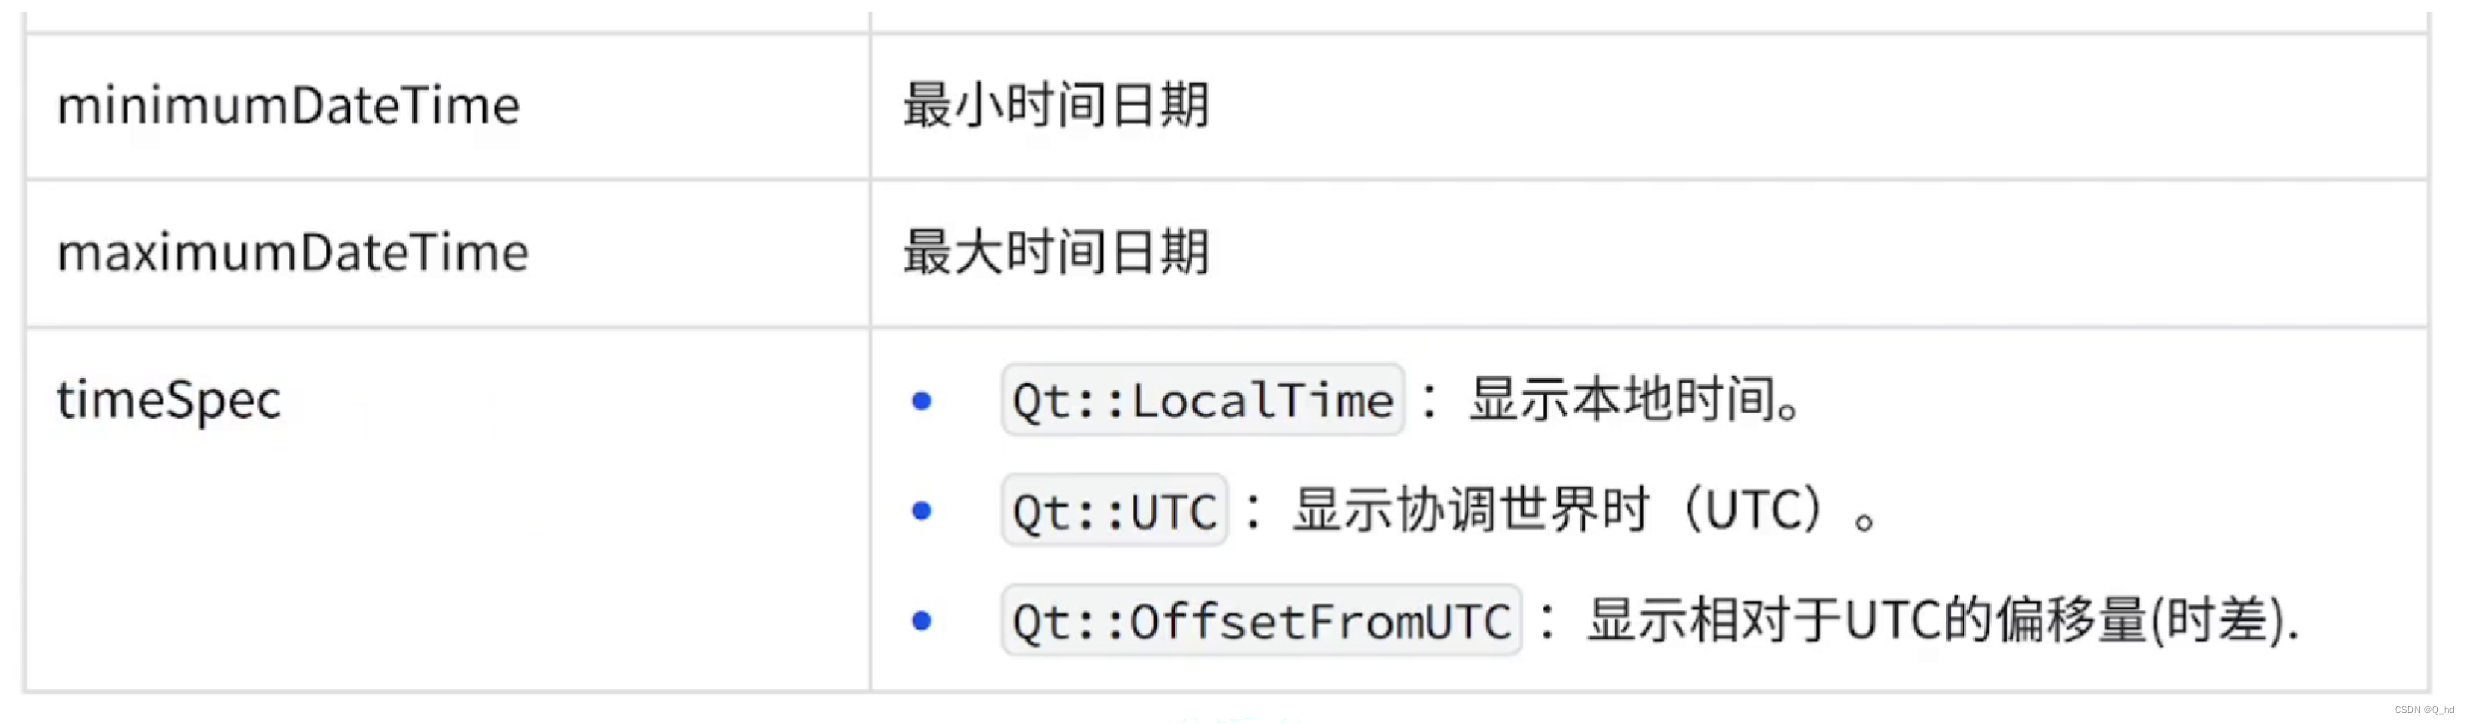
5. Date Edit & Time Edit
使用 QDateEdit 作为日期的微调框
使用 QTimeEdit 作为时间微调框
使用 QDateTimeEdit 作为时间日期微调框
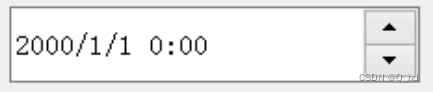
下面就以:QDateTimeEdit 为例:
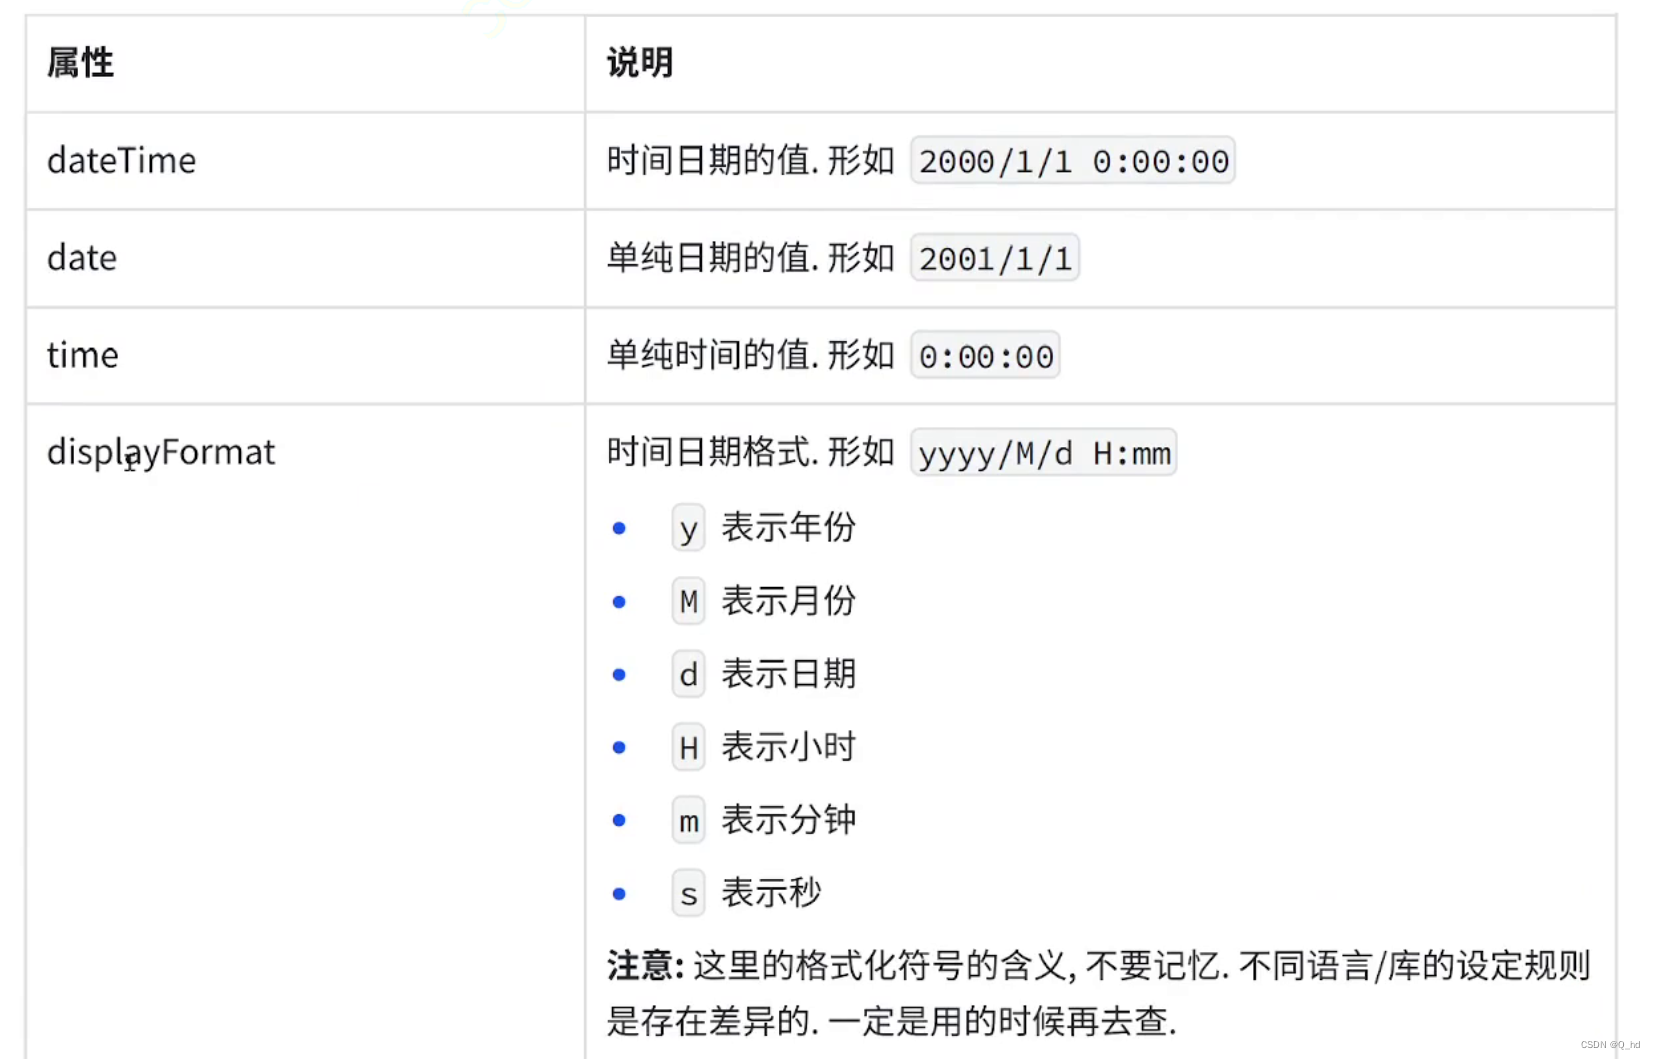
displayFormat: 通过一些特殊字符来描述时间日期的格式:2023 年 01 月 01 日
2023 - 01 - 01
2023 / 01 / 01
01 / 01 / 2023
日常使用的时间格式,没有一个统一的标准
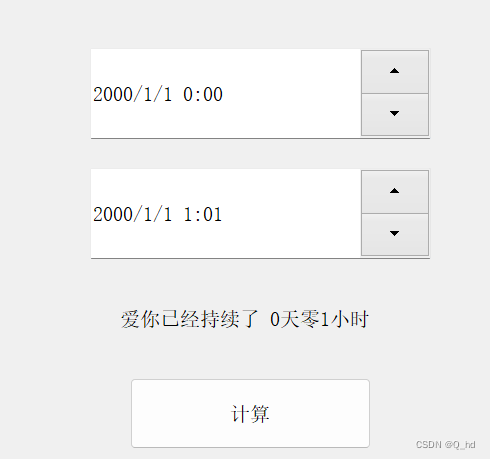
5.1. 代码示例: 实现日期计算器
时间计算器:计算两个时间中间的间隔是多少天/ 多少小时
QDateTime 提供了两个函数:
daysTo 计算两个时间日期的差值
secsTo 计算两个时间的秒数差值
#include "widget.h"
#include "ui_widget.h"
#include <QDebug>

Widget::Widget(QWidget *parent)
    : QWidget(parent)
    , ui(new Ui::Widget)
{
    ui->setupUi(this);
}

Widget::~Widget()
{
    delete ui;
}


void Widget::on_pushButton_clicked()
{
    // 1. 先获取到这两个输入框之间的时间都是啥
    QDateTime timeOld = ui->dateTimeEdit->dateTime();
    QDateTime timeNew = ui->dateTimeEdit_2->dateTime();
    qDebug() << timeOld << timeNew;
    // 2. 计算日期的差值
    // int days = timeOld.daysTo(timeNew); // daysTo 在时间小于一天而跨越一天时,会算成一天
    int seconds = timeOld.secsTo(timeNew);
    // 3. 把秒数换算成为小时
    int hours = (seconds / 3600) % 24;
    int days = (seconds / 3600) / 24; // 如果当前得到的小时数不足24
                                     // 由于时"整数除法",就舍弃掉小数点后的内容
                                    // 得到的结果就是 0 了
    qDebug() << days << hours;
    // 4. 把计算结构放到 label 中
    ui->label->setText(QString("爱你已经持续了 ") + QString::number(days)
                       + QString("天零") + QString::number(hours) + QString("小时"));

}
6. Dial
使用 QDail 表示一个旋转按钮。
6.1. 代码示例: 调整窗口透明度
编写代码,通过旋钮来控制窗口不透明度(opacity)
#include "widget.h"
#include "ui_widget.h"
#include <QDebug>

Widget::Widget(QWidget *parent)
    : QWidget(parent)
    , ui(new Ui::Widget)
{
    ui->setupUi(this);
}

Widget::~Widget()
{
    delete ui;
}


void Widget::on_dial_valueChanged(int value)
{
    qDebug() << value;
    this->setWindowOpacity((double)value / 100);  // 不透明度是 0-1 的数值
}

- 能否借助这个旋钮实现调整系统声音呢?
可以,但是没那么容易 调整系统声音,是 Windows 系统api。
Qt 没有封装这个API 此时就需要通过 VS 写一个动态库,把系统的原生API 封装一下,再让Qt的程序来调用动态库。
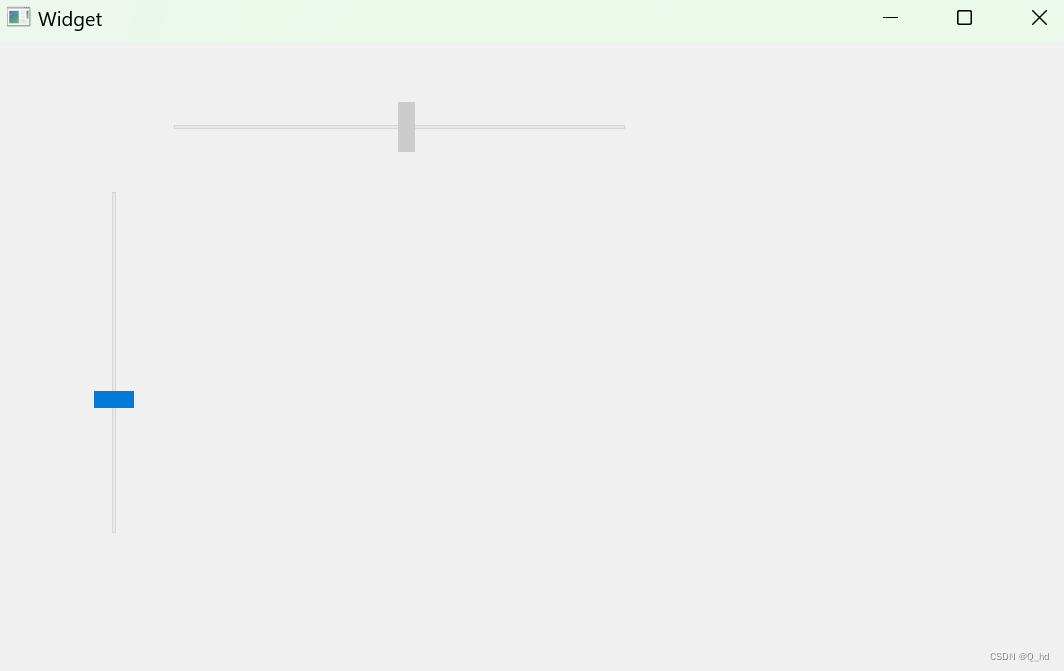
7. Slider
使用QSlider表示一个滑动条
7.1. 代码示例: 调整窗口大小
在窗口上放两个滑动条,一个水平,垂直。
滑动这两个滑动条,就能调整窗口的大小
#include "widget.h"
#include "ui_widget.h"

Widget::Widget(QWidget *parent)
    : QWidget(parent)
    , ui(new Ui::Widget)
{
    ui->setupUi(this);

    ui->horizontalSlider->setMinimum(100);
    ui->horizontalSlider->setMaximum(2000);
    ui->horizontalSlider->setValue(800);
    ui->horizontalSlider->setSingleStep(50);


    ui->verticalSlider->setMinimum(100);
    ui->verticalSlider->setMaximum(1500);
    ui->verticalSlider->setValue(600);
    ui->horizontalSlider->setSingleStep(50);
}

Widget::~Widget()
{
    delete ui;
}


void Widget::on_horizontalSlider_valueChanged(int value)
{
    const QRect& rect = this->geometry();
    this->setGeometry(rect.x(), rect.y(), value, rect.height());
}

void Widget::on_verticalSlider_valueChanged(int value)
{
    const QRect& rect = this->geometry();
    this->setGeometry(rect.x(), rect.y(), rect.width(), value);
}
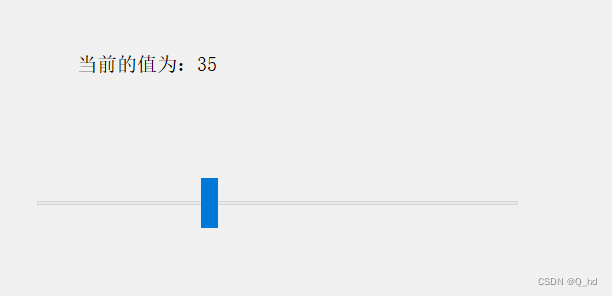
7.2. 代码示例: 通过自定义快捷键调整滑动条位置
自定义快捷键,通过快捷键来操作滑动条
滑动条本身可以通过方向键可 pageUp、pageDown 操作。
但是咱们也可以自定义!
#include "widget.h"
#include "ui_widget.h"
#include <QShortcut>

Widget::Widget(QWidget *parent)
    : QWidget(parent)
    , ui(new Ui::Widget)
{
    ui->setupUi(this);

    // 使用快捷键, 需要用到 QShortCut 类
    // 需要两个快捷键, - 进行减少 = 进行增加 (= 和 + 是一个按钮)
    QShortcut* shortCut1 = new QShortcut(this);
    shortCut1->setKey(QKeySequence("-"));
    QShortcut* shortCut2 = new QShortcut(this);
    shortCut2->setKey(QKeySequence("="));


    // 使用槽函数,感知到快捷键被按下
    connect(shortCut1, &QShortcut::activated, this, &Widget::subValue);
    connect(shortCut2, &QShortcut::activated, this, &Widget::addValue);
}

Widget::~Widget()
{
    delete ui;
}


void Widget::on_horizontalSlider_valueChanged(int value)
{
    ui->label->setText("当前的值为:" + QString::number(value));
}

void Widget::subValue()
{
    // 获取到当前的值
    int value = ui->horizontalSlider->value();
    if (value <= ui->horizontalSlider->minimum()) {
        return;
    }
    ui->horizontalSlider->setValue(value - 5);
}

void Widget::addValue()
{
    // 获取当前值
    int value = ui->horizontalSlider->value();
    if (value >= ui->horizontalSlider->maximum()) {
        return;
    }
    ui->horizontalSlider->setValue(value + 5);
}
总结:
本文通过一系列详细的代码示例,全面介绍了Qt框架中的多种常用控件及其应用场景。从基础的文本输入框到复杂的日期时间选择器,再到提供用户交互的滑动条和旋转按钮,每个控件都配有实际的编程示例,帮助读者理解其功能和用法。通过这些示例,读者可以学习到如何利用Qt提供的控件来构建具有良好用户体验的应用程序界面。同时,文章还涉及了正则表达式的使用,以及如何通过信号与槽机制和自定义快捷键来增强控件的交互功能。这些知识点对于Qt开发者来说是非常宝贵的,可以帮助他们提升应用程序的质量和用户的满意度。


 518
518


 被折叠的 条评论
为什么被折叠?
被折叠的 条评论
为什么被折叠?
 到【灌水乐园】发言


