


文章目录
JPEG原理分析及JPEG解码器的调试
原理分析
JPEG编解码流程图
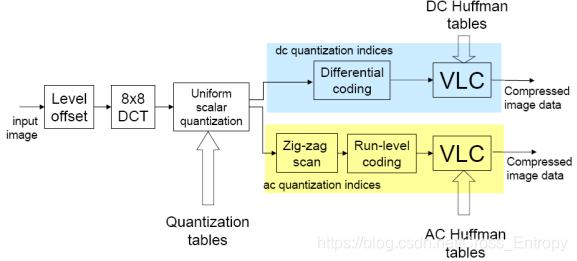
- 将传入的图像进行零电平偏置,其实就是将所有像素的数值减去128,将其范围从[0,255]变成[-128,127]。
- 进行8×8的DCT变换,实现能量集中和去相关,便于去除图像的空间冗余度。
- 使用量化表进行量化。利用根据人眼视觉特性设计的量化的量化矩阵进行量化,低频细量化,高频粗量化,进而减少视觉冗余。
- 最后对量化后的直流系数进行差分和VLC编码;对交流系数进行zig-zag扫描和游程编码最后再进行VLC编码。从而减少数据冗余。
DC系数编码
由于直流系数 F(0,0)反映了该子图像中包含的直流成分,通常较大,又由于两个相邻的子图像的直流系数通常具有较大的相关性,所以对 DC 系数采用差值脉冲编码(DPCM),即对本像素块直流系数与前一像素块直流系数的差值进行无损编码。
AC系数编码
首先,进行游程编码(RLC),并在最后加上块结束码(EOB);然后,系数序列分组,将非零系数和它前面的相邻的全部零系数分在一组内;每组用两个符号表示[(Run,Size),(Amplitude)]
其中Amplitude表示非零系数的幅度值;Run:表示零的游程即零的个数;Size:
表示非零系数的幅度值的编码位数;
JPEG文件格式
Segment组织形式
JPEG 在文件中以 Segment 的形式组织,它具有以下特点:
- 均以 0xFF 开始,后跟 1 byte 的 Marker 和 2 byte 的 Segment length(该长度包含Length本身所占用的 2 byte,指的是length及其后的数据长度)
- 采用 Motorola 序(相对于 Intel 序),即保存时高位在前,低位在后;
- Data 部分中,0xFF 后若为 0x00,则跳过此字节不予处理;
JPEG 的 Segment Marker
non-hierarchical Huffman coding
| Symbol | Code Assignment(0xFF+Marker) | Description |
|---|---|---|
| S O F 0 SOF_0 SOF0 | 0xFFC0 | Baseline DCT |
| S O F 1 SOF_1 SOF1 | 0xFFC1 | Extended sequential DCT |
| S O F 2 SOF_2 SOF2 | 0xFFC2 | Progressive DCT |
| S O F 3 SOF_3 SOF3 | 0xFFC3 | Spatial (sequential) lossless |
hierarchical Huffman coding
| Symbol | Code Assignment(0xFF+Marker) | Description |
|---|---|---|
| S O F 5 SOF_5 SOF5 | 0xFFC5 | Differential sequential DCT |
| S O F 6 SOF_6 SOF6 | 0xFFC6 | Differential progressive DCT |
| S O F 7 SOF_7 SOF7 | 0xFFC7 | Differential spatial lossless |
non-hierarchical arithmetic coding
| Symbol | Code Assignment(0xFF+Marker) | Description |
|---|---|---|
| JPG | 0xFFC8 | Reserved for JPEG extensions |
| S O F 9 SOF_9 SOF9 | 0xFFC9 | Extended sequential DCT |
| S O F 10 SOF_{10} SOF10 | 0xFFCA | Progressive DCT |
| S O F 11 SOF_{11} SOF11 | 0xFFCB | Spatial (sequential) Lossless |
hierarchical arithmetic coding
| Symbol | Code Assignment(0xFF+Marker) | Description |
|---|---|---|
| S O F 1 3 SOF_13 SOF13 | 0xFFCD | Differential sequential DCT |
| S O F 1 4 SOF_14 SOF14 | 0xFFCE | Differential progressive DCT |
| S O F 15 SOF_{15} SOF15 | 0xFFCF | Differential progressive DCT |
Huffman table specification
| Symbol | Code Assignment(0xFF+Marker) | Description |
|---|---|---|
| DHT | 0xFFC4 | Define Huffman table(s) |
arithmetic coding conditioning specification
| Symbol | Code Assignment(0xFF+Marker) | Description |
|---|---|---|
| DAC | 0xFFCC | Define arithmetic conditioning table |
Restart interval termination
| Symbol | Code Assignment(0xFF+Marker) | Description |
|---|---|---|
| RSTm | 0xFFD0~0xFFD7 | Restart with modulo 8 counter m |
Other marker
| Symbol | Code Assignment(0xFF+Marker) | Description |
|---|---|---|
| SOI | 0xFFD8 | Start of image |
| EOI | 0xFFD9 | End of image |
| SOS | 0xFFDA | Start of scan |
| DQT | 0xFFDB | Define quantization table(s) |
| DNL | 0xFFDC | Define number of lines |
| DRI | 0xFFDD | Define restart interval |
| DHP | 0xFFDE | Define hierarchical progression |
| EXP | 0xFFDF | Expand reference image(s) |
| A P P n APP_n APPn | 0xFFE0~0xFFEF | Reserved for application use |
| J P G n JPG_n JPGn | 0xFFF0~0xFFFD | Reserved for JPEG extension |
| COM | 0xFFFE | Comment |
Reserved markers
| Symbol | Code Assignment(0xFF+Marker) | Description |
|---|---|---|
| TEM | 0xFF01 | For temporary use in arithmetic coding |
| RES | 0xFF02~0xFFBF | Reserved |
Segment详细信息
SOI & EOI
| 标志 | 字节数 | 含义 |
|---|---|---|
| SOI | 2字节 | Start of Image,图像开始 |
| EOI | 2字节 | End of Image,图像结束 |
APP0
共有9个字段
| 字段 | 字节数 | 含义 |
|---|---|---|
| 数据长度 | 2字节 | 1-9共9个字段的总长度 |
| 标识符 | 5字节 | 固定值0x4A46494600,即字符串“JFIF0” |
| 版本号 | 2字节 | 一般是0x0102,表示JFIF的版本号1.2 |
| X和Y的密度单位 | 1字节 | 只有三个值可选 0:无单位;1:点数/英寸;2:点数/厘米 |
| X方向像素密度 | 2字节 | X方向像素密度 |
| Y方向像素密度 | 2字节 | Y方向像素密度 |
| 缩略图水平像素数目 | 1字节 | 缩略图水平像素数 |
| 缩略图垂直像素数目 | 1字节 | 缩略图垂直像素数 |
| 缩略图RGB位图 | 长度可能是3的倍数 | 缩略图RGB位图数据 |
DQT
即定义量化表。
| 字段 | 字节数 | 含义 |
|---|---|---|
| 数据长度 | 2字节 | 所有字段的总长度 |
| 量化表×n | 数据长度-2字节 | 详细内容见下表 |
量化表中字段的含义:
| 字段 | 字节数 | 含义 |
|---|---|---|
| 量化精度及量化表ID | 1字节 | 高四位精度,0表示8位,1表示16位 低四位为量化表ID,取值范围为0-3 |
| 表项 | (64×(精度+1))字节 | 表格的具体内容 |
本标记段中,量化表可以重复出现,表示有多个量化表,但最多只能出现4次。
SOF0
即帧图像开始 。
| 字段 | 字节数 | 含义 |
|---|---|---|
| 数据长度 | 2字节 | 所有字段的总长度 |
| 精度 | 1字节 | 每个数据样本的位数 通常是8位,一般软件都不支持 12位和16位 |
| 图像高度 | 2字节 | 图像高度(单位:像素) |
| 图像宽度 | 2字节 | 图像宽度(单位:像素) |
| 颜色分量数 | 1字节 | 只有3个数值可选 1:灰度图; 3:YCrCb或YIQ; 4:CMYK 而JFIF中使用YCrCb,故这里颜色分量数恒为3 |
| 颜色分量信息 | 颜色分量数×3字节 (通常为9字节) | 颜色分量ID 1字节 水平/垂直采样因子 1字节 高四位为水平采样因子,低四位为垂直采样因子 量化表 1字节 当前分量所使用量化表的ID |
DHT
即定义哈夫曼表。
| 字段 | 字节数 | 含义 |
|---|---|---|
| 数据长度 | 2字节 | 所有字段的总长度 |
| Huffman表×n | 数据长度-2字节 | 详细内容见下表 |
Huffman表中的内容:
| 字段 | 字节数 | 含义 |
|---|---|---|
| 表ID和表类型 | 1字节 | 高四位表示类型,0表示直流,1表示交流 低四位为Huffman表ID,DC表和AC表分开编码 |
| 不同位数的码字数量 | 16字节 | 不同位数码字的数量 |
| 编码内容 | 16个不同位数的码字数量之和(字节) | 编码的具体内容 |
Huffman表可以重复出现,但最多4次。对于Huffman表的存储方式在下面会有介绍。
SOS
即扫描开始。
| 字段 | 字节数 | 含义 |
|---|---|---|
| 数据长度 | 2字节 | 所有字段的总长度 |
| 颜色分量数 | 1字节 | 应该和SOF中的相应字段值相同 1:灰度图是;3: YCrCb或YIQ;4:CMYK |
| 颜色分量信息 | 2字节 | 其中包括 颜色分量ID 1字节 直流/交流系数表号 1字节 高四位:直流分量使用的哈夫曼树编号;低四位交流分量使用的哈夫曼树编号。 |
| 压缩图像数据 | 2字节 | 谱选择开始 1字节 固定值0x00 谱选择结束 1字节 固定值0x3F 谱选择 1字节 在基本JPEG中总为00 |
Huffman表存储方式说明
在标记段DHT内,包含了一个或者多个的哈夫曼表。对于单一个哈夫曼表,应该包括了三部分
- 哈夫曼表ID和表类型
- 这个字节的值为一般只有四个0x00、0x01、0x10、0x11。
- 0x00表示DC直流0号表
- 0x01表示DC直流1号表
- 0x10表示AC交流0号表
- 0x11表示AC交流1号表
- 这个字节的值为一般只有四个0x00、0x01、0x10、0x11。
- 不同位数的码字数量
- 编码内容
- 第一字段:JPEG文件的哈夫曼编码最长只有16位。所以这个字段的16个字节分别表示1-16位的编码码字在哈夫曼树中的个数。
- 第二字段:这个字段记录了哈夫曼树中各个叶子结点的权。所以,上一字段(不同位数的码字数量)的16个数值之和就应该是本字段的长度,也就是哈夫曼树中叶子结点个数。
举个例子:FF C4 00 3E 00 00 03 01 01 01 01 01 01 01 00 00 00 00 00 00 04 05 06 03 02 01 00 09 07 08
其中
- 红色部分表示哈夫曼表的ID和表的类型,本例中0x00表示此部分数据描述的是DC交流0号表。
- 蓝色部分表示为不同码长的码字的数量。本例中,即码长为1的码字有0个,码长为2的码字有3个,码长为3的码字有1个,以此类推。
- 绿色部分的字节数等于蓝色部分的数值相加。此处为10字节。表示每个叶子节点从小到大(所谓从小到大实际上是指的码长和出现顺序)排序后,对应的权值(权值对直流和交流系数的含义不同)。
建立huffman树/表
Huffman码表的建立方式比较简单,
具体方法为:
- 第一个码字必定为0
- 如果第一个码字位数为1,则码字为0;
- 如果第一个码字位数为2,则码字为00;
- 以此类推
- 从第二个码字开始
- 如果它和它前面的码字位数相同,则当前码字为它前面的码字加1;
- 如果它的位数比它前面的码字位数大,则当前码字是前面的码字加1后再在后边添若干个0,直至满足位数长度为止。
按照上述方法,可以根据上一个例子建立一个霍夫曼码表:
| 序号 | 码长 | 码字 | 权值 |
|---|---|---|---|
| 1 | 2 | 00 | 4 |
| 2 | 2 | 01 | 5 |
| 3 | 2 | 10 | 6 |
| 4 | 3 | 110 | 3 |
| 5 | 4 | 1110 | 2 |
| 6 | 5 | 11110 | 1 |
| 7 | 6 | 111110 | 0 |
| 8 | 7 | 1111110 | 9 |
| 9 | 8 | 11111110 | 7 |
| 10 | 9 | 111111110 | 8 |
代码解析
具体实现为:
/*
 * Takes two array of bits, and build the huffman table for size, and code
 * 使用两个关于bits的数组构建出来huffmantable
 * lookup will return the symbol if the code is less or equal than HUFFMAN_HASH_NBITS.
 * lookup表会返回编码后的码字,如果编码长度小于等于HUFFMAN_HASH_NBITS
 * code_size will be used to known how many bits this symbol is encoded.
 * 编码大小会被用来表示这个符号的长度为多少bit
 * slowtable will be used when the first lookup didn't give the result.
 * 当上述查找表无法使用给出答案的时候,使用slowtable
 */
static void build_huffman_table(const unsigned char* bits, const unsigned char* vals, struct huffman_table* table)
{
	//bits为每个长度出现的频次,vals是权值,table是要构建的霍夫曼表
	unsigned int i, j, code, code_size, val, nbits;
	unsigned char huffsize[HUFFMAN_BITS_SIZE + 1], * hz;
	unsigned int huffcode[HUFFMAN_BITS_SIZE + 1], * hc;
	int next_free_entry;

	/*
	 * Build a temp array
	 *   huffsize[X] => numbers of bits to write vals[X]
	 *   huffsize[x]表示用多少bit去表示vals[X]
	 * bits数组表示该huffman编码长度的出现的次数
	 * 下列代码将所有子节点初始化
	 */
	hz = huffsize;
	for (i = 1; i <= 16; i++)
	{
		for (j = 1; j <= bits[i]; j++)
			*hz++ = i;
	}
	*hz = 0;

	//初始化lookup表,全部赋值为最大值。初始化slowtable全为0
	memset(table->lookup, 0xff, sizeof(table->lookup));
	for (i = 0; i < (16 - HUFFMAN_HASH_NBITS); i++)
		table->slowtable[i][0] = 0;

	/* Build a temp array
	 *   huffcode[X] => code used to write vals[X]
	 *   huffcode[X] 表示用来表示vals[X]的编码
	 */
	code = 0;
	hc = huffcode;
	hz = huffsize;
	nbits = *hz;
	while (*hz)
	{
		//当长度没有变化的时候下一个编码为上一个+1
		while (*hz == nbits)
		{
			*hc++ = code++;
			hz++;
		}
		//当长度发生变换的时候则是+1补零
		code <<= 1;
		nbits++;
	}

	/*
	 * Build the lookup table, and the slowtable if needed.
	 * 建立慢速查找表,如果有需要
	 */
	next_free_entry = -1;
	//如果 huffsize[i]不为0,则执行循环
	for (i = 0; huffsize[i]; i++)
	{
		//获取值,编码,和码长
		val = vals[i];
		code = huffcode[i];
		code_size = huffsize[i];
		//建立权值和码长的关系
		table->code_size[val] = code_size;
		if (code_size <= HUFFMAN_HASH_NBITS)
		{
			/*
			 * Good: val can be put in the lookup table, so fill all value of this
			 * column with value val
			 * 如果code_size小于HUFFMAN_HASH_NBITS,即查找表的固定长度
			 * 就重复 1UL << (HUFFMAN_HASH_NBITS - code_size) 次
			 * 就相当于把表格中码字后边的所有位数补全,并把它的值全赋值成val
			 */
			int repeat = 1UL << (HUFFMAN_HASH_NBITS - code_size);
			code <<= HUFFMAN_HASH_NBITS - code_size;
			while (repeat--)
				table->lookup[code++] = val;

		}
		else
		{
			uint16_t* slowtable = table->slowtable[code_size - HUFFMAN_HASH_NBITS - 1];
			//如果当前查找表已经有值了,那就存储到下一个位置
			while (slowtable[0])
				slowtable += 2;
			slowtable[0] = code;
			slowtable[1] = val;
			slowtable[2] = 0;
			/* TODO: NEED TO CHECK FOR AN OVERFLOW OF THE TABLE */
		}

	}
}
JPEG中Huffman解码过程
代码解析
直接用代码进行说明吧:
static int get_next_huffman_code(struct jdec_private* priv, struct huffman_table* huffman_table)
{
	int value, hcode;
	unsigned int extra_nbits, nbits;
	uint16_t* slowtable;
	//读取HUFFMAN_HASH_NBITS比特,并赋值给hcode
	look_nbits(priv->reservoir, priv->nbits_in_reservoir, priv->stream, HUFFMAN_HASH_NBITS, hcode);
	//在霍夫曼码表中找到对应的权值
	value = huffman_table->lookup[hcode];
	if (__likely(value >= 0))
	{
		unsigned int code_size = huffman_table->code_size[value];
		//跳过code_size比特
		skip_nbits(priv->reservoir, priv->nbits_in_reservoir, priv->stream, code_size);
		//返回权值
		return value;
	}

	/* Decode more bits each time ...每次读取更多bit */
	for (extra_nbits = 0; extra_nbits < 16 - HUFFMAN_HASH_NBITS; extra_nbits++)
	{
		nbits = HUFFMAN_HASH_NBITS + 1 + extra_nbits;
		//读取n比特
		look_nbits(priv->reservoir, priv->nbits_in_reservoir, priv->stream, nbits, hcode);
		slowtable = huffman_table->slowtable[extra_nbits];
		/* Search if the code is in this array */
		while (slowtable[0]) {
			if (slowtable[0] == hcode) {
				//如果找到,那么将当前的bit数跳过并返回权值
				skip_nbits(priv->reservoir, priv->nbits_in_reservoir, priv->stream, nbits);
				return slowtable[1];
			}
			slowtable += 2;//查找下一个位置有没有
		}
	}
	return 0;
}
直流
对于直流来说,权值是解码时需要额外读入的bit位数。这个再次读入的数通过查表来得到真正的码值。
比如比特流:0110101011
由于前缀码的特性,读入01后码字结束,查表可以得到额外比特数为5,所以需要额外读5位数,此处为10101,译码可以得到21。所以直流系数为21.要注意的是,直流系数是差分编码之后得到的。
实际中的过程是把所有的颜色分量单元按颜色分量(Y、Cr、Cb)分类。每一种颜色分量内,相邻的两个颜色分量单元的直流变量是以差分来编码的。也就是说,通过Huffman码表解码出来的直流变量数值只是当前颜色分量单元的实际直流变量减去前一个颜色分量单元的实际直流变量。也就是说,当前直流变量要通过前一个颜色分量单元的实际(非解码)直流分量来校正,即 D C n = D C n − 1 + D i f f DC_n=DC_{n-1}+Diff DCn=DCn−1+Diff,其中Diff为差分校正变量,也就是直接解码出来的直流系数。但如果当前颜色分量单元是第一个单元,则解码出来的直流数值就是真正的直流变量。
交流
对于交流系数,用交流哈夫曼树/表查得该码字对应的权值。权值的高4位表示当前数值前面有多少个连续的零,低4位表示该交流分量数值的二进制位数,也就是接下来需要读入的位数。
例如,权值0X31可以表示为(3,1)。表明交流系数前面有3个0,此外交流系数的具体值还需要再读入1bit的码字才能得到。
JPEG 的解码流程
-
读取文件
-
解析 Segment Marker
-
解析 SOI
-
解析 APP0
-
检查标识“JFIF”及版本
-
得到一些参数
-
-
解析 DQT
- 得到量化表长度(可能包含多张量化表)
- 得到量化表的精度
- 得到及检查量化表的序号(只能是 0 ——3)
- 得到量化表内容(64 个数据)
-
解析 SOF0
-
得到每个 sample 的比特数、长宽、颜色分量数
-
得到每个颜色分量的 ID、水平采样因子、垂直采样因子、使用的量化表序号(与 DQT 中序号对应)
-
解析 DHT
-
-
解析 DHT
- 得到 Huffman 表的类型(AC、DC)、序号
- 依据数据重建 Huffman 表
-
解析 SOS
- 得到解析每个颜色分量的 DC、AC 值所使用的 Huffman 表序号(与 DHT 中序号对应)
-
-
依据每个分量的水平、垂直采样因子计算 MCU 的大小,并得到每个 MCU 中 8*8宏块的个数
-
对每个 MCU 解码(依照各分量水平、垂直采样因子对 MCU中每个分量宏块解码)
- 对每个宏块进行 Huffman 解码,得到 DCT 系数
- 对每个宏块的 DCT 系数进行 IDCT,得到 Y、Cb、Cr
- 遇到 Segment Marker RST 时,清空之前的 DC DCT 系数
-
解析到 EOI,解码结束
-
将 Y、Cb、Cr 转化为需要的色彩空间并保存。
部分代码解释
convert_one_image
加载一个jpeg图像,对其进行解压缩,并存储结果
/**
 * Load one jpeg image, and decompress it, and save the result.
 * 加载一个jpeg图像,对其进行解压缩,并存储结果
 */
int convert_one_image(const char *infilename, const char *outfilename, int output_format)
{
  FILE *fp;
  unsigned int length_of_file;
  unsigned int width, height;
  unsigned char *buf;
  struct jdec_private *jdec;
  unsigned char *components[3];

  /* Load the Jpeg into memory */
  fp = fopen(infilename, "rb");
  if (fp == NULL)
    exitmessage("Cannot open filename\n");
  length_of_file = filesize(fp);
  buf = (unsigned char *)malloc(length_of_file + 4);
  if (buf == NULL)
    exitmessage("Not enough memory for loading file\n");
  fread(buf, length_of_file, 1, fp);
  fclose(fp);

  /* Decompress it 初始化解码器*/
  jdec = tinyjpeg_init();
  if (jdec == NULL)
    exitmessage("Not enough memory to alloc the structure need for decompressing\n");
  //对header进行解码
  if (tinyjpeg_parse_header(jdec, buf, length_of_file)<0)
    exitmessage(tinyjpeg_get_errorstring(jdec));

  /* Get the size of the image 获取图像大小*/
  tinyjpeg_get_size(jdec, &width, &height);

  snprintf(error_string, sizeof(error_string),"Decoding JPEG image...\n");
  //进行解码
  if (tinyjpeg_decode(jdec, output_format) < 0)
    exitmessage(tinyjpeg_get_errorstring(jdec));

  /*
   * Get address for each plane (not only max 3 planes is supported), and
   * depending of the output mode, only some components will be filled
   * RGB: 1 plane, YUV420P: 3 planes, GREY: 1 plane
   * 根据所选的输出方式选择输出模式,获取每一个通道的地址。
   */
  tinyjpeg_get_components(jdec, components);

  /* Save it */
  switch (output_format)
   {
    case TINYJPEG_FMT_RGB24:
    case TINYJPEG_FMT_BGR24:
      write_tga(outfilename, output_format, width, height, components);
      break;
    case TINYJPEG_FMT_YUV420P:
      write_yuv(outfilename, width, height, components);
      break;
    case TINYJPEG_FMT_GREY:
      write_pgm(outfilename, width, height, components);
      break;
   }
  //释放内存
  /* Only called this if the buffers were allocated by tinyjpeg_decode() */
  tinyjpeg_free(jdec);
  /* else called just free(jdec); */

  free(buf);
  return 0;
}
tinyjpeg_decode
对图片进行解码。
/**
* Decode and convert the jpeg image into @pixfmt@ image
*
* Note: components will be automaticaly allocated if no memory is attached.
*/
int tinyjpeg_decode(struct jdec_private* priv, int pixfmt)
{
unsigned int x, y, xstride_by_mcu, ystride_by_mcu;
unsigned int bytes_per_blocklines[3], bytes_per_mcu[3];
decode_MCU_fct decode_MCU;
const decode_MCU_fct* decode_mcu_table;
const convert_colorspace_fct* colorspace_array_conv;
convert_colorspace_fct convert_to_pixfmt;
if (setjmp(priv->jump_state))
return -1;
/* To keep gcc happy initialize some array */
bytes_per_mcu[1] = 0;
bytes_per_mcu[2] = 0;
bytes_per_blocklines[1] = 0;
bytes_per_blocklines[2] = 0;
decode_mcu_table = decode_mcu_3comp_table;
switch (pixfmt) {
case TINYJPEG_FMT_YUV420P:
colorspace_array_conv = convert_colorspace_yuv420p;
if (priv->components[0] == NULL)
priv->components[0] = (uint8_t*)malloc(priv->width * priv->height);
if (priv->components[1] == NULL)
priv->components[1] = (uint8_t*)malloc(priv->width * priv->height / 4);
if (priv->components[2] == NULL)
priv->components[2] = (uint8_t*)malloc(priv->width * priv->height / 4);
bytes_per_blocklines[0] = priv->width;
bytes_per_blocklines[1] = priv->width / 4;
bytes_per_blocklines[2] = priv->width / 4;
bytes_per_mcu[0] = 8;
bytes_per_mcu[1] = 4;
bytes_per_mcu[2] = 4;
break;
case TINYJPEG_FMT_RGB24:
colorspace_array_conv = convert_colorspace_rgb24;
if (priv->components[0] == NULL)
priv->components[0] = (uint8_t*)malloc(priv->width * priv->height * 3);
bytes_per_blocklines[0] = priv->width * 3;
bytes_per_mcu[0] = 3 * 8;
break;
case TINYJPEG_FMT_BGR24:
colorspace_array_conv = convert_colorspace_bgr24;
if (priv->components[0] == NULL)
priv->components[0] = (uint8_t*)malloc(priv->width * priv->height * 3);
bytes_per_blocklines[0] = priv->width * 3;
bytes_per_mcu[0] = 3 * 8;
break;
case TINYJPEG_FMT_GREY:
decode_mcu_table = decode_mcu_1comp_table;
colorspace_array_conv = convert_colorspace_grey;
if (priv->components[0] == NULL)
priv->components[0] = (uint8_t*)malloc(priv->width * priv->height);
bytes_per_blocklines[0] = priv->width;
bytes_per_mcu[0] = 8;
break;
default:
#if TRACE
fprintf(p_trace, "Bad pixel format\n");
fflush(p_trace);
#endif
return -1;
}
//选择合适的采样方式来进行解码
xstride_by_mcu = ystride_by_mcu = 8;
if ((priv->component_infos[cY].Hfactor | priv->component_infos[cY].Vfactor) == 1) {
decode_MCU = decode_mcu_table[0];
convert_to_pixfmt = colorspace_array_conv[0];
#if TRACE
fprintf(p_trace, "Use decode 1x1 sampling\n");
fflush(p_trace);
#endif
}
else if (priv->component_infos[cY].Hfactor == 1) {
decode_MCU = decode_mcu_table[1];
convert_to_pixfmt = colorspace_array_conv[1];
ystride_by_mcu = 16;
#if TRACE
fprintf(p_trace, "Use decode 1x2 sampling (not supported)\n");
fflush(p_trace);
#endif
}
else if (priv->component_infos[cY].Vfactor == 2) {
decode_MCU = decode_mcu_table[3];
convert_to_pixfmt = colorspace_array_conv[3];
xstride_by_mcu = 16;
ystride_by_mcu = 16;
#if TRACE
fprintf(p_trace, "Use decode 2x2 sampling\n");
fflush(p_trace);
#endif
}
else {
decode_MCU = decode_mcu_table[2];
convert_to_pixfmt = colorspace_array_conv[2];
xstride_by_mcu = 16;
#if TRACE
fprintf(p_trace, "Use decode 2x1 sampling\n");
fflush(p_trace);
#endif
}
resync(priv);
/* Don't forget to that block can be either 8 or 16 lines */
bytes_per_blocklines[0] *= ystride_by_mcu;
bytes_per_blocklines[1] *= ystride_by_mcu;
bytes_per_blocklines[2] *= ystride_by_mcu;
bytes_per_mcu[0] *= xstride_by_mcu / 8;
bytes_per_mcu[1] *= xstride_by_mcu / 8;
bytes_per_mcu[2] *= xstride_by_mcu / 8;
/* Just the decode the image by macroblock (size is 8x8, 8x16, or 16x16) */
//对每个块进行解码
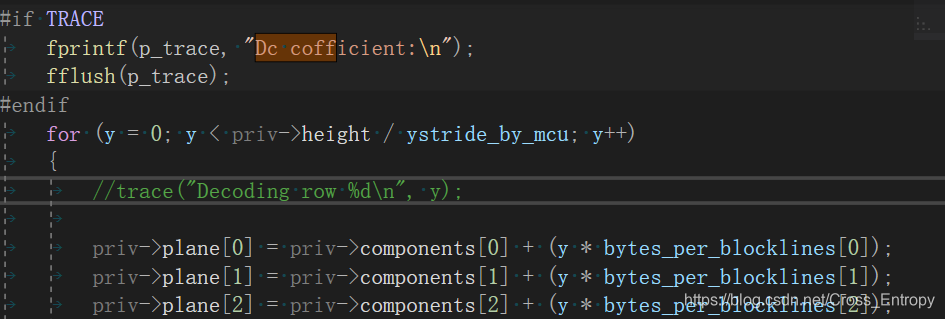
for (y = 0; y < priv->height / ystride_by_mcu; y++)
{
//trace("Decoding row %d\n", y);
priv->plane[0] = priv->components[0] + (y * bytes_per_blocklines[0]);
priv->plane[1] = priv->components[1] + (y * bytes_per_blocklines[1]);
priv->plane[2] = priv->components[2] + (y * bytes_per_blocklines[2]);
//一块一块的进行
for (x = 0; x < priv->width; x += xstride_by_mcu)
{
decode_MCU(priv);
convert_to_pixfmt(priv);
priv->plane[0] += bytes_per_mcu[0];
priv->plane[1] += bytes_per_mcu[1];
priv->plane[2] += bytes_per_mcu[2];
if (priv->restarts_to_go > 0)
{
priv->restarts_to_go--;
if (priv->restarts_to_go == 0)
{
priv->stream -= (priv->nbits_in_reservoir / 8);
resync(priv);
if (find_next_rst_marker(priv) < 0)
return -1;
}
}
}
}
#if TRACE
fprintf(p_trace, "Input file size: %d\n", priv->stream_length + 2);
fprintf(p_trace, "Input bytes actually read: %d\n", priv->stream - priv->stream_begin + 2);
fflush(p_trace);
#endif
return 0;
}
YCrCB_to_YUV420P_1x1
将YCrCb换成YUV4:2:0格式。还有类似的函数起到相同的功能,一般看名字就可以理解。
static void YCrCB_to_YUV420P_1x1(struct jdec_private* priv)
{
	const unsigned char* s, * y;
	unsigned char* p;
	int i, j;

	p = priv->plane[0];
	y = priv->Y;
	for (i = 0; i < 8; i++)
	{
		memcpy(p, y, 8);
		p += priv->width;
		y += 8;
	}

	p = priv->plane[1];
	s = priv->Cb;
	for (i = 0; i < 8; i += 2)
	{
		for (j = 0; j < 8; j += 2, s += 2)
			*p++ = *s;
		s += 8; /* Skip one line */
		p += priv->width / 2 - 4;
	}

	p = priv->plane[2];
	s = priv->Cr;
	for (i = 0; i < 8; i += 2)
	{
		for (j = 0; j < 8; j += 2, s += 2)
			*p++ = *s;
		s += 8; /* Skip one line */
		p += priv->width / 2 - 4;
	}
}
resync
初始化jdec_private。
static void resync(struct jdec_private* priv)
{
	int i;

	/* Init DC coefficients 初始化DC系数*/
	for (i = 0; i < COMPONENTS; i++)
		priv->component_infos[i].previous_DC = 0;

	priv->reservoir = 0;
	priv->nbits_in_reservoir = 0;
	if (priv->restart_interval > 0)
		priv->restarts_to_go = priv->restart_interval;
	else
		priv->restarts_to_go = -1;
}
decode_MCU_1x1_3planes
即对每个通道进行解码。类似的函数还有多个。
static void decode_MCU_1x1_3planes(struct jdec_private* priv)
{
	// Y
	process_Huffman_data_unit(priv, cY);
	IDCT(&priv->component_infos[cY], priv->Y, 8);

	// Cb
	process_Huffman_data_unit(priv, cCb);
	IDCT(&priv->component_infos[cCb], priv->Cb, 8);

	// Cr
	process_Huffman_data_unit(priv, cCr);
	IDCT(&priv->component_infos[cCr], priv->Cr, 8);
}
process_Huffman_data_unit
/**
*
* Decode a single block that contains the DCT coefficients.
* 解码出单个DCT系数的块
* The table coefficients is already dezigzaged at the end of the operation.
* 表格的系数已经在操作最后进行了反zig-zag变换
*/
static void process_Huffman_data_unit(struct jdec_private* priv, int component)
{
unsigned char j;
unsigned int huff_code;
unsigned char size_val, count_0;
//获取该component的信息
struct component* c = &priv->component_infos[component];
short int DCT[64];
/* Initialize the DCT coef table 初始化DCT系数*/
memset(DCT, 0, sizeof(DCT));
/* DC coefficient decoding 直流系数解码*/
huff_code = get_next_huffman_code(priv, c->DC_table); //对霍夫曼编码进行解码
//trace("+ %x\n", huff_code);
if (huff_code) { //如果权值不为零
//读取额外的bit
get_nbits(priv->reservoir, priv->nbits_in_reservoir, priv->stream, huff_code, DCT[0]);
//由于直流是差分编码,所以需要与前一个值相加才能获得真是值
DCT[0] += c->previous_DC;
c->previous_DC = DCT[0];
}
else {
DCT[0] = c->previous_DC;
}
/* AC coefficient decoding 交流系数解码*/
j = 1;
while (j < 64)
{
huff_code = get_next_huffman_code(priv, c->AC_table);
//trace("- %x\n", huff_code);
//前四位为需要读取的额外bit,后四位是需要跳过的0的个数
size_val = huff_code & 0xF;
count_0 = huff_code >> 4;
if (size_val == 0)
{ /* RLE */
if (count_0 == 0)
break; /* EOB found, go out EOB块结尾*/
else if (count_0 == 0xF)
j += 16; /* skip 16 zeros */
}
else
{
j += count_0; /* skip count_0 zeroes */
if (__unlikely(j >= 64))
{
snprintf(error_string, sizeof(error_string), "Bad huffman data (buffer overflow)");
break;
}
get_nbits(priv->reservoir, priv->nbits_in_reservoir, priv->stream, size_val, DCT[j]);
j++;
}
}
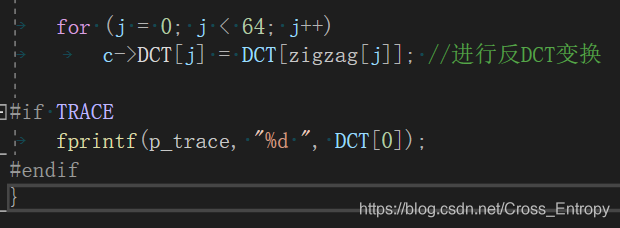
for (j = 0; j < 64; j++)
c->DCT[j] = DCT[zigzag[j]]; //进行反DCT变换
实验步骤
- 逐步调试JPEG解码器程序。将输入的JPG文件进行解码,将输出文件保存为可供YUVViewer观看的YUV文件。
- 程序调试过程中,做到
- 理解程序设计的整体框架
- 理解三个结构体的设计目的
- struct huffman_table
- struct component
- struct jdec_private
- 理解在视音频编解码调试中TRACE的目的和含义
- 会打开和关闭TRACE
- 会根据自己的要求修改TRACE
- 以txt文件输出所有的量化矩阵和所有的HUFFMAN码表。
- 输出DC图像并统计其概率分布。
- 输出某一个AC值图像并统计其概率分布。
逐步调试JPEG解码器程序。将输入的JPG文件进行解码,将输出文件保存为可供YUVViewer观看的YUV文件。
由于使用的块是8×8的,所以当图像不够一整个块的时候会填充一些额外字节。所以所选图像的宽最好是8的倍数。
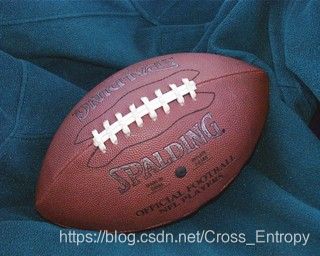
过程中用到的图片,大小320×256:
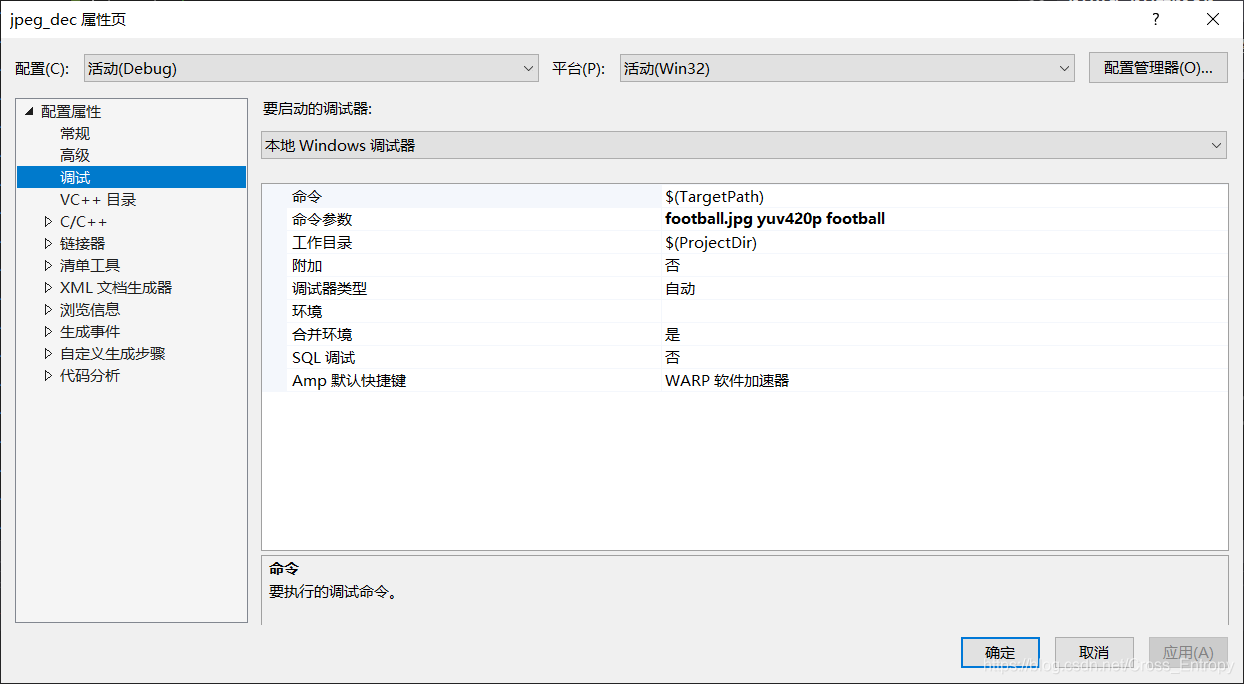
根据程序,输入如下命令行参数:
为了将输出文件保存为可供YUVViewer观看的YUV文件,找到保存yuv文件的函数:
static void write_yuv(const char *filename, int width, int height, unsigned char **components)
进行如下修改:
static void write_yuv(const char *filename, int width, int height, unsigned char **components)
{
  FILE *F;
  char temp[1024];

  snprintf(temp, 1024, "%s.Y", filename);
  F = fopen(temp, "wb");
  fwrite(components[0], width, height, F);
  fclose(F);
  snprintf(temp, 1024, "%s.U", filename);
  F = fopen(temp, "wb");
  fwrite(components[1], width*height/4, 1, F);
  fclose(F);
  snprintf(temp, 1024, "%s.V", filename);
  F = fopen(temp, "wb");
  fwrite(components[2], width*height/4, 1, F);
  fclose(F);

  snprintf(temp, 1024, "%s.YUV", filename);
  F = fopen(temp, "wb");
  fwrite(components[0], width, height, F);
  fwrite(components[1], width * height / 4, 1, F);
  fwrite(components[2], width * height / 4, 1, F);
  fclose(F);
}
使用YUVviewer打开:
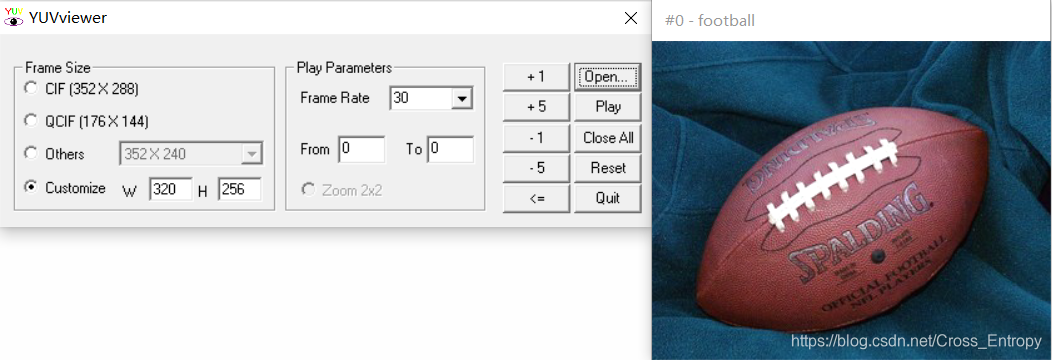
可见成功输出了yuv文件。
代码理解
程序设计的整体框架
本次程序大致分为三部分:
- 异常处理,包括trace记录
- 文件读写
- 解码
- 读取Segment信息
- 针对每个Segment进行相应的解码
解码过程则是按照文章最开始的流程图进行的。
结构体设计的目的
huffman_table
创立一个快速查找表用于快速解码。另外如果查找失败的话则使用慢速查找表。
最主要的目的就是加速解码的过程。
struct huffman_table
{
  /* Fast look up table, using HUFFMAN_HASH_NBITS bits we can have directly the symbol,
   * 快速查找表,使用HUFFMAN_HASH_NBITS个比特可以快速找到符号
   * if the symbol is <0, then we need to look into the tree table
   * 如果符号小于0,那么需要在慢速查找表中查找,lookup中返回的是权值*/
  short int lookup[HUFFMAN_HASH_SIZE];
  /* code size: give the number of bits of a symbol is encoded 给出码字的长度,输出权值对应的码长*/
  unsigned char code_size[HUFFMAN_HASH_SIZE];
  /* some place to store value that is not encoded in the lookup table
   * 给出在慢速查找表中没有出现的码字
   * FIXME: Calculate if 256 value is enough to store all values
   */
  uint16_t slowtable[16-HUFFMAN_HASH_NBITS][256];
};
component
componet主要是用来保存一个MCU块的信息。每处理一个新的MCU块后,信息都会更新。用它来保存一些解码过程中需要用到的信息,如量化表,前一个直流的值,和当前MCU的DCT块从而使解码更加简单。
struct component
{
  unsigned int Hfactor; //水平采样情况
  unsigned int Vfactor; //垂直采样情况
  float *Q_table;		/* Pointer to the quantisation table to use 指向量化表*/
  struct huffman_table *AC_table; //指向直流霍夫曼查找表
  struct huffman_table *DC_table; //指向交流霍夫曼查找表
  short int previous_DC;	/* Previous DC coefficient 前一个直流系数*/
  short int DCT[64];		/* DCT coef DCT系数*/
#if SANITY_CHECK
  unsigned int cid;
#endif
};
jdec_private
该结构体使用最为广泛,是解码过程中频繁用到的东西,起到整合基本信息、连接各个部分的作用。他保存着图像的基本信息和各通道的信息。包括了前两个结构体的内容。由于是采用指针方式,并不占用额外的空间。
struct jdec_private
{
  /* Public variables */
  uint8_t *components[COMPONENTS];
  unsigned int width, height;	/* Size of the image */
  unsigned int flags;

  /* Private variables */
  const unsigned char *stream_begin, *stream_end;
  unsigned int stream_length;

  const unsigned char *stream;	/* Pointer to the current stream */
  unsigned int reservoir, nbits_in_reservoir;

  struct component component_infos[COMPONENTS]; //每个通道的信息
  float Q_tables[COMPONENTS][64];		/* quantization tables 三个通道的量化表*/
  struct huffman_table HTDC[HUFFMAN_TABLES];	/* DC huffman tables  交流霍夫曼表 */
  struct huffman_table HTAC[HUFFMAN_TABLES];	/* AC huffman tables   直流霍夫曼表*/
  int default_huffman_table_initialized;        //是否使用默认初始化
  int restart_interval;
  int restarts_to_go;				/* MCUs left in this restart interval 剩余的MCU*/
  int last_rst_marker_seen;			/* Rst marker is incremented each time 上一个看到的marker*/

  /* Temp space used after the IDCT to store each components */
  uint8_t Y[64*4], Cr[64], Cb[64]; //解码后各个分量的值

  jmp_buf jump_state;
  /* Internal Pointer use for colorspace conversion, do not modify it !!! 用于色彩空间的变换*/
  uint8_t *plane[COMPONENTS];

};
trace的目的和含义
trace的目的主要是输出中间过程中的某些变量,或者错误信息。方便理解程序运行的过程以及哪部分可能会出错等。
trace还可以顺便理解程序运行的顺序和方式。
打开和关闭trace
本代码中trace的打开和关闭非常简单.
#define  snprintf _snprintf//add by nxn
#define TRACE 1//add by nxn
#define  TRACEFILE "trace_jpeg.txt"//add by nxn
发现有TRACE字段,将TRACE设置为1为打开,设置为0为关闭。
按照需求修改trace
如需要在trace记录中输出直流系数,只需要在process_Huffman_data_unit函数中添加
#if TRACE
	fprintf(p_trace, "%d ", DCT[0]);
#endif
即可。
为了方便,还可以继续输出一些标志,在解码前添加:
输出结果:

添加额外代码解决后续问题
在tinyjpeg.h中添加如下声明:
FILE* p_trace;//add by nxn
FILE* DC_coff, DC_freq;
FILE* AC_coff, AC_freq;
FILE* Huffman_code;
FILE* quantization_table;
int* AC_buffer[3], * DC_buffer[3];
int AC_pos[3], DC_pos[3];
int AC_max[3], DC_max[3], AC_min[3], DC_min[3];
在主程序中为霍夫曼表和量化矩阵分配文件指针。
#if TRACE
  p_trace=fopen(TRACEFILE,"w");
  if (p_trace==NULL)
  {
	  printf("trace file open error!");
  }

  DC_coff = fopen("DC_coff.yuv", "wb+");
  if (DC_coff == NULL)
  {
      printf("DC file open error!");
  }
  AC_coff = fopen("AC_coff.yuv", "wb+");
  if (DC_coff == NULL)
  {
      printf("AC file open error!");
  }
  Huffman_code = fopen("Huffman_code.txt", "w+");
  if (Huffman_code == NULL)
  {
      printf("Huffman_code file open error!");
  }
  quantization_table = fopen("quantization_table.txt", "w+");
  if (DC_coff == NULL)
  {
      printf("quantization_table file open error!");
  }
#endif
在tinyjpeg.c中实现保存即获得概率分布的函数。
//保存直流或交流的系数
void save_DC_AC(struct jdec_private* priv, int component)
{
	int DC = (priv->component_infos[component]).DCT[0], AC = priv->component_infos[component].DCT[1];
	DC_buffer[component][DC_pos[component] ++] = DC;
	DC_max[component] = DC_max[component] < DC ? DC : DC_max[component];
	DC_min[component] = DC_min[component] < DC ? DC_min[component] : DC;
	AC_buffer[component][AC_pos[component] ++] = AC;
	AC_max[component] = DC_max[component] < AC ? AC : DC_max[component];
	AC_min[component] = DC_min[component] < AC ? DC_min[component] : AC;
}
//初始话
void save_Init(struct jdec_private* priv)
{
	for (int i = 0; i < 3; ++i)
	{
		AC_buffer[i] = (int*)malloc(priv->width * priv->height / 16);
		DC_buffer[i] = (int*)malloc(priv->width * priv->height / 16);
		AC_pos[i] = 0; DC_pos[i] = 0;
		AC_max[i] = -1E9; AC_min[i] = 1E9;
		DC_max[i] = -1E9; DC_min[i] = 1E9;

	}
}
//输出直流和交流的频率分布
void get_freq()
{
	double* AC_fre[3], * DC_fre[3];
	for (int i = 0; i < 3; ++i)
	{
		AC_fre[i] = (int*)malloc((AC_max[i] - AC_min[i] + 1) * sizeof(double) );
		DC_fre[i] = (int*)malloc((DC_max[i] - DC_min[i] + 1) * sizeof(double));
		memset(AC_fre[i], 0, (AC_max[i] - AC_min[i] + 1) * sizeof(double));
		memset(DC_fre[i], 0, (DC_max[i] - DC_min[i] + 1) * sizeof(double));
	}
	for (int i = 0; i < 3; ++i)
	{
		for (int j = 0; j < DC_pos[i]; ++j)
		{
			AC_fre[i][AC_buffer[i][j] - AC_min[i]] ++;
			DC_fre[i][DC_buffer[i][j] - DC_min[i]] ++;
		}

	}
	char AC_file_name[] = "freq_DC_x.csv";
	char DC_file_name[] = "freq_AC_x.csv";
	for (int i = 0; i < 3; ++i)
	{
		DC_file_name[8] = i + '0';
		AC_file_name[8] = i + '0';
		FILE* DC = fopen(DC_file_name, "w+"), * AC = fopen(AC_file_name, "w+");
		fprintf(DC, "value, frequency\n"); fprintf(AC, "value, frequency\n");
		for (int j = 0; j < DC_max[i] - DC_min[i] + 1; ++j)
			fprintf(DC, "%d, %lf\n", j + DC_min[i], (1.0 * DC_fre[i][j]) / DC_pos[i]);
		for (int j = 0; j < AC_max[i] - AC_min[i] + 1; ++j)
			fprintf(AC, "%d, %lf\n", j + AC_min[i], (1.0 * AC_fre[i][j]) / AC_pos[i]);
		fclose(DC); fclose(AC);
	}
}
保存DC和直流分量
如果有其他解码方式,也可以用类似的方法来获得相对应的系数。
/*
 * Decode all the 3 components for 1x1
 */
static void decode_MCU_1x1_3planes(struct jdec_private* priv)
{
	// Y
	process_Huffman_data_unit(priv, cY);
#if  TRACE
	save_DC_AC(priv, cY);
#endif //  TRACE
	IDCT(&priv->component_infos[cY], priv->Y, 8);
	// Cb
	process_Huffman_data_unit(priv, cCb);
#if  TRACE
	save_DC_AC(priv, cCb);
#endif //  TRACE
	IDCT(&priv->component_infos[cCb], priv->Cb, 8);

	// Cr
	process_Huffman_data_unit(priv, cCr);
#if  TRACE
	save_DC_AC(priv, cCr);
#endif //  TRACE
	IDCT(&priv->component_infos[cCr], priv->Cr, 8);
}
在tinyjpeg_decoder中添加如下代码:
int tinyjpeg_decode(struct jdec_private* priv, int pixfmt)
{
    ...
#if TRACE
	fprintf(p_trace, "\nInput file size: %d\n", priv->stream_length + 2);
	fprintf(p_trace, "Input bytes actually read: %d\n", priv->stream - priv->stream_begin + 2);
	fflush(p_trace);
	//输出直流和交流的各个分量
	for (int comp = 0; comp < 3; ++comp)
	{
		for (int i = 0; i < AC_pos[comp]; ++i)
		{
			unsigned char t_AC = 1.0 * (AC_buffer[comp][i] - DC_min[comp]) / (AC_max[comp] - AC_min[comp]) * 255;
			unsigned char t_DC = 1.0 * (DC_buffer[comp][i] - AC_min[comp]) / (DC_max[comp] - DC_min[comp]) * 255;
			fwrite(&t_DC, 1, 1, DC_coff);
			fwrite(&t_AC, 1, 1, AC_coff);
		}
	}
	//获取频率分布
	get_freq();
#endif
	return 0;
}
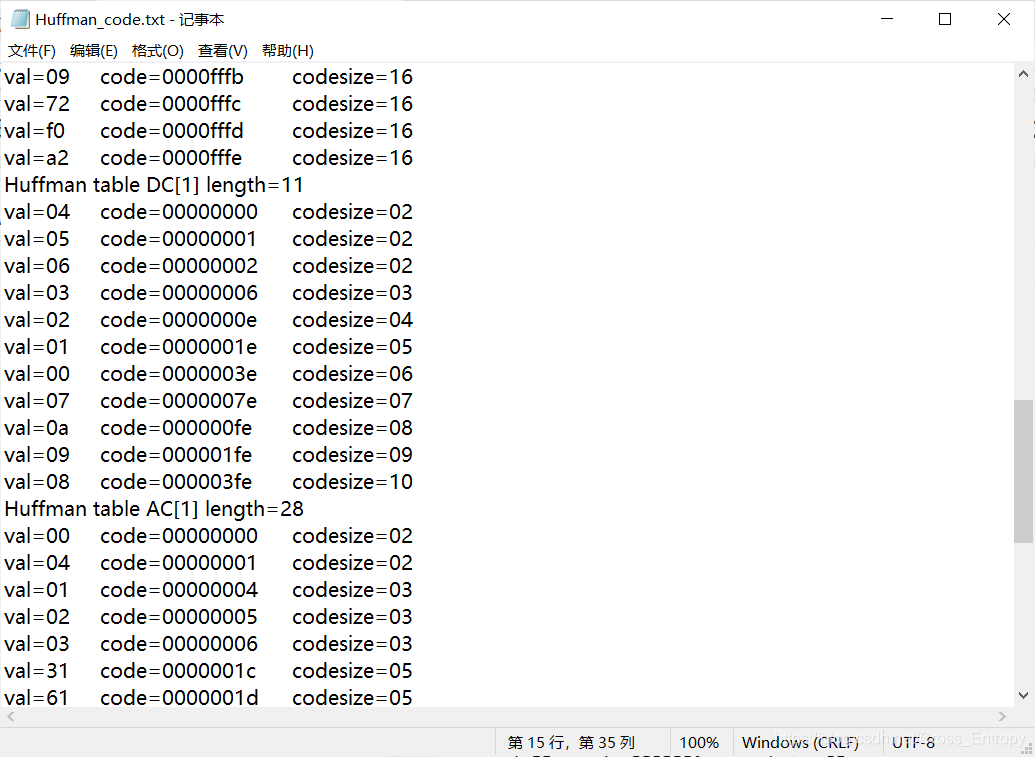
以txt文件输出所有的量化矩阵和所有的HUFFMAN码表。
Huffman表
在parse_DHT中添加如下代码:
static int parse_DHT(struct jdec_private* priv, const unsigned char* stream)
{
	...
#if TRACE
		fprintf(p_trace, "Huffman table %s[%d] length=%d\n", (index & 0xf0) ? "AC" : "DC", index & 0xf, count);
		fprintf(Huffman_code, "Huffman table %s[%d] length=%d\n", (index & 0xf0) ? "AC" : "DC", index & 0xf, count);
		fflush(p_trace);
#endif


		if (index & 0xf0)
			build_huffman_table(huff_bits, stream, &priv->HTAC[index & 0xf]);
		else
			build_huffman_table(huff_bits, stream, &priv->HTDC[index & 0xf]);

		length -= 1;
		length -= 16;
		length -= count;
		stream += count;
	}
#if TRACE
	fprintf(p_trace, "< DHT marker\n");
	fflush(p_trace);
#endif
	return 0;
}
在build_huffman_table中添加:
static void build_huffman_table(const unsigned char* bits, const unsigned char* vals, struct huffman_table* table)
{
	...
	for (i = 0; huffsize[i]; i++)
	{
		//获取值,编码,和码长
		val = vals[i];
		code = huffcode[i];
		code_size = huffsize[i];
#if TRACE
		fprintf(p_trace, "val=%2.2x \tcode=%8.8x \tcodesize=%2.2d\n", val, code, code_size);
		fprintf(Huffman_code, "val=%2.2x \tcode=%8.8x \tcodesize=%2.2d\n", val, code, code_size);
		fflush(p_trace);
#endif
		//建立权值和码长的关系
		table->code_size[val] = code_size;
		...
}
结果
其中一部分如下:
量化矩阵
在parse_DQT添加如下代码:
static int parse_DQT(struct jdec_private* priv, const unsigned char* stream)
{
	...
	while (stream < dqt_block_end)
	{
		qi = *stream++;
#if SANITY_CHECK
		if (qi >> 4)
			snprintf(error_string, sizeof(error_string), "16 bits quantization table is not supported\n");
		if (qi > 4)
			snprintf(error_string, sizeof(error_string), "No more 4 quantization table is supported (got %d)\n", qi);
#endif
#if TRACE
		fprintf(quantization_table, "original quantization table [%d]\n", qi);
#endif
		table = priv->Q_tables[qi];
		build_quantization_table(table, stream);
		stream += 64;
#if TRACE
		fprintf(quantization_table, "scaled quantization table [%d]\n", qi);
		for (int i = 0; i < 8; ++i)
			for (int j = 0; j < 8; ++j)
				if (j == 7) fprintf(quantization_table, "%10.3f\n", table[i * 8 + j]);
				else fprintf(quantization_table, "%10.3f\t", table[i * 8 + j]);
#endif
	...
	}
在build_quantization_table中添加:
static void build_quantization_table(float* qtable, const unsigned char* ref_table)
{
	...
	for (i = 0; i < 8; i++) {
		for (j = 0; j < 8; j++) {
			*qtable++ = ref_table[*zz++] * aanscalefactor[i] * aanscalefactor[j];
		}
	}
#if TRACE
	for (int i = 0; i < 8; ++i)
		for (int j = 0; j < 8; ++j)
			if (j == 7) fprintf(quantization_table, "%10d\n", (int)ref_table[zigzag[i * 8 + j]]);
			else fprintf(quantization_table, "%10d\t", (int)ref_table[zigzag[i * 8 + j]]);
#endif
}
结果
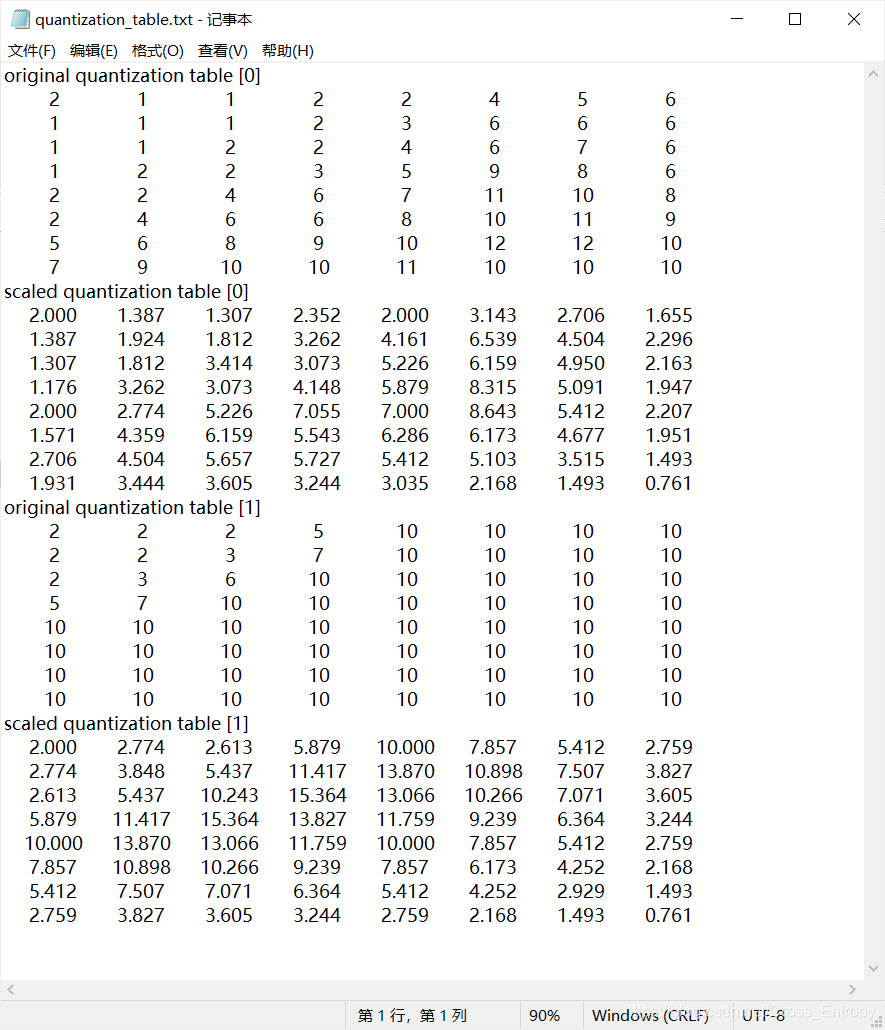
输出某一个DC值图像并统计其概率分布
由于橄榄球的图像过小,仅保留直流或交流分量后,图片显示不清晰,于是采用下面的两个图片:
- 长和宽均为1024像素。
- 分辨率为1440×1080

利用上文中的代码,可以得到DC系数图像:
| 图片1 | 图片2 |
|---|---|
 |  |
如果仅看Y分量的DC系数,则是:
| 图片1 | 图片2 |
|---|---|
 |  |
概率分布为:
图1:
| Y Y Y | C b C_b Cb | C r C_r Cr |
|---|---|---|
 |  |  |
图2
| Y Y Y | C b C_b Cb | C r C_r Cr |
|---|---|---|
 |  |  |
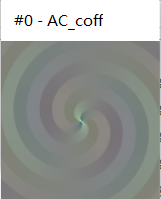
输出某一个AC值图像并统计其概率分布
该交流系数为DCT表中第一行第2个数。
利用上文中的代码,可以得到AC系数图像:
| 图片1 | 图片2 |
|---|---|
 | 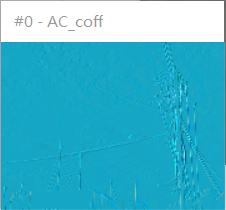 |
如果仅看Y分量的AC系数,则是:
| 图片1 | 图片2 |
|---|---|
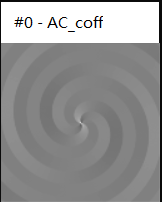 |  |
概率分布为:
图1
| Y Y Y | C b C_b Cb | C r C_r Cr |
|---|---|---|
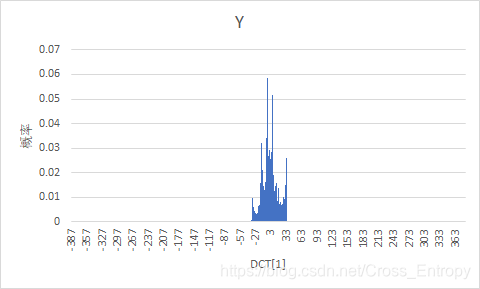 | 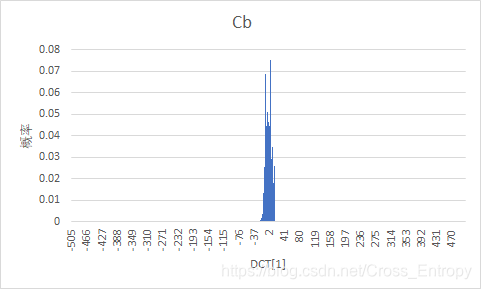 |  |
图2
| Y Y Y | C b C_b Cb | C r C_r Cr |
|---|---|---|
 |  |  |


 1747
1747

 被折叠的 条评论
为什么被折叠?
被折叠的 条评论
为什么被折叠?
 到【灌水乐园】发言


