


一:案例实战演示:
package com.dt.spark.sparkstreaming
import org.apache.spark.SparkConf
import org.apache.spark.sql.Row
import org.apache.spark.sql.hive.HiveContext
import org.apache.spark.sql.types.{IntegerType, StringType, StructField, StructType}
import org.apache.spark.streaming.{Seconds, StreamingContext}
/**
* 使用Spark Streaming+Spark SQL来在线动态计算电商中不同类别中最热门的商品排名,例如手机这个类别下面最热门的三种手机、电视这个类别
* 下最热门的三种电视,该实例在实际生产环境下具有非常重大的意义;
*
* @author DT大数据梦工厂
* 新浪微博:http://weibo.com/ilovepains/
*
*
* 实现技术:Spark Streaming+Spark SQL,之所以Spark Streaming能够使用ML、sql、graphx等功能是因为有foreachRDD和Transform
* 等接口,这些接口中其实是基于RDD进行操作,所以以RDD为基石,就可以直接使用Spark其它所有的功能,就像直接调用API一样简单。
* 假设说这里的数据的格式:user item category,例如Rocky Samsung Android
*/
object OnlineTheTop3ItemForEachCategory2DB {
def main(args: Array[String]){
/**
* 第1步:创建Spark的配置对象SparkConf,设置Spark程序的运行时的配置信息,
* 例如说通过setMaster来设置程序要链接的Spark集群的Master的URL,如果设置
* 为local,则代表Spark程序在本地运行,特别适合于机器配置条件非常差(例如
* 只有1G的内存)的初学者 *
*/
val conf = new SparkConf() //创建SparkConf对象
conf.setAppName(“OnlineTheTop3ItemForEachCategory2DB”) //设置应用程序的名称,在程序运行的监控界面可以看到名称
// conf.setMaster(“spark://Master:7077”) //此时,程序在Spark集群
conf.setMaster(“local[6]”)
//设置batchDuration时间间隔来控制Job生成的频率并且创建Spark Streaming执行的入口
val ssc = new StreamingContext(conf, Seconds(5))
ssc.checkpoint("/root/Documents/SparkApps/checkpoint")
val userClickLogsDStream = ssc.socketTextStream("Master", 9999)
val formattedUserClickLogsDStream = userClickLogsDStream.map(clickLog =>
(clickLog.split(" ")(2) + "_" + clickLog.split(" ")(1), 1))
// val categoryUserClickLogsDStream = formattedUserClickLogsDStream.reduceByKeyAndWindow((v1:Int, v2: Int) => v1 + v2,
// (v1:Int, v2: Int) => v1 - v2, Seconds(60), Seconds(20))
val categoryUserClickLogsDStream = formattedUserClickLogsDStream.reduceByKeyAndWindow(_+_,
_-_, Seconds(60), Seconds(20))
categoryUserClickLogsDStream.foreachRDD { rdd => {
if (rdd.isEmpty()) {
println("No data inputted!!!")
} else {
val categoryItemRow = rdd.map(reducedItem => {
val category = reducedItem._1.split("_")(0)
val item = reducedItem._1.split("_")(1)
val click_count = reducedItem._2
Row(category, item, click_count)
})
val structType = StructType(Array(
StructField("category", StringType, true),
StructField("item", StringType, true),
StructField("click_count", IntegerType, true)
))
val hiveContext = new HiveContext(rdd.context)
val categoryItemDF = hiveContext.createDataFrame(categoryItemRow, structType)
categoryItemDF.registerTempTable("categoryItemTable")
val reseltDataFram = hiveContext.sql("SELECT category,item,click_count FROM (SELECT category,item,click_count,row_number()" +
" OVER (PARTITION BY category ORDER BY click_count DESC) rank FROM categoryItemTable) subquery " +
" WHERE rank <= 3")
reseltDataFram.show()
val resultRowRDD = reseltDataFram.rdd
resultRowRDD.foreachPartition { partitionOfRecords => {
if (partitionOfRecords.isEmpty){
println("This RDD is not null but partition is null")
} else {
// ConnectionPool is a static, lazily initialized pool of connections
val connection = ConnectionPool.getConnection()
partitionOfRecords.foreach(record => {
val sql = "insert into categorytop3(category,item,client_count) values('" + record.getAs("category") + "','" +
record.getAs("item") + "'," + record.getAs("click_count") + ")"
val stmt = connection.createStatement();
stmt.executeUpdate(sql);
})
ConnectionPool.returnConnection(connection) // return to the pool for future reuse
}
}
}
}
}
}
/**
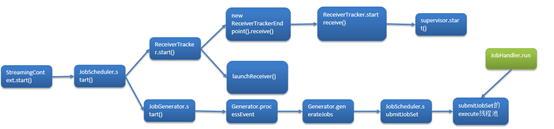
* 在StreamingContext调用start方法的内部其实是会启动JobScheduler的Start方法,进行消息循环,在JobScheduler
* 的start内部会构造JobGenerator和ReceiverTacker,并且调用JobGenerator和ReceiverTacker的start方法:
* 1,JobGenerator启动后会不断的根据batchDuration生成一个个的Job
* 2,ReceiverTracker启动后首先在Spark Cluster中启动Receiver(其实是在Executor中先启动ReceiverSupervisor),在Receiver收到
* 数据后会通过ReceiverSupervisor存储到Executor并且把数据的Metadata信息发送给Driver中的ReceiverTracker,在ReceiverTracker
* 内部会通过ReceivedBlockTracker来管理接收到的元数据信息
* 每个BatchInterval会产生一个具体的Job,其实这里的Job不是Spark Core中所指的Job,它只是基于DStreamGraph而生成的RDD
* 的DAG而已,从Java角度讲,相当于Runnable接口实例,此时要想运行Job需要提交给JobScheduler,在JobScheduler中通过线程池的方式找到一个
* 单独的线程来提交Job到集群运行(其实是在线程中基于RDD的Action触发真正的作业的运行),为什么使用线程池呢?
* 1,作业不断生成,所以为了提升效率,我们需要线程池;这和在Executor中通过线程池执行Task有异曲同工之妙;
* 2,有可能设置了Job的FAIR公平调度的方式,这个时候也需要多线程的支持;
*
*/
ssc.start()
ssc.awaitTermination()
}
}
二:源码分析
第一步:创建StreamingContext
val ssc = new StreamingContext(conf, Seconds(5))
- StreamingContext源码如下:
/**
- Create a StreamingContext by providing the configuration necessary for a new SparkContext.
- @param conf a org.apache.spark.SparkConf object specifying Spark parameters
- @param batchDuration the time interval at which streaming data will be divided into batches
*/
def this(conf: SparkConf, batchDuration: Duration) = {
this(StreamingContext.createNewSparkContext(conf), null, batchDuration)
}
/**
* Create a StreamingContext by providing the details necessary for creating a new SparkContext.
* @param master cluster URL to connect to (e.g. mesos://host:port, spark://host:port, local[4]).
* @param appName a name for your job, to display on the cluster web UI
* @param batchDuration the time interval at which streaming data will be divided into batches
*/
def this(
master: String,
appName: String,
batchDuration: Duration,
sparkHome: String = null,
jars: Seq[String] = Nil,
environment: Map[String, String] = Map()) = {
this(StreamingContext.createNewSparkContext(master, appName, sparkHome, jars, environment),
null, batchDuration)
}
2. 其中this里面的第一个参数创建SparkContext,Spark Streaming就是Spark Core上面的一个应用程序。
private[streaming] def createNewSparkContext(conf: SparkConf): SparkContext = {
new SparkContext(conf)
}
第二步:获取输入数据源
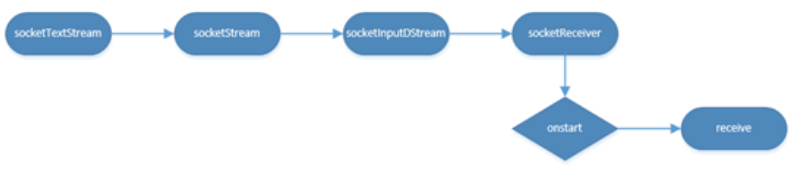
val userClickLogsDStream = ssc.socketTextStream(“Master”, 9999)
- socketTextStream接收socket数据流。
/**
- Create a input stream from TCP source hostname:port. Data is received using
- a TCP socket and the receive bytes is interpreted as UTF8 encoded
\ndelimited - lines.
- @param hostname Hostname to connect to for receiving data
- @param port Port to connect to for receiving data
- @param storageLevel Storage level to use for storing the received objects
- (default: StorageLevel.MEMORY_AND_DISK_SER_2)
*/
def socketTextStream(
hostname: String,
port: Int,
storageLevel: StorageLevel = StorageLevel.MEMORY_AND_DISK_SER_2
): ReceiverInputDStream[String] = withNamedScope(“socket text stream”) {
socketStream[String](hostname, port, SocketReceiver.bytesToLines, storageLevel)
}
- 创建SocketInputDStream实例。
/**
- Create a input stream from TCP source hostname:port. Data is received using
- a TCP socket and the receive bytes it interepreted as object using the given
- converter.
- @param hostname Hostname to connect to for receiving data
- @param port to connect to for receiving data
- @param converter Function to convert the byte stream to objects
- @param storageLevel Storage level to use for storing the received objects
- @tparam T Type of the objects received (after converting bytes to objects)
*/
def socketStream[T: ClassTag](
hostname: String,
port: Int,
converter: (InputStream) => Iterator[T],
storageLevel: StorageLevel
): ReceiverInputDStream[T] = {
new SocketInputDStream[T](this, hostname, port, converter, storageLevel)
}
通过SocketReceiver接收数据。
private[streaming]
class SocketInputDStream[T: ClassTag](
ssc_ : StreamingContext,
host: String,
port: Int,
bytesToObjects: InputStream => Iterator[T],
storageLevel: StorageLevel
) extends ReceiverInputDStreamT {def getReceiver(): Receiver[T] = {
new SocketReceiver(host, port, bytesToObjects, storageLevel)
}
}- SocketReceiver中通过onstart方法调用receiver方法。
def onStart() {
// Start the thread that receives data over a connection
new Thread(“Socket Receiver”) {
setDaemon(true)
override def run() { receive() }
}.start()
} - Receive方法通过网络连接,接收来自网络的数据。
/* Create a socket connection and receive data until receiver is stopped /
def receive() {
var socket: Socket = null
try {
logInfo(“Connecting to ” + host + “:” + port)
socket = new Socket(host, port)
logInfo(“Connected to ” + host + “:” + port)
//根据IP和端口
val iterator = bytesToObjects(socket.getInputStream())
while(!isStopped && iterator.hasNext) {
store(iterator.next)
}
if (!isStopped()) {
restart(“Socket data stream had no more data”)
} else {
logInfo(“Stopped receiving”)
}
} catch {
case e: java.net.ConnectException =>
restart(“Error connecting to ” + host + “:” + port, e)
case NonFatal(e) =>
logWarning(“Error receiving data”, e)
restart(“Error receiving data”, e)
} finally {
if (socket != null) {
socket.close()
logInfo(“Closed socket to ” + host + “:” + port)
}
} - Receive接收到数据产生DStream,而DStream内部是以RDD的方式封装数据。
// RDDs generated, marked as private[streaming] so that testsuites can access it
@transient
private[streaming] var generatedRDDs = new HashMap[Time, RDD[T]] ()
socketTextStream读取数据的调用过程如下:
*第三步:根据自己的业务进行transformation操作。
第四步:调用start方法。*
/**
- 在StreamingContext调用start方法的内部其实是会启动JobScheduler的Start方法,进行消息循环,在JobScheduler
- 的start内部会构造JobGenerator和ReceiverTacker,并且调用JobGenerator和ReceiverTacker的start方法:
- 1,JobGenerator启动后会不断的根据batchDuration生成一个个的Job
- 2,ReceiverTracker启动后首先在Spark Cluster中启动Receiver(其实是在Executor中先启动ReceiverSupervisor),在Receiver收到
- 数据后会通过ReceiverSupervisor存储到Executor并且把数据的Metadata信息发送给Driver中的ReceiverTracker,在ReceiverTracker
- 内部会通过ReceivedBlockTracker来管理接受到的元数据信息
- 每个BatchInterval会产生一个具体的Job,其实这里的Job不是Spark Core中所指的Job,它只是基于DStreamGraph而生成的RDD
- 的DAG而已,从Java角度讲,相当于Runnable接口实例,此时要想运行Job需要提交给JobScheduler,在JobScheduler中通过线程池的方式找到一个
- 单独的线程来提交Job到集群运行(其实是在线程中基于RDD的Action触发真正的作业的运行),为什么使用线程池呢?
- 1,作业不断生成,所以为了提升效率,我们需要线程池;这和在Executor中通过线程池执行Task有异曲同工之妙;
- 2,有可能设置了Job的FAIR公平调度的方式,这个时候也需要多线程的支持;
*
*/
ssc.start()
Start源码如下:
/**- Start the execution of the streams.
* @throws IllegalStateException if the StreamingContext is already stopped.
*/
def start(): Unit = synchronized {
state match {
case INITIALIZED =>
startSite.set(DStream.getCreationSite())
StreamingContext.ACTIVATION_LOCK.synchronized {
StreamingContext.assertNoOtherContextIsActive()
try {
validate()// Start the streaming scheduler in a new thread, so that thread local properties
// like call sites and job groups can be reset without affecting those of the
// current thread.
//线程本地存储,线程有自己的私有属性,设置这些线程的时候不会影响其他线程,
ThreadUtils.runInNewThread(“streaming-start”) {
sparkContext.setCallSite(startSite.get)
sparkContext.clearJobGroup()
sparkContext.setLocalProperty(SparkContext.SPARK_JOB_INTERRUPT_ON_CANCEL, “false”)
//调用JobScheduler的start方法。
scheduler.start()
}
state = StreamingContextState.ACTIVE
} catch {
case NonFatal(e) =>
logError(“Error starting the context, marking it as stopped”, e)
scheduler.stop(false)
state = StreamingContextState.STOPPED
throw e
}
StreamingContext.setActiveContext(this)
}
shutdownHookRef = ShutdownHookManager.addShutdownHook(
StreamingContext.SHUTDOWN_HOOK_PRIORITY)(stopOnShutdown)
// Registering Streaming Metrics at the start of the StreamingContext
assert(env.metricsSystem != null)
env.metricsSystem.registerSource(streamingSource)
uiTab.foreach(_.attach())
logInfo(“StreamingContext started”)
case ACTIVE =>
//当有StreamingContext运行的时候就不许新的StreamingContext运行了,因为,//目前Spark还不支持多个SparkContext同时运行。
logWarning(“StreamingContext has already been started”)
case STOPPED =>
throw new IllegalStateException(“StreamingContext has already been stopped”)
}
}
- Start the execution of the streams.
- 追踪JobScheduler的start方法源码如下:
JoScheduler的启动主要实现以下步骤: 创建eventLoop的匿名类实现,主要是处理各类JobScheduler的事件。
def start(): Unit = synchronized {if (eventLoop != null) return // scheduler has already been started
logDebug(“Starting JobScheduler”)
eventLoop = new EventLoop[JobSchedulerEvent](“JobScheduler”) {
override protected def onReceive(event: JobSchedulerEvent): Unit = processEvent(event)override protected def onError(e: Throwable): Unit = reportError(“Error in job scheduler”, e)
}
eventLoop.start()// attach rate controllers of input streams to receive batch completion updates
for {
//获得inputDStream
inputDStream <- ssc.graph.getInputStreams
// rateController可以控制输入速度
rateController <- inputDStream.rateController
} ssc.addStreamingListener(rateController)
//启动StreamingListenerBus,主要是用于更新Spark UI中的StreamTab的内容。
listenerBus.start(ssc.sparkContext)
receiverTracker = new ReceiverTracker(ssc)
inputInfoTracker = new InputInfoTracker(ssc)
receiverTracker.start()
jobGenerator.start()
logInfo(“Started JobScheduler”)
}- JobScheduler负责动态作业调度的具体类。
JobScheduler是整个Job的调度器,本身用了一条线程循环去监听不同的Job启动,Job完成或失败等
private def processEvent(event: JobSchedulerEvent) {
try {
event match {
case JobStarted(job, startTime) => handleJobStart(job, startTime)
case JobCompleted(job, completedTime) => handleJobCompletion(job, completedTime)
case ErrorReported(m, e) => handleError(m, e)
}
} catch {
case e: Throwable =>
reportError(“Error in job scheduler”, e)
}
} 其中receiverTracker的start方法源码如下:
ReceiverTracker的作用是: 处理数据接收,数据缓存,Block生成等工作。
ReceiverTracker是以发送Job的方式到集群中的Executor去启动receiver。
/* Start the endpoint and receiver execution thread. /
def start(): Unit = synchronized {
if (isTrackerStarted) {
throw new SparkException(“ReceiverTracker already started”)
}if (!receiverInputStreams.isEmpty) {
endpoint = ssc.env.rpcEnv.setupEndpoint(
“ReceiverTracker”, new ReceiverTrackerEndpoint(ssc.env.rpcEnv))
if (!skipReceiverLaunch) launchReceivers()
logInfo(“ReceiverTracker started”)
trackerState = Started
}
}ReceiverTrackEndpoint用于接收来自Receiver的消息。
Receive接收消息:启动一个Job接收消息。
/* RpcEndpoint to receive messages from the receivers. /
private class ReceiverTrackerEndpoint(override val rpcEnv: RpcEnv) extends ThreadSafeRpcEndpoint {// TODO Remove this thread pool after https://github.com/apache/spark/issues/7385 is merged
private val submitJobThreadPool = ExecutionContext.fromExecutorService(
ThreadUtils.newDaemonCachedThreadPool(“submit-job-thread-pool”))private val walBatchingThreadPool = ExecutionContext.fromExecutorService(
ThreadUtils.newDaemonCachedThreadPool(“wal-batching-thread-pool”))@volatile private var active: Boolean = true
override def receive: PartialFunction[Any, Unit] = {
// Local messages
case StartAllReceivers(receivers) =>val scheduledLocations = schedulingPolicy.scheduleReceivers(receivers, getExecutors)
for (receiver <- receivers) {
//在那些机器上启动executors
val executors = scheduledLocations(receiver.streamId)
updateReceiverScheduledExecutors(receiver.streamId, executors)
receiverPreferredLocations(receiver.streamId) = receiver.preferredLocation
startReceiver(receiver, executors)
}
case RestartReceiver(receiver) =>
// Old scheduled executors minus the ones that are not active any more
val oldScheduledExecutors = getStoredScheduledExecutors(receiver.streamId)
val scheduledLocations = if (oldScheduledExecutors.nonEmpty) {
// Try global scheduling again
oldScheduledExecutors
} else {
val oldReceiverInfo = receiverTrackingInfos(receiver.streamId)
// Clear “scheduledLocations” to indicate we are going to do local scheduling
val newReceiverInfo = oldReceiverInfo.copy(
state = ReceiverState.INACTIVE, scheduledLocations = None)
receiverTrackingInfos(receiver.streamId) = newReceiverInfo
schedulingPolicy.rescheduleReceiver(
receiver.streamId,
receiver.preferredLocation,
receiverTrackingInfos,
getExecutors)
}
// Assume there is one receiver restarting at one time, so we don’t need to update
// receiverTrackingInfos
startReceiver(receiver, scheduledLocations)
case c: CleanupOldBlocks =>
receiverTrackingInfos.values.flatMap(.endpoint).foreach(.send(c))
case UpdateReceiverRateLimit(streamUID, newRate) =>
for (info <- receiverTrackingInfos.get(streamUID); eP <- info.endpoint) {
eP.send(UpdateRateLimit(newRate))
}
// Remote messages
case ReportError(streamId, message, error) =>
reportError(streamId, message, error)
}调用startReceiver方法在Executors上启动receiver.其中以封装函数startReceiverFunc的方式启动receiver.
/**- Start a receiver along with its scheduled executors
*/
private def startReceiver(
receiver: Receiver[_],
scheduledLocations: Seq[TaskLocation]): Unit = {
def shouldStartReceiver: Boolean = {
// It’s okay to start when trackerState is Initialized or Started
!(isTrackerStopping || isTrackerStopped)
}
val receiverId = receiver.streamId
if (!shouldStartReceiver) {
onReceiverJobFinish(receiverId)
return
}val checkpointDirOption = Option(ssc.checkpointDir)
val serializableHadoopConf =
new SerializableConfiguration(ssc.sparkContext.hadoopConfiguration)// Function to start the receiver on the worker node
val startReceiverFunc: Iterator[Receiver[_]] => Unit =
(iterator: Iterator[Receiver[_]]) => {
if (!iterator.hasNext) {
throw new SparkException(
“Could not start receiver as object not found.”)
}
if (TaskContext.get().attemptNumber() == 0) {
val receiver = iterator.next()
assert(iterator.hasNext == false)
val supervisor = new ReceiverSupervisorImpl(
receiver, SparkEnv.get, serializableHadoopConf.value, checkpointDirOption)
supervisor.start()
supervisor.awaitTermination()
} else {
// It’s restarted by TaskScheduler, but we want to reschedule it again. So exit it.
}
}// Create the RDD using the scheduledLocations to run the receiver in a Spark job
val receiverRDD: RDD[Receiver[_]] =
if (scheduledLocations.isEmpty) {
ssc.sc.makeRDD(Seq(receiver), 1)
} else {
val preferredLocations = scheduledLocations.map(_.toString).distinct
ssc.sc.makeRDD(Seq(receiver -> preferredLocations))
}
receiverRDD.setName(s”Receiver receiverId”)ssc.sparkContext.setJobDescription(s”Streamingjobrunningreceiver receiverId”)
ssc.sparkContext.setCallSite(Option(ssc.getStartSite()).getOrElse(Utils.getCallSite()))val future = ssc.sparkContext.submitJob[Receiver[_], Unit, Unit](
receiverRDD, startReceiverFunc, Seq(0), (, ) => Unit, ())
// We will keep restarting the receiver job until ReceiverTracker is stopped
future.onComplete {
case Success(_) =>
if (!shouldStartReceiver) {
onReceiverJobFinish(receiverId)
} else {
logInfo(s”Restarting Receiver receiverId”)
self.send(RestartReceiver(receiver))
}
case Failure(e) =>
if (!shouldStartReceiver) {
onReceiverJobFinish(receiverId)
} else {
logError(“Receiver has been stopped. Try to restart it.”, e)
logInfo(s”Restarting Receiver $receiverId”)
self.send(RestartReceiver(receiver))
}
}(submitJobThreadPool)
logInfo(s”Receiver{receiver.streamId} started”)
}- Start a receiver along with its scheduled executors
- 在startReceiver方法内部会启动supervisor.
/* Start the supervisor /
def start() {
onStart()
startReceiver()
} - 首先调用了onStart()方法,其实调用的是子类的onstart方法。
/**
- Called when supervisor is started.
- Note that this must be called before the receiver.onStart() is called to ensure
- things like [[BlockGenerator]]s are started before the receiver starts sending data.
*/
protected def onStart() { }
- 也就是ReceiverSupervisorImpl的onStart方法。
override protected def onStart() {
registeredBlockGenerators.foreach { _.start() }
} - BlockGenerator的start方法启动了BlockIntervalTimer和BlockPushingThread.
/* Start block generating and pushing threads. /
def start(): Unit = synchronized {
if (state == Initialized) {
state = Active
blockIntervalTimer.start()
blockPushingThread.start()
logInfo(“Started BlockGenerator”)
} else {
throw new SparkException(
s”Cannot start BlockGenerator as its not in the Initialized state [state = $state]”)
}
} - 回到上面,我们现在看ReceiverSupervisor.startReceiver方法的调用。
/* Start receiver /
def startReceiver(): Unit = synchronized {
try {
if (onReceiverStart()) {
logInfo(“Starting receiver”)
receiverState = Started
receiver.onStart()
logInfo(“Called receiver onStart”)
} else {
// The driver refused us
stop(“Registered unsuccessfully because Driver refused to start receiver ” + streamId, None)
}
} catch {
case NonFatal(t) =>
stop(“Error starting receiver ” + streamId, Some(t))
}
} - 其中onReceiverStart方法在子类ReceiverSupervisorImpl的onReceiverStart,启用给ReciverTrackEndpoint发送registerReceiver消息。
override protected def onReceiverStart(): Boolean = {
val msg = RegisterReceiver(
streamId, receiver.getClass.getSimpleName, host, executorId, endpoint)
trackerEndpoint.askWithRetryBoolean
} - 此时,ReceiverTrackEndpoint接收到消息后会调用registerReceiver方法。
override def receiveAndReply(context: RpcCallContext): PartialFunction[Any, Unit] = {
// Remote messages
case RegisterReceiver(streamId, typ, host, executorId, receiverEndpoint) =>
val successful =
registerReceiver(streamId, typ, host, executorId, receiverEndpoint, context.senderAddress)
context.reply(successful)
case AddBlock(receivedBlockInfo) =>
if (WriteAheadLogUtils.isBatchingEnabled(ssc.conf, isDriver = true)) {
walBatchingThreadPool.execute(new Runnable {
override def run(): Unit = Utils.tryLogNonFatalError {
if (active) {
context.reply(addBlock(receivedBlockInfo))
} else {
throw new IllegalStateException(“ReceiverTracker RpcEndpoint shut down.”)
}
}
})
至此,ReceiverTrack的启动就完成了。下面就回到我们最初的代码。 - JobScheduler的start方法:
receiverTracker.start()
jobGenerator.start() 启动JobGenerator,JobGenerator负责对DstreamGraph的初始化,DStream与RDD的转换,生成Job,提交执行等工作。
/* Start generation of jobs /
def start(): Unit = synchronized {
if (eventLoop != null) return // generator has already been started// Call checkpointWriter here to initialize it before eventLoop uses it to avoid a deadlock.
// See SPARK-10125
checkpointWriter
// eventLoop用于接收JobGeneratorEvent消息的通信体。
eventLoop = new EventLoop[JobGeneratorEvent](“JobGenerator”) {
override protected def onReceive(event: JobGeneratorEvent): Unit = processEvent(event)override protected def onError(e: Throwable): Unit = {
jobScheduler.reportError(“Error in job generator”, e)
}
}
eventLoop.start()if (ssc.isCheckpointPresent) {
restart()
} else {startFirstTime()
}- 调用processEvent,以时间间隔发消息。
/* Processes all events /
private def processEvent(event: JobGeneratorEvent) {
logDebug(“Got event ” + event)
event match {
case GenerateJobs(time) => generateJobs(time)
case ClearMetadata(time) => clearMetadata(time)
case DoCheckpoint(time, clearCheckpointDataLater) =>
doCheckpoint(time, clearCheckpointDataLater)
case ClearCheckpointData(time) => clearCheckpointData(time)
}
} - generateJobs中发time就是我们指点的batch Duractions
/* Generate jobs and perform checkpoint for the giventime. /
private def generateJobs(time: Time) {
// Set the SparkEnv in this thread, so that job generation code can access the environment
// Example: BlockRDDs are created in this thread, and it needs to access BlockManager
// Update: This is probably redundant after threadlocal stuff in SparkEnv has been removed.
SparkEnv.set(ssc.env)
Try {
// batch时间间隔获得Block数据。
jobScheduler.receiverTracker.allocateBlocksToBatch(time) // allocate received blocks to batch
// generateJobs生成Job
graph.generateJobs(time) // generate jobs using allocated block
} match {
case Success(jobs) =>
val streamIdToInputInfos = jobScheduler.inputInfoTracker.getInfo(time)
//如果作业成功生成,那么就提交这个作业。将作业提交给JobScheduler.
jobScheduler.submitJobSet(JobSet(time, jobs, streamIdToInputInfos))
case Failure(e) =>
jobScheduler.reportError(“Error generating jobs for time ” + time, e)
}
eventLoop.post(DoCheckpoint(time, clearCheckpointDataLater = false))
} - submitJobSet提交Job.
def submitJobSet(jobSet: JobSet) {
if (jobSet.jobs.isEmpty) {
logInfo(“No jobs added for time ” + jobSet.time)
} else {
listenerBus.post(StreamingListenerBatchSubmitted(jobSet.toBatchInfo))
jobSets.put(jobSet.time, jobSet)
jobSet.jobs.foreach(job => jobExecutor.execute(new JobHandler(job)))
logInfo(“Added jobs for time ” + jobSet.time)
}
} 而我们提交的Job,是被JobHandle封装的。
private class JobHandler(job: Job) extends Runnable with Logging {
import JobScheduler._def run() {
try {
val formattedTime = UIUtils.formatBatchTime(
job.time.milliseconds, ssc.graph.batchDuration.milliseconds, showYYYYMMSS = false)
val batchUrl = s”/streaming/batch/?id= job.time.milliseconds”valbatchLinkText=s”[outputoperation {job.outputOpId}, batch time ${formattedTime}]”ssc.sc.setJobDescription( s"""Streaming job from <a href="$batchUrl">$batchLinkText</a>""") ssc.sc.setLocalProperty(BATCH_TIME_PROPERTY_KEY, job.time.milliseconds.toString) ssc.sc.setLocalProperty(OUTPUT_OP_ID_PROPERTY_KEY, job.outputOpId.toString) // We need to assign `eventLoop` to a temp variable. Otherwise, because // `JobScheduler.stop(false)` may set `eventLoop` to null when this method is running, then // it's possible that when `post` is called, `eventLoop` happens to null. var _eventLoop = eventLoop if (_eventLoop != null) { _eventLoop.post(JobStarted(job, clock.getTimeMillis())) // Disable checks for existing output directories in jobs launched by the streaming // scheduler, since we may need to write output to an existing directory during checkpoint // recovery; see SPARK-4835 for more details. PairRDDFunctions.disableOutputSpecValidation.withValue(true) { job.run() } _eventLoop = eventLoop if (_eventLoop != null) { _eventLoop.post(JobCompleted(job, clock.getTimeMillis())) } } else { // JobScheduler has been stopped. }} finally {
ssc.sc.setLocalProperty(JobScheduler.BATCH_TIME_PROPERTY_KEY, null)
ssc.sc.setLocalProperty(JobScheduler.OUTPUT_OP_ID_PROPERTY_KEY, null)
}
}
}
}
总体流程如下图所示:
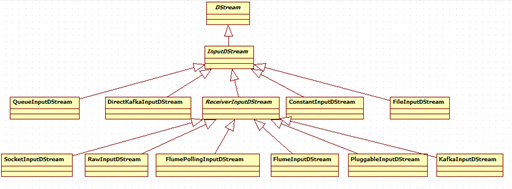
InputDStream继承关系图如下:
补充:
Spark运行的时候会启动作业,runDummySparkJob函数是为了确保Receiver不会集中在一个节点上。
/**- Run the dummy Spark job to ensure that all slaves have registered. This avoids all the
- receivers to be scheduled on the same node.
* - TODO Should poll the executor number and wait for executors according to
- “spark.scheduler.minRegisteredResourcesRatio” and
- “spark.scheduler.maxRegisteredResourcesWaitingTime” rather than running a dummy job.
*/
private def runDummySparkJob(): Unit = {
if (!ssc.sparkContext.isLocal) {
ssc.sparkContext.makeRDD(1 to 50, 50).map(x => (x, 1)).reduceByKey(_ + _, 20).collect()
}
assert(getExecutors.nonEmpty)
}
/**
* Get the receivers from the ReceiverInputDStreams, distributes them to the
* worker nodes as a parallel collection, and runs them.
*/
private def launchReceivers(): Unit = {
val receivers = receiverInputStreams.map(nis => {
val rcvr = nis.getReceiver()
rcvr.setReceiverId(nis.id)
rcvr
})
runDummySparkJob()
logInfo(“Starting ” + receivers.length + ” receivers”)
//在资源没有问题的前提下
//ReceiverTrackEndpoint => endpoint
endpoint.send(StartAllReceivers(receivers))
}
**配套视频链接:https://www.youtube.com/watch?v=TIyaep2tlDQ
http://www.tudou.com/home/_79823675/playlist
课程及技术交流QQ:460507491**


 463
463


 被折叠的 条评论
为什么被折叠?
被折叠的 条评论
为什么被折叠?
 到【灌水乐园】发言


