


文章目录
前言
本文将介绍如何使用YOLOv10和StrongSORT+OSNet实现目标跟踪+重识别+轨迹绘制,并详细讲解代码中的每个参数和函数的作用。
功能概述
1. 选择需要跟踪的视频路径
2. 加载 YOLOv10 模型并进行目标检测
3. 使用 StrongSORT+OSNet实现目标跟踪于重识别
4. 根据跟踪内容可视化绘制跟踪轨迹
必要环境
- 配置yolov10环境 可参考往期博客
地址:https://blog.csdn.net/Dora_blank/article/details/139302363?spm=1001.2014.3001.5502
一、代码结构
1. 参数定义
parser = argparse.ArgumentParser()
# 检测参数1`
parser.add_argument('--weights', default=r"yolov10n.pt", type=str, help='weights path')
parser.add_argument('--source', default=r"video_1.mp4", type=str, help='video(.mp4)path')
parser.add_argument('--save', default=r"./save", type=str, help='save img or video path')
parser.add_argument('--vis', default=True, action='store_true', help='visualize image')
parser.add_argument('--conf_thre', type=float, default=0.5, help='conf_thre')
parser.add_argument('--iou_thre', type=float, default=0.5, help='iou_thre')

# 跟踪参数
parser.add_argument('--track_model', default=r"./track_models/osnet_x0_25_msmt17.pt", type=str, help='track model')
parser.add_argument('--max_dist', type=float, default=0.2, help='max dist')
parser.add_argument('--max_iou_distance', type=float, default=0.7, help='max_iou_distance')
parser.add_argument('--max_age', type=int, default=30, help='max_age')
parser.add_argument('--n_init', type=int, default=3, help='n_init')
parser.add_argument('--nn_budget', type=int, default=100, help='nn_budget')
# 解析参数
opt = parser.parse_args()
参数作用如下:
目标检测:
–weights:YOLOv10权重路径
–source:输入视频路径
–save:结果保存路径
–vis:可视化跟踪结果
–conf_thre:置信度阈值
–iou_thre:IoU阈值
目标跟踪:
–track_model:选择osnet重识别权重路径
–max_dist: 关联检测框和跟踪框的最大距离阈值,当距离小于这个阈值时,检测框和跟踪框会被认为是匹配的
–max_iou_distance: 关联的最大IOU距离阈值,当IOU小于这个阈值时,检测框和跟踪器会被认为是匹配的
–max_age: 跟踪框最大保留的帧数 超过时则会删除
–n_init: 定义了跟踪器需要被匹配到的最小连续帧数,只有连续被匹配到这么多帧的跟踪器才会被认为是一个有效的跟踪目标
–nn_budget: 每个跟踪器保留的外观特征向量的最大数量,用于计算外观相似性
2. 设备选择
根据是否有GPU可用,选择使用CUDA或CPU
device = torch.device('cuda:0' if torch.cuda.is_available() else 'cpu')
3. 定义检测器类
定义一个Detector类来封装检测和跟踪逻辑并初始化模型参数
class Detector(object):
    def __init__(self, weight_path, conf_threshold=0.2, iou_threshold=0.5):
        self.device = device
        self.model = YOLOv10(weight_path).to(self.device)
        self.conf_threshold = conf_threshold
        self.iou_threshold = iou_threshold

        self.tracker = StrongSORT(
            opt.track_model,
            self.device,
            max_dist=opt.max_dist,
            max_iou_distance=opt.max_iou_distance,
            max_age=opt.max_age,
            n_init=opt.n_init,
            nn_budget=opt.nn_budget,
        )

        self.trajectories = {}
        self.max_trajectory_length = 5
4. 获取目标框颜色
在绘制轨迹和边框时,我们需要为每个目标分配不同的颜色
@staticmethod
def get_color(idx):
    idx = idx * 3
    color = ((37 * idx) % 255, (17 * idx) % 255, (29 * idx) % 255)
    return color
5. 检测与跟踪
用于对图像中检测到的目标进行跟踪,并绘制跟踪框和跟踪轨迹
def detect_image(self, img_bgr):
    image = img_bgr.copy()
    results = self.model(img_bgr, conf=self.conf_threshold, iou=self.iou_threshold)
    boxes = results[0].boxes.xyxy.cpu().numpy()  # xyxy format
    confidences = results[0].boxes.conf
    class_preds = results[0].boxes.cls

    confidences_expanded = confidences.unsqueeze(1)
    class_preds_expanded = class_preds.unsqueeze(1)
    boxes_tensor = torch.from_numpy(boxes).to(class_preds_expanded.device)
    xywhs = xyxy2xywh(boxes_tensor)
    online_targets = self.tracker.update(xywhs.cpu(), confidences_expanded.cpu(), class_preds_expanded.cpu(), image)

    for t in online_targets:
        tlwh = [t[0], t[1], t[2] - t[0], t[3] - t[1]]
        tid = t[4]
        cls = t[5]
        xmin, ymin, xmax, ymax = tlwh[0], tlwh[1], tlwh[0] + tlwh[2], tlwh[1] + tlwh[3]
        class_pred = int(cls)
        color = self.get_color(class_pred + 4)
        center = (int(xmin+xmax)//2, int(ymin + ymax)//2)
        bbox_label = results[0].names[class_pred]
        cv2.rectangle(img_bgr, (int(xmin), int(ymin)), (int(xmax), int(ymax)), color, 2)

        if tid not in self.trajectories:
            self.trajectories[tid] = deque(maxlen=self.max_trajectory_length)
        self.trajectories[tid].appendleft(center)

        # 截断轨迹长度
        if len(self.trajectories[tid]) > self.max_trajectory_length:
            self.trajectories[tid] = self.trajectories[tid][:self.max_trajectory_length]

        for i in range(1, len(self.trajectories[tid])):

            if self.trajectories[tid][i - 1] is None or self.trajectories[tid][i] is None:
                continue

            thickness = int(np.sqrt(64 / float(i + 1)))
            cv2.line(img_bgr, self.trajectories[tid][i-1],
                     self.trajectories[tid][i], color,
                     thickness)

        # 显示类名和跟踪ID
        cv2.putText(img_bgr, f"{bbox_label} {int(tid)}",
                    (int(xmin), int(ymin-5)), cv2.FONT_HERSHEY_COMPLEX, 0.6, color, 2)

    return img_bgr
6. 绘制轨迹线代码详解
这段代码会遍历每个跟踪框的中心点,使用OpenCV的cv2.line函数绘制轨迹线,线的长度以及厚度会随距离增加而减小,轨迹长度大于self.max_trajectory_length会被截断,以便更清晰地显示在图像中
for j in range(1, len(self.trajectories[tid])):
    if self.trajectories[tid][j - 1] is None or self.trajectories[tid][j] is None:
        continue

    thickness = int(np.sqrt(64 / float(j + 1)))
    cv2.line(img_bgr, self.trajectories[tid][j - 1],
             self.trajectories[tid][j], color,
             thickness)
7. 目标框格式转换详解
这段代码块目的是将检测结果转化为可传入StrongSORT中的格式
1. 扩展置信度和类别预测的维度
confidences_expanded = confidences.unsqueeze(1)
class_preds_expanded = class_preds.unsqueeze(1)
2. 将检测框转换为Tensor并移动到与预测相同的设备
boxes_tensor = torch.from_numpy(boxes).to(class_preds_expanded.device)
3. 将坐标格式转为中心点、宽度、高度
xywhs = xyxy2xywh(boxes_tensor)
4. 使用 StrongSORT的更新函数 得到跟踪框信息
online_targets = self.tracker.update(xywhs.cpu(), confidences_expanded.cpu(), class_preds_expanded.cpu(), image)
二、完整代码
完整代码如下:
import cv2
import torch
from ultralytics import YOLOv10
import os
import argparse
from strong_sort.strong_sort import StrongSORT
from collections import deque
import numpy as np


parser = argparse.ArgumentParser()
# 检测参数1`
parser.add_argument('--weights', default=r"yolov10n.pt", type=str, help='weights path')
parser.add_argument('--source', default=r"video_1.mp4", type=str, help='video(.mp4)path')
parser.add_argument('--save', default=r"./save", type=str, help='save img or video path')
parser.add_argument('--vis', default=True, action='store_true', help='visualize image')
parser.add_argument('--conf_thre', type=float, default=0.5, help='conf_thre')
parser.add_argument('--iou_thre', type=float, default=0.5, help='iou_thre')

# 跟踪参数
parser.add_argument('--track_model', default=r"./track_models/osnet_x0_25_msmt17.pt", type=str, help='track model')
parser.add_argument('--max_dist', type=float, default=0.2, help='max dist')
parser.add_argument('--max_iou_distance', type=float, default=0.7, help='max_iou_distance')
parser.add_argument('--max_age', type=int, default=30, help='max_age')
parser.add_argument('--n_init', type=int, default=3, help='n_init')
parser.add_argument('--nn_budget', type=int, default=100, help='nn_budget')
# 解析参数
opt = parser.parse_args()
device = torch.device('cuda:0' if torch.cuda.is_available() else 'cpu')

def xyxy2xywh(x):
    # Convert nx4 boxes from [x1, y1, x2, y2] to [x, y, w, h] where xy1=top-left, xy2=bottom-right
    y = x.clone() if isinstance(x, torch.Tensor) else np.copy(x)
    y[:, 0] = (x[:, 0] + x[:, 2]) / 2  # x center
    y[:, 1] = (x[:, 1] + x[:, 3]) / 2  # y center
    y[:, 2] = x[:, 2] - x[:, 0]  # width
    y[:, 3] = x[:, 3] - x[:, 1]  # height
    return y

class Detector(object):
    def __init__(self, weight_path, conf_threshold=0.2, iou_threshold=0.5):
        self.device = device
        self.model = YOLOv10(weight_path).to(self.device)
        self.conf_threshold = conf_threshold
        self.iou_threshold = iou_threshold

        self.tracker = StrongSORT(
            opt.track_model,
            self.device,
            max_dist=opt.max_dist,
            max_iou_distance=opt.max_iou_distance,
            max_age=opt.max_age,
            n_init=opt.n_init,
            nn_budget=opt.nn_budget,
        )

        self.trajectories = {}
        self.max_trajectory_length = 5

    @staticmethod
    def get_color(idx):
        idx = idx * 3
        color = ((37 * idx) % 255, (17 * idx) % 255, (29 * idx) % 255)
        return color

    def detect_image(self, img_bgr):
        image = img_bgr.copy()
        results = self.model(img_bgr, conf=self.conf_threshold, iou=self.iou_threshold)
        boxes = results[0].boxes.xyxy.cpu().numpy()  # xyxy format
        confidences = results[0].boxes.conf
        class_preds = results[0].boxes.cls

        confidences_expanded = confidences.unsqueeze(1)
        class_preds_expanded = class_preds.unsqueeze(1)
        boxes_tensor = torch.from_numpy(boxes).to(class_preds_expanded.device)
        xywhs = xyxy2xywh(boxes_tensor)
        online_targets = self.tracker.update(xywhs.cpu(), confidences_expanded.cpu(), class_preds_expanded.cpu(), image)

        for t in online_targets:
            tlwh = [t[0], t[1], t[2] - t[0], t[3] - t[1]]
            tid = t[4]
            cls = t[5]
            xmin, ymin, xmax, ymax = tlwh[0], tlwh[1], tlwh[0] + tlwh[2], tlwh[1] + tlwh[3]
            class_pred = int(cls)
            color = self.get_color(class_pred + 4)
            center = (int(xmin+xmax)//2, int(ymin + ymax)//2)
            bbox_label = results[0].names[class_pred]
            cv2.rectangle(img_bgr, (int(xmin), int(ymin)), (int(xmax), int(ymax)), color, 2)

            if tid not in self.trajectories:
                self.trajectories[tid] = deque(maxlen=self.max_trajectory_length)
            self.trajectories[tid].appendleft(center)

            # 截断轨迹长度
            if len(self.trajectories[tid]) > self.max_trajectory_length:
                self.trajectories[tid] = self.trajectories[tid][:self.max_trajectory_length]

            for i in range(1, len(self.trajectories[tid])):

                if self.trajectories[tid][i - 1] is None or self.trajectories[tid][i] is None:
                    continue

                thickness = int(np.sqrt(64 / float(i + 1)))
                cv2.line(img_bgr, self.trajectories[tid][i-1],
                         self.trajectories[tid][i], color,
                         thickness)

            # 显示类名和跟踪ID
            cv2.putText(img_bgr, f"{bbox_label} {int(tid)}",
                        (int(xmin), int(ymin-5)), cv2.FONT_HERSHEY_COMPLEX, 0.6, color, 2)

        return img_bgr


# Example usage
if __name__ == '__main__':
    model = Detector(weight_path=opt.weights, conf_threshold=opt.conf_thre, iou_threshold=opt.iou_thre)

    capture = cv2.VideoCapture(opt.source)
    fps = capture.get(cv2.CAP_PROP_FPS)
    size = (int(capture.get(cv2.CAP_PROP_FRAME_WIDTH)),
            int(capture.get(cv2.CAP_PROP_FRAME_HEIGHT)))
    fourcc = cv2.VideoWriter_fourcc('m', 'p', '4', 'v')
    outVideo = cv2.VideoWriter(os.path.join(opt.save, os.path.basename(opt.source).split('.')[-2] + "_out.mp4"), fourcc,
                               fps, size)

    while True:
        ret, frame = capture.read()
        if not ret:
            break
        img_vis = model.detect_image(frame)
        outVideo.write(img_vis)

        img_vis = cv2.resize(img_vis, None, fx=1, fy=1, interpolation=cv2.INTER_NEAREST)
        cv2.imshow('track', img_vis)
        cv2.waitKey(30)

    capture.release()
    outVideo.release()
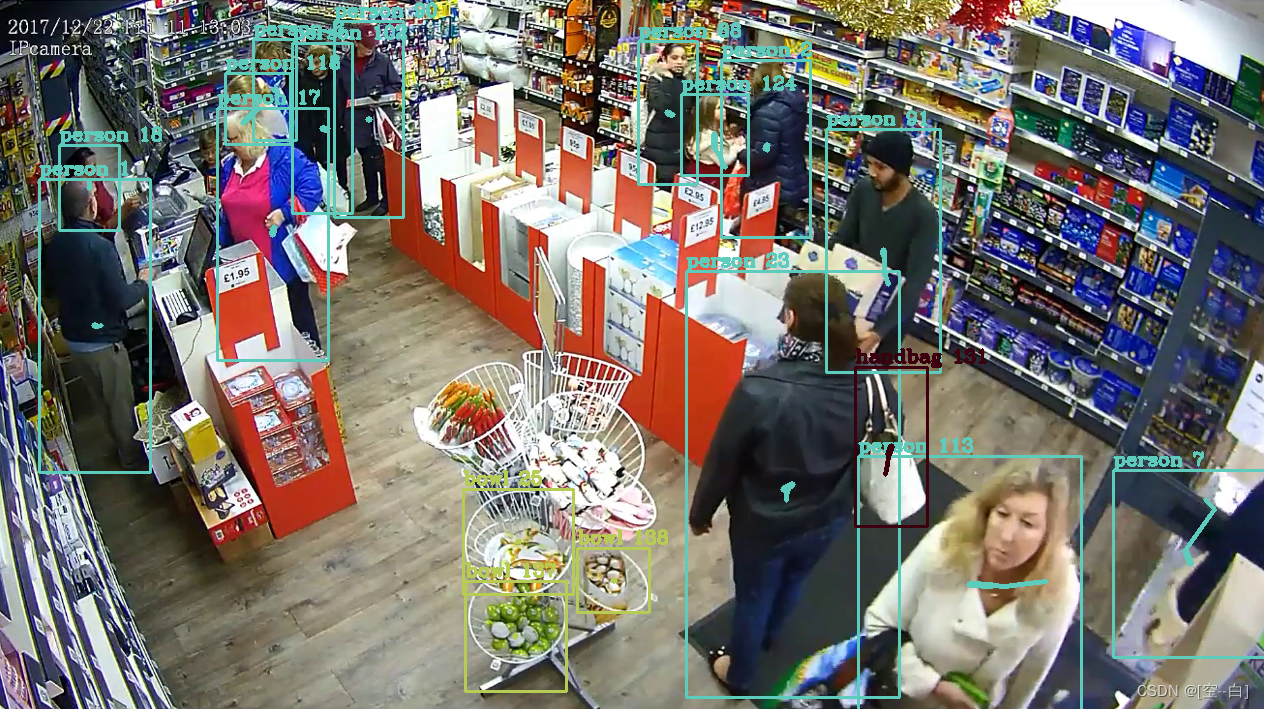
三、效果展示
StrongSORT跟踪效果
总结
本期博客就到这里啦,喜欢的小伙伴们可以点点关注,感谢!
最近经常在b站上更新一些有关目标检测的视频,大家感兴趣可以来看看 https://b23.tv/1upjbcG
学习交流群:995760755


 3662
3662

 被折叠的 条评论
为什么被折叠?
被折叠的 条评论
为什么被折叠?
 到【灌水乐园】发言


