


首先需要打开dify
点击嵌入网站
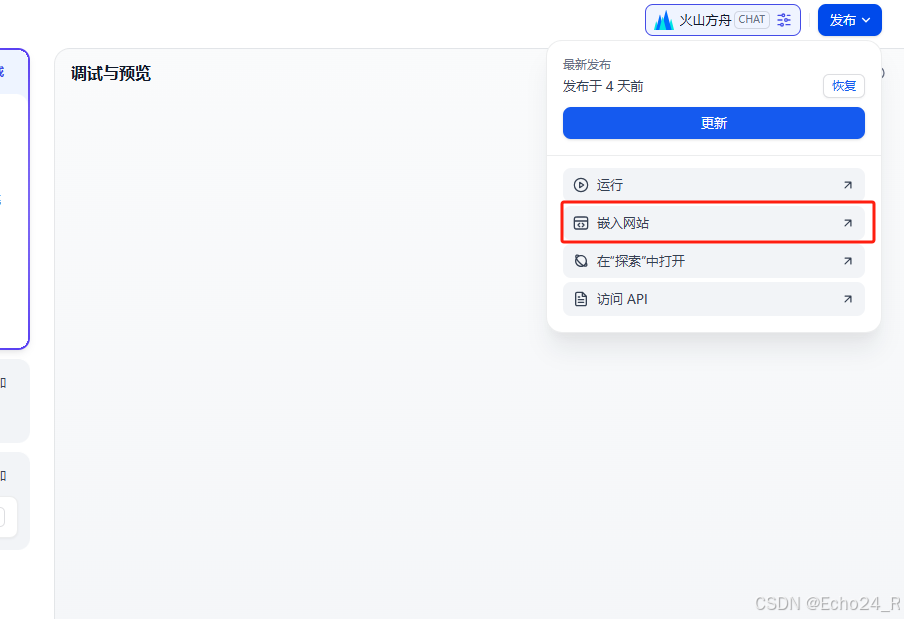
地址可以看图中框起来的位置,但是注意,网站没有给端口号,需要自己补充

代码可直接复制封装成组件(记得改地址!!)
<template>
  <div>
    <!-- 悬浮球 -->
    <div
      class="chat-bubble"
      ref="floatingBall"
      :style="{ left: ballLeft + 'px', top: ballTop + 'px' }"
      @mousedown="handleMouseDown"
    >
      <img
        src="data:image/svg+xml,%3Csvg xmlns='http://www.w3.org/2000/svg' viewBox='0 0 24 24' fill='white'%3E%3Cpath d='M20 2H4c-1.1 0-2 .9-2 2v18l4-4h14c1.1 0 2-.9 2-2V4c0-1.1-.9-2-2-2z'/%3E%3C/svg%3E"
        alt="ai助手"
      />
    </div>
    <!-- 菜单 -->
    <div
      class="menu"
      id="chatContainer"
      v-if="isMenuVisible"
      :style="{ left: menuLeft + 'px', top: menuTop + 'px' }"
    >

    <!--  Dify ai智能体地址-图中红线框起来的地方 -->
      <iframe
        src="http://你自己的地址/chatbot/R1HNviMUst0xjdBz"
        class="chat-iframe"
      ></iframe>
    </div>
  </div>
</template>

<script>
export default {
  data() {
    return {
      ballLeft: window.innerWidth - 80, // 初始位置
      ballTop: window.innerHeight - 120,
      isDragging: false,
      startX: 0,
      startY: 0,
      offsetX: 0,
      offsetY: 0,
      isMenuVisible: false,
      menuLeft: 0,
      menuTop: 0,
      clickThreshold: 5, // 点击判断阈值
      menuWidth: 350,
      menuHeight: 500,
      minEdgeDistance: 10, // 距离边缘最小距离
    };
  },
  methods: {
    handleMouseDown(event) {
      event.preventDefault();
      this.isDragging = false;
      this.startX = event.clientX;
      this.startY = event.clientY;
      this.offsetX = this.ballLeft;
      this.offsetY = this.ballTop;
      document.addEventListener("mousemove", this.handleMouseMove);
      document.addEventListener("mouseup", this.handleMouseUp);
      // 拖动时移除过渡效果
      this.$refs.floatingBall.style.transition = "none";
    },
    handleMouseMove(event) {
      if (this.isDragging) {
        const dx = event.clientX - this.startX;
        const dy = event.clientY - this.startY;
        this.ballLeft = this.offsetX + dx;
        this.ballTop = this.offsetY + dy;
        // 边界处理,考虑最小边缘距离
        this.ballLeft = Math.max(
          this.minEdgeDistance,
          Math.min(this.ballLeft, window.innerWidth - 60 - this.minEdgeDistance)
        );
        this.ballTop = Math.max(
          this.minEdgeDistance,
          Math.min(this.ballTop, window.innerHeight - 60 - this.minEdgeDistance)
        );

        // 更新菜单位置
        if (this.isMenuVisible) {
          this.updateMenuPosition();
        }
      } else {
        const dx = Math.abs(event.clientX - this.startX);
        const dy = Math.abs(event.clientY - this.startY);
        if (dx > this.clickThreshold || dy > this.clickThreshold) {
          this.isDragging = true;
        }
      }
    },
    handleMouseUp() {
      document.removeEventListener("mousemove", this.handleMouseMove);
      document.removeEventListener("mouseup", this.handleMouseUp);
      if (!this.isDragging) {
        this.toggleMenu();
      }
      // 吸壁效果,考虑最小边缘距离
      const targetLeft =
        this.ballLeft < window.innerWidth / 2
          ? this.minEdgeDistance
          : window.innerWidth - 60 - this.minEdgeDistance;

      // 添加过渡效果
      this.$refs.floatingBall.style.transition = "left 0.3s ease";
      this.ballLeft = targetLeft;

      // 吸壁后更新菜单位置
      if (this.isMenuVisible) {
        this.updateMenuPosition();
      }
      this.isDragging = false;
    },
    toggleMenu() {
      this.isMenuVisible = !this.isMenuVisible;
      this.updateMenuPosition();
    },
    updateMenuPosition() {
      let left = 0;
      let top = 0;
      if (
        this.ballLeft + this.menuWidth >
        window.innerWidth - this.minEdgeDistance
      ) {
        // 悬浮球在右边,菜单显示在左边
        left = this.ballLeft - this.menuWidth;
      } else {
        // 悬浮球在左边,菜单显示在右边
        left = this.ballLeft + 80;
      }
      // 处理垂直方向菜单超出屏幕的情况
      if (
        this.ballTop + this.menuHeight >
        window.innerHeight - this.minEdgeDistance
      ) {
        // 若菜单底部超出屏幕,将菜单向上偏移
        top = Math.max(
          this.minEdgeDistance,
          window.innerHeight - this.menuHeight - this.minEdgeDistance
        );
      } else {
        top = this.ballTop;
      }
      this.menuLeft = left;
      this.menuTop = top;
    },
  },
};
</script>

<style scoped>
.chat-bubble {
  position: fixed;
  bottom: 60px;
  right: 20px;
  width: 60px;
  height: 60px;
  background-color: #15dbf5;
  border-radius: 50%;
  display: flex;
  justify-content: center;
  align-items: center;
  cursor: pointer;
  user-select: none;
  box-shadow: 0 2px 10px rgba(0, 0, 0, 0.2);
  z-index: 9999;
  transition: left 0.3s ease;
}

.chat-bubble img {
  width: 30px;
  height: 30px;
  user-select: none;
}

.menu {
  position: fixed;
  width: 350px;
  height: 500px;
  background: white;
  border-radius: 10px;
  box-shadow: 0 2px 10px rgba(0, 0, 0, 0.2);
  z-index: 9999;
}

.chat-iframe {
  width: 100%;
  height: 100%;
  border: none;
  border-radius: 10px;
}
</style>


 1388
1388

 被折叠的 条评论
为什么被折叠?
被折叠的 条评论
为什么被折叠?
 到【灌水乐园】发言


