


6、 vue2全家桶成员 —— Vuex
6.1、vuex 概述
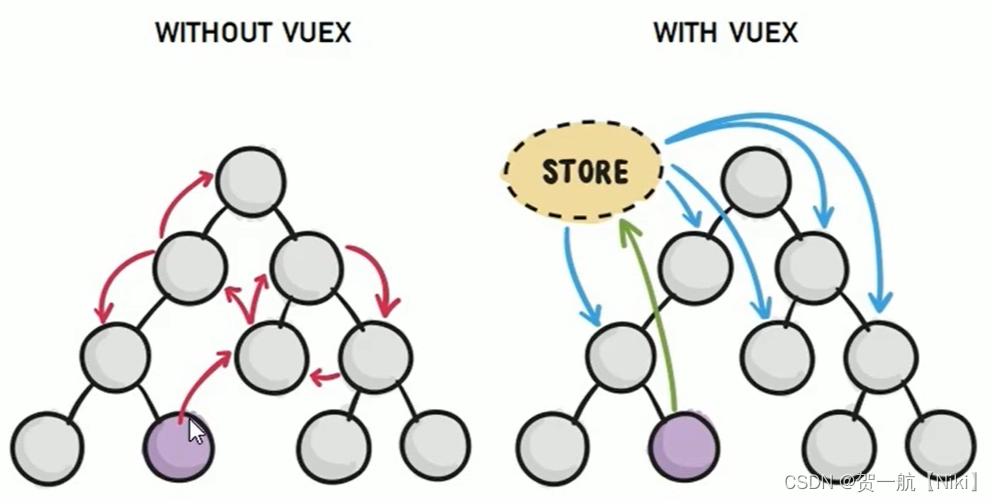
Vuex 是一个专为 Vue.js 应用程序开发的状态管理模式。它主要用于管理应用中的共享状态,例如用户登录信息、购物车内容等。Vuex 将应用的状态存储在一个单一的、全局的状态树中,这个状态树可以被多个组件共享访问。通过使用 Vuex,你可以更好地组织你的代码,使得状态管理更加清晰和可维护
6.2、vuex 原理
| 组成 | 描述 |
|---|---|
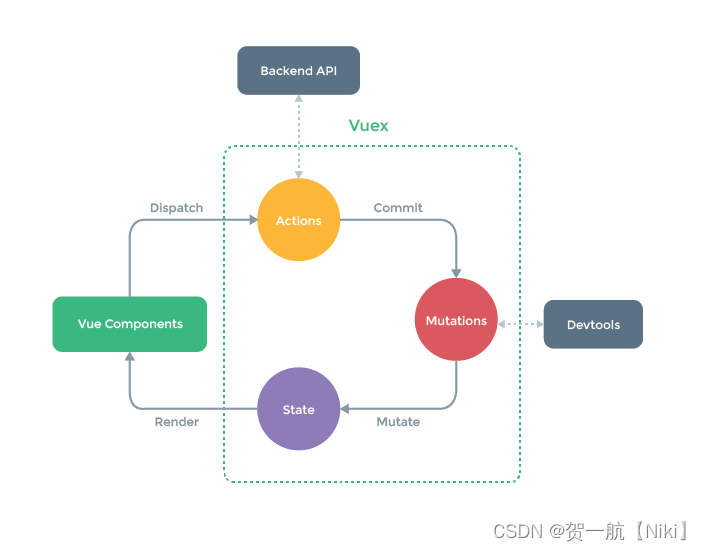
| Vue Components(Vue 组件) | 这是应用的 Vue 组件,它们可能包含了用户界面和交互逻辑 |
| Dispatch(分发) | 在组件中,通过 dispatch 方法触发一个 action。Action 是一种提交 mutations 的方式,可以执行异步操作 另一种提交mutations的方式是vue组件直接调用 commit 方法(在图中没有体现这个连线),即可以直接提交 mutations 而不需要经过 Action (在不需要异步操作时可以这样做) |
| Actions(动作) | Actions 接收 dispatch 的请求,并可能执行一些 异步操作 。然后,它们可以通过 commit 方法提交一个 mutation 来修改状态 |
| Commit(提交) | 在 Actions 中,通过 commit 方法提交一个 mutation。这个提交是同步的 |
| Mutations(突变) | Mutations 是真正用于 修改状态 的地方。它们接收提交的请求并执行状态的变化。Mutations 是 同步操作,用于确保状态的可追踪性 |
| Mutate(突变) | 这一步表示状态的变化,也就是实际上对状态进行修改 |
| State(状态) | 状态是 Vuex 中的核心,它存储了应用的所有共享状态。在状态被修改后,它会被更新为新的值 |
| Render(渲染) | 状态的变化会触发 Vue 组件的重新渲染。这意味着任何依赖于状态的界面元素都会更新,以反映最新的状态 |
Tip:
1、Actions、Mutations、State三者是 Vuex 的重要组成部分
2、 Actions、Mutations、State三者本质上都是一个对象,Actions、Mutations是关于键和函数的映射,State是关于键和数据值的映射
2、Mutate 和 Render 不需要我们写代码进行实现,当我们在Mutaions中指明要对数据进行什么样的操作时,底层会根据代码的指示自动调用 Mutate 对 State 进行更新,更新完了之后又会自动调用 Render 将更新后的数据渲染到组件中、页面上
6.3、vuex 开发环境搭建
安装:npm install vuex@3 (vue2要使用vuex3,vue3要使用vuex4)
Vuex 库对外暴露 Vuex 的各种接口、类和辅助函数,这些定义是为了让 Vuex 在项目中以插件的形式被引入和使用,通过这种方式对 Vuex 进行实现,以让项目中可以使用 Vuex 提供的功能,因此我们需要通过使用插件的形式来引入 Vuex
// main.js
import Vue from "vue";
import App from "./App";

// 引入vuex库
import Vuex from 'vuex'
// 以使用插件的形式来引入 Vuex 提供的各种功能
Vue.use(Vuex)

const vm = new Vue({
  el: "#app",
  store: "hello",
  render: (h) => h(App),
});

console.log(vm.$store); // 输出hello
当我们引入了 Vuex 之后,配置对象的 store 配置将会被识别到(不引入 Vuex 的话认为是垃圾数据直接扔掉),vue 实例创建时也会多了一个 $store 属性,该值就是配置对象里 store 对应的值,而且不仅是 vue 实例身上会有,组件实例身上也可以看到该 $store 属性且与 vue 实例的 $store 是一样的
当然上面为 store 赋值 hello 肯定是不行的,我们需要为该配置传入一个 store 实例,现在我们在 src 下创建一个 store / index.js,该文件用于创建 store实例,编写如下
// src/store/index.js
// 该文件用于创建Vuex中最为核心的store

// 引入Vuex
import Vuex from "vuex";

// 准备state —— 用于存储数据
const state = {};
// 可以选用getters —— 对数据进行处理,类似于计算属性
const getters = {};
// 准备actions —— 用于响应组件中的动作
const actions = {};
// 准备mutations —— 用于操作数据(state)
const mutations = {};

//创建store并暴露
export default new Vuex.Store({
  state,
  getters,
  actions,
  mutations,
});
main.js编写如下
// main.js
import Vue from "vue";
import App from "./App";
import Vuex from "vuex";
Vue.use(Vuex);
import store from "./store"; //from一个文件夹自动会去找index.js

const vm = new Vue({
  el: "#app",
  store, //配置一个store实例
  render: (h) => h(App),
});
然而现在会发现,项目报错了,原因在于脚手架在运行代码的时候,会先按序执行整个文件的 import 语句,然后再执行其他的代码,因此 main.js 中代码的写法实际上是先执行 import store from “./store”; (创建store实例)再执行Vue.use(Vuex); 而在创建store之前需要让vuex安插在vue身上;因此如果要让Vue.use(Vuex);实现在store创建之前的话可以将Vue.use(Vuex); 放在store/index.js中的前头,例如
// src/store/index.js
import Vue from "vue"
import Vuex from "vuex";
Vue.use(Vuex);

const state = {};
const getters = {};
const actions = {};
const mutations = {};

//创建store并暴露
export default new Vuex.Store({
  state,
  getters,
  actions,
  mutations,
});
// main.js
import Vue from "vue";
import App from "./App";
import store from "./store";
const vm = new Vue({
el: "#app",
store,
render: (h) => h(App),
});
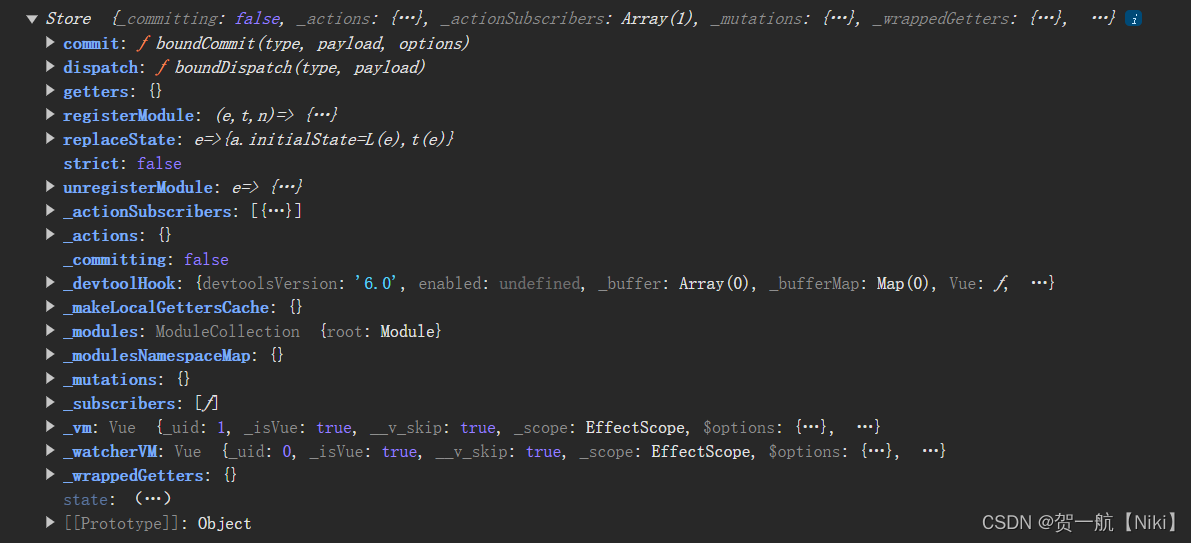
console.log(vm.$store); // 看看创建的store实例
现在可以看到 store 实例已经被创建出来了,其中包含其重要的 API,例如commit、dispatch等等
Tip
1、在JavaScript中,模块是单例的,即每个模块只会在内存中加载一次,不管你在多少个地方引入它。因此,如果在 main.js 中导入了Vue,那么尽管 store/index.js 再次导入Vue时,它们使用的依然是同一个Vue,而不会再次加载Vue库
2、那既然使用的是同一个Vue,那为什么在store/index.js中还要在写一次import Vue,因为在main中我们将vue模块导入并取名Vue来代表这个模块,因此在main.js中写跟“Vue”相关的代码之后,底层解析就知道这是跟vue模块相关的;然而在 store/index.js 中如果不为vue模块指名Vue的话,那么在解析这个文件中的 Vue.use(Vuex); 时,底层就会很疑惑这个 Vue 到底是谁,因为你引入 vue 模块的时候,你给它取名 ABC 都行,所以你要写 import Vue from “vue”; 来告诉这个文件,Vue 其实就是 vue模块(人会联想机器可不会联想,你看到Vue能联想到是vue模块,机器可是很严格很死板的,你没说那Vue就待定未知),这样做的好处也是在于好维护,没有必要大家写代码的时候都要统一的叫一个模块为xxx,运用一个模块就要沟通一次运用一个模块就要沟通一次,大家在自己的代码中自己给某个模块取名然后使用它就行了,底层解析只要知道大家在引用同一个模块的时候,把这个模块共享给大家用而没必要在内存中创建多份冗余的模块代码就行了
6.4、vuex 使用知识点及小案例
① actions中方法(action)包含两个参数,context和value
| 参数 | 描述 |
|---|---|
| context | context: 这是一个包含了与 state、getters、mutations 和 commit、dispatch 等属性和方法的对象,通过它可以访问到 Vuex 中的各种功能 |
| value | 可选,即向 action 传递的数据,它可以是单个值,也可以是一个包含多个值的对象 |
Tip
1、如果一个 action 处理完,下一步要给另一个 action 做进一步的处理,可以使用 context.dispatch(另一个action,数据)进行传递
2、在 action 中其实可以直接对数据进行操作,即对 context.state.xxx 进行操作即可,但是开发者工具无法捕获,开发者工具是与 mutations 进行对话的
3、action 处理完要递交给 mutation 处理的话,可以使用context.commit(mutation,数据)进行传递
② mutations 中方法(mutation)包含两个参数,state和value
| 参数 | 描述 |
|---|---|
| state | vuex管理的数据 |
| value | 可选,即向 mutation 传递的数据,它可以是单个值,也可以是一个包含多个值的对象 |
Tip
1、在 mutation 中要对数据进行处理,即对 state.数据 进行操作
③ 组件中要使用 vuex 的 state(引入computed)有三种方式
| 方式 | 描述 |
|---|---|
| 计算属性的写法 | 自定义属性名(){ return this.$store.state.数据 } |
| 借助mapState来引入 (对象写法) | …mapState({自定义属性名1:state的数据1,自定义属性名2:state的数据2,…}) |
| 借助mapState来引入 (数组写法) | …mapState([state的数据1,state的数据2…]) |
Tip
1、mapState引入:import mapState from ‘vuex’;(下同)
2、通过mapState引入的数据,在开发者工具中会出现在 vuex bindings 中(下同)
④ 组件中要使用 vuex 的 getters(引入computed)有三种方式
| 方式 | 描述 |
|---|---|
| 计算属性的写法 | 自定义属性名(){ return this.$store.getters.数据 } |
| 借助mapGetters来引入 (对象写法) | …mapGetters({自定义属性名1:getters的数据1,自定义属性名2:getters的数据2,…}) |
| 借助mapGetters来引入 (数组写法) | …mapGetters([state的数据1,getters的数据2…]) |
⑤ 组件中要使用 vuex 的 action(引入computed)有三种方式
| 方式 | 描述 |
|---|---|
| 普通函数的写法 | 自定义函数名(){ this.$store.dispatch(action,数据) } |
| 借助mapActions来引入 (对象写法) | …mapActions({自定义函数名1:action1,自定义函数名2:action2,…}) |
| 借助mapActions来引入 (数组写法) | …mapActions([action1,action2…]) |
⑥ 组件中要使用 vuex 的 getters(引入computed)有三种方式
| 方式 | 描述 |
|---|---|
| 普通函数的写法 | 自定义函数名(){ this.$store.commit(mutation,数据) } |
| 借助mapMutations来引入 (对象写法) | …mapMutations({自定义函数名1:mutation1,自定义函数名2:mutation2,…}) |
| 借助mapMutations来引入 (数组写法) | …mapMutations([mutation1,mutation2…]) |
⑦ 小案例
// main.js
import Vue from "vue";
import App from "./App";
import store from "./store";

new Vue({
  el: "#app",
  store,
  render: (h) => h(App),
});
// store/index.js
import Vuex from "vuex";
import Vue from "vue";
Vue.use(Vuex);

const state = {
  sum: 0,
  school: "MIT UNIVERSITY",
  subject: "SoftWare",
};

const getters = {
  bigSum(state) {
    return state.sum * 10;
  },
};

const actions = {
  incrementIfOdd(context, value) {
    if (context.state.sum % 2)
      context.commit("INCREMENT", value);
  },
  incrementWait(context, value) {
    setTimeout(() => {
      context.commit("INCREMENT", value);
    }, 1000);
  },
};

const mutations = {
  INCREMENT(state, value) {
    state.sum += value;
  },
  DECREMENT(state, value) {
    state.sum -= value;
  },
};

// store实例
export default new Vuex.Store({
  state, //数据,类似于data
  getters,//加工过的数据,类似于computed
  actions, //做一些处理数据前的异步操作
  mutations, //处理数据
});
<!-- APP.vue -->
<template>
   <div>
     <Count/>
   </div>
</template>

<script>
import Count from "@/components/Count";
export default {
  name: "App",
  components:{
    Count
  },
  mounted() {
  }
}
</script>
<!-- Count.vue -->
<template>
  <div>
    <h1>使用state的数据</h1>
    <h3>SUM: {{ sum }}</h3>
    <h1>使用getters的数据</h1>
    <h3>SUM乘以10倍:{{ bigSum }}</h3>
    <!-- <h3>我在 {{ school }}, 学习 {{ subject }}</h3> -->
    <h1>使用actions、mutations的方法</h1>
    <select v-model.number="n">
      <option value="1">1</option>
      <option value="2">2</option>
      <option value="3">3</option>
    </select>
    <button @click="increment(n)">+</button>
    <button @click="decrement(n)">-</button>
    <button @click="incrementIfOdd(n)">当前求和为奇数再加</button>
    <button @click="incrementWait(n)">等一等再加</button>
  </div>
</template>

<script>
import { mapState, mapGetters, mapMutations, mapActions} from 'vuex';
export default {
  name: "Count",
  data(){
    return {
      n: 1,
    }
  },
  computed:{
    ... mapState(['sum', 'school', 'subject']),
    ...mapGetters(['bigSum'])

  },
  methods:{
    ...mapMutations({
      increment: 'INCREMENT',
      decrement: 'DECREMENT',
    }),
    ...mapActions(['incrementWait', 'incrementIfOdd'])
  },
}
</script>

<style scoped>
   button{
     margin-left: 5px;
   }
   h1{
    background-color: cadetblue;
   }
</style>
6.5、vuex 模块化编程
如果现在要将数据分为两批,一批为A,一批为B,那么可以将store分成三个文件
// store/A.js
export default  {
    namespaced: true,
    state:{...},
    getters:{...},
    actions:{...},
    mutations:{...}
}

// store/B.js
export default  {
    namespaced: true,
    state:{...},
    getters:{...},
    actions:{...},
    mutations:{...}
}

// store/index.js
import Vuex from 'vuex';
import Vue from "vue";
import count from './A';
import person from './B';
Vue.use(Vuex);

export default new Vuex.Store({
    modules:{
        count,
        person
    }
});
Tip:当一个模块设置了 namespaced: true 后,它的 state、getters、actions 和 mutations 都将被命名空间化。这意味着在组件中访问模块中的 state、getters、actions 和 mutations 时,需要通过模块的命名空间来访问,例如,如果模块 A 设置了 namespaced: true,那么在组件中访问模块 A 的 state 时,需要使用 this.$store.state.A.stateName,相当于如果 namespaced: false,那么A和B的数据都会扔到 $store 身上,如果 namespaced: true ,就相当于将数据放在了两个房间里,这样的好处自然在于A和B有同名数据的话则不会相互影响
在模块化之后,使用 mapState, mapGetters, mapMutations, mapActions来访问仓库的数据、方法时也要带上模块名,以mapState的数组写法为例,即… mapState(模块名, [数据1,数据2,数据3]),其他的API也是相同的道理
7、 vue2全家桶成员 —— VueRouter
7.1、vue-router 是什么
Vue Router 是 Vue.js 官方的路由管理器。它允许你在 Vue 应用程序中构建单页面应用 (SPA),通过定义不同的路由,使用户在不同的 URL 下访问到不同的页面。Vue Router 提供了诸如路由匹配、嵌套路由、路由参数、导航守卫等功能,帮助你更轻松地管理应用程序的路由
7.2、vue-router 基本的使用
安装:npm install vue-router@3(vue2对应vue-router3,vue3对应vue-router4)
vue-router 的使用跟 vuex 很类似,感受一下
// main.js
import Vue from "vue";
import App from "./App";
import VueRouter from "vue-router";
import router from "./router";

Vue.use(VueRouter);

new Vue({
  el: "#app",
  render: (h) => h(App),
  router,
});
<!-- App.vue -->
<template>
  <div>
    <div class="row">
      <div class="col-xs-offset-2 col-xs-8">
        <div class="page-header"><h2>Vue Router Demo</h2></div>
      </div>
    </div>
    <div class="row">
      <div class="col-xs-2 col-xs-offset-2">
        <div class="list-group">
          <!--vue中借助router=link标签实现路由的切换-->
          <router-link class="list-group-item" active-class="active" to="/about">About</router-link>
          <router-link class="list-group-item" active-class="active" to="/home">Home</router-link>
        </div>
      </div>
      <div class="col-xs-6">
        <div class="panel">
          <div class="panel-body">
            <!--router-view确定视图的位置-->
            <router-view>
            </router-view>
          </div>
        </div>
      </div>
    </div>
  </div>
</template>

<script>
export default {
  name: "App",
}
</script>
// src/router/index.js
import VueRouter from "vue-router";
import About from "@/components/About";
import Home from "@/components/Home";

//创建并默认暴露一个路由器
export default new VueRouter({
  routes: [
    {
      path: "/about",
      component: About,
    },
    {
      path: "/home",
      component: Home,
    },
  ],
});
<!-- About.vue -->
<template>
  <h2>我是About的内容</h2>
</template>

<script>
export default {
  name: "About"
}
</script>
<!-- Home.vue -->
<template>
  <h2>我是Home的内容</h2>
</template>

<script>
export default {
  name: "Home"
}
</script>
| 概要 | 描述 |
|---|---|
| 如何使用 | 使用标签router-link来指明要路由到的组件,并使用router-view标签来展示路由到的组件 |
| 为什么vuex要先使用插件才能够new一个store实例,而路由可以先new一个router实例再使用插件 | 这是因为Vue Router 在内部已经处理了注册的逻辑,而vuex没有,其实也就是它们在实现上有所差异,都是无关紧要的,只要知道vuex要先使用插件而vue-router可以不用先使用插件即可 |
| router-link标签的属性 | 描述 |
|---|---|
| to | 必需属性,指定目标路由的链接。可以是一个字符串,表示目标路由的路径,也可以是一个描述目标位置的对象 字符串形式有如 to=“/about” 对象形式有如 to=“{ path: ‘/about’ }” 或者 :to=“{ name: ‘about’ }” |
| replace | 可选属性,当设置为 true 时,点击链接时将使用 router.replace() 替代 router.push(),导航而不会留下历史记录 |
| append | 可选属性,当设置为 true 时,将会在当前路径后追加目标路径,而不是替换当前路径 |
| tag | 可选属性,指定渲染的标签,默认为 a 标签 |
| active-class | 可选属性,指定链接被视为「激活状态」时应该应用的 CSS 类名 |
| exact | 可选属性,当链接的 to 属性值与当前路由精确匹配时,才会激活链接 |
| event | 可选属性,指定触发导航的事件。默认情况下,router-link 会监听 click 事件 |
7.3、多级路由
路由配置
{
	path:'/home',
	component: Home,
	children:[
		{
			path: 'news',
			component: News
		},
		{
			path: 'message',
			component: Message
		}
	]
}
7.4、query参数
携带
// 法一:跳转路由并携带query参数,to的字符串写法
<router-link :to="`/home/message/detail?id=${m.id}&title=${m.title}`">{{ m.title }}</router-link>

// 法二:跳转路由并携带query参数,to的对象写法
<router-link
    :to="{
      path:'/home/message/detail',
      query:{
        id: m.id,
        title: m.title
      }
}">
接收
<li>消息编号:{{ $route.query.id }}</li>
<li>消息标题:{{ $route.query.title }}</li>
7.5、路由命名
路由配置
routes:[
	{
		// 用 name ,后面在写to的时候就不会太辛苦
		name: 'regard',
		path:'/about',
		component: About
	},
]
使用
<router-link class="list-group-item" active-class="active" :to="{name: 'regard'}">About</router-link>
7.6、params
路由配置。声明 params 叫什么
{
	name: 'particulars',
	path: 'detail/:id/:title',
	component: Detail
}
携带
// 法一:跳转路由并携带params参数,to的字符串写法
<router-link :to="`/home/message/detail/${m.id}/${m.title}`">{{ m.title }}</router-link>

// 法二:跳转路由并携带params参数,to的对象写法
<router-link
    :to="{
      //如果使用对象来携带params传递参数,那么不能搭配path,只能搭配name
      name: 'particulars',
      params: {
        id: m.id,
        title: m.title
      }
}">
接收
<li>消息编号:{{ $route.params.id }}</li>
<li>消息标题:{{ $route.params.title }}</li>
7.7、prop配置
路由配置
// 法1:props为一个对象,只能是死数据
{
    name: 'particulars',
    path: 'detail/:id/:title',
    component: Detail,
    props:{
        a:1,
        b:'hello'
    }
}

// 法2:props为一个布尔值,布尔值为真,就会把该路由组件收到的所有params参数以props的形式传递给detail组件
{
    name: 'particulars',
    path: 'detail/:id/:title',
    component: Detail,
    props: true
}

// 法3:props为一个函数
{
    name: 'particulars',
    path: 'detail/:id/:title',
    component: Detail,
    props({ query: { id, title } }){
        return {
            id,
            title
        }
    }
}
接收
// 针对法1
props: ['a', 'b']
// 针对法2
props: ['id', 'title']
7.8、编程式导航
使用
methods:{
  pushShow(m){
  	// 注意使用 $router 而不是 $route
    this.$router.push({ //这里与router-link的to属性配置形式是一样的
      name: 'particulars',
      query:{
        id: m.id,
        title: m.title
      }
    })
  },
  // replace 就是不会在浏览器留下记录,点击浏览器左上角的返回将找不到这个记录
  replaceShow(m){
     this.$router.replace({
       name: 'particulars',
       query:{
         id: m.id,
         title: m.title
       }
     })
  }
}
7.9、缓存路由
// 1、缓存一个
<keep-alive include="News">  // include携带的是组件的name 不是路由的name
	<router-view></router-view>
</keep-alive>

// 2、缓存多个
<keep-alive include="['News', 'Message']">
	<router-view></router-view>
</keep-alive>
7.10、缓存路由的两个钩子
只有被keep-alive的组件才会有
// 激活 发生在mounted()之后
activated() {
  console.log('News组件被激活');
},
// 失活
deactivated() {
  console.log('News组件失活了');
}
7.11、全局路由守卫(前置、后置)
// 全局前置路由守卫
router.beforeEach((to, from, next) => {
	next();
});

// 全局后置路由守卫
router.afterEach(( to, from ) => {})
7.12、独享路由守卫(前置)
{
	name: 'ns',
	path: 'news',
	component: News,
	meta:{
    	isAuth: true,
    	title: '新闻'
	},
	//独享路由守卫
	beforeEnter(to,from,next){
		next();
	}
}
7.13、组件内部路由守卫(前置、后置)
// 前置
beforeRouteEnter(to, from, next){
  next();
},
// 后置
beforeRouteLeave(to, from, next){
  next();
}
执行顺序总结
1、进入:全局前置路由守卫 > 独享前置路由守卫 > 组件内部前置路由守卫 > 全局后置路由守卫 > beforeCreate~mounted钩子 > activated钩子
2、离开:(离开的)组件内部后置路由守卫 > (新的组件)上面的内容 > (离开的组件的)deactivated钩子
7.14 history 模式和 hash 模式
| 概述 | 描述 |
|---|---|
| 路由工作模式 | 默认是hash,如果要改动,要在配置文件中添加一个配置,即mode:'history'(与routes同级) |
| 两种工作模式的区别 | ① hash模式更美观 ② 切换路由组件时 history 和 hash 都会在地址栏变动 URL,但是 hash 可以刷新,history 不能,因为 history 模式会将路由组件的路径当成是服务器的请求路径去发送请求就会出错,而 hash 模式有 # 的分割,就知道前面的部分是去请求服务器的,后面的部分是要参照前端路由文件去实现组件路由切换的 |
| 要想兼顾两种模式的优点怎么办 | ① 要 URL 好看因此选择 history 模式 ② 要前端刷新后服务器知道哪个部分是属于前端路由的,因此需要在服务端代码对请求的路径做处理,服务端使用 connect-history-api-fallback中间件可以解决这个问题 |
7.14 使用 element-ui 组件库
// main.js 全局引入 然后直接在代码中使用其标签即可
import ElementUI from 'element-ui';
Vue.use(ElementUI);
8、声明
本文参考了:
web快看知识点 的视频 mvc,mvp,mvvm 的区别【up认为是讲得最好的】
尚硅谷 的视频 尚硅谷Vue2.0+Vue3.0全套教程丨vuejs从入门到精通
Panyue-genkiyo 的尚硅谷教程代码笔记 vue-advance
Moment 的文章 对象、原型、原型链与继承?这次我懂了!
渡一教育编程课堂 的视频 原型链的全貌图【渡一教育】
感谢大牛们的分享和帮助!


 776
776

 被折叠的 条评论
为什么被折叠?
被折叠的 条评论
为什么被折叠?
 到【灌水乐园】发言


